
BoomR
Moderator
- Joined
- Dec 18, 2011
- Messages
- 1,256
- Motherboard
- Gigabyte Z490 VISION D
- CPU
- i9-10850K
- Graphics
- RX 580
- Mac
- Classic Mac
- Mobile Phone
BoomR's Cube2.0: Core i5 2500K | H77M-ITX | 8GB RAM | HD3000
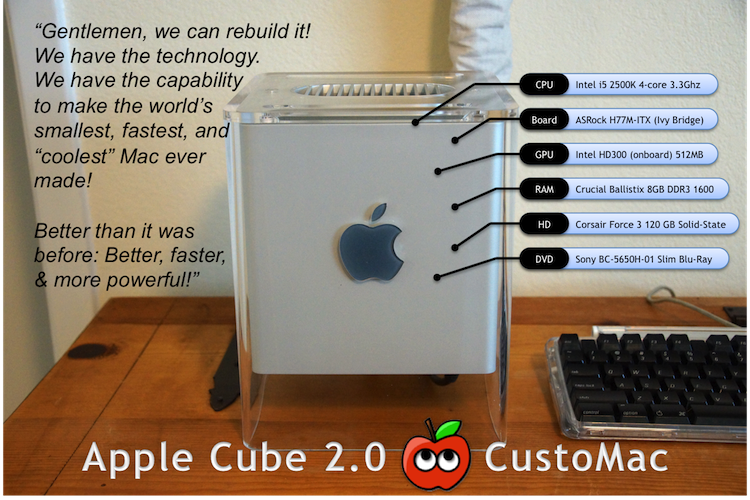
(photo is an homage to sleppek - my initial inspiration for the build)
Components
(photo is an homage to sleppek - my initial inspiration for the build)
ASRock H77M-ITX LGA 1155 (Intel H77 HDMI SATA 6Gb/s USB 3.0) Mini ITX Intel Motherboard
http://www.newegg.com/Product/Product.aspx?Item=N82E16813157311
Intel Core i5-2500K Sandy Bridge 3.3GHz Quad-Core Desktop Processor Intel HD Graphics 3000
http://www.newegg.com/Product/Product.aspx?Item=N82E16819115072
Crucial Ballistix sport 8GB 240-Pin DDR3 SDRAM DDR3 1600 (PC3 12800) Desktop Memory
http://www.newegg.com/Product/Product.aspx?Item=N82E16820148540
Corsair Force Series 3 CSSD-F120GB3A-BK 2.5" 120GB SATA III Internal Solid State Drive
http://www.newegg.com/Product/Product.aspx?Item=N82E16820233206
UPDATE: Sony BC-5650H-01 Black 6X SATA Combo Slim Slot Blu-ray
http://www.newegg.com/Product/Product.aspx?Item=N82E16827118070
GELID Solutions Slim Silence i-Plus (CC-SSilence-iplus) 75mm Ball Bearing CPU Cooler
http://www.newegg.com/Product/Product.aspx?Item=N82E16835426028
Mini-Box PW-200-M, 200w output, 12v input DC-DC Pico Power Supply, with optional P4-ATX Cable
http://www.mini-box.com/PW-200M-DC-DC-power-supply
Mini-Box Model: STD-12160 AC-DC 12V / 16A Switching Power Adapter (100/240V)
http://www.mini-box.com/12v-16A-AC-DC-Power-Adapter
SilenX IXP-11-14 40mm Case Fan (2)
http://www.newegg.com/Product/Product.aspx?Item=N82E16835191001
Sabrent Mini Bluetooth USB 2.0 Wireless Adapter - model BT-USBT
http://www.frys.com/product/6103319
Already owned:
Apple Wired Keyboard (original Cube G4 issue)
Apple Wired Mouse (original Cube G4 issue)
Logitech diNovo Mini Bluetooth Keyboard (for in-bed navigation/browsing
 )
)http://www.amazon.com/dp/B0011FOOI2/
Apple OS X Lion @ Mac Apps Store
http://itunes.apple.com/us/app/os-x-lio ... 3913?mt=12
Components
About the G4 Cube customization...
The focus of this post in the User Builds section is about the components selected, followed by UniBeast installation of OS X & configuration using MultiBeast.
For those who want to read the post that goes into great detail on the actual G4 Cube customization process (including a boatload of photos), I give you this link to the "sister" post in the Customization forum:
I caught the fever...G4 Cube fever!
Installation/Configuration
BIOS settings:
Used all the recommended/proper BIOS settings as found in Lnx2Mac's Blog post on BIOS settings Of course, since this is ASRock board, and ESP since it is new UEFI BIOS, some critical thinking involved in order to map/match-up parameter names from traditional Gigabyte BIOS to ASRock UEFI. But basically whenever possible, just used default settings; however, making sure to enable things like ACHI mode, as well as enabling on-board HD Audio and HDMI audio.
OSX Installation:
Using latest UniBeast (1.4) I did a fresh install of Lion 10.7.4 from my retail purchase of OSX in the App Store, taking care to follow these instructions.
DSDT file for ASRock H77M-ITX:
MANY MANY thanks to Mieze for all the hard work. Mieze took my extracted DSDT file from the motherboard & applied necessary edits & patches when my attempts to follow the "create your own DSDT" instructions failed. The last tweak to the DSDT file was done 3July - a change to the layout-id in order to activate the HD Audio via HDMI settings.
For those of you who are currently trying (or are thinking of trying) to use this board, ESPECIALLY if you want to use on-board HD3000 graphics and have audio over HDMI, then this DSDT file will give you the success you want:
H77MITX-patched-layout-id-392.zip
Note in the filename that it uses layout-id 392 which activates the HDMI audio feature. If you plan to use a discrete graphics card, or want some other more advanced multi-channel audio configuration, that may require additional edits to the DSDT in order to define the proper layout-id. (Mieze - please correct me if this assertion is incorrect).
MultiBeast installation:
With the patched DSDT file from Mieze on my desktop, it's time to run latest MultiBeast. It's important you run MB 4.6.x as this new version now includes the necessary kext edits/enablers for 7-series Ivy Bridge motherboards. You no longer need to follow Toleda's Interim Ivy Bridge Realtek audio kext installation process in order to get audio working on 7-series IB motherboards!
The MultiBeast settings I used are as follows (this configuration includes motherboard plugin & hardware monitor app, as I want to closely monitor CPU/mobo temp inside my Cube build):
[x] User DSDT
[x] System Utilities
Drivers & Bootloaders
[x] System Utilities
Drivers & Bootloaders
Kexts & Enablers
Customization[x] Audio > Realtek ALC8xx > Patched AppleHDA > ALC892
[x] Disk > 3rd Party SATA
Misc[x] Disk > 3rd Party SATA
[x] SMB Motherboard Plugin
[x] Hardware monitor app
[x] Patched AppleIntelCPUPower for 10.7.4
Network[x] Hardware monitor app
[x] Patched AppleIntelCPUPower for 10.7.4
[x] Lnx2Mac's Realtek RTL81xx
Bootloaders[x] Boot options > SSDT > i5
[x] MacMini profile
(I will try to replace that text representation with a proper image soon)
Once you successfully complete MultiBeast install, reboot. To be on the safe side, at Chimera screen, I used GraphicsEnabler=No upon first reboot. While I didn't have any problems without, there is still one more patch that needs to be done to speed the boot process and give full HDMI video functionality.
HD3000 video patch for HDMI
As instructed by Mieze, I booted up Terminal & patched AppleIntelSNBGraphicsFB.kext (there is also the option to use Dremwatcher's AppleIntelSNBGraphicsFBInjector.kext to resolve this issue). This step is crucial to get working QE/CI. For more info & instructions, please see viewtopic.php?f=15&t=61821
Reboot after patch
Making this patch causes your kernel caches to be updated/rebuilt. Your first boot after applying this patch may take longer than usual (with my SSD, it took over a minute). BUT the good news is: You should now be done with installation & configuration once reboot is complete.
Of course, to confirm full functionality, I checked System Preferences to make sure I had:
--working Ethernet
--all Displays resolution options
...and finally:
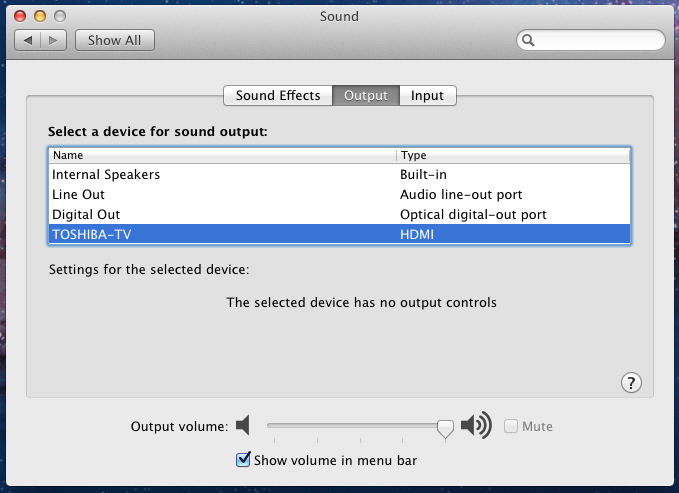
--Audio > Output - to make sure that I have HDMI audio option:
--all Displays resolution options
...and finally:
--Audio > Output - to make sure that I have HDMI audio option:
Wrap-up
I think it brings my journey to a close as it relates to getting a finely-tuned build. At the gray Apple boot screen & spinning progress indicator, I only wait about 1-2 seconds (1-2 spins of the progress indicator), and then I'm at the desktop!
This build is intended as a "guest computer" and media player (Plex) in our guest room. A couple pics of the build in action:
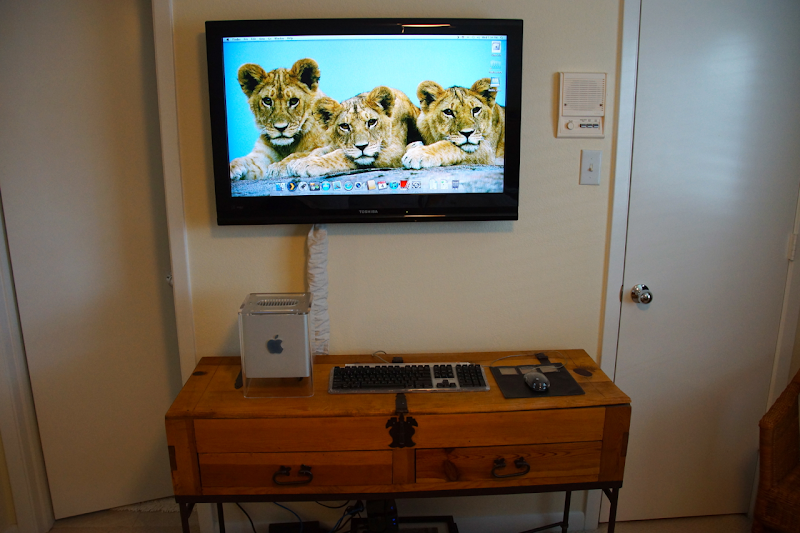


If you are also considering this board for a new HTPC or MiniHack, it is a great option! And now, thanks to our great colleague Mieze, we have a functional DSDT file. If you download & use the file, please also share your thanks & appreciation to Mieze. And also maybe even consider a donation to tonymacx86.com.
Cheers to everyone!
