P67A-UD3-B3 (Rev 1.1) Mountain Lion Success (Step by step guide)
Motherboard = Gigabyte P67A-UD3-B3 (Rev 1.1) F9 Bios
Graphics = Asus HD6870 1GB GDDR5 using two monitors via the display ports. (Not tested using HDMI ports)
8GB Apple Memory (4x2GB dimms) I just happened to have this memory on hand, it is not required) (I also didn't have to pull any out to do the install)
90GB Corsair SATA 3 SSD. (Not very big, but big enough for the install and some testing)
CORE i7-2600K LGA1155 CPU (Unlocked, but I am not overclocking at this time)
I purchased Mountain Lion via the app store and created a bootable USB stick using the Unibeast 1.5.3 process documented on this site.
For those of you who haven't been through a Unibeast process before, it is a hurry up and wait process. The first part goes really fast and then it tells you it will be done in a minute, but really that minute is more like an hour depending on what system you are building it on. Just be patient and don't interrupt it, it will finish eventually. It's well worth the wait. Way easier than the alternative way of doing an install.
Note: In my case the HD6870 Graphics card suffers from an issue where you boot to a white screen and you are able to move the mouse around, but can't do anything else. This problem has been solved and I referenced the link below to fix the issue.
http://www.tonymacx86.com/mountain-...mountain-lion-6xxx-gpu-issues-fix-inside.html
1) Update to the F9 BIOS which you will find on the Gigabyte site.
2) Download the DSDT for your Rev board and BIOS version from this site.
2) Boot from the Unibeast USB stick you just created.
3) I did a bare metal install so I went through the disk utility and partitioned/formatted my SSD.
4) Start the install. (Mine finished in about 9 minutes). The beauty of Unibeast!
5) Boot back up using the Unibeast USB stick and select your newly created Mountain Lion partition on boot.
6) Once up place the DSDT file on your desktop as well as Muiltibeast for Mountain Lion.
7) If you have a Graphics card such as mine, you need to complete the instructions you started above. (It can be done later, but now is a good time)
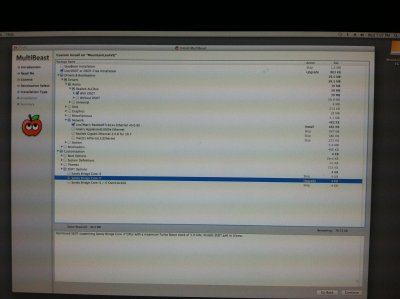
8) Run Multibeast for Mountain Lion and select the appropriate options. (I have included a screen shot of what I selected)
9) Reboot when prompted and you should be all set.
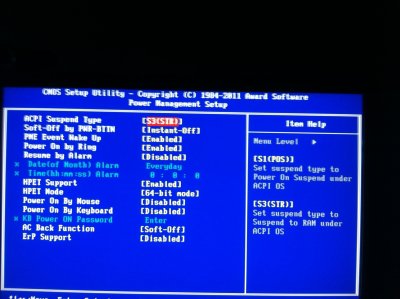
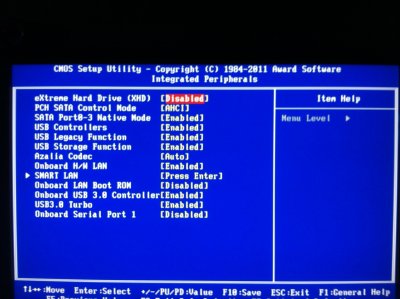
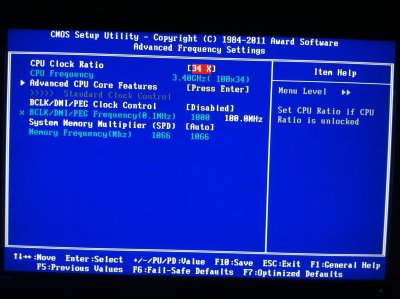
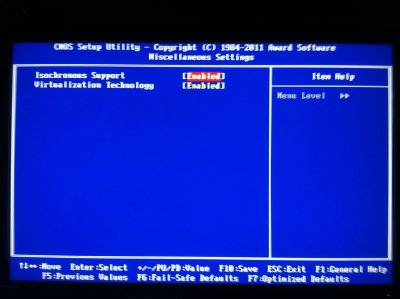
I added a few low quality pictures, but they should be clear enough for you to see. Keep in mind that this is a best effort and I am not 100% sure of my BIOS settings, but they seem to work for me.
A couple of things I have noticed right off the bat in Mountain Lion is that there is no X server included. If you click on the x-terminal under Utilities it will prompt you to download XQuartz. Looks and works just like the X that use to be included with previous versions os OSX.
I also noticed that you can't just install any old software package like you could in the past. You have to allow it under system prefs first. I included a screen shot of that as well.
Good luck! I hope this is helpful to many of you.