
NorthAmTransAm
Moderator
- Joined
- Jul 26, 2018
- Messages
- 2,036
- Motherboard
- MSI Pro Z690-A DDR4
- CPU
- i7-12700k
- Graphics
- RX 580
- Mac
- Mobile Phone
NATA's Intel Alder Lake i7-12700K:
MSI PRO Z690-A DDR4 + i7-12700K + AMD RX 580
(also applies to MSI PRO Z690-A WIFI DDR4)
Before we begin...
Credit goes to the people involved in the Z690 Chipset and Alder Lake CPUs thread. Those kind people paired with the hard workers of OpenCore and Dortania deserve a round or three of whatever makes them happiest.
For me, the Hackintosh platfrom becomes worth the (initial) time and energy when we have a fully functional Thunderbolt Bus. Thank you @CaseySJ and the many others involved for picking up that project in such a scientific manor. If you'd like to know more and about what all went into it and who contributed please head to the link below and expand the Thunderbolt Local Node And Bus Investigation spoiler. There were tons of heads and testers and they are properly credited there.
[SUCCESS] Gigabyte Designare Z390 (Thunderbolt 3) + i7-9700K + AMD RX 580
CaseySJ's Coffee Lake in Phanteks Evolv X ATX Case: Gigabyte Designare Z390 - i7-9700K - UHD 630 - AMD RX 580 (Please do not quote this build guide in its entirely. Post a link instead.) (See this post for how to refer to a Guide or Mini-Guide.) URGENT: Please avoid Clover 5123 and newer for...
Note 1: MSI PRO Z690-A WIFI DDR4 users, if you'd like to use your onboard wifi you must add the correct drivers for it first. Please head to the OpenIntelWireless Github to get these. Link here.
Note 2: In Bios, Intel Speed Shift should be set to Enabled as opposed to Auto.
Quick Links
1. Creating a macOS Monterey USB Installer
MSI PRO Z690 A DDR4 + i7-12700K + AMD RX 580
OK! Everything works. My Apollo Twin is connected. However, it must be on when starting or otherwise it is not recognized... Is there a solution? Can you send me a copy of your IOReg?
2. Bios settings
MSI PRO Z690 A DDR4 + i7-12700K + AMD RX 580
OK! Everything works. My Apollo Twin is connected. However, it must be on when starting or otherwise it is not recognized... Is there a solution? Can you send me a copy of your IOReg?
3. USB Ports Identified
MSI PRO Z690 A DDR4 + i7-12700K + AMD RX 580
@NorthAmTransAm, i was finally able to get through and install! there were a few things i did: 1. I had my corsair RGB controllers all connected via USB and noticed there was an error with those, so i d/ced all of them. 2. I also tried installing with the installation USB through the back of the...
3. Recommended Settings for Pro Tools
MSI PRO Z690 A DDR4 + i7-12700K + AMD RX 580
i try iltwm and Airportitlwm-monterey, both of them dont work for me Do you have AppleVTD in your IOReg?
***EFI Updates***
- OpenCore 079 - Mind the notes, read the guide, and keep in mind we are a work in progress. Click here.
- OpenCore 080 - Mind the notes, read the guide, and keep in mind we are a work in progress. Click here.
- OpenCore 081 - ...
- OpenCore 082 - ...
Components
Corsair Carbide Series 100r Silent Edition Computer Case
https://www.amazon.com//dp/B00RORBQSW
https://www.corsair.com/us/en/Categ...Silent-Edition-Mid-Tower-Case/p/CC-9011077-WW
MSI PRO Z690-A DDR4 Motherboard
https://www.amazon.com/dp/B09GLD6LYW
https://www.newegg.com/p/N82E16813144489
Intel i7-12700K
https://www.amazon.com/dp/B09FXKHN7M
https://www.newegg.com/p/N82E16819118343
Be Quiet! BK024 Dark Rock Slim Air Cooler
https://www.amazon.com/dp/B07R5TQQMR
https://www.bequiet.com/en/cpucooler/1659
Adata XPG Z1 DDR4 2666MHz RAM (4x8GB)
https://www.amazon.com/dp/B071KV78XC?th=1
https://www.newegg.com/p/0RN-003P-00288
Sapphire PULSE Radeon RX 580 8GB GDDR5
https://www.amazon.com/dp/B06ZZ6FMF8
https://www.newegg.com/p/N82E16814202278
Fenvi T919 BCM94360CD WiFi/BT PCIe Card
https://www.amazon.com/gp/product/B07VCCZS54
https://www.newegg.com/p/0XM-00JK-00033
Gigabyte GC-Titan 2.0
https://www.amazon.com/dp/B08BC11XW8
https://www.newegg.com/p/0DS-01T2-00017
Western Digital Blue 4TB Desktop Hard Disk Drive WD40EZAZ
https://www.amazon.com/dp/B013HNYV8I
https://www.newegg.com/wd40ezaz-14tb/p/1Z4-0002-01CG2
Seagate BarraCuda 4TB Internal Hard Drive HDD ST4000DMZ04/DM004
https://www.amazon.com/gp/product/B07D9C7SQH
https://www.newegg.com/p/1B0-015M-00022
Samsung PM961 256GB
NA (old eBay item)
Intel 660p 1TB
https://www.amazon.com/dp/B07GCL6BR4
https://www.newegg.com/p/N82E16820167462
Samsung X5 500GB (removed from enclosure)
[URLhttps://www.samsung.com/us/computing/memory-storage/portable-solid-state-drives/portable-ssd-x5-500gb-mu-pb500b-am/[/URL]
Hardware Comments
A mix of these components were previously owned items such as the case, various hard drives, memory, Fenvi T919, and an RX 580 GPU. Financially speaking, I am not sure what I would have done if I needed to purchase a GPU at the moment so I am beyond grateful to have an RX 580 on hand--it has served me very well and I can only hope it continues to do so. If you're not aware, the iGPU on 12th Gen Intel CPU's will not work with macOS so you will need some sort of compatible graphics card. My stash of NVME drives comes from a time of picking up random parts from eBay and various sales. However, if I were to buy new drives now then I would follow the communities lead and purchase Sabrent Rocket NVME's without hesitation.
For more information on NVME drives please refer to this post by @vit9696.
SSD hall of fame needs new entries · Issue #192 · dortania/bugtracker
Guide Anti-Hackintosh Buyers Guide (link) After our discovery of a severe bug in the TRIM implementation of practically all Samsung SSDs we spent time investigating which SSDs are affected by all k...
 github.com
A Walk Through
EFI
According to Dortania and the work on the ground via the Z690 Chipset And Alder Lake Thread we need to start with a few basic things in our ACPI. That research coupled with my build's individual needs lands me here.
Update: I see now, Device MC_ exist in our DSDT and iGfxSsdt Table and that exactly what the two patches are handling.
Booter
No patches but please mind the
Device Properties
Here I've edited my graphics card and it's audio counterpart to only say 580 instead of "480, 580, 590" along with adding a device ID of F3158680 to my Intel I255-V. I recommend you do the same.
Note: The GPU Device Property is a cosmetic choice. Not at all necessary.
Kernel
This has some important information.
Lets first focus on Cpuid1Data and Cpuid1Mask. Because our CPU's are not supported by macOS (are not used on any actual Mac models) we must tell macOS that it is a previous generation. So we're going to say that its a Comet Lake CPU.
Code:
Cpuid1Data: 55060A00 00000000 00000000 00000000
Cpuid1Mask: FFFFFFFF 00000000 00000000 00000000
Note on Kext choice: CPUFriend is mandatory, and its companion CPUFriendDataProvider is where things start to get powerful. Airportbrcmfixup is not needed as macOS will connect the FenviT919 to the correct driver automatically. I just like that creates the device ARPT is all. Purely cosmetic. If you like a slimmer EFI then feel free to remove it.
Why the hang up on ARPT? A long time ago Hand Off wasn't available without ARPT but that is no longer the case and I should uh, let it go.
I use a boot picker that I believe I borrowed from @CaseySJ. I'll try to track down the original source but for now the basic procedure to install is to replace the Resources folder of your EFI with mine and to copy my settings here (Picker Mode=External, PickerVariant=Auto).
I chose to add these 3 tools as well (image below). I find them the most useful although CleanNvram is redundant as you can enable AllowNvramReset in the Security tab. Again, choice is yours.
Pro Tip: You can check off Auxiliary on each Tool entry that you've added and enable Hide Auxiliary in the main window to clean up your boot picker. The tools can be accessed by pressing space bar in Boot Picker.
NVRAM
Here we cosmetically rename our CPU back to what it really is. In this case its a 12 Core Intel i7-12700K.
Next we have our standard boot arguments -v keepsysms=1 debug=0x100. I recommend keep -v enabled so that we can keep an eye on whats happening when we boot macOS.
Next we have our appleALC (for our onboard audio controller) ID number which I've found to be 66 so we enter alcid=66. This was once accomplished by using a Device Property but was replaced with adding a boot argument.
Lastly we benefit from a boot flag via the whatevergreen.kext that lets us disable the iGPU because ours is incompatible with macOS -wegnoigpu
Note on GPU: Copied from another thread here.
- A discrete GPU is required because Alder Lake's iGPU (UHD 770) is not supported in macOS.
- Recommended GPUs are:
- AMD RX 400 series, RX 500 series, RX 5000 series, RX 6800, RX 6800 XT, RX 6900 XT.
- AMD RX 6600 and 6600 XT are only supported in Monterey 12.1 and newer.
- Boot Argument agdpmod=pikera should not be used on Vega 56, Vega 64, and Radeon VII.
- Boot Argument agdpmod=pikera is required for AMD 5000 and 6000 series.
Platform Info
For our build we're using the SMBIOS Mac Pro 7,1. You'll need to generate your own serial number and check its validity by using this guide by Dortania. It can be frustrating so take your time.
UEFI
Not much to see here. Make sure you've added your drivers and that they are enabled. This has been all I've needed.
Pro Tip for all you Ultra Wide Screen users. Set your UIScale to -1 so you don't have comically large icons during boot picker.
[/SPOILER]
USB Made Easy
Time saver! All ports identified. Expand the spoiler below.
Port Name (Connector) (port)
JUSB1/JUSB2
HS13 (255) (0D000000)
JUSB3
HS09 (3) (09000000)
HS10 (3) (0A000000)
SS08 (3) (18000000)
SS09 (3) (19000000)
JUSB4
HS07 (3) (07000000)
HS08 (3) (08000000)
SS06 (3) (16000000)
SS07 (3) (17000000)
Back Panel I/O
HS03 (3) (03000000)
HS05 (3) (05000000)
HS11 (3) (0B000000)
HS12 (3) (0C000000)
SS01 (9) (11000000)
SS02 (9) (12000000)
SS04 (3) (14000000)
SS05 (3) (15000000)
[/SPOILER]
MSI PRO Z690 A DDR4 + i7-12700K + AMD RX 580
Congratulations! A good Golden Build!
A brief explanation
For my builds I like to use USBPorts.kext. Theres no wrong way to do it, it's simply my preferred method.
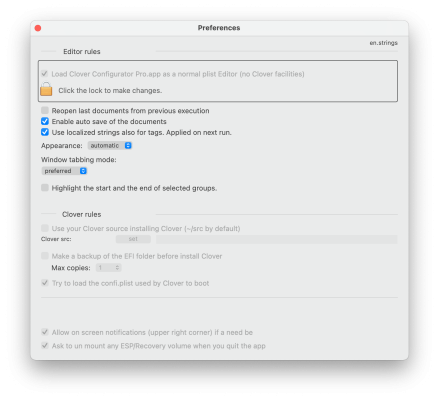
We can look inside the my map by right clicking USBPortsNATA.kext and selecting show package contents. Here we find a file called info.plist. Open it with your Plist Editor.
If you don't have a Plist Editor already, here's what I recommend doing. Open OpenCore Configurator on its own, select file in the menu bar, and then select preferences. Check off Load at startup as a normal plist editor. Relaunch OpenCore Configurator. Now you have a Plist Editor. Don't forget to switch back to normal mode for editing your Config. Carry on.
Note: I actually love this plist editor and am looking for a way to make it a standalone app so we can use both modes at the same time.
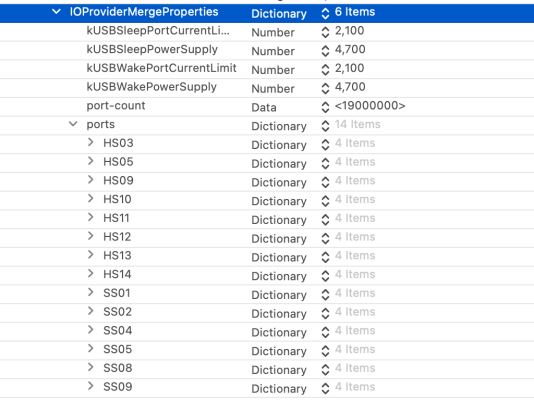
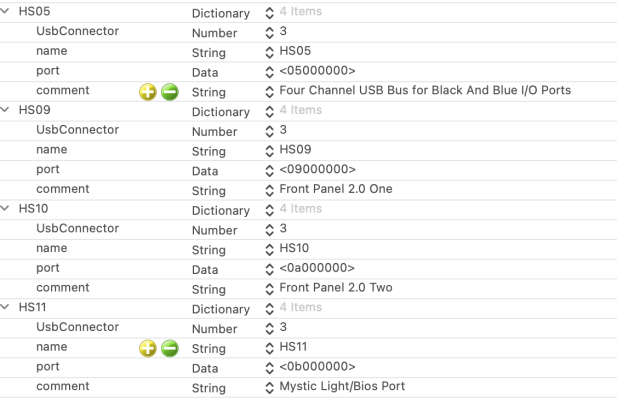
If you drill down and expand the plist I've provided enough you'll find our ports. It'll look like this.
Here we see a few things.
- Ports (HSxx, SSxx)
- UsbConnector
- name
- port#
- comment
Ports
HSxx Ports are our USB 2.0 Ports. HS means High Speed.
SSxx Ports are our USB 3.0 Ports. SS means Super Speed.
UsbConnector
We're going to use 3 different connector types here.
- Type 3 for 2.0 and 3.0 ports
- Type 255 for internal headers (Bluetooth from Fenvi T919 and USB 2.0 Connection from GC-Titan TB Card)
- Type 9 for USB 3.2 Gen 2
Lets start you off on a better footing for this one. Below, notice that for HS port#'s we are only changing the second digit to match the port number. The first example you'll see is HS05=05000000. When its time to move to the 10's we switch to letters.
0, 1, 2, 3, 4, 5, 6, 7, 8, 9, A, B, C, etc...
When we move on to SSxx ports we change the first digit to a 1 like so.
For Example
HS01 = 01000000
HS02 = 02000000
HS09 = 09000000
HS10 = 0A000000
HS11 = 0B000000
SS01 = 11000000
SS02 = 12000000
SS09 = 19000000
SS10 = 1A000000
SS11 = 1B000000
You'll also notice we're able to add comments to each port. This allows us to keep tabs on what each port is and to retain accuracy as we populate the build. It can be confusing as sometimes ports are bussed together like a hub. For example HS05 is actually four USB 2.0 ports on the IO panel. Two of those Ports are also two other SSxx ports. See how it would help to write it down as you go?
[/SPOILER]
Do it yourself? Yes
Prerequisites
- Headkazes Hackintool
- Updated USBInjectall.kext Enabled
- Type A USB 3.0 Hub
- Type C USB Device
- IOReg
- Enabled XHCIPortlimit Quirk in Kernel Tab
With all of the prerequisites taken care of, open IOReg and scroll down to your XHCI bus. You should see HS01-HS15, SS01-SS15, and USR01-USR02. If so, proceed.
Starting with the USB ports on the front of your case, plug in your USB 3.0 hub and watch IOReg to see which HSxx port it populates. Write it down. Unplug it and you'll see the IOReg port turn red and scratch out.
If the physical port you plugged into is blue then plug the hub back into the same port again but this time scroll down to the SSxx ports and see where it populated. Write it down.
Repeat this process for each port and make sure you are writing down where each port is.
Don't get tripped up by HS05. It's a bus. Meaning, it shares ports like a hub. HS05=4 USB Ports, 2 of which are 3.0.
The same goes for the 3.2 Gen 2 Ports (Red and Type C). The 3.2 speeds are on separate ports but the 2.0 speeds are a shared bus on HS03.
Here are my results for the back panel IO (HS03 and HS05 should make a little more sense here).
Note: The Flash BIOS Port will show up as Mystic Light in IOReg with no device plugged into it on HS01. This is a device the motherboard uses to control RGB. While HS01 will work, I've found the actual port is HS11. Nuance! Besides, I'd rather not load unsupported devices into macOS if I dont have to.
Pay attention in IOreg as to where your Bluetooth device is because that is connected internally with a header. Write it down along with any other devices that connected internally (this doesn't not count for headers that connect to ports on your case).
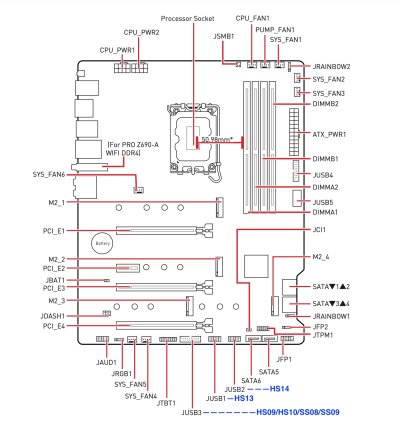
Here's a another diagram of the headers I'm using. Anyone care to test out the remaining JUSB4 and JUSB5?
Note: Admittedly JUSB2=HS14 is an educated guess. I haven't tested it yet due to time but will confirm and update shortly.
Once you're all documented open Hackintool and head to the USB tab. Export a USB Port Map by clicking the export icon on the bottom right corner marked in the photo below.
Now that you have a dummy map and a list of all the ports your using you can edit the USBPorts.kext according to your needs using the info above. When you're ready, be sure to disable USBInjectall, disable XHCIPortlimit Quirk, and to add your new USBPort.kext to your Kext and EFI. Good hunting.
Note 1: Using the diagrams above you really don't have to do any mapping yourself. Simply write down which headers you use and edit the USBPort.kext accordingly.
Note 2: You might have to do some copy and pasting. Take your time.
Note 3: You can also make all of your adjustments directly in Hackintool. You can select, remove ports, change port types, and even comment. Your export will include these adjustments.
USB Final Results
We have all of the ports, types, even the USBX power section that is usually provided in SSDT-USBX.
Note: You can keep USBX properties in SSDT-EC-USBX if its already there and remove them from the USBPorts.kext. You can keep them in both places as well.
You can also review your result in Hackintool along with making edits to Connector Types and Comments. Simply boot with your USBPorts.kext enabled (USBInjectall disabled). From there you can export again and you'll have a fresh new USBPorts.kext
Last bit on USB
If you'd prefer to use USBInjectall with an SSDT then keep USBInjectall.kext enabled and use the SSDT-UIAC.aml that Hackintool created on your final export.
[/SPOILER]
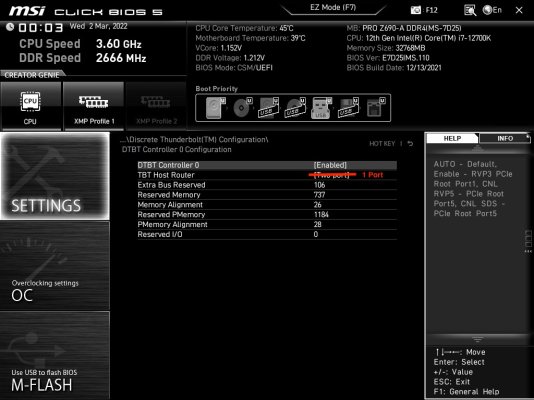
Thunderbolt
Your absolute best bet at this moment in time is to find a GC-Titan 2.0 card and flash it using NVM33. As much as I'd love to tell you all about it I feel it best to keep this info central. This guide supports this only for now.
Flashing the firmware here.
Repository of flashed firmware here.
The obligatory GB5
For pro audio I love to see that single core speed sit at 1900. To me that tells me that most errors I get are due to faulty software and I can generally rule out cpu performance as an issue.
Summary (what works, what doesn't)
Looking at the prices of the new Apple Silicon machines, I'd say that if you own a GPU then this build is worth your time. The single core speed is still competitive (if not faster) than all M1 variants. I have to set my scope on out building a Pro model of an Apple product and with that in mind I have, affordably. After about a week in it's feeling like a keeper.
Everything works until we notice it doesn't. Leave a comment if you come across anything that doesn't.
What doesn't work
- Sleep is still finicky. I believe its resolvable, we'll just need more time.
Attachments
-
 Screen Shot 2022-03-02 at 6.59.13 AM.png153.5 KB · Views: 590
 -
 Screen Shot 2022-03-02 at 7.06.21 AM.png53.8 KB · Views: 321
 -
 Screen Shot 2022-03-02 at 7.11.25 AM.png29.3 KB · Views: 330
 -
 Screen Shot 2022-03-02 at 7.14.02 AM.png54.9 KB · Views: 309
 -
 Screen Shot 2022-03-02 at 10.09.58 AM.png137.4 KB · Views: 298
 -
 Screen Shot 2022-03-02 at 10.29.14 AM.png488.3 KB · Views: 301
 -
 Screen Shot 2022-03-02 at 10.37.46 AM.png129.3 KB · Views: 249
 -
 Screen Shot 2022-03-02 at 12.39.14 PM.png116.5 KB · Views: 341
 -
 Headers.jpg346.8 KB · Views: 7,409
 -
 11 DTBT Controller 0 Configuration.jpg175.3 KB · Views: 1,319
Last edited: