
- Joined
- Sep 21, 2010
- Messages
- 13,416
- Motherboard
- HP 17" 17-by3053cl
- CPU
- i5-1035G1
- Graphics
- Intel UHD Graphics, 1920x1080
- Mac
- Classic Mac
- Mobile Phone
For those of you who have Windows installed on your system, each motherboard manufacturer has a website page on how to update the BIOS (see Option 2). However, the following methods are alternatives to updating the BIOS in Windows with a motherboard manufacturer's own utilities.
CAUTION: DO NOT POWER DOWN OR INTERRUPT THE FLASHING PROCESS ONCE IT HAS STARTED. DOING SO COULD MAKE YOUR MOTHERBOARD COMPLETELY UN-USABLE. LET THE PROCESS COMPLETE ON IT'S OWN
The following guides are for updating Gigabyte motherboard BIOS.
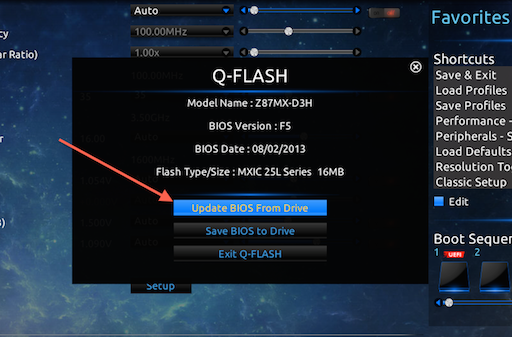
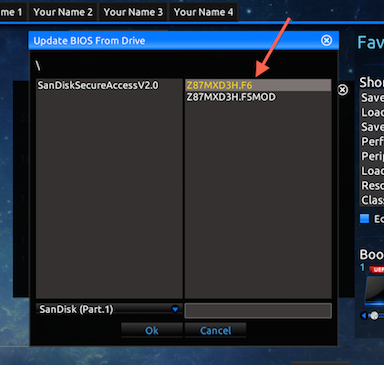
Option 1: Q-Flash Method
Motherboard BIOS utiity. Prepare from OS X. Easy Method for GUI oriented souls.
 Boot into the BIOS and note the settings that you changed as part of your initial installation. Go to the official page for your particular motherboard to download the latest BIOS;
___
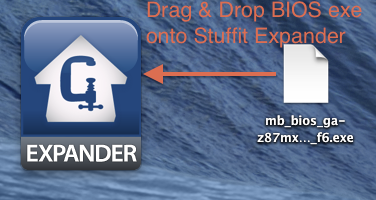
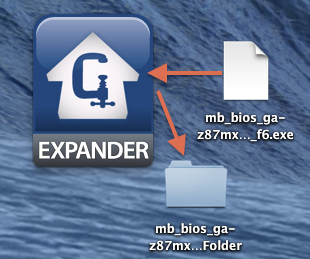
 Uncompress the BIOS compressed ".exe" file with OS X compression tools Stuffit Expander,
___The Unarchiver, UnRarX or a similar utility as Apple's OS X Archive app doesn't unpack
___".exe" files;
Extract the BIOS from the ".exe" file (below is using Stuffit Expander);______
__________
___
 Format a USB Thumb drive in FAT32 format;
___

Today, most new USB thumb drives come pre-formatted in FAT32, so you can change the name in the Finder by single clicking the USB drive "NO NAME" and pressing the Return key which will highlight the "NO NAME", and you can rename it.
Copy the BIOS file onto the USB Thumb drive; Boot the computer into the BIOS; and Use the BIOS's update function (Q-Flash for Gigabyte motherboards) to update the BIOS.___
__________
 Reboot back into the BIOS, Load the Optimal Defaults and reset any BIOS parameters.
Congratulations! You've now updated your BIOS.
Option 2: @BIOS Method
Gigabyte supplies a Windows app to update your BIOS. If you have a windows installation, this could be a good option, as it's supplied on the motherboard DVD and Support downloads. See the official document here.
Option 3: USB Drive with FreeDOS + BIOS file
However, if you can deal with the olde MS-DOS prompt, then here are a few more options for you. (Not for the faint of heart.)
Method 1: (Create a USB Flash drive on OS X) MacMan's Guide for using FreeDOS on a USB Thumb Drive. But, first, boot into the BIOS and note the settings that you changed as part of your initial installation.
Method 2. (Create a USB Flash drive on Windows) Recommended by wildwillow. This method has an excellent guide here. But, first, boot into the BIOS and note the settings that you changed as part of your initial installation.
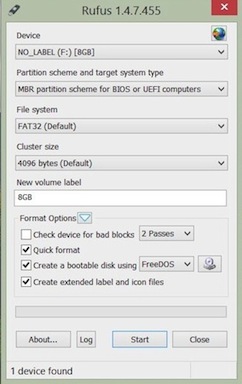
Method 3. (Create a USB Flash drive on Windows) trs96 found this (XP through 8.1) Method using Efiflash* (included in UEFI BIOS downloads) and Rufus on a 8GB USB thumb drive.
Boot into the BIOS and note the settings that you changed as part of your initial installation. Download the BIOS ".exe" file (see Option 1) and Rufus; Create the FreeDos bootable USB using Rufus and leave all the settings at stock;___
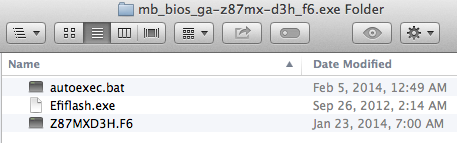
 Double click on the BIOS ".exe" file to extract BIOS file and Efiflash.exe
___(delete the autobat file as it isn't needed);
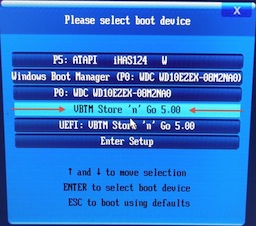
Add the BIOS file and Efiflash.exe to the USB drive; Reboot and press F12 to go to the BOOT Menu; Select the USB thumb drive and press enter to run in the DOS environment;___
 At the command prompt, type:
Code:
C:/>Efiflash[COLOR=#FFFFFF]_______________[/COLOR]<--- This will start the Efiflash tool.
C:/>Efiflash <BIOS file>[COLOR=#FFFFFF]___[/COLOR]<--- For example, Z87MXD3H.F4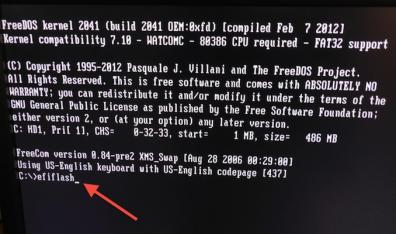
_________
 Hit enter and it's all taken care of automagically from there.
* FLASHSPI.EXE was used in earlier Gigabyte BIOS releases instead of Efiflash.exe. Same use.
Gigabyte Socket 1150 Haswell 8-Series Motherboards:
http://www.gigabyte.com/products/list.aspx?s=42&jid=0&p=2&v=31
Gigabyte Socket 1155 Ivy Bridge 7-Series and Sandy Bridge 6-Series Motherboards:
http://www.gigabyte.com/products/list.aspx?s=42&jid=0&p=2&v=24
Gigabyte Socket 1156 5-Series Motherboards:
http://www.gigabyte.com/products/list.aspx?s=42&jid=0&p=2&v=11
Gigabyte Socket 1156 X58 Motherboards:
http://www.gigabyte.com/products/list.aspx?s=42&jid=0&p=2&v=1
Gigabyte Socket 2011 X79/C606 Motherboards:
http://www.gigabyte.com/products/list.aspx?s=42&jid=0&p=2&v=28
How to Reflash BIOS:
http://www.gigabyte.com/webpage/20/HowToReflashBIOS.html
Related:
http://www.tonymacx86.com/dsdt/124646-gigabyte-beta-bios-modified-bios.html
http://www.tonymacx86.com/general-help/38604-gigabyte-backup-bios.html
Last edited by a moderator:
")