
- Joined
- Dec 28, 2011
- Messages
- 154
- Motherboard
- GA-Z68MX-UD2H-B3
- CPU
- i5 2500k @ 4.2GHZ
- Graphics
- AMD Radeon HD 6850 Dual Fan Edition
- Mac
- Classic Mac
- Mobile Phone
Hey all,
So it has been a crazy couple of weeks, with a lot of experimentation to get ML working perfectly (USB 3.0 too!!!) on this board. What I have for you here is a detailed (sorry about not having many pictures) guide on how to get ML working perfectly on your GA-Z68MX-UD2H-B3 board with a 6xxx series gfx card. This guide is assuming that you already have the latest version of Lion running on your mac.... if not, follow this guide (http://www.tonymacx86.com/61-unibeast-install-os-x-mountain-lion-any-supported-intel-based-pc.html) on how to format your drive for OSX!
As I said, it took a lot of tries and different methods, but I never gave up, and got it in the end!! If you follow this guide to the letter, you shouldn't have a problem with this (but no guarantees!! lol)
Before I did this successfully, I tried a million times, and most of the time got this message
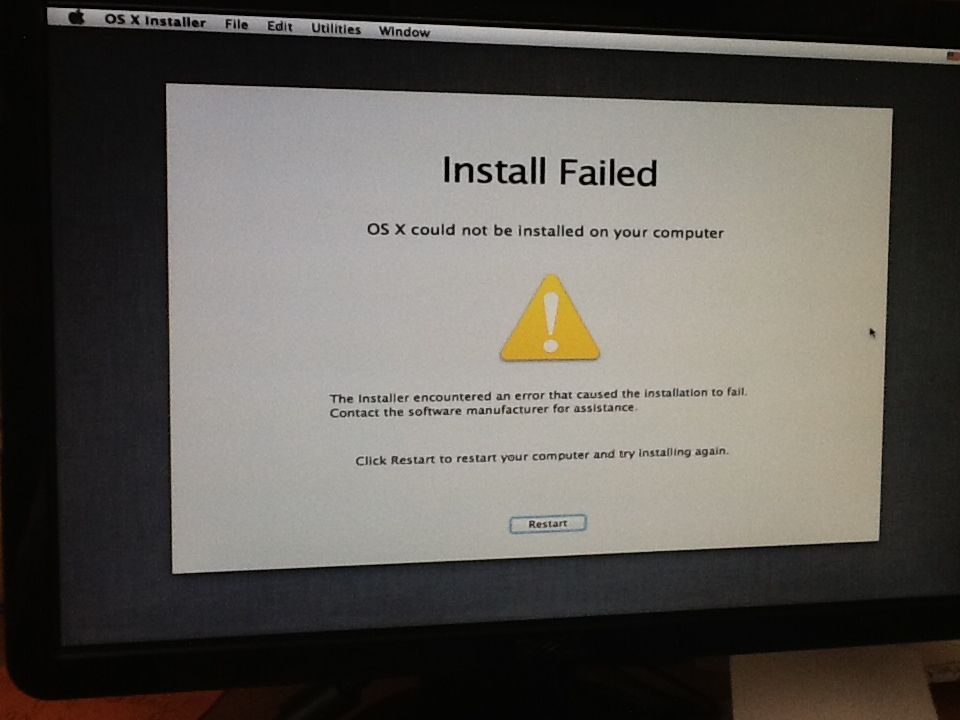
(crummy iPad picture too lol)
1- Get in a calm mental state of mind and clear your calendar for a few hours lol
2- Get your screwdrivers and anti-static wristbands, cuz here we go!!
3- Prepare your UniBeast USB drive as this guide states (http://www.tonymacx86.com/61-unibeast-install-os-x-mountain-lion-any-supported-intel-based-pc.html)
4- Shut down your computer
5- Disconnect all of your drives (except for the drive you want to install ML on)
6- If you have more than 4GB of RAM, take that out too!
7- Remove your 6xxx graphics card and plug your display cable directly into your mobo so you can run on HD3000 graphics
8- Boot from the USB drive and install OSX as you normally would
9- Restart and boot from your UniBeast drive, selecting the drive you just installed ML on
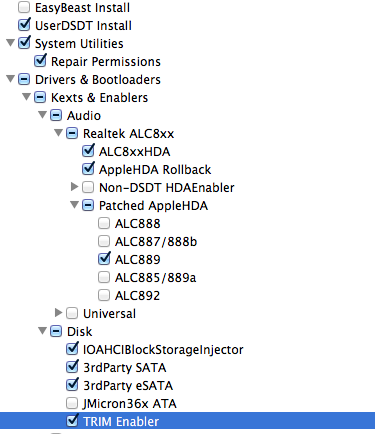
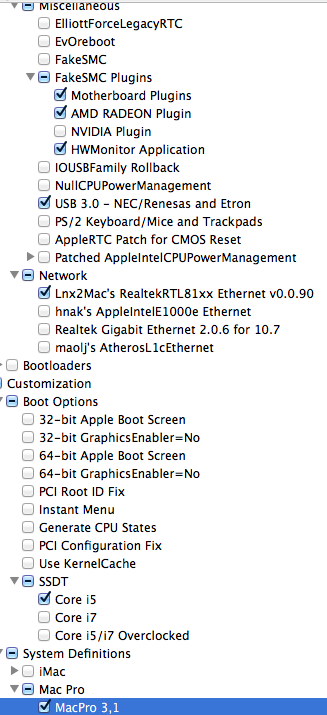
10- Once the OS boots, run MultiBeast (see my configuration below & download my DSDT)
11- CONGRATULATIONS!!!!!!!!!! But you aren’t done yet!
12- Put all of your RAM and your 6xxx card back into your computer and boot up normally… and everything SHOULD go as planned!
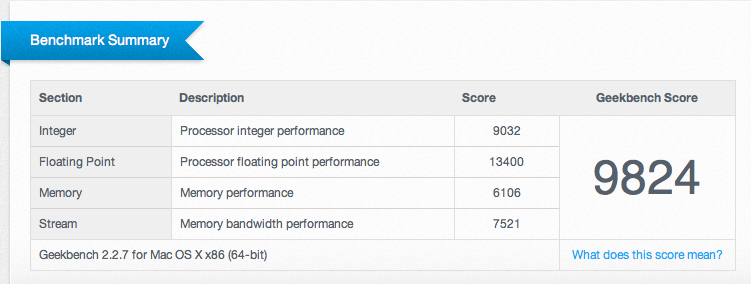
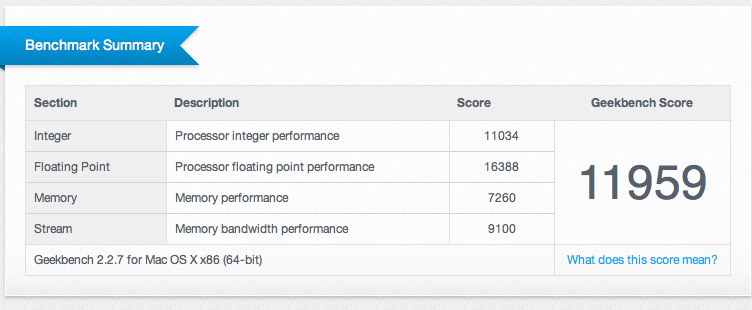
GeekBench:
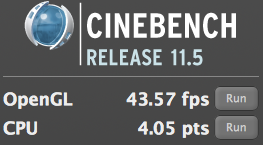
CineBench:
I have now overclocked my build!!! I am running stable at 4.2GHZ!!!! PM me if you want more info!
So it has been a crazy couple of weeks, with a lot of experimentation to get ML working perfectly (USB 3.0 too!!!) on this board. What I have for you here is a detailed (sorry about not having many pictures) guide on how to get ML working perfectly on your GA-Z68MX-UD2H-B3 board with a 6xxx series gfx card. This guide is assuming that you already have the latest version of Lion running on your mac.... if not, follow this guide (http://www.tonymacx86.com/61-unibeast-install-os-x-mountain-lion-any-supported-intel-based-pc.html) on how to format your drive for OSX!
As I said, it took a lot of tries and different methods, but I never gave up, and got it in the end!! If you follow this guide to the letter, you shouldn't have a problem with this (but no guarantees!! lol)
Before I did this successfully, I tried a million times, and most of the time got this message
(crummy iPad picture too lol)
1- Get in a calm mental state of mind and clear your calendar for a few hours lol
2- Get your screwdrivers and anti-static wristbands, cuz here we go!!
3- Prepare your UniBeast USB drive as this guide states (http://www.tonymacx86.com/61-unibeast-install-os-x-mountain-lion-any-supported-intel-based-pc.html)
4- Shut down your computer
5- Disconnect all of your drives (except for the drive you want to install ML on)
6- If you have more than 4GB of RAM, take that out too!
7- Remove your 6xxx graphics card and plug your display cable directly into your mobo so you can run on HD3000 graphics
8- Boot from the USB drive and install OSX as you normally would
9- Restart and boot from your UniBeast drive, selecting the drive you just installed ML on
10- Once the OS boots, run MultiBeast (see my configuration below & download my DSDT)
11- CONGRATULATIONS!!!!!!!!!! But you aren’t done yet!
12- Put all of your RAM and your 6xxx card back into your computer and boot up normally… and everything SHOULD go as planned!
GeekBench:
CineBench:
I have now overclocked my build!!! I am running stable at 4.2GHZ!!!! PM me if you want more info!