
- Joined
- Sep 21, 2010
- Messages
- 13,414
- Motherboard
- HP 17" 17-by3053cl
- CPU
- i5-1035G1
- Graphics
- Intel UHD Graphics, 1920x1080
- Mac
- Classic Mac
- Mobile Phone
Update: Please do not post Yosemite questions in this guide thread; this thread is a guide for installing Mavericks. TIA. I've created a Yosemite guide for the H/Z97-N WIFI /i5-4690/HD4000 system > http://www.tonymacx86.com/yosemite-...i-using-hd4600-chimera-multibeast-method.html
Update: for updating from Mavericks 10.9.4 to 10.9.5, see this post in this thread. Additionally, this thread has been updated to reflect previous add-ons are now incorporated in MultiBeast for Mavericks v6.5.0. So, being an Early adopter has become easier.
Early adopters have it rough! Little or no support until Apple supports the hardware/firmware/chipsets in a product. Note: if you are using a discrete graphics card (e.g., a GTX 760 or similar), you don't need this guide; just use the tonymacx86 Installation Guide for Mavericks.
The 9-series of motherboards are a PITA to set-up for and install Mavericks. First, the 9-series are not currently supported by Apple so modified drivers/kexts are required. The good news is that tonymacx86 and toleda have been hard at work to make them work for the time being. Second, the HD4600 has a different implementation in the 9-series motherboards, so you will have to use two of toleda's graphics "helpers" after running MultiBeast for Mavericks v6.5.0 to get Mavericks to properly use the on-board graphics.
Normally, I wouldn't put such a detailed installation procedure in a build installation guide, but, instead, referencing the tonymacx86 guide with just a few installation steps to cover unique differences. However, as I mentioned before, Apple does not yet support the Intel 9-series motherboard chipset in a product. So, thus, the detailed installation procedure with the check boxes so you can copy & paste into a document for printing and checking off each step as you accomplish the step so as not to miss a step.
Hector (as I named my H97N system) is using an i5-4690 Haswell Refresh processor, driving two monitors using the motherboard's DVI and bottom HDMI ports. Additionally, this installation procedure will work for a Z97N-WIFI as the two motherboards are very similar. Finally, any Intel i3/i5/i7 4000 series processor, which supports HD4600 Intel Integrated Graphics, will work with either motherboard. Note: Apple has not supported VGA natively in OS X for years. So don't use the on-board VGA connector. Instead, use either the DVI and/or the HDMI connectors.
Preparation
 Prepare the UniBeast USB thumb drive in accordance with the tonymacx86 Installation Guide, Steps 1-2;
Download and put the following zip files on the UniBeast thumb drive:
MultiBeast for Mavericks v6.5.0,
FileNVRAM-1.1.3 if you want to use iMessage,
Kext Utility,
toleda's AppleIntelFramebufferAzul.Kext, and
toleda's graphics_intel_hd5k-azul-d-90_patch (read his post for more information);
Power down the computer;
Disconnect all drives except for the drive onto which Mavericks will be installed;
Connect you monitor to either the DVI or HMDI Back Panel connector; and
Put the UniBeast USB thumb drive in an USB 2.0 socket on the motherboard Back Panel.
BIOS Set-up
Rather than clutter up this guide, I won't show a lot of BIOS screen snapshots, just the actual BIOS parameters that I changed to start the Installation of Mavericks. Boot into the BIOS by holding down the DELETE key on your keyboard's numeric keypad. (Also see Step 3 in the tonymacx86x 10.9 Mavericks Installation Guide.)
Update to the latest BIOS version (See http://www.tonymacx86.com/bios-uefi/131047-how-update-your-gigabyte-motherboards-bios.html ) and Load the Optimized Defaults (F7);
M.I.T. > Advanced Memory Settings > X.M.P. > Profile 1 for memory not recognized with the Default setting;
BIOS Features > Boot Options Priorities > set this to the P0 setting for the UniBeast USB thumb drive (legacy boot)
BIOS Features > VT-d > Disable <--- for non K processors and the new Haswell Refresh "K" processors
Peripherals > Initial Display Output > IGFX <--- make sure on-board graphics is enabled
Peripherals > Intel Processor Graphics > Enable <--- likewise, make sure this is enabled
Peripherals > XHCI Mode > Auto <--- Smart Auto gives you problems with USB peripherals
Peripherals > EHCI Hand-off > Enable
Power Management > Wake on LAN > Disable
Save & Exit > Save & Exit Setup (and the computer will reboot)
Pre Installation Notes
As in the beginning of Steps 4 & 5 of the tonymacx86 installation guide, you will need to hold the F12 keyboard key and choose the USB-HDD to boot from the UniBeast USB thumb drive for both the initial installation and the reboot after the installation to run MultiBeast.
Installation of OS X
At the Chimera screen, choose the UniBeast thumb drive USB) to execute and follow the installation procedure in Steps 4; if you get a Kernel Panic:
Reboot and, at the Chimera screen, press the keyboard's SpaceBar to open the boot flag window at the bottom of the screen;
Enter "-v maxmem=4096" (without the quotes), where 4096 is your memory size div by two; and
Press the Return key on the keyboard to boot into the Mavericks Desktop. After the installation, the computer will reboot;
At the Chimera screen, use the arrow keyboard key to highlight the Mavericks drive;
Press the keyboard's SpaceBar to open the boot flag window at the bottom of the screen;
Enter "-v -x" (without the quotes) and press the Return key on the keyboard to boot into the Mavericks Desktop.
At the Mavericks Desktop, copy the MultiBeast for Mavericks v6.5.0 zip file into the /Applications folder and unzip it;
Before running MultiBeast for Mavericks, open the Security & Privacy Preference Pane in System Preferences, which is located in your Dock, and:
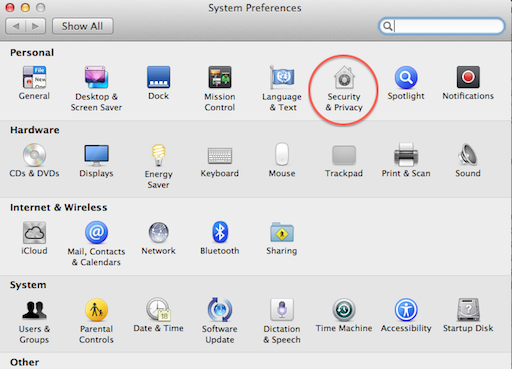 In the lower left corner, click on the padlock and type in your Admin username & password;
 Click on the General tab if it isn't already highlighted;
Click on the "Anywhere" radio button under "Allow applications and downloaded from:" and
Close the System Preferences window.
Run MultiBeast and selection the following:
Quick Start > DSDT-Free
Drivers > Audio > Realtek ALC8xx > ALC892
Drivers > Audio > Intel 9 Series Motherboard Support
Drivers > Disk > Intel Generic AHCI SATA
Drivers > Graphics -> Intel 9 Series HD 4600 Graphics Fix
Drivers > Disk > Trim Enabler <--- Optional for SSDs (most SSDs will need it)
Drivers > Network > either or both of the following:
Atheros > ALXEthernet <--- Ethernet cable to the Atheros Ethernet port
Intel > AppleIntelE1000e Customize > System Definitions > iMac > iMac14 (",1" for i3/i5 processors and ",2" for i7)
Build <--- To see your full configuration
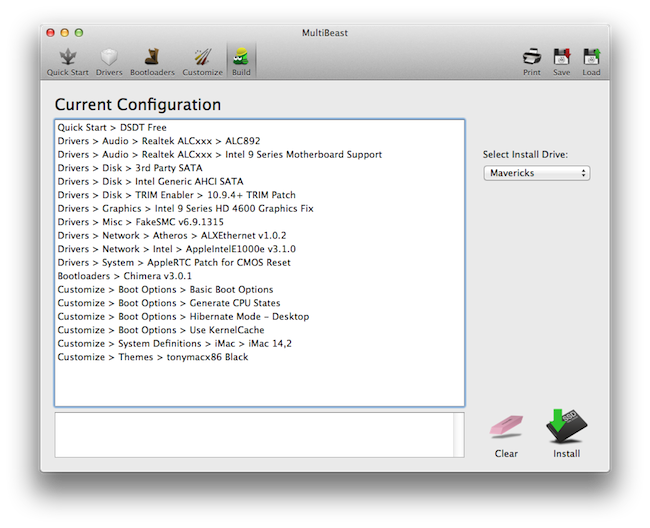 Note: While the MultiBeast Configuration snapshot above may reflect earlier versions of some of the drivers/kexts, the .mb file will automatically be updated by MultiBeast to the current MultiBeast versions.
Save <--- Save your MultiBeast configuration file somewhere convenient
Click on the Install button in the MultiBeast window bottom right hand corner. Reboot into the BIOS.
Change BIOS Features > Boot Options Priorities > set this to the P0 setting for the Mavericks drive
F10 to save the BIOS update and reboot.
One last tip/note, to check to see if your SSDTs are loading, use the following command in the Terminal:
You can also add this to your .profile in your user folder so that, upon opening the Terminal, it shows the results.
Done! Enjoy your Gigabyte H/Z97N-WIFI motherboard based system using HD4600 graphics. :thumb up:
What does work that I've tested so far:
What doesn't work that I've tested so far:
I'll add to the above What Works and What Doesn't Work list as I use the system. But, I wanted to get the information out to you.
This Guide could not come about without the exceptional work of toleda and tonymacx86. I just compile this Guide from all the things toleda & I had to do to get our H/Z97N-WIFI systems to work.
Guide Updates:
November 2014 - Corrected the Atheros driver selected in MultiBeast > ALXEthernet
September 2014 - Added the following to reflect 9-series audio supported in MultiBeast for Mavericks 6.5+. See Post #184 for more details.
Update: for updating from Mavericks 10.9.4 to 10.9.5, see this post in this thread. Additionally, this thread has been updated to reflect previous add-ons are now incorporated in MultiBeast for Mavericks v6.5.0. So, being an Early adopter has become easier.
Early adopters have it rough! Little or no support until Apple supports the hardware/firmware/chipsets in a product. Note: if you are using a discrete graphics card (e.g., a GTX 760 or similar), you don't need this guide; just use the tonymacx86 Installation Guide for Mavericks.
The 9-series of motherboards are a PITA to set-up for and install Mavericks. First, the 9-series are not currently supported by Apple so modified drivers/kexts are required. The good news is that tonymacx86 and toleda have been hard at work to make them work for the time being. Second, the HD4600 has a different implementation in the 9-series motherboards, so you will have to use two of toleda's graphics "helpers" after running MultiBeast for Mavericks v6.5.0 to get Mavericks to properly use the on-board graphics.
Normally, I wouldn't put such a detailed installation procedure in a build installation guide, but, instead, referencing the tonymacx86 guide with just a few installation steps to cover unique differences. However, as I mentioned before, Apple does not yet support the Intel 9-series motherboard chipset in a product. So, thus, the detailed installation procedure with the check boxes so you can copy & paste into a document for printing and checking off each step as you accomplish the step so as not to miss a step.
Hector (as I named my H97N system) is using an i5-4690 Haswell Refresh processor, driving two monitors using the motherboard's DVI and bottom HDMI ports. Additionally, this installation procedure will work for a Z97N-WIFI as the two motherboards are very similar. Finally, any Intel i3/i5/i7 4000 series processor, which supports HD4600 Intel Integrated Graphics, will work with either motherboard. Note: Apple has not supported VGA natively in OS X for years. So don't use the on-board VGA connector. Instead, use either the DVI and/or the HDMI connectors.
Preparation
Prepare the UniBeast USB thumb drive in accordance with the tonymacx86 Installation Guide, Steps 1-2; Download and put the following zip files on the UniBeast thumb drive: MultiBeast for Mavericks v6.5.0, FileNVRAM-1.1.3 if you want to use iMessage, Kext Utility, toleda's AppleIntelFramebufferAzul.Kext, and toleda's graphics_intel_hd5k-azul-d-90_patch (read his post for more information);Note: The graphics_intel_hd5k-azul-d-90_patch is unique to the H/Z97N-WIFI motherboard on-board graphics layout.
Note: Now included in MultiBeast for Mavericks 6.5.0 as noted above and below.
Power down the computer; Disconnect all drives except for the drive onto which Mavericks will be installed; Connect you monitor to either the DVI or HMDI Back Panel connector; and Put the UniBeast USB thumb drive in an USB 2.0 socket on the motherboard Back Panel.BIOS Set-up
Rather than clutter up this guide, I won't show a lot of BIOS screen snapshots, just the actual BIOS parameters that I changed to start the Installation of Mavericks. Boot into the BIOS by holding down the DELETE key on your keyboard's numeric keypad. (Also see Step 3 in the tonymacx86x 10.9 Mavericks Installation Guide.)
Update to the latest BIOS version (See http://www.tonymacx86.com/bios-uefi/131047-how-update-your-gigabyte-motherboards-bios.html ) and Load the Optimized Defaults (F7); M.I.T. > Advanced Memory Settings > X.M.P. > Profile 1 for memory not recognized with the Default setting; BIOS Features > Boot Options Priorities > set this to the P0 setting for the UniBeast USB thumb drive (legacy boot) BIOS Features > VT-d > Disable <--- for non K processors and the new Haswell Refresh "K" processors Peripherals > Initial Display Output > IGFX <--- make sure on-board graphics is enabled Peripherals > Intel Processor Graphics > Enable <--- likewise, make sure this is enabled Peripherals > XHCI Mode > Auto <--- Smart Auto gives you problems with USB peripherals Peripherals > EHCI Hand-off > Enable Power Management > Wake on LAN > Disable Save & Exit > Save & Exit Setup (and the computer will reboot)Pre Installation Notes
As in the beginning of Steps 4 & 5 of the tonymacx86 installation guide, you will need to hold the F12 keyboard key and choose the USB-HDD to boot from the UniBeast USB thumb drive for both the initial installation and the reboot after the installation to run MultiBeast.
Installation of OS X
At the Chimera screen, choose the UniBeast thumb drive USB) to execute and follow the installation procedure in Steps 4; if you get a Kernel Panic: Reboot and, at the Chimera screen, press the keyboard's SpaceBar to open the boot flag window at the bottom of the screen; Enter "-v maxmem=4096" (without the quotes), where 4096 is your memory size div by two; and Press the Return key on the keyboard to boot into the Mavericks Desktop. After the installation, the computer will reboot; At the Chimera screen, use the arrow keyboard key to highlight the Mavericks drive; Press the keyboard's SpaceBar to open the boot flag window at the bottom of the screen; Enter "-v -x" (without the quotes) and press the Return key on the keyboard to boot into the Mavericks Desktop.Note: The "-v" will show you the load information and is useful for debugging. The "-x" causes Mavericks to boot into the Safe mode.
At the Mavericks Desktop, copy the MultiBeast for Mavericks v6.5.0 zip file into the /Applications folder and unzip it; Before running MultiBeast for Mavericks, open the Security & Privacy Preference Pane in System Preferences, which is located in your Dock, and:
In the lower left corner, click on the padlock and type in your Admin username & password;
Click on the General tab if it isn't already highlighted; Click on the "Anywhere" radio button under "Allow applications and downloaded from:" and Close the System Preferences window. Run MultiBeast and selection the following: Quick Start > DSDT-Free Drivers > Audio > Realtek ALC8xx > ALC892 Drivers > Audio > Intel 9 Series Motherboard Support Drivers > Disk > Intel Generic AHCI SATA Drivers > Graphics -> Intel 9 Series HD 4600 Graphics Fix Drivers > Disk > Trim Enabler <--- Optional for SSDs (most SSDs will need it) Drivers > Network > either or both of the following: Atheros > ALXEthernet <--- Ethernet cable to the Atheros Ethernet port Intel > AppleIntelE1000e Customize > System Definitions > iMac > iMac14 (",1" for i3/i5 processors and ",2" for i7)Note: toleda has suggested that we use the following:
iMac14,1 - HD4600 only, or
iMac14,2 - HD4600 and discrete graphics card or discrete graphics only
Note: Optional > Use a processor specific SSDT, independent of SysDef. See toleda's guideiMac14,2 - HD4600 and discrete graphics card or discrete graphics only
for more information: http://www.tonymacx86.com/mavericks...vericks-native-cpu-igpu-power-management.html
Build <--- To see your full configuration
Save <--- Save your MultiBeast configuration file somewhere convenientHere's my MultiBeast configuration file: View attachment Hector Fresh.mb
To use it
Download it and unzip it;
Run MultiBeast and click on the Load button and select the downloaded .mb file; and
To use it
Download it and unzip it; Run MultiBeast and click on the Load button and select the downloaded .mb file; and Click on the Install button in the MultiBeast window bottom right hand corner. Reboot into the BIOS. Change BIOS Features > Boot Options Priorities > set this to the P0 setting for the Mavericks drive F10 to save the BIOS update and reboot.One last tip/note, to check to see if your SSDTs are loading, use the following command in the Terminal:
Code:
bdmesg|grep -y amlDone! Enjoy your Gigabyte H/Z97N-WIFI motherboard based system using HD4600 graphics. :thumb up:
What does work that I've tested so far:
- Bluetooth Apple keyboard wakes from sleep but 2nd monitor is a tad slower to "catch up" to display.
- iMessage
What doesn't work that I've tested so far:
- iTunes trailers playing causes system freeze. This is due to the 9-series not being recognized by the iTunes store.
- Sleep/wake-up. Monitors sleep but motherboard doesn't. Wake-up by any means doesn't work. Only solution is to restart.
I'll add to the above What Works and What Doesn't Work list as I use the system. But, I wanted to get the information out to you.
This Guide could not come about without the exceptional work of toleda and tonymacx86. I just compile this Guide from all the things toleda & I had to do to get our H/Z97N-WIFI systems to work.
Guide Updates:
November 2014 - Corrected the Atheros driver selected in MultiBeast > ALXEthernet
September 2014 - Added the following to reflect 9-series audio supported in MultiBeast for Mavericks 6.5+. See Post #184 for more details.
Drivers > Audio > Intel 9 Series Motherboard Support
Drivers > Disk > Intel Generic AHCI SATA
Drivers > Graphics -> Intel 9 Series HD 4600 Graphics Fix
Drivers > Disk > Intel Generic AHCI SATA
Drivers > Graphics -> Intel 9 Series HD 4600 Graphics Fix
Attachments
Last edited: