- Joined
- Feb 19, 2014
- Messages
- 13
- Motherboard
- Gigabyte Z87MX-D3H
- CPU
- i7-4790K
- Graphics
- GTX 780
- Mac
- Mobile Phone
another PowerMac G4 Stormtrooper Haswell
Hi everyone,
(First of all, sorry for my poor english, and greetings from Belgium )
)
A few months ago, I felt in love with this G4 case mod :
http://clustr.com/images/news/1366/macbane_02.jpg
And one or two months ago, the GPU from my macbook pro decided to die...(for the second time) as I hadn't enough money to buy a new macbook, I decided to built my dream Hackintosh.
My goal was a computer built for sound recording, so it had to :
-Run Mac OsX 10.9 and 10.6
-Look like a mac (and not a saaaaad PC case)
-Be as quiet as possible
-Have a powerful CPU
-Be affordable
-Have Firewire, PCIE and USB3
So I read a lot through the tonymacx86 forum, wiki page and buyer's guide and choosed my configuration :
Gigabyte GA-Z87MX-D3H
Intel i7 4770k
Noctua NH-L12
Crucial Ballistix Sport 16GB
Samsung 840 SSD 120GB
Zotac GT 640 (passive)
BeQuiet L8 350W
Samsung SN-506BB slim Bluray
Startech PEX1394B3 Firewire card
TP-LINK WDN4800 Wifi card
Actually this project has nothing really original...but I took a lot of pictures so I decided to share this build with you!
First, I bought an old G4 case from ebay, disassembled it, took a few measures and ordered my parts from amazon.

The real challenge came from the small size of this case. The motherboard has to be mATX (it's possible with a full ATX but you have only 4 PCI slots at the bottom of this case). The heatsink has to be maximum 70mm high, otherwise the case won't close because of the PSU position.
The optical drive lenght has to be less than 170mm otherwise it won't fit with the RAM, and approximately 120mm if you want to be confortable with the ATX powercable.
It is well known but here is the naked case:

If you need help for disassembly, just follow this guide:
http://tim.id.au/laptops/apple/powermac/powermac_g4.pdf
I removed the security bar, because it annoyed me while changing the PSU:

I removed the Wifi/Bluetooth holder (I used a Dremel tool and a Drill)

To remove the old MOBO standoffs, the easiest way is to drill through them.

Once it's cleaned, you can trace and cut the rear case for the panel cover, and check if it fits.
The panel was glued with "metal" epoxy.


Then you have to place and screw your new MOBO risers on the panel.
And of course, adapt the latch panel. You also have to cut a lot of metal pieces in the corner, so it won't block the new MOBO.


SPOILING : Here is the final version (with some painting) with the two holes for the CPU atx cable, and the platic cutted at the new heatsink size.

As the new power supply fan was facing the wrong side, I decided to cut a hole in the side panel so it could take fresh air from the outside of the case.


First problem, I had to remove to Fan Bracket because my GPU was too fat and prevented my case from closing.


Second problem, the heatsink was really close to the PSU when the case was closed, so I decided to place the new PSU really against the edge, increasing the room between the cpu and psu.

As the computer was reaaaaaally quiet (the single Harddrive was making more noise than the fans) so I decided to increase the airflow (for prospective OC) adding an extraction fan at the top, juste above the CPU and GPU. (Of course, you have to cut the top plastic too)


Also added a 40mm blowing fan at the bottom of the case. (so cute)

For the optical drive, I decided to use a "Slim drive to 5.25' bay adapter" that holds my slim bluray burner, a 1To HDD and my samsung SSD. I also added a USB 3 front hub with audio output.


(I also drilled a hole, and placed a LED that lights the Apple logo)
The problem is that if you want to close your case easily, you have to cut the optical drive holder again and again...and again (I had exactly 120mm before hitting my atx cable)


I cut the front platic panel for the USB3, adapted the CD tray opening system..., and modified the third button as a HDD LED.

The power switch board:

Then came the painting!
I first tried to remove the old grey painting (I spent an entire day, sanding down and polishing the plastic) and paint it in white from the inside of the plastic plate.

Even if it worked fine for the handles, it was a really bad idea for the sides. It gave me a beautiful white in the inside and an ugly greyish white color from the outside


Anyway...
I sanded all the parts, applied a coat of primer, sanded down, applied a second coat, painted it in black and white (two layers), sanded with steel wool, and finally applied three layers of varnish.

 (and I am happy with this result )
The inside received some paintings too (camo green and black) to give it an old tank look (yes it's really a trooper!)

Once it's dry, you can put everything back together.


And here is the final result...
....
wut?
Oh! You want a picture, right?

Tadaaam


Hi everyone,
(First of all, sorry for my poor english, and greetings from Belgium
)A few months ago, I felt in love with this G4 case mod :
http://clustr.com/images/news/1366/macbane_02.jpg
And one or two months ago, the GPU from my macbook pro decided to die...(for the second time) as I hadn't enough money to buy a new macbook, I decided to built my dream Hackintosh.
My goal was a computer built for sound recording, so it had to :
-Run Mac OsX 10.9 and 10.6
-Look like a mac (and not a saaaaad PC case)
-Be as quiet as possible
-Have a powerful CPU
-Be affordable
-Have Firewire, PCIE and USB3
So I read a lot through the tonymacx86 forum, wiki page and buyer's guide and choosed my configuration :
Gigabyte GA-Z87MX-D3H
Intel i7 4770k
Noctua NH-L12
Crucial Ballistix Sport 16GB
Samsung 840 SSD 120GB
Zotac GT 640 (passive)
BeQuiet L8 350W
Samsung SN-506BB slim Bluray
Startech PEX1394B3 Firewire card
TP-LINK WDN4800 Wifi card
Actually this project has nothing really original...but I took a lot of pictures so I decided to share this build with you!
First, I bought an old G4 case from ebay, disassembled it, took a few measures and ordered my parts from amazon.

The real challenge came from the small size of this case. The motherboard has to be mATX (it's possible with a full ATX but you have only 4 PCI slots at the bottom of this case). The heatsink has to be maximum 70mm high, otherwise the case won't close because of the PSU position.
The optical drive lenght has to be less than 170mm otherwise it won't fit with the RAM, and approximately 120mm if you want to be confortable with the ATX powercable.
It is well known but here is the naked case:

If you need help for disassembly, just follow this guide:
http://tim.id.au/laptops/apple/powermac/powermac_g4.pdf
I removed the security bar, because it annoyed me while changing the PSU:

I removed the Wifi/Bluetooth holder (I used a Dremel tool and a Drill)

To remove the old MOBO standoffs, the easiest way is to drill through them.

Once it's cleaned, you can trace and cut the rear case for the panel cover, and check if it fits.
The panel was glued with "metal" epoxy.


Then you have to place and screw your new MOBO risers on the panel.
And of course, adapt the latch panel. You also have to cut a lot of metal pieces in the corner, so it won't block the new MOBO.


SPOILING : Here is the final version (with some painting) with the two holes for the CPU atx cable, and the platic cutted at the new heatsink size.

As the new power supply fan was facing the wrong side, I decided to cut a hole in the side panel so it could take fresh air from the outside of the case.


First problem, I had to remove to Fan Bracket because my GPU was too fat and prevented my case from closing.
Second problem, the heatsink was really close to the PSU when the case was closed, so I decided to place the new PSU really against the edge, increasing the room between the cpu and psu.
As the computer was reaaaaaally quiet (the single Harddrive was making more noise than the fans) so I decided to increase the airflow (for prospective OC) adding an extraction fan at the top, juste above the CPU and GPU. (Of course, you have to cut the top plastic too)
Also added a 40mm blowing fan at the bottom of the case. (so cute)
For the optical drive, I decided to use a "Slim drive to 5.25' bay adapter" that holds my slim bluray burner, a 1To HDD and my samsung SSD. I also added a USB 3 front hub with audio output.
(I also drilled a hole, and placed a LED that lights the Apple logo)
The problem is that if you want to close your case easily, you have to cut the optical drive holder again and again...and again
(I had exactly 120mm before hitting my atx cable)I cut the front platic panel for the USB3, adapted the CD tray opening system..., and modified the third button as a HDD LED.
The power switch board:
Then came the painting!
I first tried to remove the old grey painting (I spent an entire day, sanding down and polishing the plastic) and paint it in white from the inside of the plastic plate.
Even if it worked fine for the handles, it was a really bad idea for the sides. It gave me a beautiful white in the inside and an ugly greyish white color from the outside
Anyway...
I sanded all the parts, applied a coat of primer, sanded down, applied a second coat, painted it in black and white (two layers), sanded with steel wool, and finally applied three layers of varnish.
(and I am happy with this result )The inside received some paintings too (camo green and black) to give it an old tank look (yes it's really a trooper!)
Once it's dry, you can put everything back together.
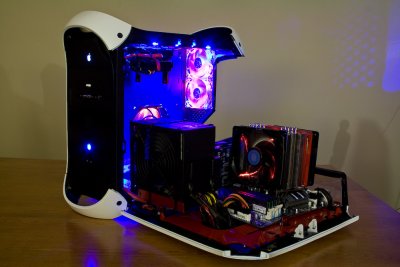
And here is the final result...
....
wut?
Oh! You want a picture, right?
Tadaaam