
- Joined
- Jan 2, 2020
- Messages
- 14
- Motherboard
- Asus Tuf Gaming X570-PLUS (WiFi)
- CPU
- Ryzen 9 3900X
- Graphics
- AMD RX 6900XT
- Classic Mac
- Mobile Phone
I have been a VERY LONG-TIME lurker around here, but I finally managed to get my hands on a G5 to mod. The very first time I ever saw the beauty that is the cheese grater, I was in love. No chassis has stood the test of time in the looks department to me as this has. Found, discarded by a pile a pallets, with only a few months worth of dust inside I lovingly RIPPED out its guts, briefly considered rehoming the CPU cooler back in this but thought better, and got to work.

View attachment IMG_20201118_191938.jpg
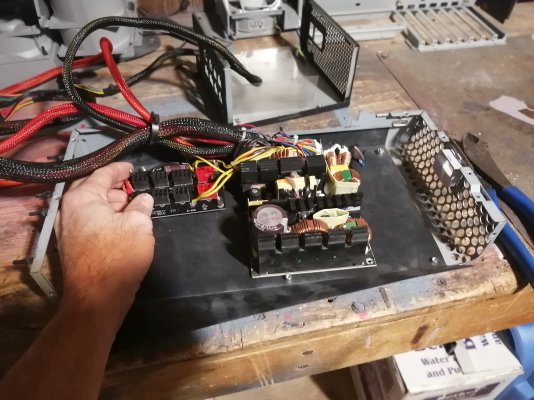
The first thing to solve was PSU. I took the guts from my wife's old EVGA Supernova NEX750 and nested it inside the original PSU chassis, unfortunately I took the original PSU Fans to the recycler with a bunch of other stuff.. so I'm on the look out for some new ones. I cut off the back side of the original mac plug (since I didn't have the cord) and JB'd in the socket from the Supernova. Viola, from a 494W to a modular 750W.


Now came the time to make a big hole where the back used to be, and cut a piece of aluminum to cover it back up. The tool of choice for this was a Jigsaw, and then lots of filling...


 View attachment 503194
It was a few days over Xmas between that point and the next stage, But I'm making some pretty good progress in the last couple days. I'm missing a few pics, but the MoBo Tray and back plane I'm using is from a random case from the E-Recycler. I drilled out the rivets.. added some of my own, and got everything all fitted up. I've gotten the mid-plate and the attic plate cut to fit, and then installed the MoBo to get a fitment and had to do some extra bends to make the mid plate work with the cooler I'm using. then I had to make a small support/filler piece because of new height of that plate at the back.
View attachment IMG_20201229_093201.jpg
View attachment IMG_20201229_093207.jpg
View attachment IMG_20201229_135212.jpg
View attachment IMG_20201229_175241.jpg
Next steps are HDD/SSD locations, cable management, pwr button and front IO.
View attachment IMG_20201118_191938.jpg
The first thing to solve was PSU. I took the guts from my wife's old EVGA Supernova NEX750 and nested it inside the original PSU chassis, unfortunately I took the original PSU Fans to the recycler with a bunch of other stuff.. so I'm on the look out for some new ones. I cut off the back side of the original mac plug (since I didn't have the cord) and JB'd in the socket from the Supernova. Viola, from a 494W to a modular 750W.
Now came the time to make a big hole where the back used to be, and cut a piece of aluminum to cover it back up. The tool of choice for this was a Jigsaw, and then lots of filling...
View attachment 503194It was a few days over Xmas between that point and the next stage, But I'm making some pretty good progress in the last couple days. I'm missing a few pics, but the MoBo Tray and back plane I'm using is from a random case from the E-Recycler. I drilled out the rivets.. added some of my own, and got everything all fitted up. I've gotten the mid-plate and the attic plate cut to fit, and then installed the MoBo to get a fitment and had to do some extra bends to make the mid plate work with the cooler I'm using. then I had to make a small support/filler piece because of new height of that plate at the back.
View attachment IMG_20201229_093201.jpg
View attachment IMG_20201229_093207.jpg
View attachment IMG_20201229_135212.jpg
View attachment IMG_20201229_175241.jpg
Next steps are HDD/SSD locations, cable management, pwr button and front IO.
Attachments
-
IMG_20201118_231417.jpg3.9 MB · Views: 156
-
 IMG_20201219_155734.jpg4.4 MB · Views: 154
 -
IMG_20201219_173141.jpg4.8 MB · Views: 144
-
IMG_20201220_213852.jpg3.8 MB · Views: 124
-
IMG_20201222_154238.jpg4.5 MB · Views: 132
-
IMG_20201222_175137.jpg4.4 MB · Views: 136
-
IMG_20201228_125746.jpg4.9 MB · Views: 129
-
IMG_20201229_093201.jpg4.1 MB · Views: 148
-
IMG_20201229_093207.jpg3.5 MB · Views: 137
-
IMG_20201229_135212.jpg3.8 MB · Views: 142
-
IMG_20201229_175241.jpg4.4 MB · Views: 170