- Joined
- Aug 18, 2011
- Messages
- 395
- Motherboard
- GA-Z97N-Wifi
- CPU
- i5-4590S
- Graphics
- HD4600
- Mac
- Mobile Phone
Thierry's First Build:
"Mac Midi" GA-B75M-D3H / i3-3225 / 8GB / HD 4000 dual displays / SSD / Temjin TJ08-E

Components
| Apple OS X Mountain Lion | Mac Apps Store | |
| GIGABYTE GA-B75M-D3H, mATX, USB3 (rev 1.0 and Bios F11) | Amazon | Cheapest, easiest MB |
| Intel Core i3-3225 3.3 GHz, HD4000 | Amazon | Cheaper proc with HD4000 |
| Corsair XMS3 8GB (2x4GB) DDR3 1600 MHz | Amazon | |
| SanDisk Extreme SSD 120 GB | Amazon | Cheaper than Crucial M4 or Samsung 840 at that time |
| be quiet! BQT E9 Straight Power (400W) | Amazon | Chosen for the silence |
| Silverstone Temjin TJ08-E mATX MidTower | Amazon | Chosen for the silence (recommended by SilentPCreview) |
| Cheaper than a Mac Mini (if I had to upgrade SSD, RAM.) | ||
| Dell UltraSharp 2007FP 20” display | Already owned | |
| Samsung SyncMaster 930er 19” display | " | |
| Samsung HDD 1TB 7200rpm | " | |
| Apple full keyboard / Logitech mouse M500 / Logitech webcam C270 | " |
What's working and not working
Working: All !? Almost all.
HD4000 on dual screens (DVI + HDMI adapter), Ethernet, USB2.0, USB3.0 , Sound, TRIM on SSD, iCloud, MacAppstore, manual sleep (and wake up)
Limitations:
[*=left]cannot mute from the keyboard button, but it is known on this board. Still possible to lower the sound level to its minimum (which is as low as mute, anyway)
[*=left]cannot plug a USB 2.0 drive (flashdrive, HDD) to the USB 3.0 ports. This is a current limitation on our hackintoshes. I discovered this limitation when I first tested my hack, and after 6 months of intensive reading on the forum. A good advice: read also the others part of the forum, during your search phase, not only the “Buying Advice”. (great information in this thread "USB3 not working")
[*=left]to run the 180mm front fan at 600/1200rpm with the dedicated switch, you must plug it to the PSU with adapter. Not to the mother board, which delivers less. But I kept mine at 500rpm for silence.
Not working:
iMessage, but there is a fix. I don't use iMessage on my mac so I did not try the fix with Chameleon.
Future ideas
[*=1|left][DONE]Buying some speakers (After having all included in my previous iMac, I completely forgot that I needed to order some speakers to get sound ).
).
[*=1|left][DONE] - Testing the USB 3.0 ports with a USB 3.0 drive
[*=1|left][Confirmed] Testing the dual monitor on the HD4000, with my new cable HDMI/DVI
[*=1|left][DONE] Improving the soundproofing, because I could still hear the HDD running/vibrating. I suspended the HDD in the 5.25" location and removed the HDD cage. (details in this message)
[*=1|left][Changed] Moving the SSD to the back plate, to have better cable management It was not an easy task to "fold" the cables. I just left the SSD at the bottom. (details here)
[*=1|left]Installing a new, more silent HDD, for storage and TimeMachine
[*=1|left][DONE] Fusion Drive after 5 months of good working hackintosh, it was time. I succeeded after the second try. (details here)
[*=1|left]Changing the CPU cooler for a more silent one. (currently using the stock CPU cooler) but I'm not sure if this would make a real difference.
Comments:
Background
This is the second time in my life that I build a computer. First one was a barebone Shuttle, back in 2003. I wanted a small computer, different from others. It was running a Pentium 4 with a heatsink directly cooled by the rear fan. Great little thing (and so loud when getting hot!)

In 2007 I switched to Mac and could never go back to Windows. I was using an iMac 20” and later a MacbookPro 15”. When I needed to get a new Mac, at the end of 2011, it would not be another iMac. Possibly a Mac Mini, for the small size, the silence and the sufficient power, according to my needs (all was still enough on my iMac C2Duo 2.4GHz).
Then I remembered about the Hackintosh community, the builders, etc., which were a great alternative. Would I be able to build one by myself? (Without too much headache?). Definetely, YES!
I started to read all what I could in this very active forum. December 2011, the MBPro was sold. May 2012, the iMac also. I ended with no Mac at all, in our home. It was a strange feeling. Back to the old heavy Dell Precision 4300.
I survived during the last 6 months and after many changes in my building list, I am proudly writing from my new “Mac Midi”. Nothing would have been possible without the TonyMac’s team and community. Without all of you, I would be running an slow Mac Mini. Thanks so much!!
Choosing components (a long but very instructive journey!)
Goals:
- No hassle to build and to run
- Quiet
- And quiet.
6-9 June 2012: I was going for a small silent Customac Mini 2011 = mini ITX board GA-H61N-USB3 with i3-2125 and small case (Element Q or JCP or maybe SG06)
http://www.tonymacx86.com/buying-ad...ustomac-mini-silent-dual-monitor-austria.html Thanks Gordo, Mate94 and others for your help at that time.
Then I realized the new Ivy Bridge processors were coming, soon to be announced at the WWDC. I was thinking of less burden and just get the new Mac Mini. Too bad, there was no launch in June. (or "to good" in the end, since it pushed me to build a hack)
But then, why not using the new processor, for more power in the same range of price?
So I delayed my purchase and was again looking at the suitable components.
Some were using the newest boards but with older Sandy Bridge processor. It was a possibility for me. "Luckily", I was short on budget in July and was waiting to order my parts.
On 21st July, the new TonyMac website was launched and soon the new CustoMac list was online. I started to think about mATX format, to have a cheaper build and more possibilities in future. (Adding HD, GPU, more RAM, etc) Still with the i3-2125 at that time.
http://www.tonymacx86.com/buying-advice/60375-hackmini-budget-mini-itx-micro-atx-gain-loss.html Thanks Mieze, Koalaman and others for your suggestions.
I was going for GA-B75M-D3H, i3-2125 with GT430 for dual monitor, in a silent Temjin TJ08B-E.
I needed a PSU. Thanks Mate94, the Be Quiet! Straight Power E9-400W is really good quality!
http://www.tonymacx86.com/buying-advice/65758-last-bit-my-build-silent-budget-psu.html
Another short break in my journey, when the Mrs decided that we should save some money.
(She was right, as always.)
21st August, the new i3-3225 was announced. There was no reason to go with the core i3 HD3000. Another waiting.
25th September, it was the final line. Was the GA-B75M enough good for me. Why so few builds were in the forum? Why we could see more Z77 (Gigabyte and Asus)?
I got my answers: because B75M had less problems to install, so people were posting less in the forum.
So, it would finally be a B75M in my rig.
4 months later, I can confirm I made all the right choices for my needs. I am very happy with the mATX size, where I can fit more HDDs. It's not the size of a Mac Mini, but it still ok.
Building
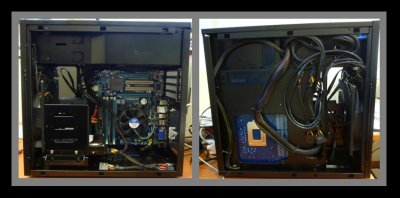
Final choice was made and the order was sent to Amazon. Now that I received all the parts, I have to fit all these:

Into that black box:

Very nice PSU. Awful lot of cables, when I am only using one SSD and one HDD. But who knows later.

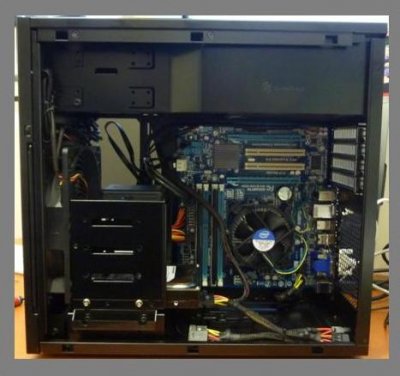
The SSD went at the bottom of the case. And the HDD in the frame. (I did not take out the frame, maybe later I'll have to add another HDD.) You can see the big front fan (180mm)

After a short time, I was able to put all inside and connect all cables.
It was easy to put the motherboard on the removable plate, then put all back in.
I had to try different position for the drives, to minimize the cable length and optimize the airflow. I only run one front fan.
Little reminder for the "beginners" like me: don't forget to place the rear I/O motherboard plate, before screwing the motherboard inside.
You'll save some time. (Yes, the I/O plate is put from inside to outside. Silly me.)All is fitting well inside the Temjin. There are many pass-through holes and cable tie bridges, which helped for the cable management.
The only thing I don't like so far, is the power cable, lying down in the bottom. I could not find any other way to put on the sides or the rear. I think it won't be a problem for the airflow (and for the components I have in this rig)
February 2013, I found this great topic about the Temjin TJ08-E, with a lots of good ideas for the cable management.
I plan to move the SSD on the back panel and the HDD to the 5.25" casing. (Done in March, as you can see below)

Installing OSX
UniBeast on the USB flashdrive
Pretty simple, just follow the guide from TonyMac. (I like to have it printed, easier to follow)
Don’t forget to also copy the MultiBeast on the drive (in case of bad luck and if you don’t get Ethernet working after installation)
As said in the guide, it takes some time to install and you don’t see much progress on the bar. (about 20min)
Bios setup
Update to the latest version (for me it was F4 => F11)
Very simple if you follow the instructions from Gigabyte:
Download the latest BIOS version, unzip and run the .exe from a PC. (or just unzip from a Mac).
Plug this USB flash drive to a USB 2.0 port (It did not work on my USB 3.0, as I had a USB 2 flashdrive)
Run Q-Flash from the BIOS setting (hit F8)
Now it’s time to configure your BIOS.
You can follow the Quick Guide from LostSwede and also the very good thread from Moarfish.
- Load the optimized settings (F7)
- If using XMP RAM like me, choose the Profile1, to have it running at 1600MHz (in the MIT/Advance Memory Setting)
- If using the Integrated Graphics like me (the HD4000), choose IGFX for the Initial Display First
- and leave the default 64MB for Internal Graphics Memory Size
- In Peripherals, xHCI mode is set to Auto.
- SATA Mode is AHCI
- xHCI and EHCI Hand-off are Enabled
- Serial port and Parallel port are Disabled
- High Precision Event Timer is Enabled
- No change were necessary on the rest
Make sure the Boot Option #1 is the USB (then later, you will change back to P0= “your SSD”)
Installing OS X Mountain Lion, by using UniBeast ML 1.5.3
Back to the UniBeast guide that you printed, just continue at the step 3. No surprise again here, if you can follow the instructions, you end up with a working OS X ML, after less than 20min (installing on a SSD drive)
Only a small surprise in my case, when I rebooted for first time, it could only see the USB drive. Impossible to choose the SSD. I thought my SSD was dead.
Luckily, after a quick check inside the casing, it was just a loose cable. (turn off the computer before checking inside, of course !)
Configuring with MultiBeast ML 5.1.3
After the first reboot into Mountain Lion, you get the Apple set up, then you arrive on your fresh new desktop.
You can copy the MultiBeast to your desktop and run it.
I used the typical configuration for our B75M from Moarfish build.
Edit: with the latest MultiBeast, there is not anymore this Realtek Gigabit Ethernet. I think it's managed by default. I did not reapply MB after the first install, so I can't really tell at this point.


Few hiccups:
1. At initial installation, I was not able to boot directly on the SSD. Impossible to choose the P0:Sandisk for the Boot Option #1.
After looking all around in the BIOS, I found that I could define the order in the Hard Drive BBS Priorities.
2. After the first few hours of playing with my new rig, and starting to install from my previous Time Machine backup, I got a crash. Rebooting the machine was just stuck at the Apple logo with turning wheel. Doing a boot with flag – v was giving more information: AppleRTL8169Ethernet : phyWaitForAutoNegotiation TIMEOUT
I got some help in the forum, read about this issue, but could not solve it. I tried all the possible flags and was always arriving to same time out.
As the rig was still fresh and not much installed, nor configured, I decided to re-install (instead of going into Single Mode user, with some command line, etc. I am not expert)
3. 15min later, OS X ML was installed again. I made the mistake of rebooting before applying all the config in MultiBeast. Big big mistake! The computer was again crashing.
Nevermind, it would be another 15min to run UniBeast and ML.
Here I got bad luck again. The computer would not boot on the USB drive. It was recognized in the BIOS, but I was just getting a “Boot1 = error”.
Reading all around the forum, the only reason for this boot error was a “non compatible” USB flash drive. How possible?? I already used mine 4 times to install ML.
I had to wait the next day, to get UniBeast on a new USB drive. (remember, I don’t have anymore Mac at home, so I had to get it from my friend’s macbookpro)
Back home with the new USB drive and all went like a charm. Just rebooted, all Mountain Lion was still installed. I ran the MultiBeast, with all correct selections this time, and all went well this time.
EDIT:
9th Nov.: adding ideas for the noise HDD and the CPU cooler
11th Nov.: trying with USB powered speakers.
It's not good. There is an electronic noise loop from the computer, when scrolling, viewing pictures in iPhoto, etc.
I returned it to the shop and bought "normal" speakers, with the usual small power supply.
15th Nov.: Confirmation from my tests and from others builds with GA-B75M, it's not possible to use a USB 2.0 drive on a USB 3.0 port.
But it's possible on a USB3 hub, that is plugged on the USB3 ports.
For now, I have the front USB on the motherboard USB2.
2nd Feb 2013: adding the Geekbench score (8224).
I got the HDMI adapter and I am currently on dual display, with the HD4000. Working great.
My problem with front fan is still not solved, even with the replacement. I still have to check, but enough cooling until now.
And, by doing the tests, I "removed" the vibration problem. So, I don't hear anymore the HDD. Cool.
I'm not yet in need to do a FusionDrive, for my daily usage. We'll see a bit later. (Especially when I am afraid to redo a complete install.) It's working great for the last 3 months, i'll leave it like that.
26th Feb. 2013:
Cleaning a bit the topic, to try to make it easier to read.
The front fan problem is solved, it just need to be connected to the PSU with adapter, to get 12V.
I have again the problem of vibration from the HDD or the fan. I will try to supsend the HDD, to supress the possible vibrations.
25th March 2013:
I added the info about my suspended HDDs. It solves all the vibration issues and I got better airflow by removing the HDD cage. (details here)
I created a Fusion Drive and it is very good. I succeeded on the second try. (Had some issue with the HD4000 at first try) Details here.