- Joined
- Sep 24, 2012
- Messages
- 634
- Motherboard
- GA-Z77N-WiFi
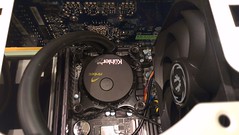
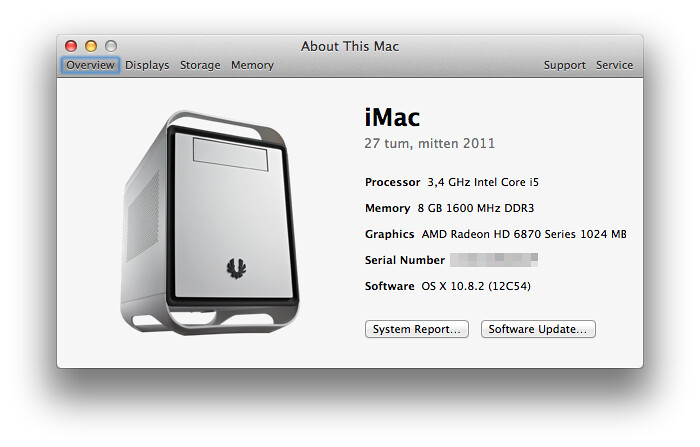
- CPU
- i5-3570k
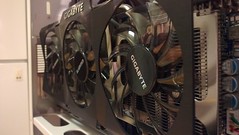
- Graphics
- 6870 SuperOC
- Mac
- Classic Mac
- Mobile Phone
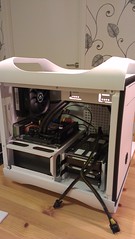
BitterMelon's Compact Gaming Hybrid - Core i5-3570K - GA-Z77N-WIFI - HD 6870

"Chip"
Components
Mac OS X version 10.8.2 Lion
Mac App Store - OS X Mountain Lion
GIGABYTE GA-Z77N-WIFI LGA 1155 Intel Z77 mini-ITX Motherboard
http://www.newegg.com/Product/Product.aspx?Item=N82E16813128568
GIGABYTE GV-R687SO-1GD Radeon HD 6870 1GB Super Overclock (link is GV-R687OC-1GD)
http://www.newegg.com/Product/Product.aspx?Item=N82E16814125357
Intel Core i5-3570K Ivy Bridge 3.4GHz (3.8GHz Turbo) LGA 1155 77W Quad-Core Desktop Processor Intel HD Graphics 4000 BX80637I53570K
http://www.newegg.com/Product/Product.aspx?Item=N82E16819116504
Antec Kuhler H2O 620 Liquid Cooling System
http://www.newegg.com/Product/Product.aspx?Item=N82E16835209049
CORSAIR Vengeance 8GB (2 x 4GB) 240-Pin DDR3 SDRAM DDR3 1600 (PC3 12800) Low Profile Desktop Memory Model CML8GX3M2A1600C9
http://www.newegg.com/Product/Product.aspx?Item=N82E16820233186
BitFenix Prodigy Arctic White / White Steel / Plastic Mini-ITX Tower Computer Case
http://www.newegg.com/Product/Product.aspx?Item=N82E16811345017
BitFenix Spectre Pro All Black 230mm Case Fan
http://www.newegg.com/Product/Product.aspx?Item=N82E16835345032
Zalman Fan Mate 2 Fan RPM controller
http://www.amazon.com/Zalman-Fan-Mate-RPM-controller/dp/B0007W8D3M/
Chieftec Nitro Series BPS-650C 650W 80 PLUS BRONZE Certified Active PFC Power Supply
http://www.ebay.com/sch/i.html?_nkw=Chieftec+BPS-650C
(Overkill, I know, but I got it 50% off!)
DELL DW1515 Dual band 2.4Ghz 5Ghz Half-height Mini-PCIe Wireless Card
http://www.ebay.com/sch/i.html?_nkw=DW1515
Belkin F8T016 Mini Bluetooth Laptop Adapter
http://www.newegg.com/Product/Product.aspx?Item=9SIA07R08U5947
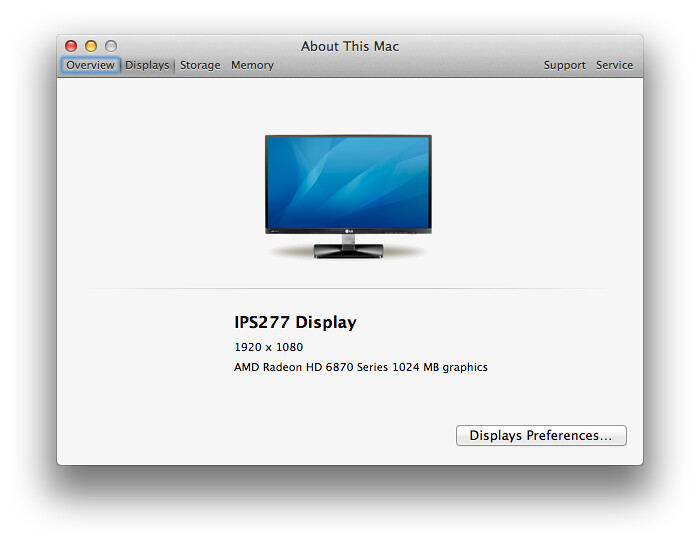
LG IPS277L 27" IPS widescreen monitor (LED, VGA, HDMI, 5ms)
[amazon-de]http://www.amazon.de/LG-IPS277L-TFT-Monitor-Reaktionszeit-mattschwarz/dp/B008968O0U/ref=sr_1_1[/amazon-de]
2 x Samsung 840 Series 2.5" 250GB SATA III SSD
http://www.newegg.com/Product/Product.aspx?Item=N82E16820147189
Already Owned
2 x Seagate Barracuda 7200.10 320 GB SATA
http://www.ebay.com/sch/i.html?_nkw=7200.10+320
(Replaced by Samsung SSDs)
Bluetooth USB Adapter BT-1300Tp
http://www.trust.com/products/product.aspx?artnr=14377
(Replaced by Belkin F8T016.)
Background:
Today my main machine is a "late 2009" iMac, the low end 21.5" model. It's ok for most desktop work, but when I occasionally want to play a game, it's mostly a pain. Lowest settings, lowest usable resolution and still lagging like crazy. Plus, I can't install an SSD in it (at least not without disassembling the whole computer into molecules). I wanted something that could do both.
This is my first from-scratch build as a Hackintosh. My last build was my old P4 back in the Tiger days. It worked pretty well, but you had to treat it right.
") This time I have spent a lot of time here to select the right parts for the build.
This time I have spent a lot of time here to select the right parts for the build. Component choices:
When I first saw the Bitfenix Prodigy, I immediately knew I had to build a Hackintosh in it. That ment ITX, and since I wanted to build an Ivy Bridge machine with a Gigabyte motherboard, all I needed to do to wait for Gigabyte to release their Ivy Bridge ITX motherboards. I had to wait several months.
This started out slightly lower performing (and cheaper!) than it ended up. At first I was looking at the i5-3450, a Radeon 6850 and a 430W PSU. But seeing as the 6850 might have some problems during the install (according to the forum), I decided it was best to get a HD4000-equipped CPU, just in case. I then switched (wrongly) to the i5-3550, only to realize at the last moment that it was only HD2500, forcing me to get the more expensive i5-3570k. I was initially going with the H77N motherboard as well, but since I had to get the i5-3570k I thought I might as well get the Z77N instead. I'm not aiming to over-clock, but I didn't want to paint myself into a corner if I ever changed my mind. Then I found the PSU deal (50% off), giving me a Chieftec 650W modular PSU for the same price as the 430W I first considered. I couldn't resist it. I now had a PSU that could offer two 6-pin PCIe connectors instead of one. That meant that I could get a Radeon 6870 instead of a 6850, with just a small premium.
As for choosing Radeon over nVidia, I compared benchmarks of several models and concluded that a Radeon 6850 or 6870 gave me the most bang-for-buck in my price segment. The nVidias were either less performing, or more expensive.
Noise-wise, I wanted the computer to be as quiet as possible. The possibility of putting a huge 230 mm fan in front of the Prodigy appealed to me (bigger fan => more air for less noise), so I decided to go for that. The fan turned out to be quite noisy though, especially with the slightly choked airflow from the white Prodigy's front. Adding a Zalman Fanmate and turning it down as low as possible resulted in a quiet fan that still pushes a lot of air.
Picking a CPU cooler (better than the stock one) is a bit tricky though, as the Z77N only allows for 50 mm between the center of the CPU and the PCI-e slot. That means that a CPU-centered heatsink needs to me no more than 100 mm wide. This rules out all 120 mm fan coolers I've seen so far. In the end, I decided to go for the Antec 620 sealed water cooing system, as that was the only way to fit a bigger fan. Plus it was pretty much the same price as many air coolers. The fan included in the 620 is said to be noisy, so I just replaced it with one of the case fans included in the Prodigy.
I decided to get the Gigabyte Radeon 6870 because of the cooling solution, which should be much more quiet than the reference design. When it comes to case fans I decided to got for just the 230 mm fan in the front. The positive pressure from that fan should be enough. I may have to construct some ducting for to optimize the airflow if temps start wandering upwards under load.
The cheapest part of the build was the WiFi-card. The standard WiFi-card on the Z77N does include Bluetooth, but is sadly not supported by OS X at all. So I found a nice Atheros 9280-based card (Dell DW1515) on eBay instead. $10, including shipping from China is a pretty good price for dual band 300 Mbps N-WiFi. The 9380-based (450 Mbps) cards were much more expensive, plus they seem to require three antennas. The Z77N only comes with two.
The Belkin F8T106 Bluetooth adapter seems to work really well. It works out of the box in OS X and Windows 7, it works in BIOS/uEFI and in the Chameleon boot loader (thanks to HID Proxy), and I haven't seen any strange dropouts or hangs that I had with the old adapter.
The computer is used for both OS X and Windows, using Windows only for games. I will play in OS X if possible, but the number of supported games is a bit small. So, it's dual-booted.
I chose the Seagate disks simply because I had them lying around. I really want an SSD, but I'm hoping for the prices to drop a little more soon. OS X will have the SSD on its own, Windows will still sit on a normal HDD.
Well, prices didn't drop, and I got impatient (those HDDs are slooow). So I bought two 250GB Samsung 840s. Migration was pretty straight forward.
* I migrated the Windows drive using Samsungs software. Very easy.
* The OS X drive was copied using CCC (Carbon Copy Cloner). After that, I had to reboot from the USB stick and re-run Multibeast to reinstall Chameleon. No other drivers needed reinstalling.
The computer is now blazing fast, both in OS X and Windows. It's almost too fast, now it launches the applications before it has time to reconnect to the WiFi, giving me network errors. First World Problems, ey?
Also, there is no ODD in the build. I decided I don't need it, I get the games off Steam anyway, and anything else can be put on a USB stick these days.
Installation process:
1. Build the machine. Leave the Radeon 6870 out.
2. Connect the OS X drive and plug in the Unibeast USB stick (in one of the USB 2.0 ports!).
3. Set up BIOS. I really didn't have to change anything here.
4. Install OS X.
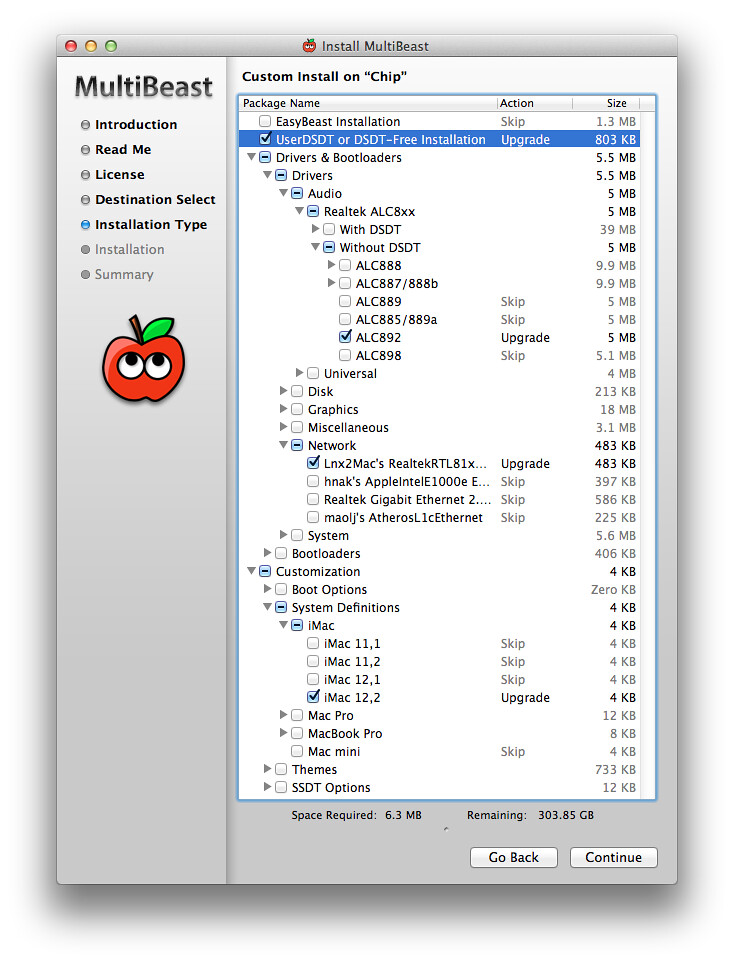
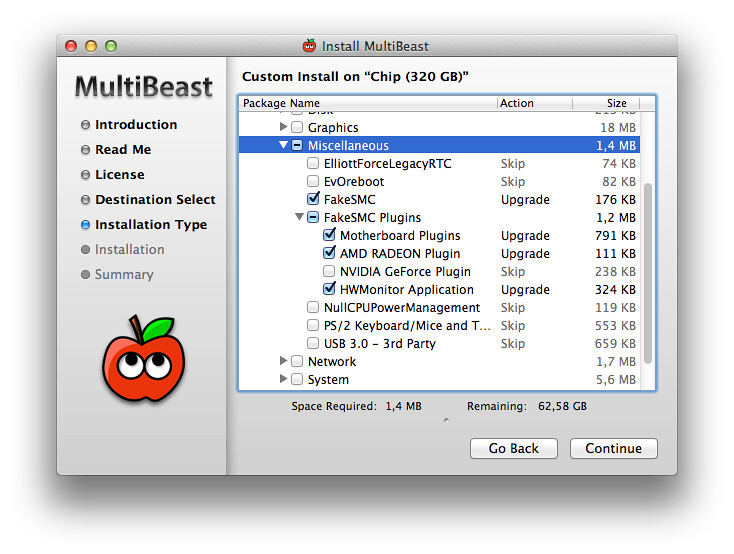
5. Launch Multibeast (which I put on the same memory stick). Select the following options:
Multibeast installation
7. Install the Radeon 6870.
8. Everything should work.
If you want Windows:
9. Unplug the OS X drive and only leave the Windows drive connected.
10. Install Windows.
11. Reconnect the OS X drive and make sure that that is the boot drive. Windows should show up in the boot loader.
12. In order for Windows not to reset the system clock wrong you need to follow this guide.
Features checklist:

|
Works! | 
|
Doesn't work | 
|
Sort of works |
|
|
Analog audio (front and back) |
|
|
Airplay Video |
|
|
Airplay Audio |
|
|
Bluetooth (onboard) |
|
|
Bluetooth (dongle) (works in BIOS and Chameleon!) |
|
|
Custom "About this Mac" (Guide) |
|
|
Hardware monitoring |
|
|
Sleep |
|
|
Autosleep (screen and disks sleep, not the whole computer) |
|
|
Speedstep |
|
|
USB 3.0 for USB 2.0 storage devices |
|
|
USB 3.0 for USB 2.0 non-storage devices (keyboards, mice, etc.) |
|
|
USB 3.0 @ USB 3.0 speeds |
|
|
WiFi (with replaced card) |
Comments:
Graphics
I have a strange problem when using the HD4000 chip for my display (HDMI). When I boot into OS X, the graphics are completely broken, looks like when you set a too high scanning frequency back in the old days. Restarting the screen (!!) resets it to normal. I'm not sure if it's the board, OS X och just the screen that breaks it. It's not a problem since I'm using the Radeon 8670 instead.
Update: Buckeyes1995 provides a solution further down.
USB 3.0
USB 2.0 storage devices (USB memories, USB harddisks) do not work in the USB 3.0 ports. Other devices, such as keyboards and mice (including wireless dongles for wireless keyboards and mice) seem to work well. USB 3.0 storage devices work as they should in the USB 3.0 ports.
Update: kocias confirms that USB 3.0 speeds work later in the thread.
Autosleep
OOB only the display and HDDs go to sleep via autosleep. If you want to get around this, you should use PleaseSleep.
Hardware monitoring
Just installing FakeSMC plus motherboard and Radeon plugins causes kernel panic. You have to install them, and then remove the OemSMBIOS.kext plugin before rebooting.
1. Install Multibeast with these items selected:
FakeSMC installation
3. Open upp the Terminal app (found in Utilities) and type the following: (You will be asked for your password.)
Code:
sudo rm -r /System/Library/Extensions/FakeSMC.kext/Contents/PlugIns/OemSMBIOS.kextTodo:
- Check more features
Edits:
2012-10-05: Airplay Audio works OOB. Video does not.
2012-10-05: Fixed dual boot.
2012-10-06: Clarified USB 3.0 situation.
2012-10-07: Added contributed confirmations of USB 3.0 and fix for HD4000-problem.
2012-10-08: Added hardware monitoring.
2012-10-09: Tested USB 3.0 memory; Works!
2012-10-13: Small update and clarifications
2012-10-15: Received WiFi card. Installed it and added USB Bluetooth dongle.
2012-11-10: Received and installed 230 mm fan and fan controller.
2012-12-23: Replaced Bluetooth dongle.
2013-01-05: Replaced HDDs with SSDs.
Build pictures: