
- Joined
- Sep 21, 2010
- Messages
- 13,414
- Motherboard
- HP 17" 17-by3053cl
- CPU
- i5-1035G1
- Graphics
- Intel UHD Graphics, 1920x1080
- Mac
- Classic Mac
- Mobile Phone
Zorro - Stork's 3rd Build:
GA-Z68X-UD3H - i7-2600K - HD3000

ComponentsGA-Z68X-UD3H - i7-2600K - HD3000
Gigabyte GA-Z68X-UD3H ATX Motherboard with DVI & HDMI, USB 3.0 & FW 400
Amazon
Intel Core i7-2600K Unlocked Processor Supporting HD 3000 Intel Integrated Graphics
Amazon || Newegg
Scythe Mugen 2 Rev B CPU Cooler Superseded by a newer model, the Mugen 3 (SCMG-3000)
Amazon || Newegg
Corsair Vengeance Low Profile While 16GB (2x2x4GB) CML8GX3M2A1600C9W Memory
Amazon || Newegg
OCZ Vertex 3 120GB SSD SATA III
Amazon || Newegg
Samsung Spinpoint F3 1TB 7200 RPM SATA II HD103SJ HDD
Amazon || Newegg
LG CD/DVD Burner Model GH22NS70
Amazon || Newgg
Targus ACB10US1 USB Bluetooth Dongle Adapter
Amzaon
Logitech Wireless Solar Keyboard K750 for Mac - Silver (920-003472)
Amazon || Logitech Store
Already Owned
Corsair 750HX 80 PLUS SILVER Certified Modular PSU
Amazon || Newegg
Corsair Graphite Series 600T Case
Anandtech Review || Amazon || Newegg
Apple Mac OS X version 10.6 Snow Leopard Family Pack
Apple
Apple OS X Mavericks 10.9 @ Mac Apps Store
Apple MAS
Apple iLife 11 (iPhoto, iMovie and GarageBand) and iWork 09 (Pages, Numbers and Keynote) Family Packs.
Microsoft Windows 7 Home Premium Family Pack.
Apple 23" Cinema Display with DVI and USB/Firewire interfaces. My bad eyes require a crisp, IPS LCD monitor. Got this gem via eBay, "gently used".
Comments:
Update: I haven't update Zorro in a while. However, Son-of-Zorro has been updated to Sierra. See Post #995 for more information.
Background
Updated for Mavericks installation. This is my third Hackintosh build, and my first Sandy Bridge system. I've turned my 1st Hackintosh into a HacHTPC, moving the guts out of the Cooler Master Elite 341 case and into a Silverstone HTPC case. http://www.tonymacx86.com/golden-bu...ol-p55m-ud2-but-cool-htpc.html?highlight=HTPC My 2nd Hackintosh became my main Hackintosh computer until this system became stable which didn't take but a few months.
Choosing the build components
I was going to wait to get a new Ivy Bridge system, but when Intel push the introduction back to March 2011 from January 2011, I started looking for Z68 based system. A fellow moderator, who knows more about the mobo state of the art than I thought was humanly possible, said he was going to get a Gigabyte GA-Z68X-UD3H to play around with HD3000 Intel Integrated Graphics and some serious overclocking (OC'ing). I kept this in mind as I was watching the tonymacx86 gang work on getting HD 3000 working in the Lab. Then, I found a GA-Z68X-UD3H on eBay, "gently used", bid on it and won, getting it for $120 USD shipped! (Some days you're a bug, and some days you're the windshield. Getting the mobo for $120 USD shipped was a windshield day!
As a side note, I found that it's easier to refer to your system by a nickname, especially when you have several systems, rather than listing the three major components all the time. Since the case and motherboard and power supply are black, I nicknamed this system Zorro. (I've also have a similar system whom I've nicknamed Son of Zorro.
I am not a gamer, so my video graphics requirements only needed to support HDTV video and music recording programs requirements. I also don't need to drive more than two monitors. So, HD3000 looked like it would work for me...and it does rather well. I'm still using it for GarageBand and general purpose computing. I saved myself about $100-$150 USD by not having to buy a graphics card. (See the Tom's Hardware Graphics Hierarchy Chart for more information on the tier rankings of graphics cards and Intel's Integrated Graphics.)
A sale on i7-2600K processors popped up, making it affordable vs an i5-2500K processor. The i7-2600K will also give more horsepower to HD3000. (Note of Caution: not all i3/i5/i7 Sandy Bridge processors support HD3000. Be sure to check the description of your processor choice to ensure it supports HD3000, not HD2000.)
Another sale allowed me to snarf up a 120GB SSD cheaper than I had anticipated.
Again, another moderator called my attention to the new (at this time) Corsair Vengeance Low Profile White 2x4GB, 1.35v (!), CLS 9, memory modules which had glowing reviews and great headroom for OC'ing. Additionally, the modules are fin-less which means I can use the Scythe Mugan 2/3 CPU cooler which all my fellow moderators swear by. Later, I bought another 4GB pair when they went on sale.
My choice of a case deserves an explanation. After assembling my 1st system into the Cooler Master Elite 341 case, I swore that I would get a larger case that has 1) excellent cable management, 2) excellent cooling and silent operation (bigger cases have more and/or larger fans which could create a wind tunnel) and 3) room for future upgrades. So, in early 2011, I read reviews at Tom's Hardware, Anandtech, Overclockers and other sites that frequently reviewed the better products. Once I narrowed it down to a few cases, I ask several of my fellow Moderators as to why they made their choices. From this information, I purchased the Corsair 600T case. The 600T is a large case - it surprised me when I took it out of the box.
 It's 23.30" deep x 10.40" wide x 20.00" tall! I have an end table next to my Lazy Boy that's 20" deep x 14" wide x 22.5" tall. I'd use the 600T as an end table, putting a lamp on it if it didn't have an exhaust fan and controls on the top of the case. But, boy oh boy! Is this a beautifully made case, or what?! Read the reviews.
When I researched how to size a power supply for a future system, I learned that the size of the PSU is primarily due to the graphics cards, especially if you have more than one graphics cards. Again, Tom's Hardware has a guide on PSU sizing. While I doubt that I'll have two or more graphics cards, I decided to have some reserve power available in case my child within me takes over, and I become a game geek. So, I picked Corsair 750HX Modular PSU. It has turned out to be way overkill for my needs. I would now recommend nothing larger than a 650 watt PSU.
Build Installation
Since the GA-Z68X-UD3H is an ATX board and the 600T is huge, all the components fit with ease - lots of room inside the Corsair 600T.

I've had Zorro running Mavericks for a year, so I installed Mavericks over Mountain Lion on a test partition. (I won't upgrade my 10.9.5 system until...well, I don't like it's GUI.) See this Post for how I did this Mavericks installation.
If I was installing OS X from scratch, there are two methods to get to a system running Mavericks. First methods is to install Snow Leopard using the tonymacx86 Simplest Mac OS X Installation Guide and, then, install Mavericks using the Mavericks UniBeast Guide. I used these methods several times, and I've never had a problem. I printed out the instructions and checked off each step with a pen or pencil so I don't inadvertently skip a step.
The second method is easier if you have access to a Mac - a friend's or a Mac at a local school, library or college/university - you can use that Mac to create an account on the Apple Mac App Store (MAS), download Mavericks from the MAS, download UniBeast for Mavericks and create the UniBeast USB thumb drive. Be advised that you may have to get the Mac's administrator to help because most of those institutional Macs are locked from users installing or running non approved apps on the Macs available to the public.
Lastly, download MultiBeast for Mavericks and the DSDT for the Z68X-UD3H motherboard from the tonymacx86 DSDT Database for the F12 BIOS. Rename the DSDT to DSDT.aml, and put both MultiBeast and the DSDT on the UniBeast USB thumb drive.
With the UniBeast Mavericks USB thumb drive built and inserted into a USB port, it's time to make some minor changes to the BIOS and install Mavericks. I booted into the BIOS to update to the latest BIOS version, F12, and setup the BIOS per the tonymacx86 iBoot+MultiBeast Installation Guide. (Just use this older installation guide for the BIOS setup. Use the Simplest Mac OS X Installation Guide for the Snow Leopard Installation.) A word of caution, don't use the UEFI Beta BIOS for this motherboard as it results in more problems than it's worth; we've tested the UEFI Beta BIOS and all of us who have this motherboard have returned to the F12 Award BIOS.
In the Advanced BIOS Features, change the Hard Disk Boot Priority and First Boot Device to the UniBeast USB thumb drive. We'll change these two setting back to the Mavericks drive after the installation process has been completed.
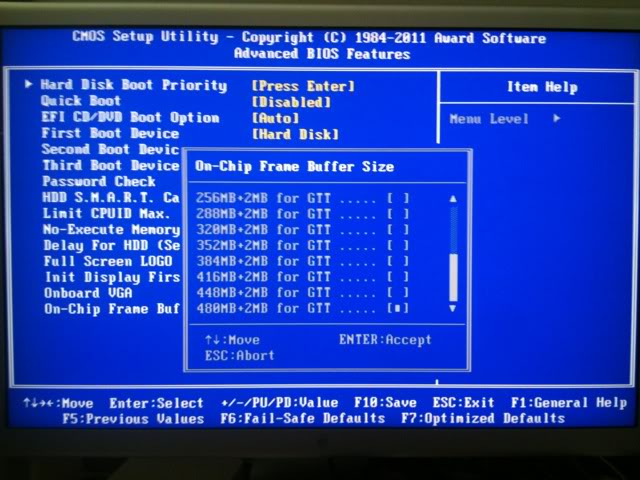
Next, since I am using HD3000 on-board, Intel Integrated Graphics, I had to set one Advanced BIOS Features parameter - On-Chip Frame Buffer Size. I had greater than or equal to 8GB RAM, so I set it at 480MB+2MB for GTT. If you have 4GB RAM, set it to 384. I also turned off the Full Screen LOGO Show parameter.
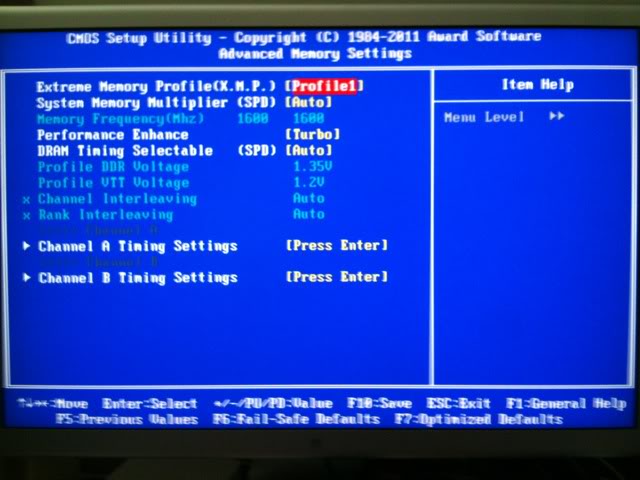
Additionally, since my memory does not have Gigabyte default memory parameter settings, I had to change the XMP Profile from Default to Profile1.
Save the BIOS settings with F10 and boot into the USB Mavericks installation thumb drive. At the Chimera boot screen, you should see your UniBeast drive and your designation drive. Choose the UniBeast drive to begin the installation process.
If you're doing a fresh installation, follow the tonymacx86 UniBeast Installation Guide. If you're installing over Snow Leopard, Lion or Mountain Lion, then proceed with the installation, skipping over Step4-6 in the Guide. If you are updating Mavericks, see post #730 for my procedure.
After the installation is though, the Mavericks installer will reboot the system. Since you still have the BIOS set to boot from the UniBeast installation USB thumb drive, you select the Mavericks drive this time instead of the UniBeast thumb drive.
If the installation completed correctly, you should now be seeing Mavericks' Desktop. First, click on the Finder drop down menu, and, in the General tab, check all boxes as shown here:

Before running MultiBeast for Mavericks, open the Security & Privacy Preference Pane in System Preferences, which is located in your Dock, and:
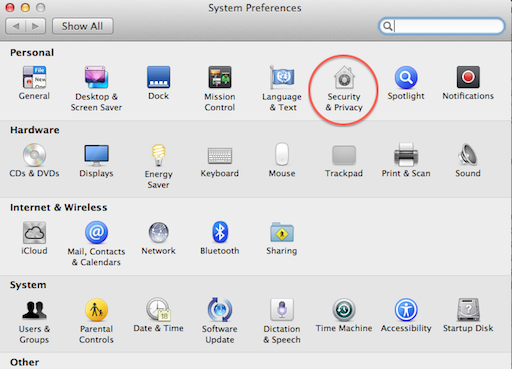
 In the lower left corner, click on the padlock and type in your Admin username & password;
 Click on the General tab if it isn't already highlighted; Click on the "Anywhere" radio button under "Allow applications and downloaded from:" and Close the System Preferences window.
Next, run MultiBeast using the following choices:
Click on the Quick Start icon in the top left hand corner. Now click on the UserDSDT since you be using the tonymacx86 DSDT from the Database.
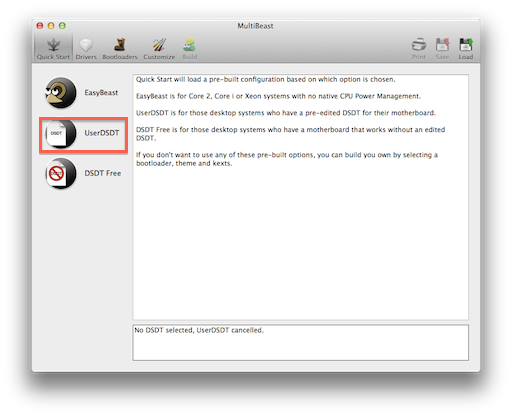 When you select the UserDSDT option, MultiBeast asks you for the location of the DSDT which should be on the desktop.
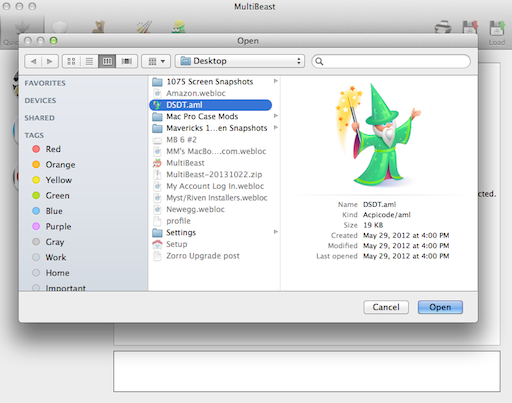 After selecting your DSDT, you can see what the UserDSDT default kexts/drivers will be.
 Now, choose the ALC889 audio driver for the Z68X-UD3H motherboard.
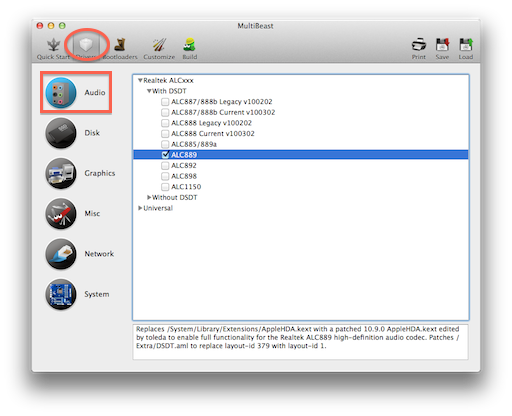 The FakeSMC kext/driver was part of the UserDSDT selection above; so all we need now is the motherboard plug-ins and the HWMonitor app. Also select the USB 3.0 Universal kext/driver.
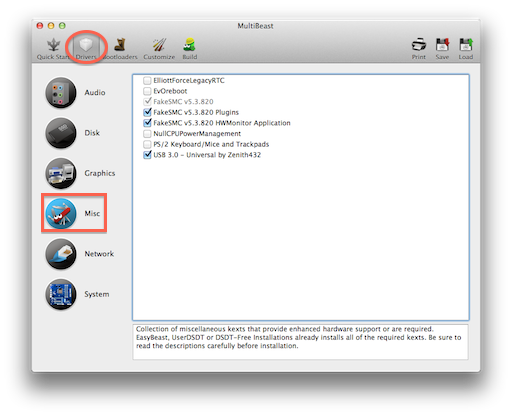 Lnx2Mac's Ethernet driver completes the Driver selections.
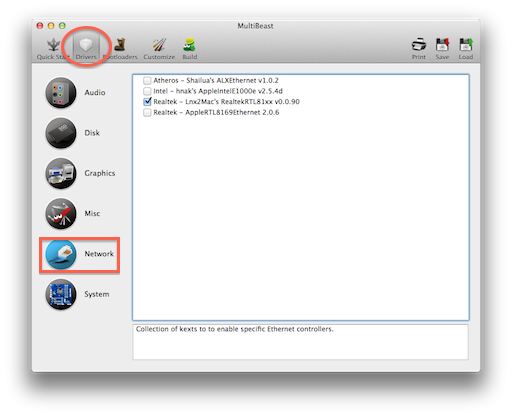 Next is the Customization category. Here I only need the required i7 SSDT. If you don't have a "K" processor, you can skip this step. No other Customization options are needed.
 Now, click on the Build category and see your configuration.
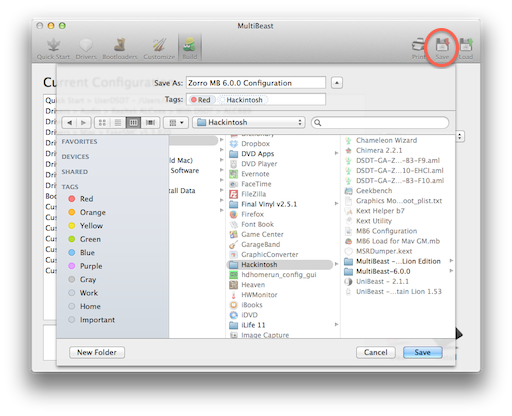
 But, we're not done yet - we have to save our configuration for future use.
 (I have attached my MultiBeast configuration file for those who would like to use it.)
 Now, you're done. Click on the install button. Reboot into the BIOS and change the drive Priority and order. Save the BIOS with F10 and boot into Mavericks.
To summarize what all will be loaded from these MultiBeast 6 selections:
Quick Start > UserDSDT - /Users/Stork/Desktop/DSDT.aml
Drivers > Audio > Realtek ALCxxx > With DSDT > ALC889
Drivers > Disk > 3rd Party SATA
Drivers > Misc > FakeSMC v5.3.820
Drivers > Misc > FakeSMC v5.3.820 Plugins
Drivers > Misc > FakeSMC v5.3.820 HWMonitor Application
Drivers > Misc > USB 3.0 - Universal by Zenith432
Drivers > Network > Realtek - Lnx2Mac's RealtekRTL81xx v0.0.90
Drivers > System > AppleRTC Patch for CMOS Reset
Bootloaders > Chimera v2.2.1
Customize > Boot Options > Basic Boot Options
Customize > Boot Options > Generate CPU States
Customize > Boot Options > Hibernate Mode - Desktop
Customize > Boot Options > Use KernelCache
Customize > System Definitions > Mac Pro > Mac Pro 3,1
Customize > SSDT Options > Sandy Bridge Core i7
Customize > Themes > tonymacx86 Black
Whoopie! We're up and running Mavericks! So, all's well with Zorro and me.
What's left
Not much. All apps work as they're suppose to work. The printer drivers work great. My Apple iSight Firewire webcam works with iChat. iMessages doesn't work, yet, but I'll get going when I haven't anything better to do.
Most importantly, GarageBand works with both my external PreSonus Inspire and Firebox interfaces and HD3000 is satisfactory for recording. I'm a Happy Camper!
Updates
May 25, 2015. Successfully update to Yosemite (10.10.3) by adding a graphics card. See Post #869.
September 20, 2014. Updated to Mavericks 10.9.5.
February 25, 2014. Updated to 10.9.2. See post #730.
December 16, 2013. Updated to 10.9.1. See post #702.
October 22, 2013. Updated the build description for Mavericks installation.
Attachments
Last edited:
