
- Joined
- Sep 21, 2010
- Messages
- 13,413
- Motherboard
- HP 17" 17-by3053cl
- CPU
- i5-1035G1
- Graphics
- Intel UHD Graphics, 1920x1080
- Mac
- Classic Mac
- Mobile Phone
Notes:
- This guide uses the UniBeast/MultiBeast/Chimera method, not Clover. There are numerous Clover Guides in this forum section. IMO, Clover is not for beginners.
- If you are using a discrete graphics card, you don't need this guide; just use the tonymacx86 Installation Guide for Yosemite.
Contents
Introduction
Early adopters have it rough! Little or no support for 9-series motherboard chipsets until Apple supports the hardware/firmware/chipsets in a product. The 9-series of motherboards were a PITA to set-up for and install Mavericks. As we'll see, getting Yosemite running on the H/Z97N-WIFI is a lot easier, thanks to the hard work by toleda, tonymacx86 and MacMan and others (see MultiBeast for Yosemite Features document for all the credits). However, the latest iMac Retina (2014) still uses the 8-series motherboard chipset. So, we're still not "out of the woods," yet.
The good news is the iMac Retina (2014) does use either an i5-4690 or an i7-4790K Haswell Refresh processor. The iMac Retina (2014) also has an iMac15,1/2 System Definition which will be shortly added to MultiBeast for Yosemite. More on using a System Definition later.
Normally, I wouldn't put such a detailed installation procedure in a guide, instead, referencing the tonymacx86 guide with just a few installation steps to cover unique differences. However, as I mentioned before, Apple does not yet support the Intel 9-series motherboard chipset in a product. Consequently, I've written this guide with as a detailed installation procedure with the check boxes so you can copy & paste into a document for printing and checking off each step as you accomplish the step so as not to miss a step.
Hector (as I named my H97N system) is using an i5-4690 Haswell Refresh processor, driving two monitors using the motherboard's DVI and bottom HDMI ports. (Apple has not supported VGA natively in OS X for years. So don't use the on-board VGA connector. Instead, use either the DVI and/or the HDMI connectors.) Additionally, this installation procedure will work for a Z97N-WIFI as the two motherboards are very similar; similar enough to share the same motherboard User's Manual. Any Intel i3/i5/i7 4000 series processor, which supports HD4600 Intel Integrated Graphics, will work with either motherboard.
Finally, I removed the Gigabyte supplied WiFi/BT card since the WiFi chipset is Intel's which is not supported by Apple's OS X. See my build description for the compatible iMac WiFi/BT 4 combo card I used.
Installation
Preparation
Now is a good time to check and see if you have the latest version of the BIOS.
 Prepare the UniBeast USB thumb drive in accordance with the tonymacx86 Installation Guide for Yosemite, Steps 1-2;
Download and put MultiBeast for Yosemite on the UniBeast thumb drive.
Power down the computer;
Disconnect all drives except for the drive onto which Yosemite will be installed;
Connect you monitor to either the DVI or HMDI Back Panel connector; and
Put the UniBeast USB thumb drive in an USB 2.0 socket on the motherboard Back Panel.
BIOS Set-up
Rather than clutter up this guide, I won't show a lot of BIOS screen snapshots, just the actual BIOS parameters that I changed to start the Installation of Yosemite.
Boot into the BIOS by holding down the DELETE key on your keyboard's numeric keypad. (Also see Step 3 in the tonymacx86x 10.9 Yosemite Installation Guide.)
Load the Optimized Defaults (F7);
M.I.T. > Advanced Memory Settings > X.M.P. > Profile 1 for memory not recognized with the Default setting;
BIOS Features > Boot Options Priorities <--- set this to the UniBeast USB thumb drive
BIOS Features > VT-d > Disable <--- for non K processors and the new Haswell Refresh "K" and non "K" processors
Peripherals > Initial Display Output > IGFX <--- make sure on-board graphics is enabled
Peripherals > Intel Processor Graphics > Enable <--- likewise, make sure this is enabled
Peripherals > XHCI Mode > Auto <--- Smart Auto gives you problems with USB peripherals
Peripherals > EHCI Hand-off > Enable
Power Management > Wake on LAN > Disable
Save & Exit > Save & Exit Setup (and the computer will reboot)
Installation of OS X
At the Chimera screen, choose the UniBeast thumb drive USB to execute and follow the installation procedure in Step 4; if you get a Kernel Panic:
Reboot and, at the Chimera screen, press the keyboard's SpaceBar to open the boot flag window at the bottom of the screen;
Enter "-v maxmem=4096" (without the quotes), where 4096 is your memory size div by two; and
Press the Return key on the keyboard to boot into the Yosemite Desktop. After the installation, the computer will reboot;
At the Chimera screen, use the arrow keyboard key to highlight the Yosemite drive;
Press the keyboard's SpaceBar to open the boot flag window at the bottom of the screen;
Enter "-v -x" (without the quotes) and press the Return key on the keyboard to boot into the Yosemite Desktop.
At the Yosemite Desktop, copy the MultiBeast for Yosemite into the /Applications folder and unzip it if you haven't done so already;
Before running MultiBeast for Yosemite, open the Security & Privacy Preference Pane in System Preferences, which is located in your Dock, and:
 In the lower left corner, click on the padlock and type in your Admin username & password;
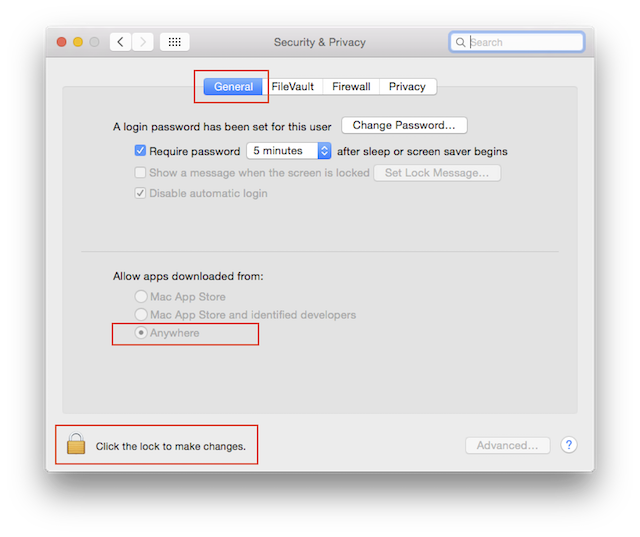 Click on the General tab if it isn't already highlighted;
Click on the "Anywhere" radio button under "Allow applications and downloaded from:" and
Close the System Preferences window.
Run MultiBeast and selection the following:
Quick Start > DSDT Free
Drivers > Audio Realtek ALCxxx > ALC892
Drivers > Misc > EvOreboot
Drivers > Network > Intel > AppleIntelE1000e v3.1.0
Customize > Boot Options > Uncheck Generate CPU States <---- Important for 9-series motherboards with Haswell Refreshed processors; prevents freezes
Customize > System Definitions > iMac > iMac 14,2
Build <--- To see your full configuration
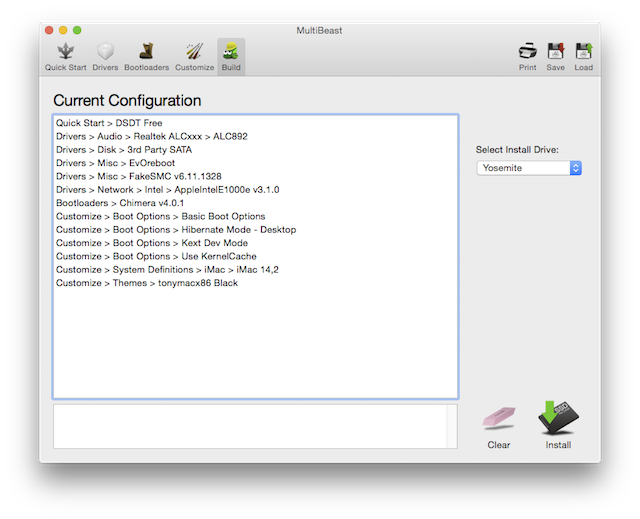 Note: While the MultiBeast Configuration snapshot above may reflect earlier versions of some of the drivers/kexts, the .mb file will automatically be updated by MultiBeast to the current MultiBeast versions.
Save <--- Save your MultiBeast configuration file somewhere convenient
Click on the Install button in the MultiBeast window bottom right hand corner. Reboot into the BIOS.
Change BIOS Features > Boot Options Priorities > set this to the P0 setting for the Yosemite drive
F10 to save the BIOS update and reboot.
Yosemite has changed it's audio output settings. So, in the Sound Preference Pane, do the following:

 Now, audio works!
Comments
I didn't check the TRIM option as my Yosemite "test" installation is on a Kingston V300 120GB SSD which uses the great "garbage collection" of the SandForce controller. Additionally, I've read about too many war stories about TRIM Enabler not yet working in Yosemite. Since I'm running Mavericks most of the time (Samsung 840 EVO SSD with TRIM enabled), this separate Yosemite drive will get TRIMed from running Mavericks. Stay tune for more info on this subject.
To get BT working, I ran the /your_hard_disk_name/System/Library/CoreServices/Bluetooth Setup Assistant. So, my Apple wireless keyboard, TrackPad and Magic Mouse work with a GMYLE BT 4 USB dongle. However, I still need a USB keyboard/mouse for booting into the BIOS. Unfortunately, Apple chose not to support BT 4 USB dongles for Yosemite's Continuity/Handoff features; a routine to modify this "oversight" is in the works, so maybe soon BT 4 USB dongles will be supported.
So far, no freezes with 16GB of memory. According to DPCIManager, my P States are 8, 35, 36 and 37 which is typical for an iMac SysDef. (Using a SSDT resulted in a system freeze so I am not recommending using a SSDT with a 9-series motherboard and a Haswell Refresh processor.)
Audio does not work after sleep wake-up due to an Apple HDA problem. So, I use shilohh's LoadHDA app. I put it on the desktop and click on it after wake-up; it reloads the Apple HDA and audio returns. It's a lot easier than rebooting.
Done! Enjoy Yosemite on your Gigabyte H/Z97N-WIFI motherboard based system using HD4600 graphics. :thumb up:
Updates
Update: I've updated this build with a Gigabyte GTX 750 Ti graphics card to begin my entry level gaming which I have not done in for decades. Here is my Guide to update from HD4600: http://www.tonymacx86.com/graphics/...am-new-gigabyte-750-ti-2gb-graphics-card.html.
To update Hector using the GTX750 with the 10.10.2 Security, I had to endure a lot of pain. Here's how I was successful; see Post #193.
Update #2: I have replaced the Gigabyte H97N-WIFI motherboards WiFi/BT card with an Apple iMac card and a miniPCIe adapter which interfaces correctly with the Gigabyte H97N's motherboard WiFi/BT card slot. Both were purchased from Amazon as described in tonymacx86's guide: http://www.tonymacx86.com/network/1...apple-mini-cards-pcie-mini-pcie-adapters.html. See Post #37 in Hector's build description for more detailed information.
References
- This guide uses the UniBeast/MultiBeast/Chimera method, not Clover. There are numerous Clover Guides in this forum section. IMO, Clover is not for beginners.
- If you are using a discrete graphics card, you don't need this guide; just use the tonymacx86 Installation Guide for Yosemite.
Contents
Introduction
Early adopters have it rough! Little or no support for 9-series motherboard chipsets until Apple supports the hardware/firmware/chipsets in a product. The 9-series of motherboards were a PITA to set-up for and install Mavericks. As we'll see, getting Yosemite running on the H/Z97N-WIFI is a lot easier, thanks to the hard work by toleda, tonymacx86 and MacMan and others (see MultiBeast for Yosemite Features document for all the credits). However, the latest iMac Retina (2014) still uses the 8-series motherboard chipset. So, we're still not "out of the woods," yet.
The good news is the iMac Retina (2014) does use either an i5-4690 or an i7-4790K Haswell Refresh processor. The iMac Retina (2014) also has an iMac15,1/2 System Definition which will be shortly added to MultiBeast for Yosemite. More on using a System Definition later.
Normally, I wouldn't put such a detailed installation procedure in a guide, instead, referencing the tonymacx86 guide with just a few installation steps to cover unique differences. However, as I mentioned before, Apple does not yet support the Intel 9-series motherboard chipset in a product. Consequently, I've written this guide with as a detailed installation procedure with the check boxes so you can copy & paste into a document for printing and checking off each step as you accomplish the step so as not to miss a step.
Hector (as I named my H97N system) is using an i5-4690 Haswell Refresh processor, driving two monitors using the motherboard's DVI and bottom HDMI ports. (Apple has not supported VGA natively in OS X for years. So don't use the on-board VGA connector. Instead, use either the DVI and/or the HDMI connectors.) Additionally, this installation procedure will work for a Z97N-WIFI as the two motherboards are very similar; similar enough to share the same motherboard User's Manual. Any Intel i3/i5/i7 4000 series processor, which supports HD4600 Intel Integrated Graphics, will work with either motherboard.
Finally, I removed the Gigabyte supplied WiFi/BT card since the WiFi chipset is Intel's which is not supported by Apple's OS X. See my build description for the compatible iMac WiFi/BT 4 combo card I used.
Installation
Preparation
Now is a good time to check and see if you have the latest version of the BIOS.
H97N BIOS: http://www.gigabyte.com/products/product-page.aspx?pid=4992#bios
Z97N BIOS: http://www.gigabyte.com/products/product-page.aspx?pid=4993#bios
To update to the latest BIOS version, see http://www.tonymacx86.com/bios-uefi/131047-how-update-your-gigabyte-motherboards-bios.html.Z97N BIOS: http://www.gigabyte.com/products/product-page.aspx?pid=4993#bios
Prepare the UniBeast USB thumb drive in accordance with the tonymacx86 Installation Guide for Yosemite, Steps 1-2; Download and put MultiBeast for Yosemite on the UniBeast thumb drive. Power down the computer; Disconnect all drives except for the drive onto which Yosemite will be installed; Connect you monitor to either the DVI or HMDI Back Panel connector; and Put the UniBeast USB thumb drive in an USB 2.0 socket on the motherboard Back Panel.BIOS Set-up
Rather than clutter up this guide, I won't show a lot of BIOS screen snapshots, just the actual BIOS parameters that I changed to start the Installation of Yosemite.
Boot into the BIOS by holding down the DELETE key on your keyboard's numeric keypad. (Also see Step 3 in the tonymacx86x 10.9 Yosemite Installation Guide.) Load the Optimized Defaults (F7); M.I.T. > Advanced Memory Settings > X.M.P. > Profile 1 for memory not recognized with the Default setting; BIOS Features > Boot Options Priorities <--- set this to the UniBeast USB thumb drive BIOS Features > VT-d > Disable <--- for non K processors and the new Haswell Refresh "K" and non "K" processors Peripherals > Initial Display Output > IGFX <--- make sure on-board graphics is enabled Peripherals > Intel Processor Graphics > Enable <--- likewise, make sure this is enabled Peripherals > XHCI Mode > Auto <--- Smart Auto gives you problems with USB peripherals Peripherals > EHCI Hand-off > Enable Power Management > Wake on LAN > Disable Save & Exit > Save & Exit Setup (and the computer will reboot)Installation of OS X
At the Chimera screen, choose the UniBeast thumb drive USB to execute and follow the installation procedure in Step 4; if you get a Kernel Panic: Reboot and, at the Chimera screen, press the keyboard's SpaceBar to open the boot flag window at the bottom of the screen; Enter "-v maxmem=4096" (without the quotes), where 4096 is your memory size div by two; and Press the Return key on the keyboard to boot into the Yosemite Desktop. After the installation, the computer will reboot; At the Chimera screen, use the arrow keyboard key to highlight the Yosemite drive; Press the keyboard's SpaceBar to open the boot flag window at the bottom of the screen; Enter "-v -x" (without the quotes) and press the Return key on the keyboard to boot into the Yosemite Desktop.Note: The "-v" will show you the load information and is useful for debugging. The "-x" causes Yosemite to boot into the Safe mode.
At the Yosemite Desktop, copy the MultiBeast for Yosemite into the /Applications folder and unzip it if you haven't done so already; Before running MultiBeast for Yosemite, open the Security & Privacy Preference Pane in System Preferences, which is located in your Dock, and:
In the lower left corner, click on the padlock and type in your Admin username & password;
Click on the General tab if it isn't already highlighted; Click on the "Anywhere" radio button under "Allow applications and downloaded from:" and Close the System Preferences window. Run MultiBeast and selection the following: Quick Start > DSDT Free Drivers > Audio Realtek ALCxxx > ALC892 Drivers > Misc > EvOreboot Drivers > Network > Intel > AppleIntelE1000e v3.1.0 Customize > Boot Options > Uncheck Generate CPU States <---- Important for 9-series motherboards with Haswell Refreshed processors; prevents freezes Customize > System Definitions > iMac > iMac 14,2Note: toleda has suggested that we use the following:
iMac14,1 - HD4600 only, or
iMac14,2 - HD4600 and discrete graphics card or discrete graphics only
iMac14,2 - HD4600 and discrete graphics card or discrete graphics only
Build <--- To see your full configuration
Save <--- Save your MultiBeast configuration file somewhere convenientHere's my MultiBeast configuration file: http://www.tonymacx86.com/attachments/hector-fresh-2-mb.114406/
To use it
Download it and unzip it;
Run MultiBeast and click on the Load button and select the downloaded .mb file; and
To use it
Download it and unzip it; Run MultiBeast and click on the Load button and select the downloaded .mb file; and Click on the Install button in the MultiBeast window bottom right hand corner. Reboot into the BIOS. Change BIOS Features > Boot Options Priorities > set this to the P0 setting for the Yosemite drive F10 to save the BIOS update and reboot.Yosemite has changed it's audio output settings. So, in the Sound Preference Pane, do the following:
Sound Effects: Check the box "Play feedback when volume has changed." This is a new option and was the default on Mavericks and earlier. You now need to turn it on to test your speaker volume.
Use Internal Speakers instead of Line Out. Again, Yosemite changed the default.
Use Internal Speakers instead of Line Out. Again, Yosemite changed the default.
Comments
I didn't check the TRIM option as my Yosemite "test" installation is on a Kingston V300 120GB SSD which uses the great "garbage collection" of the SandForce controller. Additionally, I've read about too many war stories about TRIM Enabler not yet working in Yosemite. Since I'm running Mavericks most of the time (Samsung 840 EVO SSD with TRIM enabled), this separate Yosemite drive will get TRIMed from running Mavericks. Stay tune for more info on this subject.
To get BT working, I ran the /your_hard_disk_name/System/Library/CoreServices/Bluetooth Setup Assistant. So, my Apple wireless keyboard, TrackPad and Magic Mouse work with a GMYLE BT 4 USB dongle. However, I still need a USB keyboard/mouse for booting into the BIOS. Unfortunately, Apple chose not to support BT 4 USB dongles for Yosemite's Continuity/Handoff features; a routine to modify this "oversight" is in the works, so maybe soon BT 4 USB dongles will be supported.
So far, no freezes with 16GB of memory. According to DPCIManager, my P States are 8, 35, 36 and 37 which is typical for an iMac SysDef. (Using a SSDT resulted in a system freeze so I am not recommending using a SSDT with a 9-series motherboard and a Haswell Refresh processor.)
Audio does not work after sleep wake-up due to an Apple HDA problem. So, I use shilohh's LoadHDA app. I put it on the desktop and click on it after wake-up; it reloads the Apple HDA and audio returns. It's a lot easier than rebooting.
Done! Enjoy Yosemite on your Gigabyte H/Z97N-WIFI motherboard based system using HD4600 graphics. :thumb up:
Updates
Update: I've updated this build with a Gigabyte GTX 750 Ti graphics card to begin my entry level gaming which I have not done in for decades. Here is my Guide to update from HD4600: http://www.tonymacx86.com/graphics/...am-new-gigabyte-750-ti-2gb-graphics-card.html.
To update Hector using the GTX750 with the 10.10.2 Security, I had to endure a lot of pain. Here's how I was successful; see Post #193.
Update #2: I have replaced the Gigabyte H97N-WIFI motherboards WiFi/BT card with an Apple iMac card and a miniPCIe adapter which interfaces correctly with the Gigabyte H97N's motherboard WiFi/BT card slot. Both were purchased from Amazon as described in tonymacx86's guide: http://www.tonymacx86.com/network/1...apple-mini-cards-pcie-mini-pcie-adapters.html. See Post #37 in Hector's build description for more detailed information.
References
- http://www.tonymacx86.com/network/1...apple-mini-cards-pcie-mini-pcie-adapters.html
- http://www.tonymacx86.com/network/104850-guide-airport-pcie-half-mini-v2.html
- http://www.tonymacx86.com/user-buil...ga-h97n-wifi-i5-4690-hd4600-two-monitors.html
- http://www.tonymacx86.com/mavericks...ifi-using-hd4600-no-graphics-card-needed.html
Attachments
Last edited by a moderator:
