
- Joined
- May 23, 2011
- Messages
- 347
- Motherboard
- ASUS ProArt Z790-CREATOR WIFI
- CPU
- i9-13900KF
- Graphics
- RX 6900 XT
- Mac
- Mobile Phone
[SUCCESS] "iMike" GA-Z77MX-D3H | i5-3570k | 16 GB RAM | GTX 560 1 GB
Apple Mac OS X Version 10.8.2 Mountain Lion:
http://itunes.apple.com/us/app/os-x-mountain-lion/id537386512?ls=1&mt=12
New (Hardware):
Gigabyte GA-Z77MX-D3H LGA 1155 Motherboard:
http://www.newegg.com/Product/Product.aspx?Item=N82E16813128542
Intel Core i5-3570K Ivy Bridge Quad-Core CPU @ 3.4GHz (3.8GHz Turbo Boost):
http://www.newegg.com/Product/Product.aspx?Item=N82E16819116504
16GB (4 x 4GB) G.Skill Ripjaw DDR3-1600 (PC3-12800) RAM:
http://www.newegg.com/Product/Product.aspx?Item=N82E16820231314
120GB OCZ Agility 3 SATA III SSD:
http://www.newegg.com/Product/Product.aspx?Item=N82E16820227726
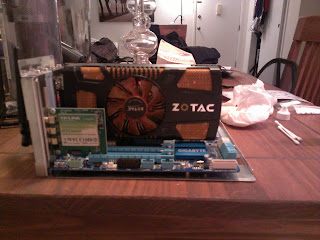
Zotac GeForce GTX 560 1 GB GDDR5 Graphics Card:
http://www.amazon.com/dp/B005DDB2SS/
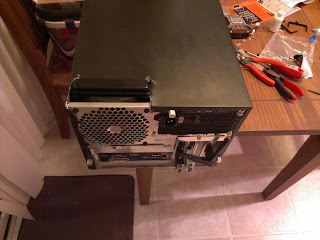
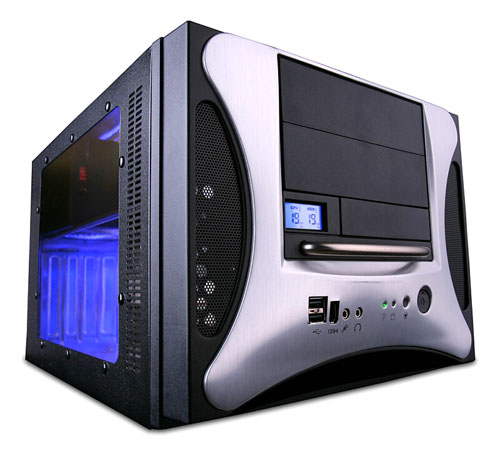
Apevia X-QPack2 Aluminum Case:
http://www.newegg.com/Product/Product.aspx?Item=N82E16811144138
Silverstone ST60F-ES 600-Watt Continuous Power PSU:
http://www.newegg.com/Product/Product.aspx?Item=N82E16817256071
Corsair H60 High Performance Liquid CPU Cooler:
http://www.newegg.com/Product/Product.aspx?Item=N82E16835181015
HP HD-3100 Webcam:
http://www.newegg.com/Product/Product.aspx?Item=9SIA0FU0B38771
ASUS VH238 23” 1080p LED Monitor:
http://www.amazon.com/dp/B004J6BIJ8/
TP-Link WDN-4800 Wireless N Dual-Band 450Mbps Wireless Ethernet Adapter:
http://www.newegg.com/Product/Product.aspx?Item=N82E16833704133
Already Owned
64GB Kingston V100+ SSDNow SATA II SSD:
http://www.newegg.com/Product/Product.aspx?Item=N82E16820139421
1.5TB Western Digital Caviar Green 5900RPM HDD:
http://www.newegg.com/Product/Product.aspx?Item=N82E16822136513
Microsoft Wired Digital Media 3000 Keyboard:
http://www.newegg.com/Product/Product.aspx?Item=N82E16823109056
Apple Magic Trackpad:
http://www.newegg.com/Product/Product.aspx?Item=N82E16826101016&Tpk=Magic
LG GH22LS40 22x DVD-R/RW:
http://www.newegg.com/Product/Product.aspx?Item=N82E16827136168
AzIO BTD-V201 USB Micro Bluetooth v2.1+EDR Adapter:
http://www.amazon.com/dp/B003765X38
Comments
What Works:
Sleep
450 Mbps Wifi
Gigabit Ethernet
USB 3.0
USB 2.0
Backpanel Sound (Limited)
QE/CI
Webcam
Display Sleep
Bluetooth
What Doesn’t Work:
Full Sound (I do not want to use VoodooHDA. It is unstable and prevents true sleep from happening.)
Background:
After a few years on the Hackintosh scenes and numerous Core2 builds, I thought it was time for me to have a modern build. No doubt my most recent desktop build with a Core2Quad provided plenty of power—I was still finding that it didn’t bring the real speed I needed. I also found that my Mikebook Pro (HP Probook 4530s turned OS X running laptop) was putting my desktop to shame.
I decided it was time to splurge on a lightning fast (in my opinion) powerful build.
Selection of Components:
I decided that I wanted to take the most recent Ivy Bridge technology mixed with the very new 7-series chipset and combine them into one. I read plenty of good reviews on Sandy Bridge builds with the 6-series, but I thought “this is 2012…so, why not?” ☺.
I knew that I wanted a system that wouldn’t use a ton of power and didn’t require any special modifications. I found the most Core2 builds required very little effort if you chose the right parts. My goals were set so then I went to NewEgg and Amazon. My two online friends.
The Build:
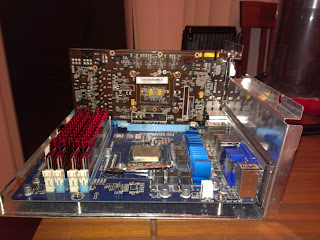
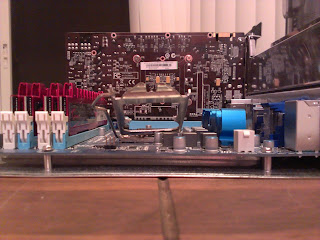
I had to make a minor case mod because my upgraded H60 CPU Cooler radiator was sticking out too much. It doesn't look the prettiest, but it fits perfect and allows for full functionality.

The Installation:
BIOS:
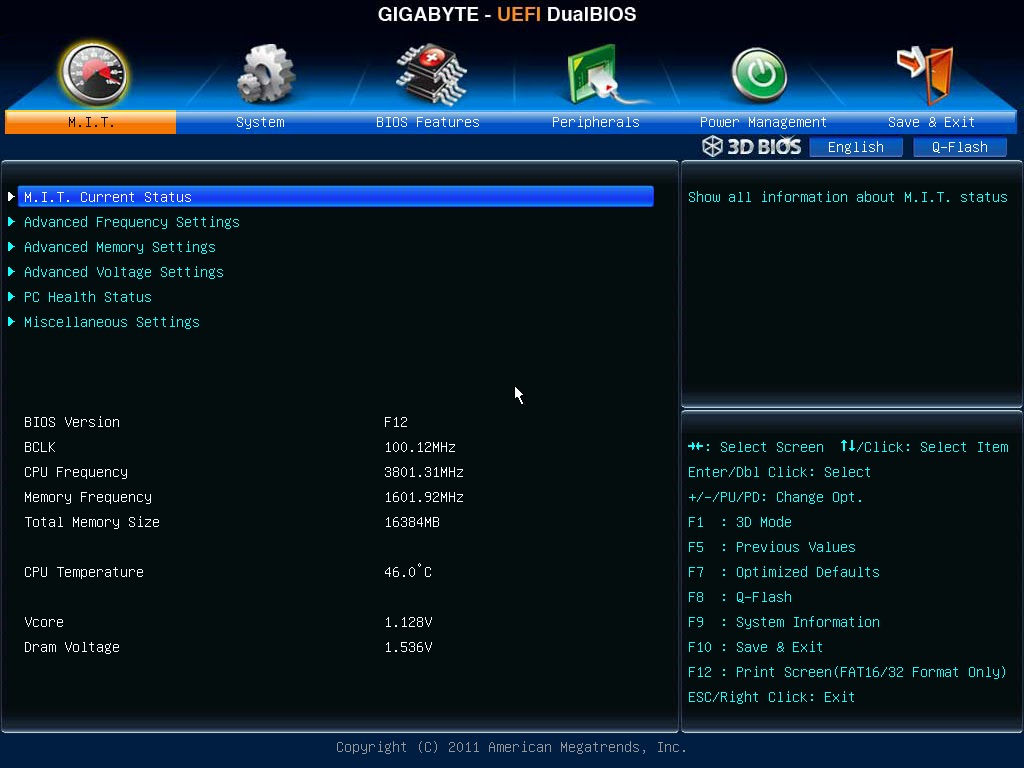
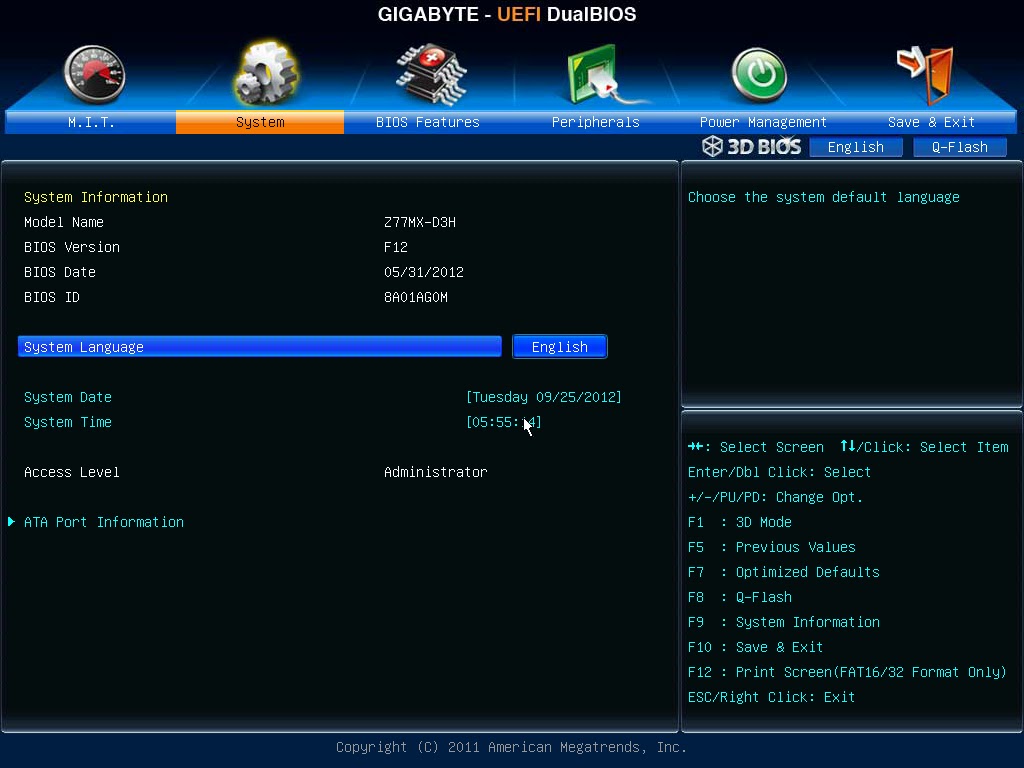
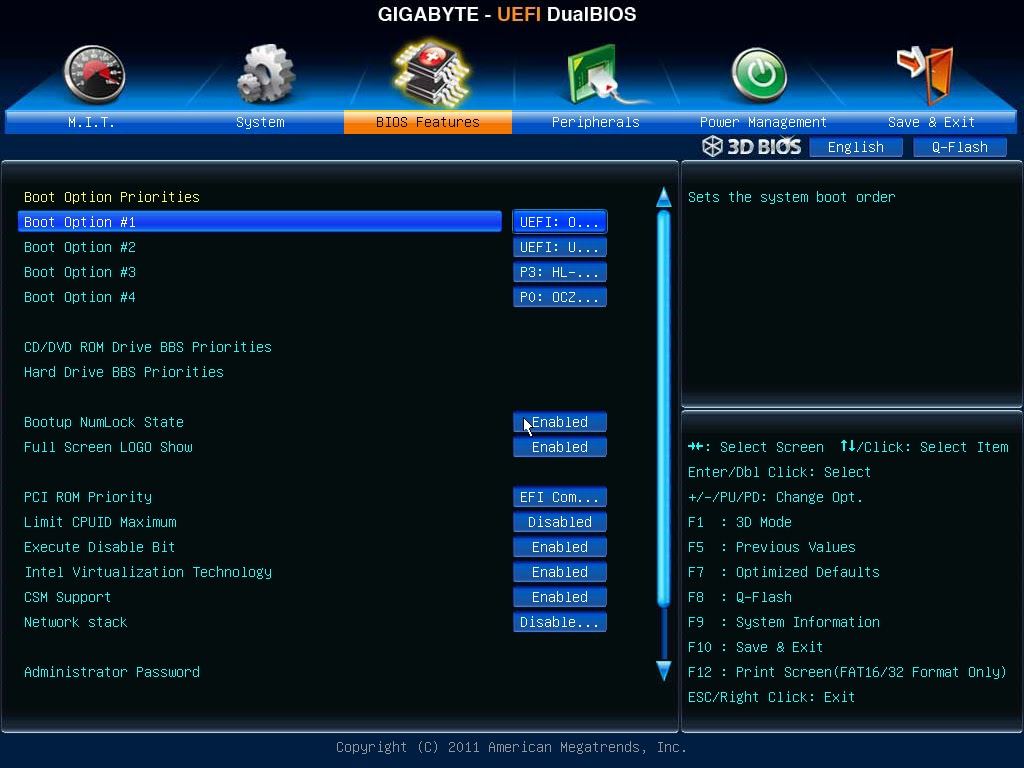
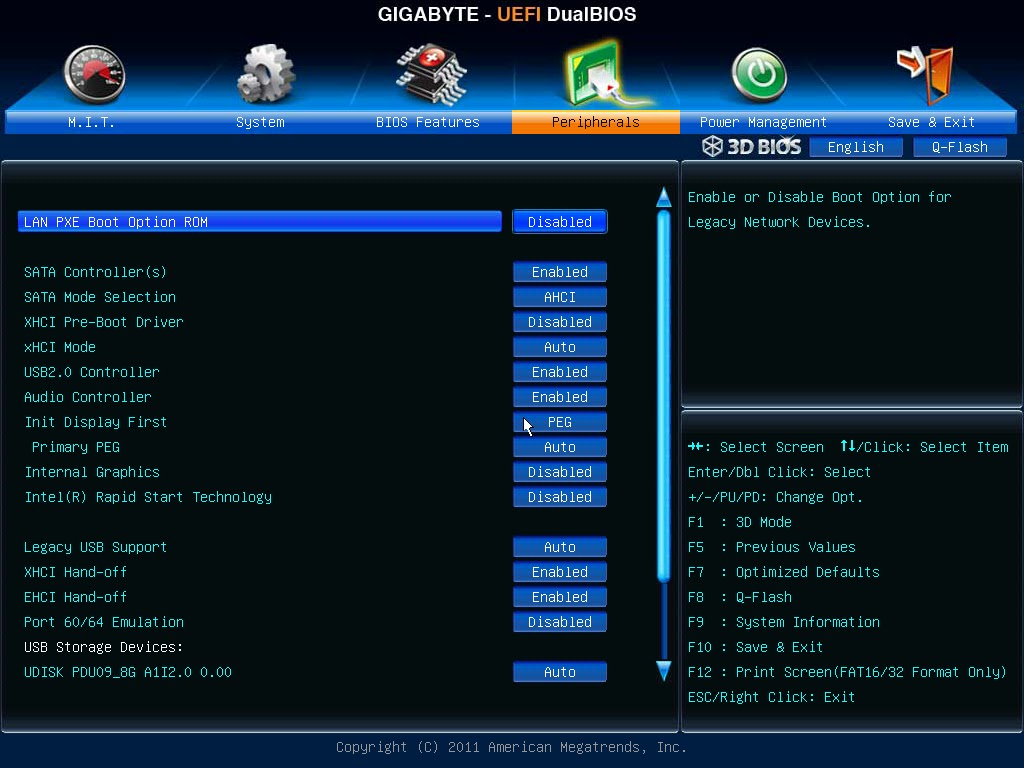
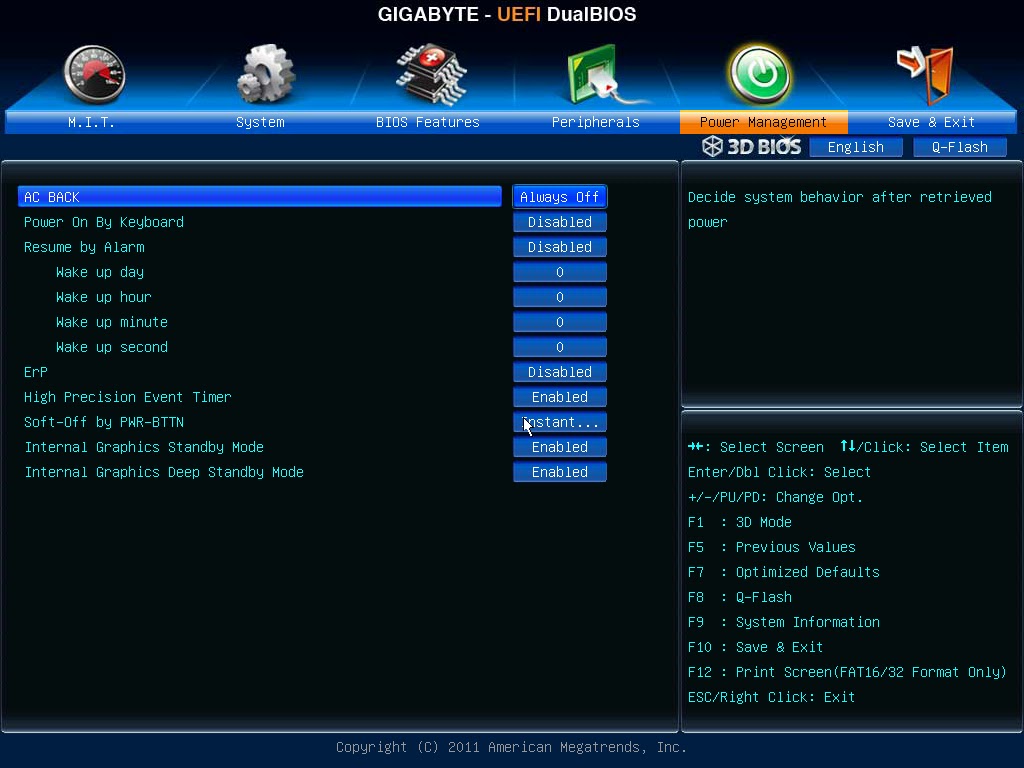
Instead of a long drawn out explanation of why I chose what I chose, I thought I would let the pictures do the talking. The main things I needed to do was enable the proper hard drive boot priority, enable USB 3.0, and disable integrated graphics. For those who want an amazing explanation of enable USB 3.0 for Gigabyte 7-series motherboards, please check out thelostswede’s explanation HERE. Screenshots to follow:
Mountain Lion Installation:
Using one of my other Hackintoshes I created my Mountain Lion USB installer. I followed the guide set fourth by Tony HERE and:
Tonymacx86’s Unibeast 1.5.3 for Mountain Lion:
[FOUND IN THE DOWNLOADS SECTION OF Tonymacx86.com]
Tonymacx86’s Multibeast 5.0.2 Mountain Lion Edition:
[FOUND IN THE DOWNLOADS SECTION OF Tonymacx86.com]
After configuring my BIOS and installing Mountain Lion I needed to install the extra components I had.
Sound
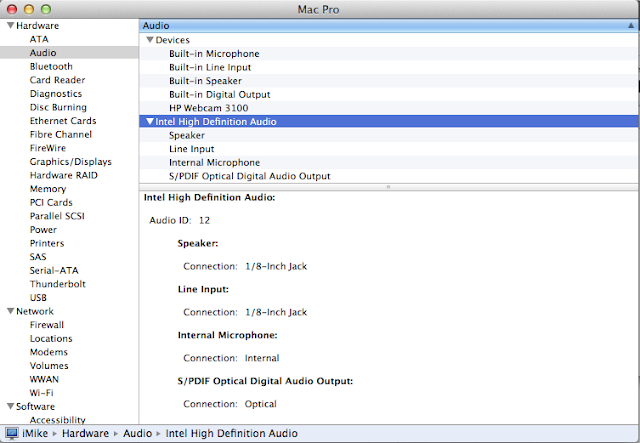
This system is designed for native power management, but if I want to use AppleHDA for sound and have sleep I need to have a DSDT. I ran DSDTSE and patched my DSDT for the basics. There are plenty of good tutorials on this site for how to extract and patch a DSDT. Once I had my DSDT patched for basics I needed to go in and patch it for AppleHDA. I follow [url='http://www.insanelymac.com/forum/topic/280004-applehda-for-gigabyte-ga-z77x-ud3h-via-vt2020vt2021/"]Here[/url] on enabling the infamous VIA VT2021 audio codec through AppleHDA.
After that was complete the next part is easy thanks to Tony and pals--Multibeast
One other thing I really wanted was to make sure I had the 7-series show up in my About My Mac > More Info. I used a simple ACHIPort.kext (can be found at the bottom) that allows for the labeling. Install that kext after Multibeast.
Windows Installation:
The key here is to completely disable the drive with Mountain Lion on it before the install. Some people recommend unplugging the data cable, but I didn’t think that was necessary.
For this step I chose to use a simple USB installer of Windows 7 Ultimate x64. For those of you who do not know how to install Windows 7 I would suggest Googling that. You could also check my Windows 7/Mac OS X dual-boot guide. Tony’s site is not for self-promotion, so I won’t say anymore.
Post Install:
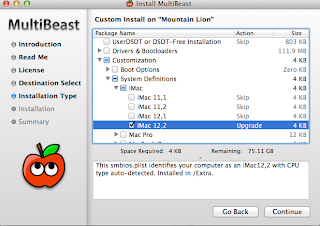
There is one customization I chose to do. This was to edit my SMBIOS so that this build does not register as a MacPro 3,1, but rather a MacPro 5,1. The only thing you need to do before choosing this customization in Multibeast is to delete the AppleTyMceDriver.kext. This will cause a kernel panic. Make sure to run a utility like Kext Wizard to repair the drive permission and clear the cache.
EDIT: I am sticking with the iMac12,2 SMBIOS.
I found that the key to getting full sleep to work was with the kernel flag npci=0x3000. With out that I could not get my MikePro #2 to hit deep sleep. Now it sleeps just fine. Here is my org.chameleon.boot.plist:
<?xml version="1.0" encoding="UTF-8"?>
<!DOCTYPE plist PUBLIC "-//Apple//DTD PLIST 1.0//EN" "http://www.apple.com/DTDs/PropertyList-1.0.dtd">
<plist version="1.0">
<dict>
<key>EthernetBuiltIn</key>
<string>Yes</string>
<key>GenerateCStates</key>
<string>Yes</string>
<key>GeneratePStates</key>
<string>Yes</string>
<key>GraphicsEnabler</key>
<string>Yes</string>
<key>Kernel</key>
<string>mach_kernel</string>
<key>Kernel Flags</key>
<string>darkwake=0 ncpi=0x3000</string>
<key>Legacy Logo</key>
<string>No</string>
<key>Timeout</key>
<string>1</string>
<key>UseKernelCache</key>
<string>Yes</string>
<key>Theme</key>
<string>Lion2</string>
<key>DSDT</key>
<string>DSDT.aml</string>
<key>Hide Partition</key>
<string>hd(1,2) hd(0,2)</string>
</dict>
</plist>
This is the easy part. Lets verify things work properly.
First I want to check my USB 3.0 read/write speed. I used a software called BlackMagic. Here is a screen shot:

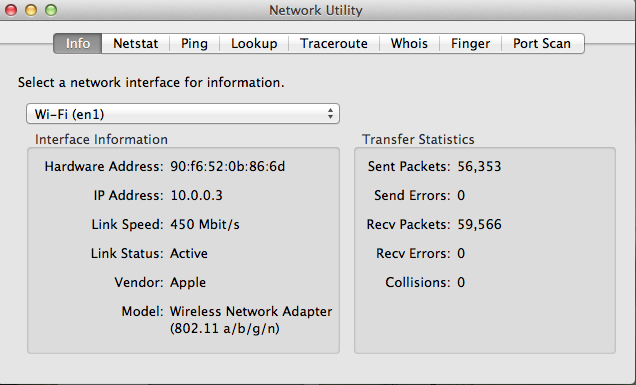
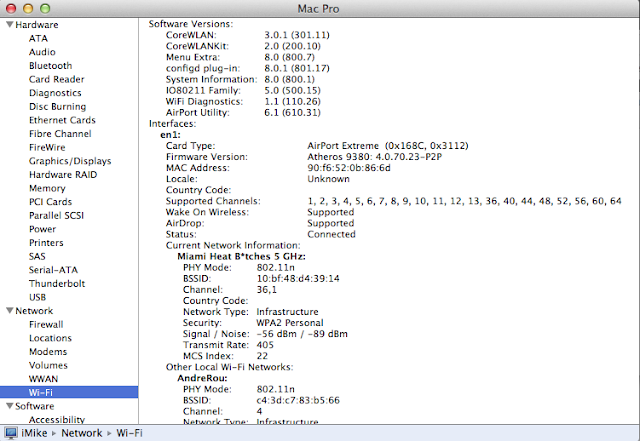
Second I wanted to check I am running at full 450 Mbps Wireless-N speeds.
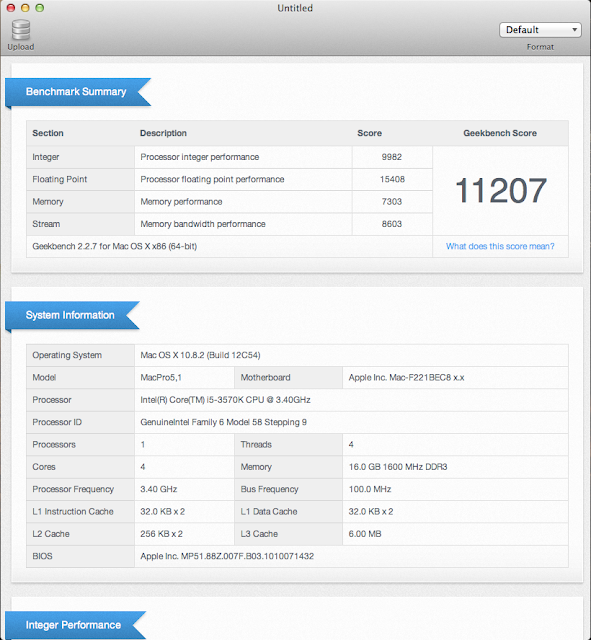
Lastly I thought I would do a Geekbench 64-bit benchmark test.
Inmike09's MikePro: GA-Z77MX-D3H | i5-3570k | 16 GB RAM | GTX 560 1 GB
Components
Apple Mac OS X Version 10.8.2 Mountain Lion:
http://itunes.apple.com/us/app/os-x-mountain-lion/id537386512?ls=1&mt=12
New (Hardware):
Gigabyte GA-Z77MX-D3H LGA 1155 Motherboard:
http://www.newegg.com/Product/Product.aspx?Item=N82E16813128542
Intel Core i5-3570K Ivy Bridge Quad-Core CPU @ 3.4GHz (3.8GHz Turbo Boost):
http://www.newegg.com/Product/Product.aspx?Item=N82E16819116504
16GB (4 x 4GB) G.Skill Ripjaw DDR3-1600 (PC3-12800) RAM:
http://www.newegg.com/Product/Product.aspx?Item=N82E16820231314
120GB OCZ Agility 3 SATA III SSD:
http://www.newegg.com/Product/Product.aspx?Item=N82E16820227726
Zotac GeForce GTX 560 1 GB GDDR5 Graphics Card:
http://www.amazon.com/dp/B005DDB2SS/
Apevia X-QPack2 Aluminum Case:
http://www.newegg.com/Product/Product.aspx?Item=N82E16811144138
Silverstone ST60F-ES 600-Watt Continuous Power PSU:
http://www.newegg.com/Product/Product.aspx?Item=N82E16817256071
Corsair H60 High Performance Liquid CPU Cooler:
http://www.newegg.com/Product/Product.aspx?Item=N82E16835181015
HP HD-3100 Webcam:
http://www.newegg.com/Product/Product.aspx?Item=9SIA0FU0B38771
ASUS VH238 23” 1080p LED Monitor:
http://www.amazon.com/dp/B004J6BIJ8/
TP-Link WDN-4800 Wireless N Dual-Band 450Mbps Wireless Ethernet Adapter:
http://www.newegg.com/Product/Product.aspx?Item=N82E16833704133
Already Owned
64GB Kingston V100+ SSDNow SATA II SSD:
http://www.newegg.com/Product/Product.aspx?Item=N82E16820139421
1.5TB Western Digital Caviar Green 5900RPM HDD:
http://www.newegg.com/Product/Product.aspx?Item=N82E16822136513
Microsoft Wired Digital Media 3000 Keyboard:
http://www.newegg.com/Product/Product.aspx?Item=N82E16823109056
Apple Magic Trackpad:
http://www.newegg.com/Product/Product.aspx?Item=N82E16826101016&Tpk=Magic
LG GH22LS40 22x DVD-R/RW:
http://www.newegg.com/Product/Product.aspx?Item=N82E16827136168
AzIO BTD-V201 USB Micro Bluetooth v2.1+EDR Adapter:
http://www.amazon.com/dp/B003765X38
Comments
What Works:
Sleep
450 Mbps Wifi
Gigabit Ethernet
USB 3.0
USB 2.0
Backpanel Sound (Limited)
QE/CI
Webcam
Display Sleep
Bluetooth
What Doesn’t Work:
Full Sound (I do not want to use VoodooHDA. It is unstable and prevents true sleep from happening.)
Background:
After a few years on the Hackintosh scenes and numerous Core2 builds, I thought it was time for me to have a modern build. No doubt my most recent desktop build with a Core2Quad provided plenty of power—I was still finding that it didn’t bring the real speed I needed. I also found that my Mikebook Pro (HP Probook 4530s turned OS X running laptop) was putting my desktop to shame.
I decided it was time to splurge on a lightning fast (in my opinion) powerful build.
Selection of Components:
I decided that I wanted to take the most recent Ivy Bridge technology mixed with the very new 7-series chipset and combine them into one. I read plenty of good reviews on Sandy Bridge builds with the 6-series, but I thought “this is 2012…so, why not?” ☺.
I knew that I wanted a system that wouldn’t use a ton of power and didn’t require any special modifications. I found the most Core2 builds required very little effort if you chose the right parts. My goals were set so then I went to NewEgg and Amazon. My two online friends.
The Build:
I had to make a minor case mod because my upgraded H60 CPU Cooler radiator was sticking out too much. It doesn't look the prettiest, but it fits perfect and allows for full functionality.
The Installation:
BIOS:
Instead of a long drawn out explanation of why I chose what I chose, I thought I would let the pictures do the talking. The main things I needed to do was enable the proper hard drive boot priority, enable USB 3.0, and disable integrated graphics. For those who want an amazing explanation of enable USB 3.0 for Gigabyte 7-series motherboards, please check out thelostswede’s explanation HERE. Screenshots to follow:
Mountain Lion Installation:
Using one of my other Hackintoshes I created my Mountain Lion USB installer. I followed the guide set fourth by Tony HERE and:
Tonymacx86’s Unibeast 1.5.3 for Mountain Lion:
[FOUND IN THE DOWNLOADS SECTION OF Tonymacx86.com]
Tonymacx86’s Multibeast 5.0.2 Mountain Lion Edition:
[FOUND IN THE DOWNLOADS SECTION OF Tonymacx86.com]
After configuring my BIOS and installing Mountain Lion I needed to install the extra components I had.
Sound
This system is designed for native power management, but if I want to use AppleHDA for sound and have sleep I need to have a DSDT. I ran DSDTSE and patched my DSDT for the basics. There are plenty of good tutorials on this site for how to extract and patch a DSDT. Once I had my DSDT patched for basics I needed to go in and patch it for AppleHDA. I follow [url='http://www.insanelymac.com/forum/topic/280004-applehda-for-gigabyte-ga-z77x-ud3h-via-vt2020vt2021/"]Here[/url] on enabling the infamous VIA VT2021 audio codec through AppleHDA.
After that was complete the next part is easy thanks to Tony and pals--Multibeast
One other thing I really wanted was to make sure I had the 7-series show up in my About My Mac > More Info. I used a simple ACHIPort.kext (can be found at the bottom) that allows for the labeling. Install that kext after Multibeast.
Windows Installation:
The key here is to completely disable the drive with Mountain Lion on it before the install. Some people recommend unplugging the data cable, but I didn’t think that was necessary.
For this step I chose to use a simple USB installer of Windows 7 Ultimate x64. For those of you who do not know how to install Windows 7 I would suggest Googling that. You could also check my Windows 7/Mac OS X dual-boot guide. Tony’s site is not for self-promotion, so I won’t say anymore.
Post Install:
There is one customization I chose to do. This was to edit my SMBIOS so that this build does not register as a MacPro 3,1, but rather a MacPro 5,1. The only thing you need to do before choosing this customization in Multibeast is to delete the AppleTyMceDriver.kext. This will cause a kernel panic. Make sure to run a utility like Kext Wizard to repair the drive permission and clear the cache.
EDIT: I am sticking with the iMac12,2 SMBIOS.
I found that the key to getting full sleep to work was with the kernel flag npci=0x3000. With out that I could not get my MikePro #2 to hit deep sleep. Now it sleeps just fine. Here is my org.chameleon.boot.plist:
<?xml version="1.0" encoding="UTF-8"?>
<!DOCTYPE plist PUBLIC "-//Apple//DTD PLIST 1.0//EN" "http://www.apple.com/DTDs/PropertyList-1.0.dtd">
<plist version="1.0">
<dict>
<key>EthernetBuiltIn</key>
<string>Yes</string>
<key>GenerateCStates</key>
<string>Yes</string>
<key>GeneratePStates</key>
<string>Yes</string>
<key>GraphicsEnabler</key>
<string>Yes</string>
<key>Kernel</key>
<string>mach_kernel</string>
<key>Kernel Flags</key>
<string>darkwake=0 ncpi=0x3000</string>
<key>Legacy Logo</key>
<string>No</string>
<key>Timeout</key>
<string>1</string>
<key>UseKernelCache</key>
<string>Yes</string>
<key>Theme</key>
<string>Lion2</string>
<key>DSDT</key>
<string>DSDT.aml</string>
<key>Hide Partition</key>
<string>hd(1,2) hd(0,2)</string>
</dict>
</plist>
This is the easy part. Lets verify things work properly.
First I want to check my USB 3.0 read/write speed. I used a software called BlackMagic. Here is a screen shot:
Second I wanted to check I am running at full 450 Mbps Wireless-N speeds.
Lastly I thought I would do a Geekbench 64-bit benchmark test.
