- Joined
- Apr 5, 2012
- Messages
- 115
- Motherboard
- GA-Z77P-D3
- CPU
- i5 3570K
- Graphics
- ATI Radeon 6850
- Mac
- Classic Mac
- Mobile Phone
Pinoymac's Budget Build: GA-Z77P-D3, i5-3570K, 8 GB RAM, AMD Radeon 6850

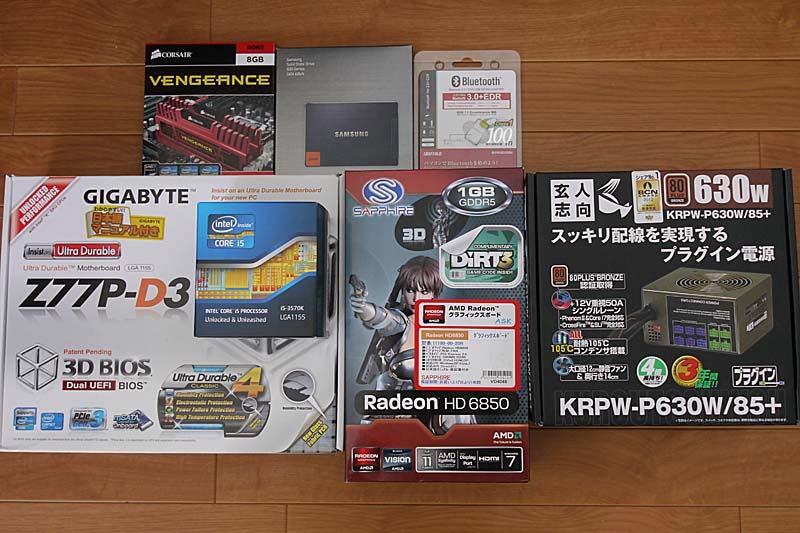
Components
Motherboard: GIGABYTE GA-Z77P-D3, BIOS F6
http://www.amazon.co.jp/dp/B00870OVU0/
CPU: Intel Core i5-3570K @3.4Ghz
www.amazon.com/Intel-Core-i5-3570K-Quad-Core-Processor/dp/B007SZ0E1K/
Graphics Card: Sapphire AMD Radeon HD 6850 1 GB DDR5
http://www.amazon.com/Sapphire-Radeon-PCI-E-Video-100315L/dp/B0047ZGIUK/
RAM: 8GB Corsair Vengeance Red DDR3-1600Mhz (2 x 4GB)
http://www.amazon.com/CORSAIR-Vengeance-240-Pin-Desktop-CMZ8GX3M2A1600C9R/dp/B0053GLCEY/
SSD: Samsung 128 GB SSD 830 Series SATA 6 Gb/s
http://www.amazon.com/SAMSUNG-2-5-Inch-Internal-MZ-7PC128B-WW/dp/B0077CR60Q/
PSU: Kuroutoshikou KRPW-P630W 85+ Bronze (Modular Type)
http://www.amazon.co.jp/dp/B004ADTRQ6/
CPU Cooler: Cooler Master Hyper 212 Evo
Case: Sharkoon T28 ATX (Green)
http://www.amazon.co.jp/dp/B0081ELWC2/
Bluetooth Adapter: Buffalo Bluetooth 3.0+EDR Class 1 BSHSBD05BK
http://www.amazon.co.jp/dp/B004UDYRSE/
Apple OS X 10.8 Mountain Lion (Apple Apps Store)
Already Owned
Monitor: BENQ G2420HD
Keyboard: Apple Wireless Keyboard
Mouse: Logicool Optical Mouse
USB: Silicon Power 2 x 16GB USB 2.0
OSX 10.7 Lion DVD installer: Purchased at Apple Store Ginza a loooong time ago.
Comments
Having already owned an existing, albeit aging Macbook Pro. It was difficult to upgrade my current system from OSX Lion to Mountain Lion due to the fact that my MBP is a 32-bit system. And with current Macbooks' prices going through the roof, it was high time i went through the hackintosh alternative. After a lot of reading through this forum, I ventured to assemble a budget build with an i5 Ivy Bridge Chip. My needs are moderate graphics and video editing using Photoshop, Premiere, Illustrator, After Effects, and Flash. But the most important factor was to build a system around a ¥60,000 ($500) budget. If I was going to spend close to ¥100,000 (~$1200) on a desktop running hackintosh, I would rather buy a real Macbook Pro.
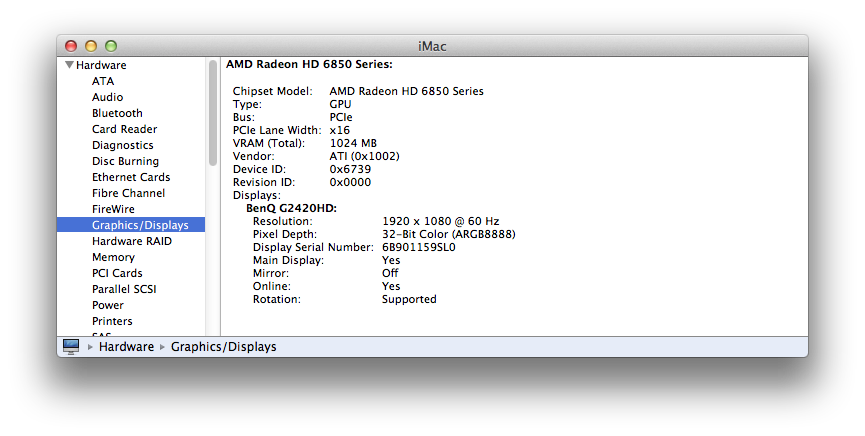
The motherboard I chose, GA-Z77P-D3, was the most basic Z77 I could find locally. I didn't go for the mid or high end of the spectrum because the standard one will do the job. The board has only 1 HDMI port but I was not planning on using Intel HD4000 anyway so I bought myself a Sapphire AMD Radeon 6850 which was on sale at a nearby shop and was natively supported under OSX Lion.
I went for a 128GB Samsung SSD because it was enough to install OSX and Adobe Creative Suite CS5. I have an old 500 GB 2.5 HDD drive which I plan on using for the Windows and Linux systems as well as for saving files into. The 8GB Corsair Vengence RAMS were also more than adequate for my needs that included playing some games.
Except for those parts which are only available in Japan, the rest can be purchased online at Amazon or Newegg.
The process to build an OSX Mountain Lion Hackintosh was a 2-step process for me. The App Store did not allow me to download Mountain Lion because my MBP couldn't support it. So, I installed OSX Lion 10.7 first using Unibeast following thisguide. Once 10.7 was up and running on the system, I upgraded the system to 10.7.4. Now, I had a system capable of running Mountain Lion. So, i went ahead to the App Store and finally was able to buy and download OSX Mountain Lion.
Installation
Preparation:
- Purchase the OS X Mountain Lion Application from the Mac App Store
- Create a Unibeast 1.5 Mountain Lion USB installer (follow this guide)
- In the Unibeast Mountain Lion USB, unhide the hidden files/folders and navigate to System>Library>Extensions.
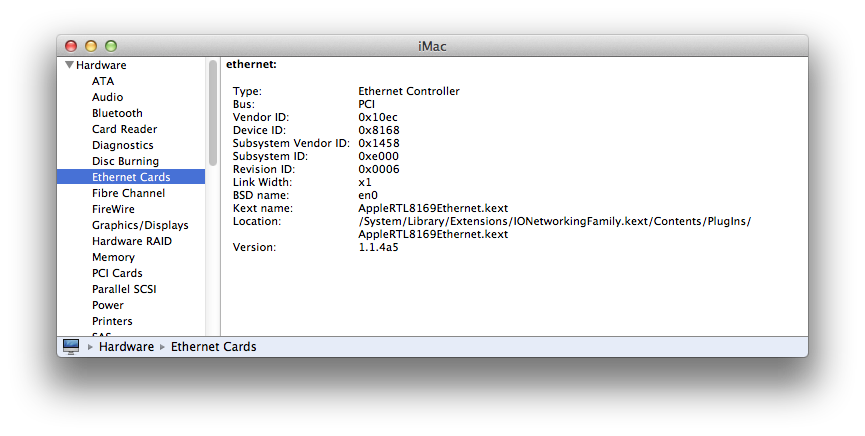
- Find the ATI6000Controller.kext (for those using Radeon 6xxx series GPUs) and IONetworkingFamily.kext files, copy them to a separate HDD or USB.
- Go back to the Unibeast USB and delete the kext files. If left undeleted, the GPU will not be recognized natively and the Realtek ethernet connection will not work. Both the copied kext files need to be reinstalled after ML is installed.
- Either use the onboard Intel HD4000 graphics via the HDMI port or use the AMD Radeon 6850 GPU. No issues here.
- Check that the motherboard's UEFI version is F6. If not, download the latest here and flash that using Q-Flash.
- Press F7 to load the Optimized Setting for the board.
- In the UEFI menu, navigate to "BIOS" and set the SATA to AHCI (default is IDE).
- Save and Exit then turn off your PC. You are about to install Mountain Lion.
- Plug in the Unibeast Mountain Lion USB to any of the USB 2.0 ports.
- Install your graphics card if you did not use it the first time around.
- Press F12 and choose the USB as the boot disk from the motherboard UEFI list.
- Follow the Tonymacx86 Unibeast Mountain Lion Step 3 guide here. Type "PCIRootUID=0 GraphicsEnabler=No" (without the quotes) at the Chimera screen and press ENTER.
- After Mountain Lion has successfully installed in the HDD, type "GraphicsEnabler=No" (without the quotes) at the Chimera screen again before choosing the HDD install to boot.
- Inside your new Mountain Lion system, navigate to the System>Library>Extensions folder.
- Find the ATI6000Controller.kext and IONetworkingFamily.kext files and delete them. Empty the trash bin.
- Install the previously copied ATI6000Controller.kext and IONetworkingFamily.kext in the new install. If you know how to properly code and install kext files, please do so. Otherwise, a free app called KextDrop is available to automate it for you. For some reason, a simple copy-paste approach did not work for me with these kext files so I used KextDrop.
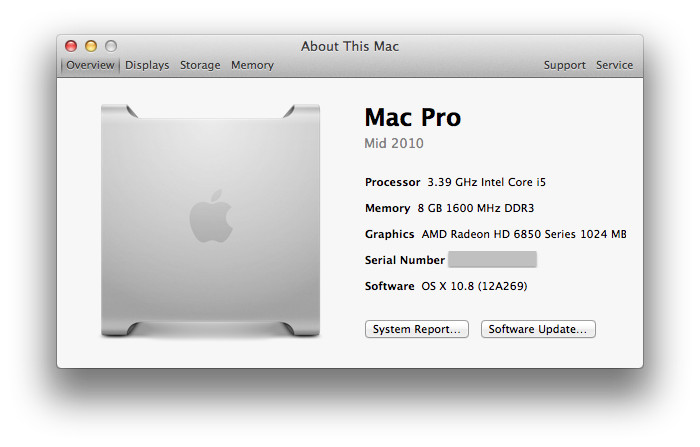
- Reboot your system and afterwhich the Graphics card will now be properly reflected in the system and the Realtek ethernet will work natively. There is no need to use the Lnx2Mac patch in Multibeast.
- Update files via the app store and your all set.
Summary
All works well except I can't use Find My Mac. I have slightly OC'd the motherboard pushing it to 3.8GHz with no problems. I didn't want to venture beyond 3.8GHz as the CPU temperature past that was hovering around 55ºC ~ 56ºC with a stock cooler :-o. For now, I'm good with 3.8GHz until such time when I decide to upgrade the cooler to handle above 4.0GHz overclocking. Current CPU temperature is still within tolerable limits at about 51ºC.
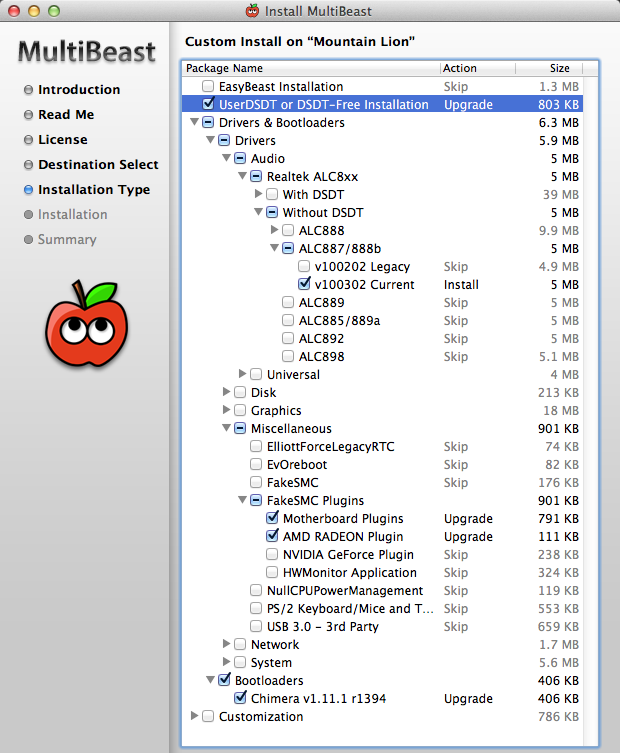
Multibeast Setting
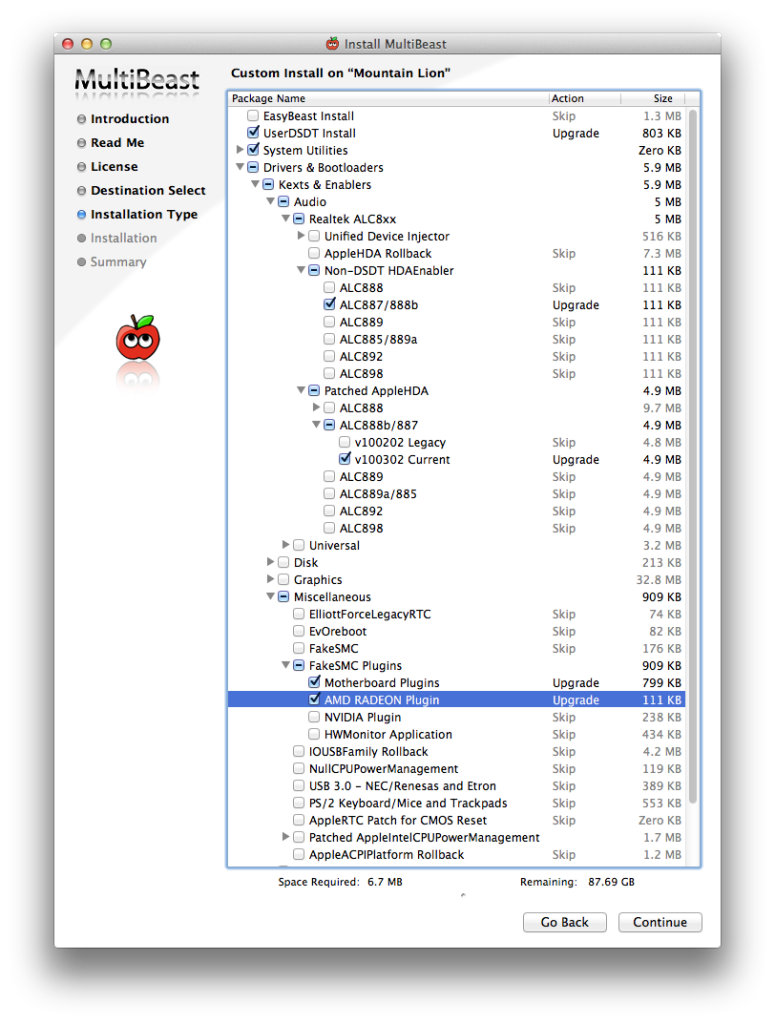
Parts Set:
Parts Set: