- Joined
- May 27, 2010
- Messages
- 2,364
- Motherboard
- Dell Optiplex 9030 All in One
- CPU
- i5-4690K
- Graphics
- HD 4600
- Mac
- Classic Mac
- Mobile Phone
[Success] i5 2500K/i7 3770K - Zotac Z77- ITX - Mountain Lion
Apple OS X Mountain Lion @ Mac Apps Store
Apple - OS*X Mountain Lion - Move your Mac even further ahead.
Zotac Z77-ITX AE WiFi Mini-ITX Motherboard
 http://www.amazon.com/dp/B0089OJHBW/
Corsair CMX8GX3M2B1600C9 XMS 8GB 1600MHz CL9 DDR3 Twin Memory Kit
[amazon-uk]http://www.amazon.co.uk/dp/B005G9C4K4/[/amazon-uk]
Crucial m4 SSD mSATA 64GB SATA III
 [amazon-uk]http://www.amazon.co.uk/dp/B008393M2S[/amazon-uk]
Atheros AR 9280
 Available from eBay
Noctua NF-R8 PWM Quiet PC Case Fan 80mm
 [amazon-uk]http://www.amazon.co.uk/dp/B006ISKZ4O[/amazon-uk]
Already Owned
Apple Cube Case
1 x i5 2500K processor
[amazon-uk]http://www.amazon.co.uk/dp/B004FA8NNW/[/amazon-uk]
Pico-PSU 160Watt

picoPSU-160-XT, 160watt (200watt peak) , 12V input DC-DC ATX Power Supply
Bluetooth Dongle DBT-120
 Available used from eBay
Apple IR receiver board from Macbook Pro
 Available used from eBay
Apple Wired Keyboard
http://www.amazon.com/dp/B000V07N9U/
Macally Mouse
[amazon-uk]http://www.amazon.co.uk/dp/B0047NKQLO/[/amazon-uk]
Comments
I have started a thread over on the Customization forums about the case mod.s needed to fit these parts inside them. Here, I will simply detail the install details and procedures needed along with comments on the system performance so far.
My choice of Sandy Bridge processor and Ivy Bridge board was based on economics (what I had) and the longer standing support for the HD 3000 graphics.
I chose the Zotac Z77 board for a few reasons: (1) I have had success with them before; (2) the spec is basically quite compatible on paper and (3) the Z77 is compatible with the HD3000 graphics while I gather that H77 systems are not usually. Doubts were whether the Cube heatsink could cope with a i5 2500k and if a 160w Pico PSU would be up to the task.
Hardware Build Up
See my thread in the tonymacx86 Customization forum section for full details. Summary of component substitutes though is as follows:
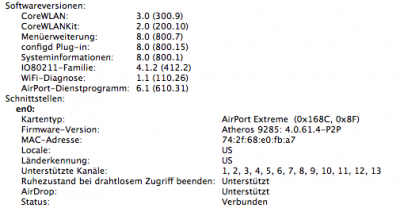
1.The Zotac combined wifi/BT card chipset in the UK is Ralink based - so does not work for OS X. I opted for an Atheros half-height card AR 9280 to take the place of the original Zotac combined card to handle wifi.
2.Wired up an Apple IR receiver board to the Cube ( via an internal USB header) for native OSX IR features. Get the board with cable. Cable colours correspond to the USB colours and it can be directly wired to an internal USB header using this kind of extension but with the end snipped off to allow direct soldering of red to red, black to black etc:

and made a hole to allow the board to poke out of the bottom of the Cube. It is hot glued in place from the inside.

3. My trusty DBT-120 is wired up an internal USB header of the type shown in 2 above (just plug in - no soldering/snipping) and positioned near the top of the Cube to be able to get a signal in and out.
4. Used a slimline slot loading DVD player and substituted for the old Mac Cube one (see my Customization thread for more details on how I did it).
5. Cooling is via the Apple Cube heatsink, some standoffs and a copper cube (again see my custo thread for details). The only fan in the system is the Noctua PWM 80mm fan that mounts to existing fan mounts in the bottom of the Cube. This combination is truly silent unless stress testing or encoding video and even then is barely audible up close.
]Software Installation
Note: If you are installing to this board for the first time, please update your Bios to the latest version before doing the OSX install.
I was really surprised by the level of functionality that is achievable without DSDT or much tweaking. It's a nice change from some previous installs and allows a quick first install.
There are some elements though that go beyond the basic running and needed doing. For me, none of the AICPUPM.kext patches available from Multibeast worked to enable me to get rid of the Nullcpupowermanagement.kext - always I got KPs on trying. Maybe it is fine for an Ivy Bridge CPU but when using the i5 2500k it just didn't work (this may have been due to my initial install having been made using the very first Zotac Uefi release and so this last comment may NOT apply to the more recent release). However, I found that the perl script patching method does work well for me. This process is described on the portugese site: -- PIRACY PROMOTING SITE o --.com • View topic - AICPMPatch. Only drawback to the manual patching is you need to have the OSX Developer tools installed. However, I have attached a 10.8 ready patched kext in the "Zotac kit" linked to near the end of this post in case it is of use to others. With this I have full sleep as well as full power management when used in combination with a DSDT*.
The other "gotcha" involved in using a Sandy Bridge processor for this Ivy Bridge board is that while full graphics acceleration is possible some edits to the AppleIntelSNBGraphicsFB.kext are needed and also the AppleIntelFramebufferCapri.kext needs a small plist edit. Both these edits are needed (for Sandy Bridge processor ONLY) because of the MEI driver device ID of the board not being Sandy Bridge friendly. Basically the system will try to load the AppleIntelFramebufferCapri.kext and not the AppleIntelSNBGraphicsFB.kext so the MEI driver device ID from the Capri kext needs to be taken from that kext and put into the AppleIntelSNBGraphicsFB.kext and you need to then either delete the Capri kext completely or modify the device ID in it so it does not load. In the attached folder I have put some pre-edited kexts though to make that easier which just need to be loaded via Kext Wizard (Kext Beast or Kext Utility could alternatively be used). In the edited AppleIntelSNBGraphicsFB.kext attached I have also made hex edits to set the connector table for the Zotac connections to ensure that they are activated correctly which is essential with getting HDMI audio to work. The reasons for this and the eidts made are explained in detail if you look at Toledas great guide to HDMI audio using the HD 3000. Note though that the patching can only activate HDMI audio for one of the two HDMI connectors.
Note that with the DSDT and the kexts attached you should use only the patched AppleHDA.kext for ALC892.
The DSDTs linked to at the end of this post have various patches for HDMI, integrated graphics, HDEF AUDIO and patched SATA and LPC sections so I'd suggest using an appropriate one of those for whichever version of Lion or Mountain Lion as part of a UserDSDT Install.
Below is a screenshot showing the results after stress testing for 4 hours. Note that this test was done before putting it all in the acrylic Cube, and theat temps in the box now are on average about 10C higher, so idle temps are mid 30s with peak stress tests hitting around 80c max. Bearing in mind that I will never in real life be pushing this Cube full out for 4 hours I think the results are pretty good.

Makes a pretty nice little "Mac Mini Pro". The results of this build are, all working: sleep, wake, wifi, bluetooth, IR, power management, full QE/CI.
Thanks go to Toleda (for all his great guides), Cassio on -- PIRACY PROMOTING SITE o --.com, flAked (for the AICPMPatch script and guide), Mieze for the tip on getting full QE/CI on Ivy with a SB CPU and to all that make this site such a great place.
EDIT: 2 August.
Thanks to Samisnake, the latest Bios version for the Zotac Z77-ITX board has been patched so that there is no need to use a patched version of Appleintelcpupowermanagement.kext or to use nullcpupowermanagement.kext. The patched bios is available from this link on rapidshare: https://rapidshare.com/files/1947814598/patchedbios.zip
For those wishing to use a DSDT I have extracted the original DSDT from the new Bios and also patched it for better functionality. Here is the original DSDT unpatched: https://rapidshare.com/files/2353133885/dsdt.aml.
Here is a version that is patched for general use (Ivy Bridge and Sandy Bridge) to remove warnings, make the board more OSX friendly, include better powermanagement and for full analogue audio when used with the ALC892 patched AppleHDA.kext: https://rapidshare.com/files/1249416293/dsdt.aml.
Please let me know how you get on with these files and any questions just ask. The Zotac Bios patch can be flashed to the motherboard in the same way as any normal new Zotac bios - check the Zotac.com website for instructions and flashing tools.
Edit 14 August. As this site now seems to allow zip file uploads properly I have attached a new "Zotac Kit" directly to this post. This does not include the old DSDTs from the earliest Bios version as in fact the best thing you can do with an initial release Bios is to flash it to the patched Bios......DSDTs for the patched Bios are linked to above.
* Power Management on this board.
I have made some interesting finds in the last few days about this board. Firstly, you really should be using the latest bios as Zotac developed the Uefi since the initial release. The earliest Uefi version did not allow me to have any powermanagement without (a) patching the AICPUPM kext and (b) having a properly edited DSDT. The new bios releases do allow powermanagement. The patched bios from Samisnake is a good start for this board as it allows you to get going without having to patch the AICPUPM kext or load revised versions from Multibeast. You should check with HW Monitor/ MSR dumper however to see what CPU frequencies you are getting (p-states) and, if it looks like you are only getting 2 p-states then the solution I found which works best for me is to use a pre-edited DSDT which includes general p-states AND to use the perl patching script referenced in this post to do a patch to your AICPUPM kext. For me, this allows full power management via OSX and not just 2 p-states.
EDIT 17 August: Following some sterling work from Miramar, there are some more DSDTs here for those of you using HD 4000 graphics. Miramar notes the following about the attached files within DSDT-miramar-Zotac-Z77ITX:
"The DSDTs are for the Zotac Z77ITX-A-E with Stock BIOS 2k120605. I've included 3 DSDTs in the archive.
(Please note that with a stock BIOS, you will need a patched AICPUPM to avoid a KP at startup)
dsdt-HDEF.aml
This dsdt contains edits to enable Realtek 892 analog audio output and SPDIF. Nothing else.
dsdt-HDEF-HDMI4000.aml
As above including edits for HD4000 HDMI audio. HDMI audio out via DisplayPort connector only. I'm using an i5 3570K.
dsdt-HDEF-HDMI4000-AR9285.aml
As above with edits for the bundled Azurewave Atheros AR9285 WiFi card. (168c,2b)"
Edit September 15:
Added a new zip folder with my current DSDT and notes. Please remember that at this point I am still using HD 3000 graphics without any discrete graphics card.
Edit October 22 2012:
DSDT Editing for the Zotac. DSDT PATCHING - roll your own!
The Zotac will work fine without a DSDT. If you are using the latest bios (or the patched bios) then all general functions work pretty much out of the box. However, if you want: to add a graphics card, have working HDMI audio, want to fix some annoying “Unknown AHCI controller” notices in system profiler, use HD 3000 graphics, or add P-state information then using a DSDT is probably the best way to go. DSDTs don’t change when OSX is updated and a fix once made is, generally, a fix forever.
While someone elses DSDT might work for you, it might also mess up your system - e.g. using a dsdt from someone who has a different processor or graphics card to you might cause a less than optimum result. So instead of using one of the DSDTs you will find attached to this post and in the threads I strongly urge you to extract and patch your own by following this "How to" which is specific to the Zotac board and for ALL processors (read the notes in the patches before applying them).
Extracting your DSDT
Some people think that because they have not injected a DSDT, there is not one on their system. That is not true, you are still “using” a DSDT, it is just that you are using the unmodified native DSDT for your system. To patch your DSDT first you have to extract it.
It used to be recommended to extract DSDT from Linux or Windows, but if you are running your Zotac already without DSDT injection then there are simple applications to let you extract the DSDT from your very own OS X system.
I am going to recommend an App called DSDTse, a version of which is attached in zip form (DSDTse.zip). The reason I am recommending that one is because I have made patches for the Zotac and added them to the attached App and writing those patches for DSDTse is just easy editing. Note: Even if you have DSDTse already, you need my version as it has the Zotac specific patches inside it.
Unzip it and put my version of DSDTse in your applications folder
Open the application and you will see this:

Now click “Extract DSDT” and the application will show you your DSDT that is native to your system and open it up in an editing window like this:

You can now see everything that is inside your DSDT and can directly make changes to it in the editing window.
Now go to the panel to the left of the main editor select "Custom Code" and click "Refresh".
See this:

Okay, so now you can see my list of stable patches. Select them one by one and check what they are and use the copy and paste functions in the editor to apply them to your DSDT in turn.
I recommend that you don't do too many at a time and that you click "Compile" regularly to check that you are not getting errors etc and to keep up to date copies before moving on to the next patch.DSDTSE shots
Editing is sensitive to every little "," etc. so it can be a frustrating time sometimes, but is a skill I think we need to have if we are going to get this working better.
I may (or someone else can if you want to please!) look at preparing these patches for a DSDT automatic patcher, such as DSDT Editor at some point.
I hope this helps people.
Edit 23 October: Added Noodles wifi patch to the patches inside DSDTse
Edit 6 May 2013. replaced CPU with IvyBridge i7 3770k and running 10.8.3 - now using DSDT from Giacomoleopardo and custom generated SSDT.
minihack's Cube Build: i5 2500K - Zotac Z77- ITX -
Mountain Lion

ComponentsMountain Lion
Apple OS X Mountain Lion @ Mac Apps Store
Apple - OS*X Mountain Lion - Move your Mac even further ahead.
Zotac Z77-ITX AE WiFi Mini-ITX Motherboard
Corsair CMX8GX3M2B1600C9 XMS 8GB 1600MHz CL9 DDR3 Twin Memory Kit
[amazon-uk]http://www.amazon.co.uk/dp/B005G9C4K4/[/amazon-uk]
Crucial m4 SSD mSATA 64GB SATA III
Atheros AR 9280
Noctua NF-R8 PWM Quiet PC Case Fan 80mm
Already Owned
Apple Cube Case
1 x i5 2500K processor
[amazon-uk]http://www.amazon.co.uk/dp/B004FA8NNW/[/amazon-uk]
Pico-PSU 160Watt
picoPSU-160-XT, 160watt (200watt peak) , 12V input DC-DC ATX Power Supply
Bluetooth Dongle DBT-120
Apple IR receiver board from Macbook Pro
Apple Wired Keyboard
http://www.amazon.com/dp/B000V07N9U/
Macally Mouse
[amazon-uk]http://www.amazon.co.uk/dp/B0047NKQLO/[/amazon-uk]
Comments
I have started a thread over on the Customization forums about the case mod.s needed to fit these parts inside them. Here, I will simply detail the install details and procedures needed along with comments on the system performance so far.
My choice of Sandy Bridge processor and Ivy Bridge board was based on economics (what I had) and the longer standing support for the HD 3000 graphics.
I chose the Zotac Z77 board for a few reasons: (1) I have had success with them before; (2) the spec is basically quite compatible on paper and (3) the Z77 is compatible with the HD3000 graphics while I gather that H77 systems are not usually. Doubts were whether the Cube heatsink could cope with a i5 2500k and if a 160w Pico PSU would be up to the task.
Hardware Build Up
See my thread in the tonymacx86 Customization forum section for full details. Summary of component substitutes though is as follows:
1.The Zotac combined wifi/BT card chipset in the UK is Ralink based - so does not work for OS X. I opted for an Atheros half-height card AR 9280 to take the place of the original Zotac combined card to handle wifi.
2.Wired up an Apple IR receiver board to the Cube ( via an internal USB header) for native OSX IR features. Get the board with cable. Cable colours correspond to the USB colours and it can be directly wired to an internal USB header using this kind of extension but with the end snipped off to allow direct soldering of red to red, black to black etc:
and made a hole to allow the board to poke out of the bottom of the Cube. It is hot glued in place from the inside.
3. My trusty DBT-120 is wired up an internal USB header of the type shown in 2 above (just plug in - no soldering/snipping) and positioned near the top of the Cube to be able to get a signal in and out.
4. Used a slimline slot loading DVD player and substituted for the old Mac Cube one (see my Customization thread for more details on how I did it).
5. Cooling is via the Apple Cube heatsink, some standoffs and a copper cube (again see my custo thread for details). The only fan in the system is the Noctua PWM 80mm fan that mounts to existing fan mounts in the bottom of the Cube. This combination is truly silent unless stress testing or encoding video and even then is barely audible up close.
]Software Installation
MultiBeast Configuration

Note: If you are installing to this board for the first time, please update your Bios to the latest version before doing the OSX install.
I was really surprised by the level of functionality that is achievable without DSDT or much tweaking. It's a nice change from some previous installs and allows a quick first install.
There are some elements though that go beyond the basic running and needed doing. For me, none of the AICPUPM.kext patches available from Multibeast worked to enable me to get rid of the Nullcpupowermanagement.kext - always I got KPs on trying. Maybe it is fine for an Ivy Bridge CPU but when using the i5 2500k it just didn't work (this may have been due to my initial install having been made using the very first Zotac Uefi release and so this last comment may NOT apply to the more recent release). However, I found that the perl script patching method does work well for me. This process is described on the portugese site: -- PIRACY PROMOTING SITE o --.com • View topic - AICPMPatch. Only drawback to the manual patching is you need to have the OSX Developer tools installed. However, I have attached a 10.8 ready patched kext in the "Zotac kit" linked to near the end of this post in case it is of use to others. With this I have full sleep as well as full power management when used in combination with a DSDT*.
The other "gotcha" involved in using a Sandy Bridge processor for this Ivy Bridge board is that while full graphics acceleration is possible some edits to the AppleIntelSNBGraphicsFB.kext are needed and also the AppleIntelFramebufferCapri.kext needs a small plist edit. Both these edits are needed (for Sandy Bridge processor ONLY) because of the MEI driver device ID of the board not being Sandy Bridge friendly. Basically the system will try to load the AppleIntelFramebufferCapri.kext and not the AppleIntelSNBGraphicsFB.kext so the MEI driver device ID from the Capri kext needs to be taken from that kext and put into the AppleIntelSNBGraphicsFB.kext and you need to then either delete the Capri kext completely or modify the device ID in it so it does not load. In the attached folder I have put some pre-edited kexts though to make that easier which just need to be loaded via Kext Wizard (Kext Beast or Kext Utility could alternatively be used). In the edited AppleIntelSNBGraphicsFB.kext attached I have also made hex edits to set the connector table for the Zotac connections to ensure that they are activated correctly which is essential with getting HDMI audio to work. The reasons for this and the eidts made are explained in detail if you look at Toledas great guide to HDMI audio using the HD 3000. Note though that the patching can only activate HDMI audio for one of the two HDMI connectors.
Note that with the DSDT and the kexts attached you should use only the patched AppleHDA.kext for ALC892.
The DSDTs linked to at the end of this post have various patches for HDMI, integrated graphics, HDEF AUDIO and patched SATA and LPC sections so I'd suggest using an appropriate one of those for whichever version of Lion or Mountain Lion as part of a UserDSDT Install.
Below is a screenshot showing the results after stress testing for 4 hours. Note that this test was done before putting it all in the acrylic Cube, and theat temps in the box now are on average about 10C higher, so idle temps are mid 30s with peak stress tests hitting around 80c max. Bearing in mind that I will never in real life be pushing this Cube full out for 4 hours I think the results are pretty good.
Makes a pretty nice little "Mac Mini Pro". The results of this build are, all working: sleep, wake, wifi, bluetooth, IR, power management, full QE/CI.
Thanks go to Toleda (for all his great guides), Cassio on -- PIRACY PROMOTING SITE o --.com, flAked (for the AICPMPatch script and guide), Mieze for the tip on getting full QE/CI on Ivy with a SB CPU and to all that make this site such a great place.
EDIT: 2 August.
Thanks to Samisnake, the latest Bios version for the Zotac Z77-ITX board has been patched so that there is no need to use a patched version of Appleintelcpupowermanagement.kext or to use nullcpupowermanagement.kext. The patched bios is available from this link on rapidshare: https://rapidshare.com/files/1947814598/patchedbios.zip
For those wishing to use a DSDT I have extracted the original DSDT from the new Bios and also patched it for better functionality. Here is the original DSDT unpatched: https://rapidshare.com/files/2353133885/dsdt.aml.
Here is a version that is patched for general use (Ivy Bridge and Sandy Bridge) to remove warnings, make the board more OSX friendly, include better powermanagement and for full analogue audio when used with the ALC892 patched AppleHDA.kext: https://rapidshare.com/files/1249416293/dsdt.aml.
Please let me know how you get on with these files and any questions just ask. The Zotac Bios patch can be flashed to the motherboard in the same way as any normal new Zotac bios - check the Zotac.com website for instructions and flashing tools.
Edit 14 August. As this site now seems to allow zip file uploads properly I have attached a new "Zotac Kit" directly to this post. This does not include the old DSDTs from the earliest Bios version as in fact the best thing you can do with an initial release Bios is to flash it to the patched Bios......DSDTs for the patched Bios are linked to above.
* Power Management on this board.
I have made some interesting finds in the last few days about this board. Firstly, you really should be using the latest bios as Zotac developed the Uefi since the initial release. The earliest Uefi version did not allow me to have any powermanagement without (a) patching the AICPUPM kext and (b) having a properly edited DSDT. The new bios releases do allow powermanagement. The patched bios from Samisnake is a good start for this board as it allows you to get going without having to patch the AICPUPM kext or load revised versions from Multibeast. You should check with HW Monitor/ MSR dumper however to see what CPU frequencies you are getting (p-states) and, if it looks like you are only getting 2 p-states then the solution I found which works best for me is to use a pre-edited DSDT which includes general p-states AND to use the perl patching script referenced in this post to do a patch to your AICPUPM kext. For me, this allows full power management via OSX and not just 2 p-states.
EDIT 17 August: Following some sterling work from Miramar, there are some more DSDTs here for those of you using HD 4000 graphics. Miramar notes the following about the attached files within DSDT-miramar-Zotac-Z77ITX:
"The DSDTs are for the Zotac Z77ITX-A-E with Stock BIOS 2k120605. I've included 3 DSDTs in the archive.
(Please note that with a stock BIOS, you will need a patched AICPUPM to avoid a KP at startup)
dsdt-HDEF.aml
This dsdt contains edits to enable Realtek 892 analog audio output and SPDIF. Nothing else.
dsdt-HDEF-HDMI4000.aml
As above including edits for HD4000 HDMI audio. HDMI audio out via DisplayPort connector only. I'm using an i5 3570K.
dsdt-HDEF-HDMI4000-AR9285.aml
As above with edits for the bundled Azurewave Atheros AR9285 WiFi card. (168c,2b)"
Edit September 15:
Added a new zip folder with my current DSDT and notes. Please remember that at this point I am still using HD 3000 graphics without any discrete graphics card.
Edit October 22 2012:
DSDT Editing for the Zotac. DSDT PATCHING - roll your own!
The Zotac will work fine without a DSDT. If you are using the latest bios (or the patched bios) then all general functions work pretty much out of the box. However, if you want: to add a graphics card, have working HDMI audio, want to fix some annoying “Unknown AHCI controller” notices in system profiler, use HD 3000 graphics, or add P-state information then using a DSDT is probably the best way to go. DSDTs don’t change when OSX is updated and a fix once made is, generally, a fix forever.
While someone elses DSDT might work for you, it might also mess up your system - e.g. using a dsdt from someone who has a different processor or graphics card to you might cause a less than optimum result. So instead of using one of the DSDTs you will find attached to this post and in the threads I strongly urge you to extract and patch your own by following this "How to" which is specific to the Zotac board and for ALL processors (read the notes in the patches before applying them).
Extracting your DSDT
Some people think that because they have not injected a DSDT, there is not one on their system. That is not true, you are still “using” a DSDT, it is just that you are using the unmodified native DSDT for your system. To patch your DSDT first you have to extract it.
It used to be recommended to extract DSDT from Linux or Windows, but if you are running your Zotac already without DSDT injection then there are simple applications to let you extract the DSDT from your very own OS X system.
I am going to recommend an App called DSDTse, a version of which is attached in zip form (DSDTse.zip). The reason I am recommending that one is because I have made patches for the Zotac and added them to the attached App and writing those patches for DSDTse is just easy editing. Note: Even if you have DSDTse already, you need my version as it has the Zotac specific patches inside it.
Unzip it and put my version of DSDTse in your applications folder
Open the application and you will see this:
Now click “Extract DSDT” and the application will show you your DSDT that is native to your system and open it up in an editing window like this:
You can now see everything that is inside your DSDT and can directly make changes to it in the editing window.
Now go to the panel to the left of the main editor select "Custom Code" and click "Refresh".
See this:
Okay, so now you can see my list of stable patches. Select them one by one and check what they are and use the copy and paste functions in the editor to apply them to your DSDT in turn.
I recommend that you don't do too many at a time and that you click "Compile" regularly to check that you are not getting errors etc and to keep up to date copies before moving on to the next patch.DSDTSE shots
Editing is sensitive to every little "," etc. so it can be a frustrating time sometimes, but is a skill I think we need to have if we are going to get this working better.
I may (or someone else can if you want to please!) look at preparing these patches for a DSDT automatic patcher, such as DSDT Editor at some point.
I hope this helps people.
Edit 23 October: Added Noodles wifi patch to the patches inside DSDTse
Edit 6 May 2013. replaced CPU with IvyBridge i7 3770k and running 10.8.3 - now using DSDT from Giacomoleopardo and custom generated SSDT.