
- Joined
- Oct 22, 2010
- Messages
- 323
- Motherboard
- z68a-d3-b3
- CPU
- i7-3770k
- Graphics
- GTX 650
Gigabyte Z68MA-D2H-B3+EVGA GTX650
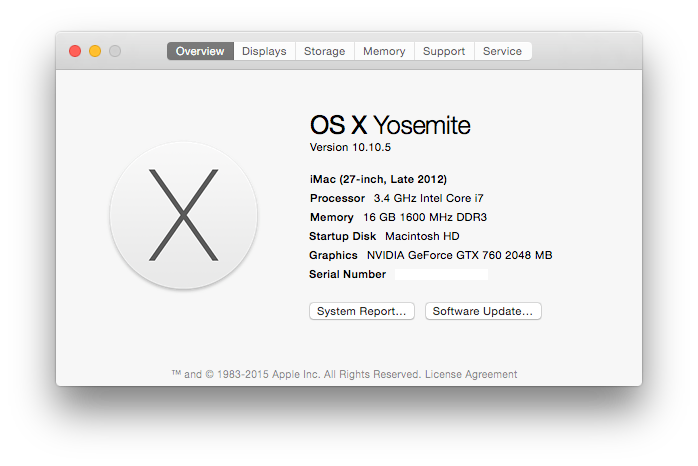
Yosemite 10.10.5 [With Clover Updated]
New Installers / re installers I highly recommend you use clover for the boot loader its just amazing link below
http://www.tonymacx86.com/yosemite-...ga-gtx650-working-dsdt-free-9.html#post954300
How to update Yosemite simply click the link to see thread
Yosemite updates
[10.10.1]- Nov-17-2014
http://www.tonymacx86.com/yosemite-...ga-gtx650-working-dsdt-free-7.html#post924891
[10.10.2]- Jan-28-2015
http://www.tonymacx86.com/yosemite-...a-gtx650-working-dsdt-free-10.html#post974342
[10.10.3]- Apr-10-2015
http://www.tonymacx86.com/yosemite-...-gtx650-working-dsdt-free-10.html#post1019165
[10.10.4]- Jul-01-2015
http://www.tonymacx86.com/yosemite-...-gtx650-working-dsdt-free-11.html#post1061577
[10.10.5]- Aug-13-2015
http://www.tonymacx86.com/yosemite-...-gtx650-working-dsdt-free-12.html#post1082438
Yosemite Issues
Temp / Full Audio Fix [Dec-28-2014]
http://www.tonymacx86.com/yosemite-...ga-gtx650-working-dsdt-free-9.html#post950800
Bootloader [Jan-02-2015] - Updated [June-06-2015]
Switching from Chameleon/Chimera to Clover
http://www.tonymacx86.com/yosemite-...ga-gtx650-working-dsdt-free-9.html#post954300
HDMI Audio [Apr-13-2015]
http://www.tonymacx86.com/yosemite-...-gtx650-working-dsdt-free-11.html#post1021194
Computer Specs
-Intel core i7 3770k
-GT 640 / 650 / 760
-16gb Ram
-3TB HD Segate
-256gb SSD
-Apple wifi card
Bios Options
Load Factory Defaults on BIOS and make the changes as mentioned below (Ignore ones that are not available/applicable)
-Gigabyte Z68MA-D2H-B3 v1.3 Bios U1b
-Enable AHCI
-Disable Intel Virtualization Technology
-Disable VT-D
Generic List
1. Set Boot Mode to UEFI/UEFI+Legacy/CSM Enabled (As per bootable USB)
2. Disable Secure Boot
3. Disable Fast Boot
4. Disable CFG-Lock
5. Set OS Type as Other OS
6. Disable VT-D
7. Disable TPM
8. Set Graphics Card as your Primary Video Adapter, Disable Internal Graphics (If the system have Discrete Graphics)
9. Set SATA Mode as AHCI
10. Disable EIST (Enhanced Intel Speedstep Technology)
11. Enable USB Legacy Support
12. Set xHCI mode as AUTO (Not SMART Auto)
13. Set xHCI Hand-Off as Enabled
14. Enable the EHCI Hand-off
15. Enable HPET
16. Set HPET to 64-Bit
Yosemite usb key
-Download Yosemite from Appstore
-Format usb stick Partition as mbr and mac osx journalized then use the unibeast app to create key
-use unibeast to create key i did not choose any settings the laptop or legacy i just clicked next and installed it on the usb
Installing (did not need any boot flags because my hardware is compatible) installed like OEM MAC
-Boot PC push f12 choose unibeast key boot from it
-use diskutil to format and install OS X Yosemite
-PC will reboot push f12 boot usb key again this time it will show you an icon for Yosemite on the installed drive boot that
-PC will boot in Yosemite setup user /pass
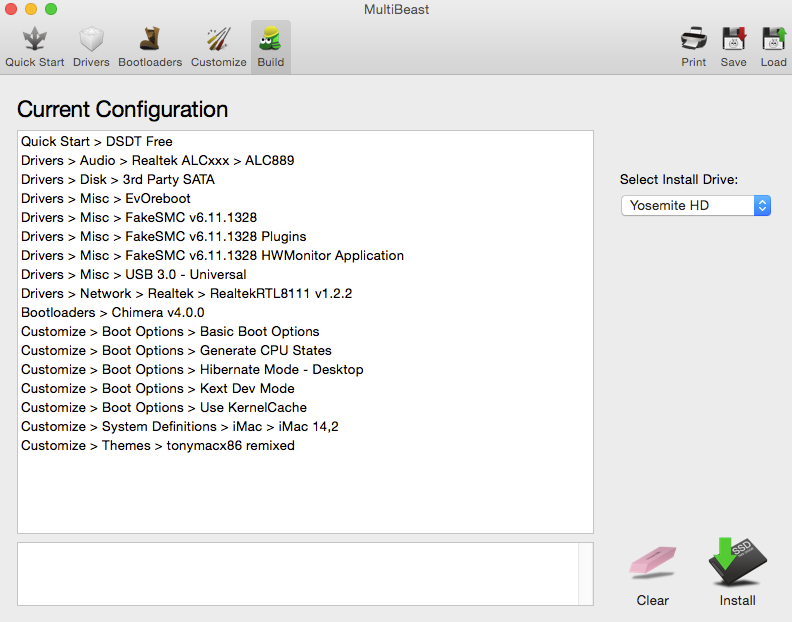
-install Multibeast use the file supplied below
-Everything is DSDT FREE
-once installed reboot your done (Audio / network / sleep / wake all work)
-Enable Trim using multibeast works
Note: if you use VMware or parallels to run windows / virtual machines you will want to Enable Virtualization Technology its generally disabled
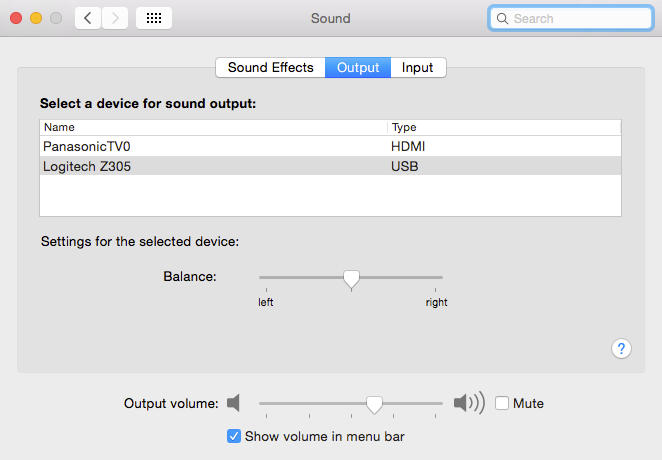
Audio (Do all this to get audio working)
-After install the audio icon doesn't show up top so go to system preferences and enable it
-Make sure sound effects and outputs is set to internal speakers
-to get the volume sliding sound go to system preferences --> Sound --> Play feedback when volume is changed

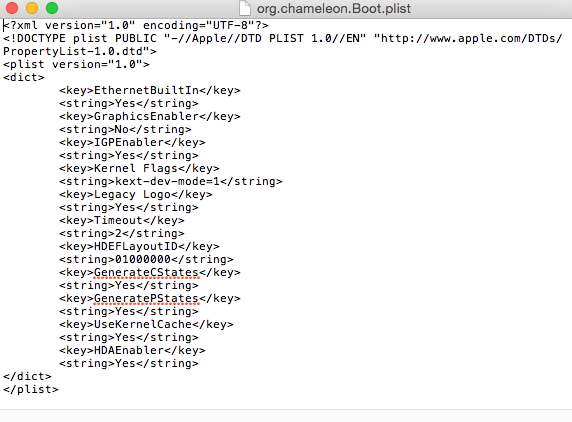
Bootplist
Note for Reference: (GraphicsEnabler=No (if you own a natively supported GPU like the Nvidia GeForce GT 640/650 etc..)
-Also if you enable GraphicsEnabler=Yes and your video card is native it will display 0mb in the about this mac section and also you may have display issues i.e. dual displays etc..
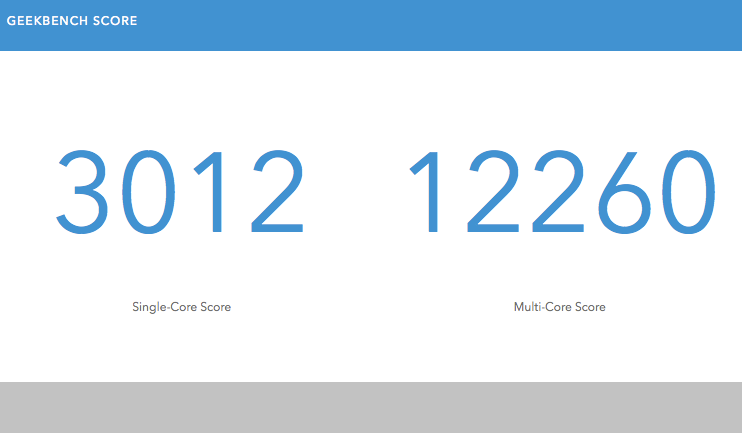
Geek Bench (Ha went up by a bit compared to mavericks)
Yosemite 10.10.5 [With Clover Updated]
New Installers / re installers I highly recommend you use clover for the boot loader its just amazing link below
http://www.tonymacx86.com/yosemite-...ga-gtx650-working-dsdt-free-9.html#post954300

How to update Yosemite simply click the link to see thread
Yosemite updates
[10.10.1]- Nov-17-2014
http://www.tonymacx86.com/yosemite-...ga-gtx650-working-dsdt-free-7.html#post924891
[10.10.2]- Jan-28-2015
http://www.tonymacx86.com/yosemite-...a-gtx650-working-dsdt-free-10.html#post974342
[10.10.3]- Apr-10-2015
http://www.tonymacx86.com/yosemite-...-gtx650-working-dsdt-free-10.html#post1019165
[10.10.4]- Jul-01-2015
http://www.tonymacx86.com/yosemite-...-gtx650-working-dsdt-free-11.html#post1061577
[10.10.5]- Aug-13-2015
http://www.tonymacx86.com/yosemite-...-gtx650-working-dsdt-free-12.html#post1082438
Yosemite Issues
Temp / Full Audio Fix [Dec-28-2014]
http://www.tonymacx86.com/yosemite-...ga-gtx650-working-dsdt-free-9.html#post950800
Bootloader [Jan-02-2015] - Updated [June-06-2015]
Switching from Chameleon/Chimera to Clover
http://www.tonymacx86.com/yosemite-...ga-gtx650-working-dsdt-free-9.html#post954300
HDMI Audio [Apr-13-2015]
http://www.tonymacx86.com/yosemite-...-gtx650-working-dsdt-free-11.html#post1021194
Computer Specs
-Intel core i7 3770k
-GT 640 / 650 / 760
-16gb Ram
-3TB HD Segate
-256gb SSD
-Apple wifi card
Bios Options
Load Factory Defaults on BIOS and make the changes as mentioned below (Ignore ones that are not available/applicable)
-Gigabyte Z68MA-D2H-B3 v1.3 Bios U1b
-Enable AHCI
-Disable Intel Virtualization Technology
-Disable VT-D
Generic List
1. Set Boot Mode to UEFI/UEFI+Legacy/CSM Enabled (As per bootable USB)
2. Disable Secure Boot
3. Disable Fast Boot
4. Disable CFG-Lock
5. Set OS Type as Other OS
6. Disable VT-D
7. Disable TPM
8. Set Graphics Card as your Primary Video Adapter, Disable Internal Graphics (If the system have Discrete Graphics)
9. Set SATA Mode as AHCI
10. Disable EIST (Enhanced Intel Speedstep Technology)
11. Enable USB Legacy Support
12. Set xHCI mode as AUTO (Not SMART Auto)
13. Set xHCI Hand-Off as Enabled
14. Enable the EHCI Hand-off
15. Enable HPET
16. Set HPET to 64-Bit
Yosemite usb key
-Download Yosemite from Appstore
-Format usb stick Partition as mbr and mac osx journalized then use the unibeast app to create key
-use unibeast to create key i did not choose any settings the laptop or legacy i just clicked next and installed it on the usb

Installing (did not need any boot flags because my hardware is compatible) installed like OEM MAC
-Boot PC push f12 choose unibeast key boot from it
-use diskutil to format and install OS X Yosemite
-PC will reboot push f12 boot usb key again this time it will show you an icon for Yosemite on the installed drive boot that
-PC will boot in Yosemite setup user /pass
-install Multibeast use the file supplied below
-Everything is DSDT FREE
-once installed reboot your done (Audio / network / sleep / wake all work)
-Enable Trim using multibeast works
Note: if you use VMware or parallels to run windows / virtual machines you will want to Enable Virtualization Technology its generally disabled
Audio (Do all this to get audio working)
-After install the audio icon doesn't show up top so go to system preferences and enable it
-Make sure sound effects and outputs is set to internal speakers
-to get the volume sliding sound go to system preferences --> Sound --> Play feedback when volume is changed


Bootplist
Note for Reference: (GraphicsEnabler=No (if you own a natively supported GPU like the Nvidia GeForce GT 640/650 etc..)
-Also if you enable GraphicsEnabler=Yes and your video card is native it will display 0mb in the about this mac section and also you may have display issues i.e. dual displays etc..

Geek Bench (Ha went up by a bit compared to mavericks)
