Contribute
Register

[SUCCESS] No Cut Mac Pro: Core i5-2500K - ASUS P8Z77-M Pro - 16GB RAM - Zotac GT640

Status
Not open for further replies.
Joined
Feb 11, 2012
Messages
227
Motherboard
ASUS P8Z77-M Pro
CPU
i5-2500K OC @ 4.8 GHz
Graphics
HD 7750
Mac
  1. iMac
  2. MacBook Air
  3. MacBook Pro
  4. Mac mini
Mobile Phone
  1. iOS
spence4's Silent Mac Pro: Core i5-2500K - ASUS P8Z77-M Pro - 16GB RAM - Zotac GT640

53116-macpro.jpg
Components

Apple Mac OS X version 10.8.3 Mountain Lion @ App Store
https://itunes.apple.com/us/app/os-...WWW-NAUS-ITUHOME-NEWAPPLICATIONS&ign-mpt=uo=2

ASUS P8Z77-M Pro LGA 1155 Intel Z77 Micro ATX Intel Motherboard
http://www.amazon.com/gp/product/B002MAPSAI?ie=UTF8

ZOTAC ZONE Edition ZT-60204-20L GeForce GT640 2GB 128-bit DDR3 PCI Express 3.0 x16 HDCP Ready Video Card
http://www.newegg.com/Product/Product.aspx?Item=N82E16814500274

Intel Core i5-2500K Sandy Bridge 3.3GHz (3.7GHz Turbo Boost) LGA 1155 95W Quad-Core Desktop Processor Intel HD Graphics 3000 BX80623I52500K
http://www.newegg.com/Product/Product.aspx?Item=N82E16819115072

LG BH12LS38 12x Blu-ray Burner BD-RE/16x DVD±RW DL SATA Drive w/3D Playback, LightScribe & Software (Black)
http://www.amazon.com/LG-BH12LS38-Blu-ray-Writer-Black/dp/B005IPJXJ6

Corsair Vengeance Blue 16GB (4x4GB) DDR3 1600 MHz (PC3 12800) Desktop Memory (CML16GX3M4A1600C9B)
http://www.amazon.com/Corsair-Vengeance-Desktop-Memory-CML16GX3M4A1600C9B/dp/B0058J1QYC

SAMSUNG 830 Series MZ-7PC128B/WW 2.5" 128GB SATA III MLC Internal Solid State Drive (SSD)
http://www.newegg.com/Product/Product.aspx?Item=N82E16820147163

SeaSonic S12II 620 Bronze 620W ATX12V V2.3 / EPS 12V V2.91 80 PLUS BRONZE Certified Active PFC Power Supply
http://www.newegg.com/Product/Product.aspx?Item=N82E16817151096

Noctua NF-S12B FLX 120mm, 3 Speed Setting, Beveled Blade Tips Design, SSO Bearing Fan x2
http://www.newegg.com/Product/Product.aspx?Item=N82E16835608009[/B]

[B]Noctua NH-D14 SE2011 140mm and 120mm SSO CPU Cooler[/B]
[newegg]http://www.newegg.com/Product/Product.aspx?Item=N82E16835608024[/B]


[SIZE=4]Already Owned[/SIZE]

[B]2008 Mac Pro case[/B]


[B]23 Inch Apple Cinema Display A1082[/B]


[B]Apple Wireless Keyboard[/B]
[amazon]http://www.amazon.com/gp/product/B002TMRZOQ/[/amazon]

[B]Apple Magic Mouse[/B]
[amazon]http://www.amazon.com/gp/product/B002TLTGM6/[/amazon]

[B]Apple Bluetooth Board from MacBook[/B]


[B]Apple Wifi Card from MacBook Pro[/B]


[B]Apple Power Mac G4 Cube USB Speakers[/B]


[B]Western Digital WD Green WD20EARX 2TB 64MB Cache SATA 6.0Gb/s 3.5" Internal Hard Drive[/B]
[newegg]http://www.newegg.com/Product/Product.aspx?Item=N82E16822136891


53115-image3.jpg
53114-image2.jpg
53113-image1.jpg
53112-image.jpg


Comments

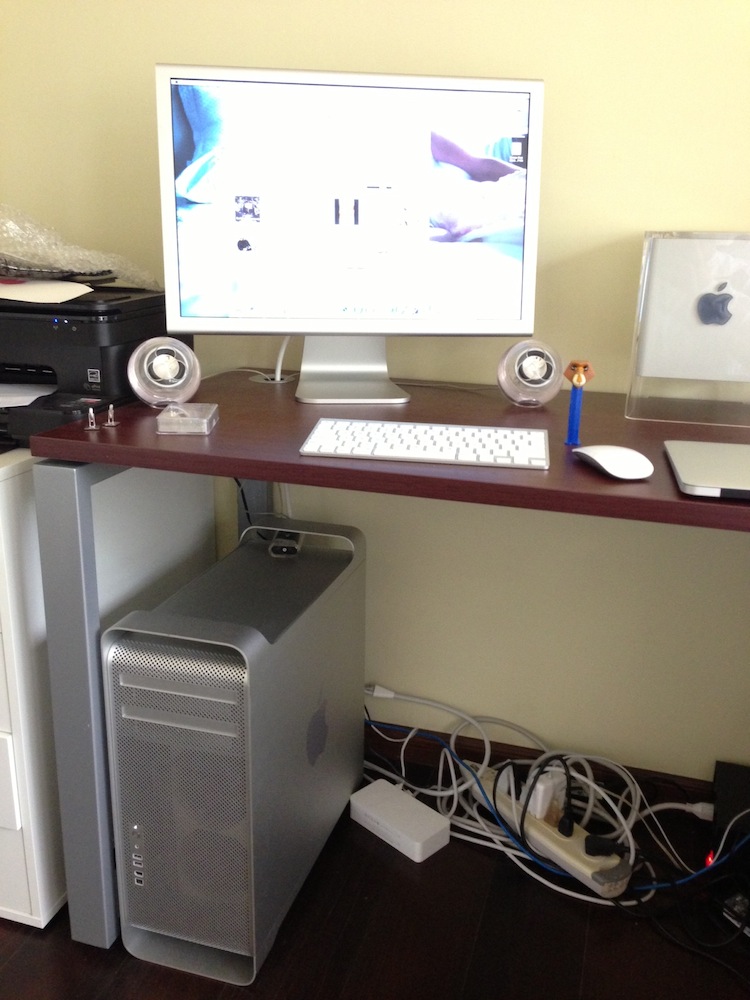
My initial goal was to make this build as close to stock as possible. Not only did I plan to do not cutting on the case, but I had the crazy idea of reusing the original Mac Pro Delta fans. I was able to get the Delta fans going, but even with only 3.3V from the orange line off a SATA power cable, the noise was noticeable. I decided to swap the originals out for some Noctua fans as the Noctuas in my G4 Cube build are quiet and move enough air to keep the temperature under control. I was not crazy about the taupe and tan color scheme and how the fans could be seen from the front of the computer, but the silent operation won out over aesthetics at the end of the day. I also originally had a Sapphire HD6850 1GB DDR5 graphics card in this machine and the computer was still making a slight noise and I determined it was the HD6850 so I downgraded to the Zotac GT640 Zone Edition because it is passively cooled. I do not play games and the most graphics intense work I do is iMovie or Aperature - I know I could have gotten away with HD3000, but then I would have had to cut the back of the case. An added bonus of the Zotac is that it is supported natively and has the proper VESA setting so my grey Apple and dial are properly proportioned. This may not seem important to many people, but I did use Preview to make the Apple logo skinnier and then turned off boot using legacy logo so that the Apple would at least be the proper dimensions. It did bother me that the dial was fat.

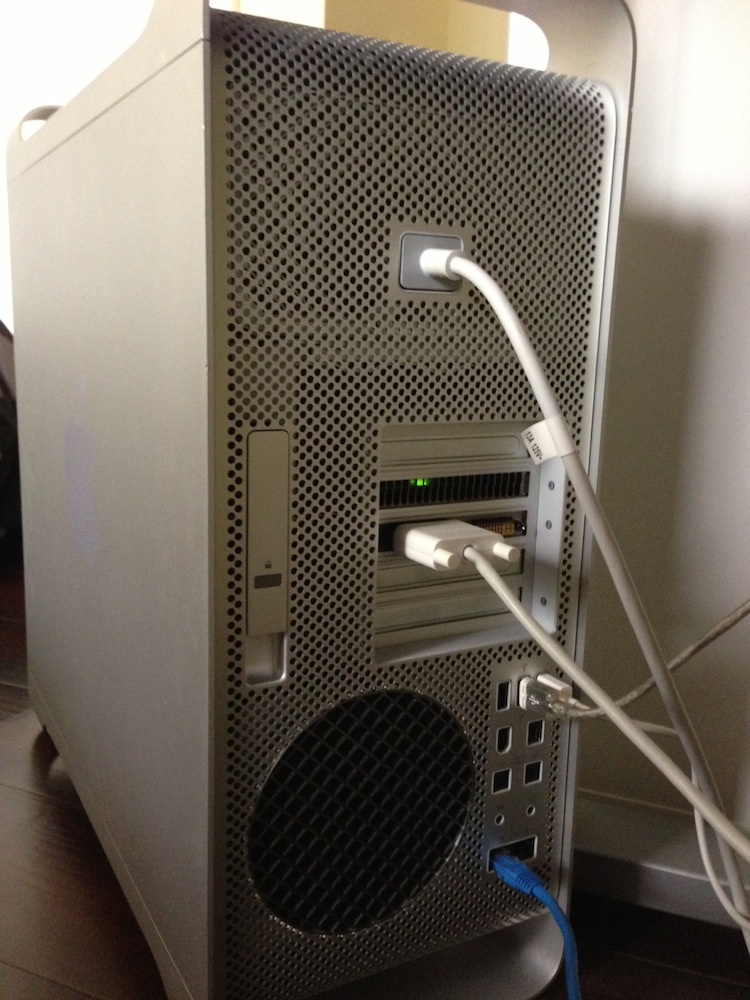
Using original Apple hardware for wifi and bluetooth ensured easy operation, but makes the inside of the case a bit messy. Similarly, using the drive sleds required an extra adapter and cable that snakes around but can be mostly concealed by the plastic front fan mount. Finally, I ripped out the insides of a real Mac Pro PSU and put the guts from my Seasonic inside. I retained the grey Apple socket, because I am obviously anal like that. I was able to move the Seasonic PSU fan into a vertical position to replace the Apple PSU fan so that the fan still is controlled by the PSU.

Everything works great on the system, sleep, wake from sleep, USB2 and USB3, etc. I am not using any of the board's built in USB ports, rather I am using all of the headers, again so that I did nto have to cut the back of the case. The front USBs are USB3 on my build and they work with only USB3 storage devices. However, if I force the computer to sleep by pressing the power button, upon waking, the front panel USB3 ports mount USB2 storage devices. The problem is that when mounting a USB3 device after the sleep/wake event it only registers at USB2 speeds. If the computer goes to sleep on its own, upon waking, the front USB3 can only mount USB3 devices and they are at USB3 speeds. Strange, I know.

I have overclocked my CPU to 4.8 GHz with no problems. When running Handbrake it gets up to the high 50's and low 60's, but nothing to worry about. I have only had the new graphics card in for a couple weeks, but so far nothing over 50C on that either.

I'm quite pleased with the build as it is fast, looks stock from the outside and doesn't make a sound - except for the stupid optical drive. Welcome anyone's comments, criticism, or feedback.


MultiBeast Settings

53117-multibeast-settings.jpg

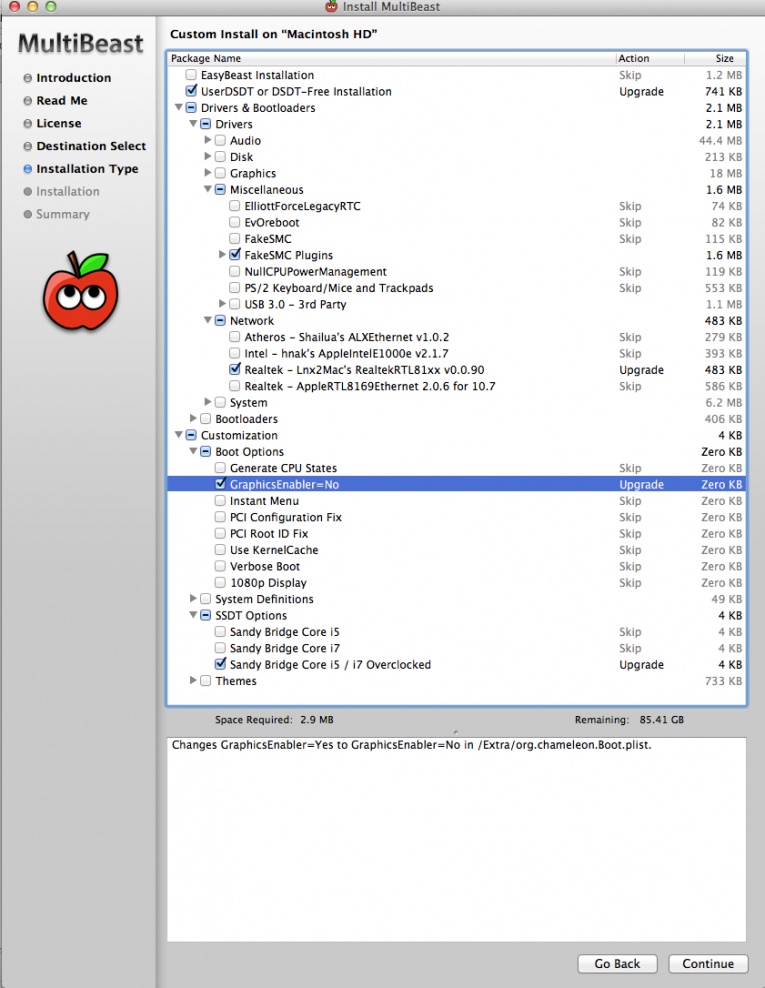
For MultiBeast I did DSDT-Free Installation, FakeSMC plugins and HWMonitor, Lnx2Mac's RealtekTRL81xx v0.0.90, GraphicsEnabler=No, and SSDT Sandy Bridge Core i5 / i7 Overclocked.

I will put a screenshot of my MultiBeast settings up as soon as I can figure out how to do so. It seems that I cannot just drag an image from my desktop into here. I will also add some pictures of my case as I have bragged about not making any cuts, but have not shown the finished result.

EDIT: I figured out how to get the MultiBeast image in there. I will add more pictures alter to make it a prettier post.

EDIT: Notice the broken links where my pictures used to be at the top and in the Multibeast section. Can someone tell me how to get the pictures to sit nicely in the middle of the text so you can see them full size? Thanks.

EDIT: Fixed pictures so they are now full-sized. Thanks, Stork.
 
Last edited by a moderator:
Well, I gotta give you some love now that you called me out. I missed the Sandy Bridge 6-Series motherboard powered by a Ivy Bridge processor. So, congratuations for accomplishing your installation with your set of components. :thumbup:

However, what caught my eye was your Mac Pro case mod philosophy. I'm just into doing the same with a GA-Z68MX-UD2H / i5-2500K based system. I was just looking at how to get cables into/out of the case to hook up the rear panel "stuff" (technical term) without cutting the rear panel. I can probably do the HD3000 graphics with an HDMI to DVI adapter cable, but that's too much like work. So, I'll use one of my Gigabyte HD 5770 graphics cards. All the USB back panel connections should work with short USB extension cables while the FW800/400 will be handled by a PCI-e card. Ethernet will be via WiFi card since I've installed Mountain Lion on the SSD in a bench top setup with the motherboard and 5770 card. Now, to get the front panel working.

Happy hackintoshing with the best looking case made today. :thumbup:
 
Thanks for giving me the shout out, Stork. If you really want to give me some love you will tell me how to get the first picture to sit where the first jpg/broken link icon sits and the last to sit where the MB settings are described. Also, how do I get the pictures of my Hack to be full size in the post rather than needing to click on them? Thanks.

The problem you will run into with the short USB extensions is that if you want the graphics card to line up properly there really isn't much room for the extensions. The biggest problem is the LAN cable - you can run the USB headers from the mobo to the back of the case. Alternatively if you just plan to use Airport, it won't be too bad.
 
To get your G5 case picture to show up under your post's title, I just used Manage Attachments while in the editor. Manage Attachments is below the editor's window when in the editor.
  • Before I clicked on Manage Attachments, I put the cursor in the edited window where I wanted the image to appear;
  • I clicked on Manage Attachments,
  • Chose the image (click the box on the lower right hand corner of the image in the bottom row of the window),
  • Clicked on the button next to the Done button that says Insert In-line, and
  • Clicked Done.
I then previewed the post to see if I had it at the right location.

But that gives a small image picture. Phooie! Here's a better way. Use your account's Album feature associated with your Profile. :thumbup: You can create sub albums to manages your images better, and they'll appear full size. Warning! You should reduce the size and resolution of your pictures in order to appear without taking all day to load and take up one or more scrolling windows to move thru the picture in the post. You've seen those posts with those pictures, I'm sure. :lol: I use my album to store all my pictures for my build descriptions and posts. Here's my album for my 10.8.3 nVidia GTX 650 Ti benchmarks which we used in another thread.
http://www.tonymacx86.com/members/stork/albums/10-8-3-nvidia-gtx-650-ti-screenshots/

...The problem you will run into with the short USB extensions is that if you want the graphics card to line up properly there really isn't much room for the extensions. The biggest problem is the LAN cable - you can run the USB headers from the mobo to the back of the case. Alternatively if you just plan to use Airport, it won't be too bad.
Yes, I anticipated that condition. I have JB Weld the standoffs to give the mATX motherboard access to the first PCI slot on the case. I have several inches to work with between the back of the mobo panel and the case. I plan to hook the necessary extension cables (audio, USB and maybe Ethernet) before "seating" the mobo. It's not an exact science, but it takes some planning. And, I'm not in a hurry to do the whole case mod project at once.

But enough of the case mod stuff. So, how do you like the look and feel of your system?
 
Thanks! I will make an album with my pics as you suggested. Although it seems you have straightened it out for me already.

I really like the look and feel of the system- obviously I am one of those guys obsessed with making things as stock as possible and having the old monitor and speakers helps. Enough of the physical though because that doesn't seem to be where your interest really lies- ill save that for the workshop forum. I figure the next thing I need is fiddling with the asus splash screen so that I have all grey before the apple logo and spinning dial rather than the asus screen. After that it will be the startup chime. But the system is fast and quiet and is also cool- could be because I really only do iTunes web surfing and email. Really prefer the gt640 to the hd6850 despite the lower performance because I didn't need to do the ati6xxx kext trick to install and the startup screen issue I mentioned. I'm about to update my cube motherboard it'll be another 7 series board with sandy bridge CPU. I don't see any reason to upgrade to ivy bridge.
 
Good points. If you had a Z68 mobo with the Intel Integrated Graphics and compatible i3/i5/i7 processor you wouldn't need the graphics card. I say this because my Zorro Sandy Bridge build uses HD3000, and it can do all I ask of it. My Son-of Zorro and Thunderball builds use graphics cards just to assist tonymacx86 crew with some beta software and procedure testing; both systems started out using HD3000/4000 and worked just fine.

Another interesting side note, if you will, is BoomR sticky thread in the Music forum section. He makes a case (pun intended) for using HD4000 Intel Integrated Graphics for audio recording.
http://www.tonymacx86.com/music/87502-old-dog-new-tricks-using-hd4000-your-pro-audio-daw-builds.html

In conclusion :lol: today's integrated graphics is powerful enough for General Purpose Computing (whatever that is). :thumbup: I can't wait to get my hands on a good 8-series motherboard and Haswell HD4600 compatible processor is Summer to see how well it performs.

BTW, Tom's Hardware site has a monthly review of best graphics cards for the money. The article always concludes with a graphics (card) hierarchy chart. It's a very good reference.
Graphics Card Hierarchy Chart : Best Graphics Cards For The Money: March 2013
 
Even if you have a 7 series motherboard and Sandy Bridge or 6 series motherboard and Ivy Bridge you can still get it to work by editing those two Kexts or by checking the box in the latest Multibeast, right? My main reason for a discrete card was so I would not have to cut the case and could have it looking stock.

Thanks for the link to Tom's Hardware. I know I could have gone way higher with my graphics cards, but I really wanted a passive one which meant it was my Zotac and the Sapphire HD7750 which uses DDR5 memory, but does not play as nice with OS X. I could have also just gotten the Arctic Cooling Accelero passive cooler for my HD6850, but then I still would have had the wide dial with skinny Apple logo at startup- I told you I am really anal about this stuff :). Anyway, sold the HD6850 to a friend doing a G5 mod for the cost of the Zotac so for me it was a free exchange.

Not sure if I will go has well or not. My 2500k overclocks to 5.0 with no problems (I keep it at 4.8) and I have heard that the Ivy counterpart, 3570k isn't as good of an over locker. The Ivy will also set me back another $200. I have an i3 2105 in the cube I'm going to redo so that is of course an option, but since that is just a media server, no need to go crazy.
 
Hey Stork, finally got those pictures sorted out.

Quick question on USB 3.0 support. My front USB 3's work fine when I start the the computer. Fine for OS X means that USB 2 mass storage devices don't mount :) However, after waking from sleep the front USB 3 ports drop down to USB 2 speeds. On the plus side, USB 2 mass storage devices mount after waking from sleep. Any ideas? Thanks.

How's your no-cut case coming? I have access to a 3D printer so I am going to make a custom bottom plate to clean up my G4 Cube mod. Pretty excited, but using Google Sketch-up is time consuming!
I do not have any experience with USB 3 ports or devices as I don't own any, yet. Sorry 'bout that.

My Mac Pro Mod got put aside for a bit. This weekend looks like an excellent weekend project. Keep us informed of your efforts on the G4 Cube mod. eelhead, beelzbozo and I are stalled because our H67N-USB3 / i3-2125 system runs way to hot to run in the Cube's case. So, eelhead is looking to reorient the mobo to get it into a better airstream. It's currently on the bottom facing the side of the case.
 
No worries. I finally got my USB issues fixed, but sleep still drops the USB3 speeds down to USB2 speeds which I figure is unacceptable. However, thanks to some fancy DSDT editing by member giacomoleopardo, My USB3 ports mount USB2 mass storage devices without needing to sleep first and still mount USB3 devices at USB3 speeds. I'm surprised you haven't moved this build over to Golden Builds or maybe created a new category called platinum or diamond. Do you see how purty she is with no cuts at the back?!

My buddy with the 3D printer will have some free time to dive into the project ina week or two, should have some more updates over in the workshop section then.
 
Status
Not open for further replies.
Back
Top