
P1LGRIM
Moderator
- Joined
- Mar 2, 2012
- Messages
- 26,462
- Motherboard
- Lenovo ThinkStation p700
- CPU
- 2x E5-2620 V3
- Graphics
- RX 560
- Mac
- Classic Mac
- Mobile Phone
ThriftyMac - HP dc7900 - £100 - 10.9.4 Mavericks

Components
HP dc7900 Family
These computers date back to 2008 (at least) and are therefore unfortunately no longer available on Amazon or Newegg. They are however readily available from many other sources.
Already Owned
Western Digital Caviar Blue 160 GB (7200 rpm) SATA 8 MB 3.5 inch Hard Drive
[AMAZON-uk]http://www.amazon.co.uk/dp/B000RT77I2/?tag=tonymacx86-21
Acer AL1913 19" VGA Monitor
No longer available on Amazon or Newegg.
Trust White Mac USB Keyboard
No longer available on Amazon or Newegg.
Generic USB Mouse
Available everywhere.
Comments
I am not sure that this even qualifies as a build as it utilises an off the shelf solution, but it offers a cheap and easy entry to Mavericks for anyone on a tight budget. I was alerted to the possibility of installing OS X on a HP dc7900 through this post by optroodt.
After conducting a little research I discovered that the dc7900 comes in three formats - A Small Form Factor, a Convertible Minitower and an Ultra-Slim Desktop. The exact specifications for each model can be found in this online pdf file.
From this we see that there are twelve processor options listed but we are only interested in the Core 2 Quad models which reduces the choice to four.
CPU Q8200 2.33 Ghz - Q9400 2.66 Ghz - Q9550 2.83 Ghz - Q9650 3.0 Ghz
Memory Non-ECC DDR2 PC2-5300 667 Mhz and PC2-6400 800 Mhz
The Ultra-Slim Desktop supports 8 GB
The Small Form Factor and Convertible Minitower both support 16 GB
Graphics - Intel Graphics Media Accelerator 4500 (Integrated on Chipset).
Audio - Integrated HD audio with AD1884A codec.
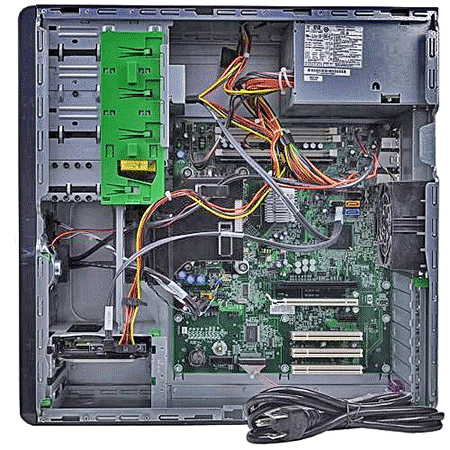
From the specifications I decided that a Minitower would probably make a good backup server.
I searched ebay and found a Convertible Minitower with a 2.33GHz CPU, 3GB RAM, and a 1TB hard drive. The auction was Buy It Now or Best Offer so I put in an offer way below the Buy It Now price which the seller immediately accepted. Windows 7 was preinstalled with a license sticker on the case too.
Installation Notes
I downloaded the latest BIOS from the HP website and installed it with the preinstalled Windows 7.
I then removed the 1TB hard drive and replaced it with a spare 160GB Western Digital drive for the Operating System installation.
BIOS Settings
The BIOS is pretty basic and the Default setting is fine for the installation, just make sure that DEP is enabled.
Installation
To enter the BIOS press F10 on boot - Press F9 for the Boot Menu.
For the first boot use boot flags -v -x
The process is quite slow but eventually you will be rewarded - Format your hard drive and start the installation.
When the system restarts select your hard drive (not the USB flash drive) and again boot with -v -x
Continue with the installation until you reach the desktop.
Open Finder and navigate to /System/Library/Extensions - Locate file AppleHPET.kext and move it to the Trash. If you don’t delete AppleHPET.kext you will have to boot with -f every time or you will lose access to your USB ports and network. Be aware that some updates will install a new version of AppleHPET.kext so if your system starts acting strangely after an update, check to see if AppleHPET.kext has been reinstalled and if so delete it again.
Next run Multibeast.
Select Easybeast options then the following :
Drivers - Disk - Deselect 3rd Part SATA
Drivers - Network - Intel - Select AppleIntelE1000e v3.0.4.1a
Drivers - Misc - Select FakeSMC Plugins and HWMonitor (this step is optional but FakeSMC is essential)
At this point you can save a copy of your settings if you wish.
Click Install. Acknowledge the notifications of the unsigned kexts.

Repair permissions.
Shutdown.
Remove the USB flash drive.
Power on.
Acceptable results for audio can be produced with VoodooHDA but by far the easiest solution is to just plug in a pair of USB speakers. I use Logitech S150 speakers.
Obviously Video isn't high performance but you can watch YouTube videos etc and for a server I'm not really concerned. I may add a discrete graphics card at a later date.
14 JUL 2014 - Added 3TB Hard Drive - Installed OS X Server
15 JUL 2014 - Installed Geforce 210 1GB Graphics Card - Changed IGPEnabler to No and added GraphicsEnabler Yes in org.chameleon.Boot.plist - Installed CUDA driver 6.0.51. Now Using DVI monitor.
19 JUL 2014 - Installed Trendnet TK-214i KVM switch to share keyboard, monitor and mouse between my two server builds.
23 JUL 2014 - Removed the original 3GB of RAM and installed 8GB (4 x HYMP125U64CP8-S6)
25 SEP 2014 - Upgraded to OS X 10.9.5 (13F34) with Combo Update.
Upgraded to OS X Server 3.2.1 via the App Store.
21 OCT 2014 - Upgraded to OS X 10.10 Yosemite - See Post #30 for procedure.
Note : Server needs an upgrade to version 4.0 to run on Yosemite - Available in the App Store.
17 NOV 2014 - Upgraded to OS X 10.10.1 (14B25) via Software Update - Deleted AppleHPET.kext.
21 NOV 2014 - Changed boot-loader from Chimera to Clover - See Post #37 for procedure.
27 JAN 2015 - Upgraded to OS X 10.10.2 (14C109) via Software Update - Deleted AppleHPET.kext.
03 FEB 2015 - Replaced Geforce 210 1GB Graphics Card with MSi GeForce GT 630 4GB.
10 MAR 2015 - Installed Security Update 2015-002 via the App Store. OS X 10.10.2 (14C1510)
20 MAR 2015 - Installed Security Update 2015-003 via the App Store. OS X 10.10.2 (14C1514)
08 APR 2015 - Upgraded to OS X 10.10.3 (14D131) via Software Update - Deleted AppleHPET.kext.
09 APR 2015 - Upgraded to OS X Server 4.1 via the App Store.
17 APR 2015 - Installed 10.10.3 Supplemental Update (14D136) via the App Store.
30 JUN 2015 - Upgraded to OS X 10.10.4 (14E46) via Software Update - Deleted AppleHPET.kext.
01 JUL 2015 - Upgraded to OS X Server 4.1.3 via the App Store.
24 AUG 2015 - Upgraded to OS X 10.10.5 (14EF27) via Software Update - Deleted AppleHPET.kext.
24 AUG 2015 - Upgraded to OS X Server 4.1.5 via the App Store.
19 SEP 2015 - Upgraded to OS X Server 5.0.3 via the App Store.
22 SEP 2015 - Upgraded to OS X Server 5.0.4 via the App Store.
22 DEC 2015 - Upgraded BIOS to v01.27 Rev.A 27 Nov 2015
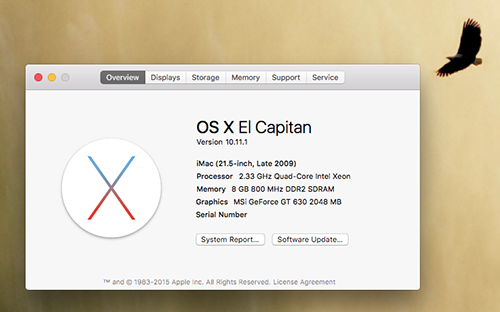
El Capitan does work on a dc7900 but as this guide was originally written for Mavericks I am not going to go into detail here, however for those that want to attempt it this is briefly what I did :
Built a flash drive using the createinstallmedia method and Clover r3330 in legacy mode.
Used a DSDT called DSDT_7900_osx109.aml that Google found (on this site).
Installed on a blank hard drive.
Hint : Use rootless=0 in your install config.plist to avoid the grey screen with endless beachball.
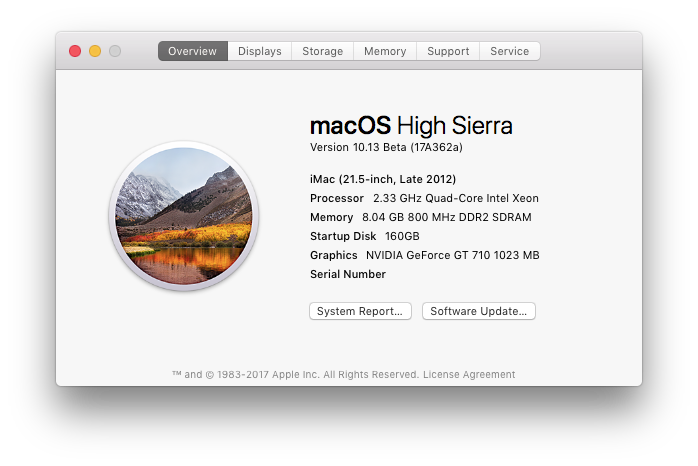
Just in case anyone was curious . . . .
Last edited:
