
- Joined
- Apr 29, 2013
- Messages
- 9
- Motherboard
- GA-Z87X-UD3H
- CPU
- Intel i5-4570
- Graphics
- Intel HD4600
- Mac
- Classic Mac
- Mobile Phone
[SUCCESS] jeoffrey’s Build: i5-4570 - GA-Z87X-UD3H - 16GB RAM - HD4600
Gigabyte GA-Z87X-UD3H
[AMAZON-de]http://www.amazon.de/dp/B00CXK59QK[/AMAZON-de]
Intel Core i5-4570 Boxed
[AMAZON-de]http://www.amazon.de/dp/B00CV3E3WK[/AMAZON-de]
Scythe Mugen 4 PCGH Edition
[AMAZON-de]http://www.amazon.de/dp/B00DZR4COA[/AMAZON-de]
Crucial Ballistix Tactical BLT2C8G3D1608ET3LX0CEU (2x8GB)
[AMAZON-de]http://www.amazon.de/dp/B00A14ZTRO[/AMAZON-de]
TP-Link TL-WDN4800 Wireless Dual Band N900 PCIe
[AMAZON-de]http://www.amazon.de/dp/B007GMPZ0A[/AMAZON-de]
Fractal Design Define R4 Pearl Black
[AMAZON-de]http://www.amazon.de/dp/B008NFWNFO[/AMAZON-de]
be quiet! Straight Power E9 480W CM
[AMAZON-de]http://www.amazon.de/dp/B005LUXLNW[/AMAZON-de]
Already Owned
Samsung 840 series EVO 120GB
[AMAZON-de]http://www.amazon.de/dp/B00E391KA8[/AMAZON-de]
Sharkoon QuickPort Combo eSATA
[AMAZON-de]http://www.amazon.de/dp/B003CUS5Z2[/AMAZON-de]
Iiyama ProLite X2377HDS-B1
[AMAZON-de]http://www.amazon.de/dp/B005UK3K8O[/AMAZON-de]
Comments
Building
CPU

Memory and CPU Cooler

Overview

SSD

BIOS
Upgraded BIOS to version F9. Note this requires a ‘new’ version of Efiflash.exe, please download the Asian version of the package, as at least the European did not contain this updated version [13-04-2014].
BIOS Settings
At boot press ‘Delete’ to enter BIOS.
I prefer to change my settings in the Classic Mode, which can be entered with ‘F2’.
0. First load Optimized Defaults ‘F7’
1. M.I.T.Advanced Memory Settings
5. Peripherals Marvell SATA Controller Configuration
OS X Mavericks Installation using Clover
I followed the tonymacx86 guide to install OS X Maverick 10.9.2 for the Clover boot loader. This guide can be found at http://www.tonymacx86.com/mavericks...-how-install-os-x-mavericks-using-clover.html.
STEP 1: Download OS X Mavericks
After these steps you’ll have a working system, where everything functions as expected except Audio. The system boots in verbose mode and you’ll notice that the EFI partition is mounted by default.
Additional configuration
1. Install Clover Configurator (optional) - http://www.tonymacx86.com/downloads.php?do=cat&id=10
2. Install EFI Mounter (if you did not install Clover Configurator) - http://www.tonymacx86.com/downloads.php?do=file&id=207
3. Following changes were made to the Clover config.plist
Benchmark
Geekbench 3.1.3 64-bit

Windowshots
About This Mac
More Info…
Graphics

Audio

TRIM

HWMonitor
If you need additional information, just ask in the comments.
The final config.plist for Clover. Just need to add the UUID for your boot partition.
View attachment config-EDIT UUID.plist.zip
jeoffrey’s Build: i5-4570 - GA-Z87X-UD3H - 16GB RAM - HD4600
The Beast

ComponentsThe Beast
Gigabyte GA-Z87X-UD3H
[AMAZON-de]http://www.amazon.de/dp/B00CXK59QK[/AMAZON-de]
Intel Core i5-4570 Boxed
[AMAZON-de]http://www.amazon.de/dp/B00CV3E3WK[/AMAZON-de]
Scythe Mugen 4 PCGH Edition
[AMAZON-de]http://www.amazon.de/dp/B00DZR4COA[/AMAZON-de]
Crucial Ballistix Tactical BLT2C8G3D1608ET3LX0CEU (2x8GB)
[AMAZON-de]http://www.amazon.de/dp/B00A14ZTRO[/AMAZON-de]
TP-Link TL-WDN4800 Wireless Dual Band N900 PCIe
[AMAZON-de]http://www.amazon.de/dp/B007GMPZ0A[/AMAZON-de]
Fractal Design Define R4 Pearl Black
[AMAZON-de]http://www.amazon.de/dp/B008NFWNFO[/AMAZON-de]
be quiet! Straight Power E9 480W CM
[AMAZON-de]http://www.amazon.de/dp/B005LUXLNW[/AMAZON-de]
Already Owned
Samsung 840 series EVO 120GB
[AMAZON-de]http://www.amazon.de/dp/B00E391KA8[/AMAZON-de]
Sharkoon QuickPort Combo eSATA
[AMAZON-de]http://www.amazon.de/dp/B003CUS5Z2[/AMAZON-de]
Iiyama ProLite X2377HDS-B1
[AMAZON-de]http://www.amazon.de/dp/B005UK3K8O[/AMAZON-de]
Comments
Building
CPU
Memory and CPU Cooler
Overview
SSD
BIOS
Upgraded BIOS to version F9. Note this requires a ‘new’ version of Efiflash.exe, please download the Asian version of the package, as at least the European did not contain this updated version [13-04-2014].
BIOS Settings
At boot press ‘Delete’ to enter BIOS.
I prefer to change my settings in the Classic Mode, which can be entered with ‘F2’.
0. First load Optimized Defaults ‘F7’
1. M.I.T.Advanced Memory Settings
a. Extreme Memory Profile (X.M.P.) Profile1

2. BIOS Features
a. Fast Boot Disabled
b. VT-d Disabled
c. Boot Mode Selection UEFI and Legacy

3. Peripherals
a. Initial Display Output IGFX
b. XHCI Mode Auto
c. Audio Controller Enabled
d. Intel Processor Graphics Memory Allocation 1024M
e. DVMT Total Memory Size MAX
f. XHCI Hand-off Enabled
g. EHCI Hand-off Enabled

4. Peripherals SATA Configurationc. Audio Controller Enabled
d. Intel Processor Graphics Memory Allocation 1024M
e. DVMT Total Memory Size MAX
f. XHCI Hand-off Enabled
g. EHCI Hand-off Enabled
a. SATA Mode Selection AHCI
b. For each Serial ATA Port
b. For each Serial ATA Port
- Hot Plug Enabled
- External SATA Disabled
- External SATA Disabled
a. GSATA Controller AHCI Mode

OS X Mavericks Installation using Clover
I followed the tonymacx86 guide to install OS X Maverick 10.9.2 for the Clover boot loader. This guide can be found at http://www.tonymacx86.com/mavericks...-how-install-os-x-mavericks-using-clover.html.
STEP 1: Download OS X Mavericks
Followed this exactly
STEP 2: Prepare Bootable USB DriveFollowed this exactly using:
- Legacy Mode for Custom Install settings
- config.plist-Standard.zip as config.plist - http://www.tonymacx86.com/attachmen...ericks-using-clover-config.plist-standard.zip
STEP 3: Install OS X Mavericks- Legacy Mode for Custom Install settings
- config.plist-Standard.zip as config.plist - http://www.tonymacx86.com/attachmen...ericks-using-clover-config.plist-standard.zip
Followed this exactly
STEP 4: Post-InstallationFollowed this exactly using:
- Custom Install: UEFI-Capable Systems for Custom Install settings
- config.plist-Standard.zip as config.plist - http://www.tonymacx86.com/attachments/mavericks-desktop-guides/85987d1394227511-how-install-os-x-mavericks-using-clover-config.plist-
- Custom Install: UEFI-Capable Systems for Custom Install settings
- config.plist-Standard.zip as config.plist - http://www.tonymacx86.com/attachments/mavericks-desktop-guides/85987d1394227511-how-install-os-x-mavericks-using-clover-config.plist-
After these steps you’ll have a working system, where everything functions as expected except Audio. The system boots in verbose mode and you’ll notice that the EFI partition is mounted by default.
Additional configuration
1. Install Clover Configurator (optional) - http://www.tonymacx86.com/downloads.php?do=cat&id=10
2. Install EFI Mounter (if you did not install Clover Configurator) - http://www.tonymacx86.com/downloads.php?do=file&id=207
3. Following changes were made to the Clover config.plist
a. Mount EFI partition (it might already be mounted)
b. Goto EFI -> Clover
c. Open ‘config.plist’ with TextEdit
- Goto <key>Boot</key>
- Goto <key>USB</key>
- Goto <key>KernelAndKextPatches</key>
b. Goto EFI -> Clover
c. Open ‘config.plist’ with TextEdit
- Goto <key>Boot</key>
PHP:
<dict>
<key>Arguments</key>
<string>dart=0</string> //removed ‘-v’ here
<key>DefaultVolume</key>
<string>YOUR UUID GOES HERE</string> // replaced ‘MacHDD’ with UUID of boot partition *See Note 1
<key>Timeout</key>
<integer>5</integer> // replaced ’10’ with ‘5’
<key>XMPDetection</key>
<true/> // enables XMPDetection
</dict>
PHP:
<dict>
<key>HighCurrent</key> // added this, however not tested
<true/>
</dict>
PHP:
<dict>
// removed     <key>AsusAICPUPM</key>
//                  <true/>
</dict>
- Goto <key>KextsToPatch</key>
Note 1: UUID can be found with Disk Utility; Open Disk Utility -> select your boot partition -> press ‘Info’ button —> find ‘Universal Unique Identifier’ -> copy number string
- Goto <key>RtVariables</key>
PHP:
<array>
<dict>                        // added for TRIM support SSD
<key>Comment</key>
<string>Trim enabler patch</string>
<key>Name</key>
<string>IOAHCIBlockStorage</string>
<key>Find</key>
<data>QVBQTEUgU1NEAA==</data>
<key>Replace</key>
<data>AAAAAAAAAAAAAA==</data>
</dict>                      // addition ends here
</array>- Goto <key>RtVariables</key>
PHP:
<dict>
<key>MountEFI</key>
<false/> // added to disable default mount of EFI partition
</dict>
d. Save config.plist
e. Restart
4. Enable Audio over HDMI Intel HD4600 and ‘regular’ ALC898e. Restart
I refer to my previous post here http://www.tonymacx86.com/buying-advice/128796-first-build-web-development.html#post794381
5. HWSensors/HWMonitora. Download the latest binaries from http://www.hwsensors.com/releases
b. Mount the .dmg file
c. Mount EFI partition (it might already be mounted)
d. Copy all .kext files (ACPISensors.kext, FakeSMC.kext, CPUSensors.kext, GPUSensors.kext, LPCSensors.kext) to EFI -> Clover -> kexts
e. Copy ‘HWMonitor.app’ to your ‘Applications’ folder
b. Mount the .dmg file
c. Mount EFI partition (it might already be mounted)
d. Copy all .kext files (ACPISensors.kext, FakeSMC.kext, CPUSensors.kext, GPUSensors.kext, LPCSensors.kext) to EFI -> Clover -> kexts
e. Copy ‘HWMonitor.app’ to your ‘Applications’ folder
Benchmark
Geekbench 3.1.3 64-bit
Windowshots
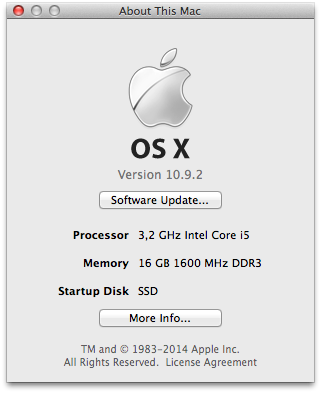
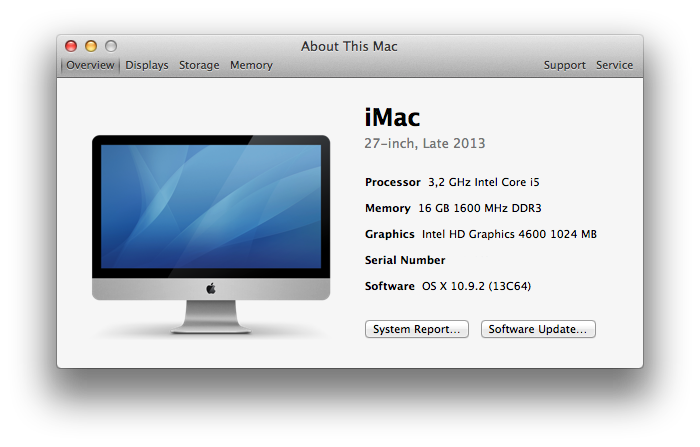
About This Mac
More Info…
Graphics
Audio
TRIM
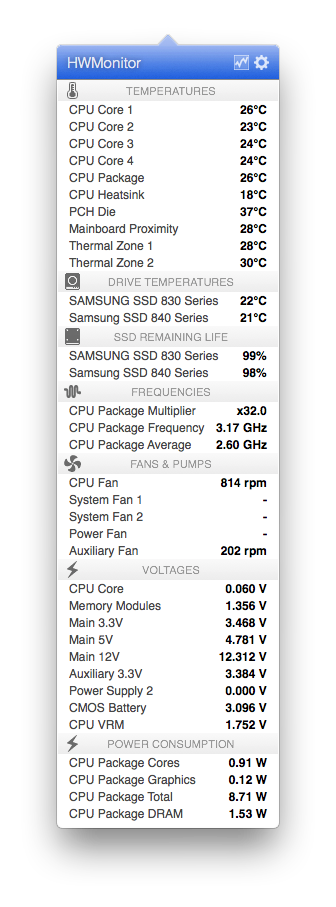
HWMonitor
If you need additional information, just ask in the comments.
The final config.plist for Clover. Just need to add the UUID for your boot partition.
View attachment config-EDIT UUID.plist.zip
Last edited by a moderator: