- Joined
- Dec 31, 2012
- Messages
- 59
- Motherboard
- CustoMac Mini 2012
- CPU
- Intel i3 3225
- Graphics
- HD4000
- Mac
- Classic Mac
- Mobile Phone
My old G5 was get very tired and slow, so decided it was time for an upgrade. I dipped my toe into the Hackintosh scene with a quick and simple 2012 Mini just to get the feel of the tools, and after success with that decided to go for broke.
First stage was to strip the G5, and stick the bits up up Ebay. Made about £60, so that went towards the new GA Z77-DS3H MB. After stripping, I cut the rear panel for a Lian Li tray, modded to fit a 120mm fan, and sprayed the front and rear panels and tray black.
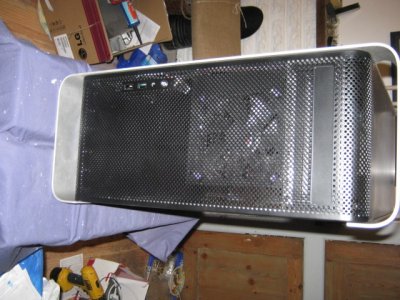
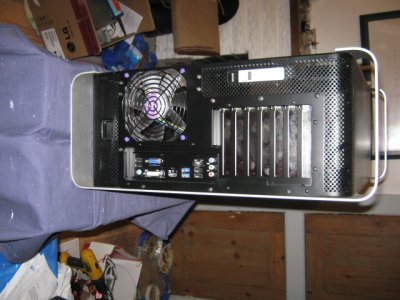
A couple of hints for spraying - firstly, give everything a good wash and scrub and let dry properly, Then, use suitable undercoat for your top coat, a couple of coats is best, and two or three top coats for a robust finish. Oh, and let everything dry for a couple of days before starting reassembly, it may feel dry, but takes time to set up properly.
Motherboard was mounted on standoffs from my bits box, JB Welded into place, and the rear panel mounted using M4 screws, placed so I could use the existing mesh holes tapped out so no need for nuts on the inside.
Next up, the interior.
I obtained an old ATX case free, (thanks Freecycle), and used the old MB for testing fitting during construction to avoid any possibility of damage to my new one. I quickly realised that the top tray would have to be cut down, and rather than mucking about with it, chopped it just short of the optical drive bay.
.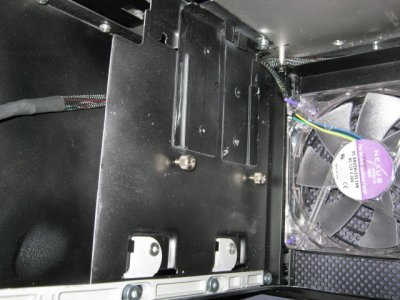
I also mounted slides on the bottom to attach the HDD tray, of which more later. When refitting the latch, at first I noticed it was loose and sloppy, not a Mac feel at all. Looking at what I'd done, I realised I needed to add washers under the plastic rod to account for the missing metal I earlier cut away. This was done, and the latch is now silky smooth again.
The front fan tray was next.
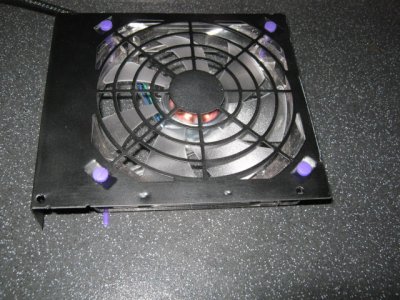
This is mounted on a couple of existing standoffs, but made from the top of the dead psu that came with the ATX case. A bit of cutting and filing, a couple of screw holes, and a coat of paint later - sorted.
Next up, the HDD tray.
Again, the ATX case came to the rescue.
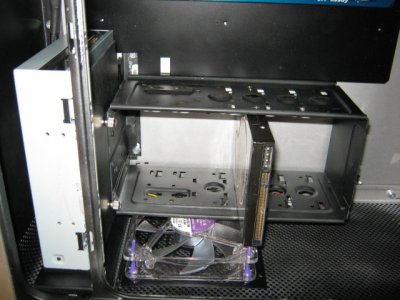
The sides were chopped out of its sheet metal stampings and bottom plate fabricated and pop riveted in place. Now, how to mount it? I realised I need to have access to both sides for fixing the drives in place, yet any permanent fixing in the case would impede this. So after much pondering, and several mugs of tea, I walked back into the workshop and tripped over some bits of the dismembered ATX case. Picking them up, I realised that I could use the snap in fixings on the side panel as runners for a sliding mount. So, some bits of panel were chopped out and pop riveted to the remains of the top tray, and to stop it moving, I drilled and tapped holes for a couple of thumb screws.
Next post, some wiring and psu stuff...
First stage was to strip the G5, and stick the bits up up Ebay. Made about £60, so that went towards the new GA Z77-DS3H MB. After stripping, I cut the rear panel for a Lian Li tray, modded to fit a 120mm fan, and sprayed the front and rear panels and tray black.


A couple of hints for spraying - firstly, give everything a good wash and scrub and let dry properly, Then, use suitable undercoat for your top coat, a couple of coats is best, and two or three top coats for a robust finish. Oh, and let everything dry for a couple of days before starting reassembly, it may feel dry, but takes time to set up properly.
Motherboard was mounted on standoffs from my bits box, JB Welded into place, and the rear panel mounted using M4 screws, placed so I could use the existing mesh holes tapped out so no need for nuts on the inside.
Next up, the interior.
I obtained an old ATX case free, (thanks Freecycle), and used the old MB for testing fitting during construction to avoid any possibility of damage to my new one. I quickly realised that the top tray would have to be cut down, and rather than mucking about with it, chopped it just short of the optical drive bay.
.

I also mounted slides on the bottom to attach the HDD tray, of which more later. When refitting the latch, at first I noticed it was loose and sloppy, not a Mac feel at all. Looking at what I'd done, I realised I needed to add washers under the plastic rod to account for the missing metal I earlier cut away. This was done, and the latch is now silky smooth again.
The front fan tray was next.

This is mounted on a couple of existing standoffs, but made from the top of the dead psu that came with the ATX case. A bit of cutting and filing, a couple of screw holes, and a coat of paint later - sorted.
Next up, the HDD tray.
Again, the ATX case came to the rescue.

The sides were chopped out of its sheet metal stampings and bottom plate fabricated and pop riveted in place. Now, how to mount it? I realised I need to have access to both sides for fixing the drives in place, yet any permanent fixing in the case would impede this. So after much pondering, and several mugs of tea, I walked back into the workshop and tripped over some bits of the dismembered ATX case. Picking them up, I realised that I could use the snap in fixings on the side panel as runners for a sliding mount. So, some bits of panel were chopped out and pop riveted to the remains of the top tray, and to stop it moving, I drilled and tapped holes for a couple of thumb screws.
Next post, some wiring and psu stuff...
