Contribute
Register

Water Cooled Cube

Status
Not open for further replies.
Looks good! I was cheeky and mounted my additional Windows SSD in almost the same location as yours. Fits perfectly. Thanks for the inspiration! :thumbup:

MacTester
 
Looks good! I was cheeky and mounted my additional Windows SSD in almost the same location as yours. Fits perfectly. Thanks for the inspiration! :thumbup:

MacTester

:lol:

Yes, it uses up what is otherwise a bit of dead space. I just love that these drives are always getting smaller......
 
In case this is of any use to other Zotac board owners, I have attached a copy of the file I am now going to use for my base plate. This one will be cut from acrylic (as aluminium would warp under laser cutting so many holes) and then bonded to the original base and sprayed.

In the zip is a copy of the jpeg, a pdf and a dxf file.

The useful bit for others will be the outline of the Cube back and the position left/right of the Zotac IO (as the board is of course a tight fit in the cube).

EDIT: please note I have not included the openings for wifi antennae as these will be internal. The rectangular slot where there was an antenna opening is for the IR board I'll be using to poke through.
 

Attachments

  • Cubetop.jpg
    Cubetop.jpg
    995.1 KB · Views: 287
  • CAD files.zip
    2.7 MB · Views: 124
Sorry not been updated for a while.

Here are a few shots from just now.

ijib.jpg


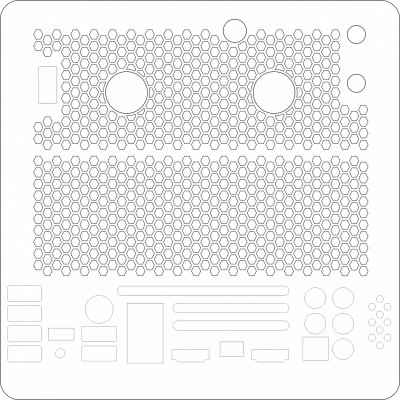
This one shows the latest version of the back which I have laser cut in house from matt black acrylic. Slight difference between this and the file I posted in that I extended the hexagonal mesh across the back.

I am bonding the acrylic to the original base, which I have given a quick spray of satin black to see if I like the colour.

The extra holes in the back panel are for a power inlet and outlet at 12v, the adjustment knob of the small fan controller and for an extra USB port.

The 12v outlet is intended for my small "retina" display that I am making up, and the USB port can of course be used for a number of things, but internally it is connected to two of the 5v sources on a USB header so that it can provide higher power - such as for DVD recorder and also to give more possibility to use an original set of Cube speakers.

z5p3.jpg


sazc.jpg


I'm using JB weld to bond the parts together and when it is set I'll add more to smooth the join and then sand back, mask off the acrylic panel and spray the sides again. I have a compressible adhesive strip coming which if it looks okay I'll use to replace the original type of spongy trim strips the Cube had. I am hoping that that strip will provide a nice seal between the Cube base and the inner can (and also conceal any messiness where the panels join!).

So the current plan is for the Cube inner to be satin black....
 
Wow! this bottom plate looks very good! Nice work. :thumbup:

MacTester

Thanks MacTester. I think it keeps it nice and open for airflow, but the honeycomb manages to keep it strong too.

New stuff:


I know you shouldn't take photos at night, with a flash, a bad camera etc. (so apologies) but thought I'd do a micro update.

7epc.jpg


This one is showing the back part after bonding and with the compression seal applied.

Also I made a small retaining piece from thin ABS sheet that holds my 500GB SSD in place against the side of the rad bracket (i.e. what used to be the drive holder before I butchered it - drive sits where the airport card would have sat). This thin ABS sheet is enough to hold the 2.5" drive in place and also to act as a trim piece to tidy cables out of sight. I will probably modify it a little to cover more left and right too - but to leave the motherboard section exposed as I won't want to cover that up!

29ou.jpg


ew27.jpg


Next post won't be for a few days. I am now though getting seriously close to being able to add the last bits and pieces and do a switch on to check basic operation of the unit as a whole.
 
Okay.....I lied.

Had to spend a little time today and so I cut a new top sheet for the Cube from 0.25mm plasticard.

mxhf.jpg

Essentially this is the same as the original top sheet, but where there would have been a space for the plastic grill insert I have instead filled the space with a honeycomb pattern to give a false top grill.

I could only find this plasticard in white, but as it is a material used a lot by modellers I gather it should be easy to spray paint.
 
It will be an amazing Cube in its final form, probably the nicest ever made to date.

Excellent.
 
Status
Not open for further replies.
Back
Top