Contribute
Register

Void's G5 Mk. II

Status
Not open for further replies.
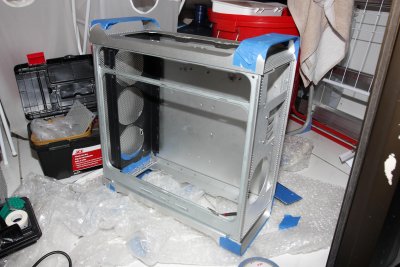
Showing some flaws on my work log. I drilled holes for the fans but used a drill gun instead of using a workstation from Dremel. I made too many mistakes on the hole drilling. but again, it will not show because of the filters also that I will put. :D
20151106_140158.jpg

and the ghetto front fan bracket I made attached with lower part of my old front fan bracket from Laser Hive. All parts will be black except the outer case. :D
I also tested the revised back plate and motherboard tray.

Juvs450D-103-5374.jpgJuvs450D-103-5369.jpgJuvs450D-103-5367.jpg20151106_143159 copy.jpgJuvs450D-103-5363.jpg

I drilled another hole on the back plate to make the PSU fan facing up. and my usual orientation (back plate attached inside of the case)
20151106_181118.jpg20151106_173702.jpg
 

Attachments

  • Juvs450D-103-5364.jpg
    Juvs450D-103-5364.jpg
    949.9 KB · Views: 227
Update:

trying out the custom psu cables and cable combs by CableMods.
image.jpegimage.jpeg


And... I finally received the LCS. Thanks to Thermaltake I will finally be able to proceed with my project... ^_^

The Riing...
image.jpg

The Fittings...

image.jpegimage.jpegimage.jpegimage.jpegimage.jpeg

The Pacific R360 Radiator and Pacific RL240 Liquid Cooling Kit...

image.jpegimage.jpg

My casing is now sent to our joinery for some painting job again... (I can't do it since I don't know how to paint but most of all...I have asthma so I really cannot do it.) For the meantime I am using a Bitfenix Pandora Casing... :D
image.jpeg
 
Update:

Finally I received my newly painted G5 parts. I like it compared to the old Plastidipped G5.
First, I took a photo with my customized filter from DEMCIFILTER which I have 3 pieces in total that I will use in front, at the top and bottom of the G5.
Juvs450D-103-5493.jpgJuvs450D-103-5481.jpg

I'm also happy that even I didn't made a perfect seamless look cover for the DVD Bay area, the black paint managed to hide the flaws a little. But I also have filters in the front so it will still be covered. No worries. XD
Juvs450D-103-5483.jpg

I also covered some of the perforated part of the case to prevent dust to get inside once it's up and running. I used vinyl stickers on those areas that the filters will not be able to cover. Dust Freak! XD
Juvs450D-103-5461.jpgJuvs450D-103-5488.jpg

Some close-up shots of the back panel by Laser Hive.
Juvs450D-103-5463.jpgJuvs450D-103-5471.jpg
Juvs450D-103-5478.jpgJuvs450D-103-5490.jpg
 
Last weekend I was able to test-fit some parts I received from Thermaltake.

The R360 and the Riing Fans looks good and able to be supported by my ghetto front mount bracket.
Juvs450D-103-5501.jpgJuvs450D-103-5497.jpgJuvs450D-103-5509.jpg

and because of my excitement... like a kid opening his new toy, I immediately tested the lights just using the molex adapters and connected to my PSU RM850.
Juvs450D-103-5515.jpgJuvs450D-103-5519.jpg
Juvs450D-103-5520.jpgJuvs450D-103-5526.jpg

I really like this Riing Fans from Thermaltake. It was well designed and will look great in any PC mods. Noise isn't too loud (I think this is non PWM so 1500RPM is the default speed)? and it pushes lots of air. I can even feel the air coming out at the back of my case.
 
New sticker for my Corsair RM850 to match my motherboard. :)
Juvs450D-103-5542.jpg

And after doing a test-fit for the front rad and 6 riing fans, I decided to removed my pc parts from the Pandora and put it back on my G5 so that I can plan the cable management and LCS.

Here is the custom motherboard tray from Laser Hive. It is revised according to my build. It can only fit 2 ssd. But on my image below I am using 1 Samsung 840 Evo 120gb SSD and the 2.5 Toshiba 1TB HDD from my old External HDD. I didn't have any issue with temperatures also.
Juvs450D-103-5534.jpg

Afterwards, I put the pc components one by one. I already had the feeling that I will face some problems. I will show later why. and I need some opinions from anyone. X_x
Juvs450D-103-5545.jpg

Here it goes... I also test-fit the RL240 radiator and the pump+reservoir combo included in the kit.
The thickness of the radiator is 64mm and another 25mm for the thickness of the fans. It's almost 90mm now. and the other problem I encountered is the reservoir which is really big inside of my G5.

This vertical set-up for the reservoir+pump will be the last in my option.
Juvs450D-103-5558.jpg

I then tried putting the reservoir and pump in a horizontal position. I think it will work but I'm still waiting for the other reservoir my friend will swap with the one I have to check the options I can do with my build.
Juvs450D-103-5559.jpg

Crazy cables right? Heheheh! but I'm not yet using the custom cables I bought from CableMods.
On my next post, I hope I can give some ideas for the PSU Shroud and Cover Plate to hide the cables.
I'm also thinking to screw the bracket of the reservoir on the Cover Plate that I'm going to make.

Since the Holiday Season is coming...I will be taking care of my daughter during my 2 weeks break after Christmas. I hope I will be able to spend time modding also.

I am now 60% done with my Mod, 40% will be for the LCS and Cable Management.

Feel free to give some opinions especially on the Custom Loop on my LCS(Liquid Cooling System).

Have a great day everyone! ^_^
 
Hi again everyone... Just an update before Christmas.


I think I need to revise the lower rad mounting. or just make a bracket to hold the 240rads to avoid cutting again. Moving it near the opening is the best option to fit a 64mm thick 240 radiator with two fans attached. If the rad is thin I might be able to do push/pull.
12398918_10154154241590995_1298147862_n.jpg

Finally got my hand on this Classy GPU. EVGA 980Ti Classified :D I chose this instead of the G1 Gaming or Strix since I need a shorter card. SC+ was not available in the store so I bought this beast.
12395191_10154154259040995_538804788_n.jpg10423550_10154154313275995_1014373694_n.jpg967678_10154154313505995_965436383_n.jpg12395638_10154154285685995_884767272_n.jpg
Also used the Custom Cables I bought from CableMods to really get an idea on the cover plate and psu shroud.

(sorry for the low res images, just used my ipad to document everything. I will upload high-res images on my break)
 
Latest Update: 01-09-2016

Before the final assembly of the liquid cooling... I made a psu shroud and cable cover plate...
bending the shroud using a heat gun. and glued the standoffs of the G5.

20160106_173626.jpg20160106_173743.jpg
20160106_174740.jpg20160107_101929.jpg
20160107_101933.jpg20160107_110029.jpg
20160107_110116.jpg20160107_110126.jpg

Next I did was the cabling... Inserting the cables one by one in the shroud and in the cover plate was bloody... my fingers hurt so much only for the cabling... I honestly believe cabling is one of the hardest part in modding...time consuming and very critical.

Here's some of the images...
20160107_122757.jpg20160107_123516.jpg
20160107_123457.jpg20160107_124626.jpg
20160107_125137.jpg20160107_125129.jpg
20160107_192001.jpg20160107_195518.jpg
20160107_203221.jpg20160107_203229.jpg
20160107_223219.jpg20160107_223237.jpg

After a few weeks of not modding... my G5 Mk. II is 95% done... :D with the help of some friends... Happy New Year Everyone!!!

pump res combo.jpghelping daw.jpgg5 rigid juvs.jpg

After my friend did the loop, we finally put the coolant and test for some leaks...luckily there is none. :D
G5 lcs no coolant.jpgchecking for leak.jpg980ti classy.jpg

Here is the almost final build... (I didn't put yet the S.H.I.E.L.D Logo at the side)
G5 Shield DONE JAN 9 2016.jpg

Hope everyone likes it... I will be doing the pictorial once I bring home my DSLR.

Enjoy! :D
 
Lovely finish indeed!

Love the red-black colors together.:thumbup:

Hope I can work on mine a little more tomorrow..


Thanks Gino!! at last, I was able to do what I wasn't able to do with my Mark I. especially with the cable management.
I really like the red black combination, maybe next time I mod I will go for white or all black.
I will be waiting for your mod also bro! :D Keep us posted!
 
Status
Not open for further replies.
Back
Top