UtterDisbelief
Moderator
- Joined
- Feb 13, 2012
- Messages
- 9,591
- Motherboard
- Gigabyte B760 Gaming X AX
- CPU
- i5-14600K
- Graphics
- RX 560
- Mac
- Classic Mac
- Mobile Phone
Components:
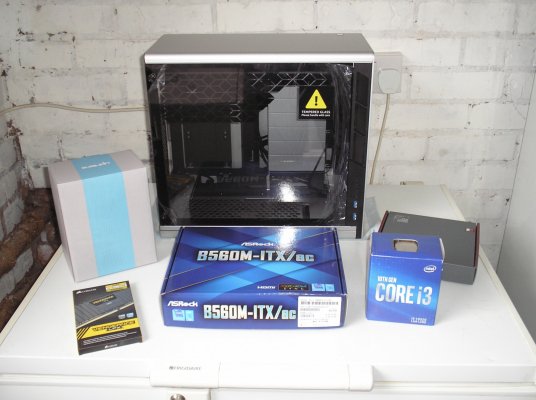
Gigabyte ASRock B560M-ITX/ac Motherboard with HDMI & DisplayPort Video output
https://www.amazon.co.uk/dp/B08XNJDGQZ/?tag=tonymacx86-21
 www.newegg.com
Intel Core i3-10320 3.8GHz Comet Lake Processor
https://www.amazon.co.uk/dp/B086M4KSMW/?tag=tonymacx86-21
 www.newegg.com
Zotac GT710 2GB GDDR3 Graphics Card
https://www.amazon.co.uk/dp/B01AZ7W88O/?tag=tonymacx86-21
 www.newegg.com
CORSAIR Vengeance LP 32GB (2 x 16GB) DDR4 3000 Memory
https://www.amazon.co.uk/dp/B07B2Y6H1M/?tag=tonymacx86-21
 www.newegg.com
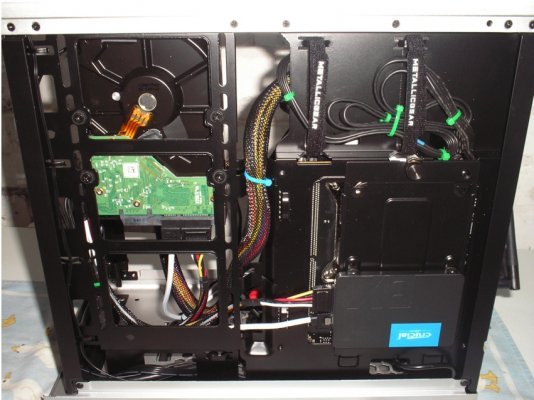
Crucial MX500 250GB SATA SSD
https://www.amazon.co.uk/dp/B0764WCXCV/?tag=tonymacx86-21
CORSAIR CX500M 500W 80-PLUS BRONZE Semi Modular PSU
 www.newegg.com
MetallicGear Neo Mini ITX v2 Silver Computer Case
https://www.amazon.co.uk/dp/B07XCNJFQN/?tag=tonymacx86-21
 www.newegg.com
UpHere CPU Fan Cooler 5 Direct Contact Heat Pipes 120mm PWM Fan
https://www.amazon.co.uk/dp/B08MX66LDQ/?tag=tonymacx86-21
Noctua NF-P12 redux 1300RPM PWM 120mm Fan 4-Pin
https://www.amazon.co.uk/dp/B07CG2PGVG/?tag=tonymacx86-21
 www.newegg.com
ARCTIC P12 PWM - 120 mm Case Fan with PWM
https://www.amazon.co.uk/dp/B07GB6SJHW/?tag=tonymacx86-21
StarTech.com 1 Port SATA to eSATA Slot Plate Bracket
https://www.amazon.co.uk/dp/B000GX4C7I/?tag=tonymacx86-21
Already Owned:
Apple Magic Mouse 1 - No longer available new but …
https://www.amazon.co.uk/dp/B016MUCHTS/?tag=tonymacx86-21
Apple Wired USB Keyboard - No longer available new
Acer 24” R241Y HD Monitor - No longer available new
Western Digital 500GB Black SATA 3.5” Hard-Disk - No longer available. BYO.
EDIT 30th April 2021: Update concerning the Zotac GT710 GPU.
It was discovered that the Zotac GT710 2GB GDDR3 GPU caused artefacts and editing problems in photographs when using the Preview or Photos app. My fellow Mods tested other brands such as MSI and Asus and this problem doesn't affect them, so is probably a Zotac VBIOS issue. Please bear this in mind when choosing your own GPU.
Comments:
This is a brand-new budget build using a 500-series Intel motherboard and Comet Lake CPU.
I began the build as a proof-of-concept, so a couple of things to note:
Comet Lake CPUs might use the same UHD 630 iGPUs as in previous generations, but actually they have a different Device-ID and so far no-one I've seen or read about has genuinely made them output display with full acceleration in a 500-series board, only in the 400-series. Maybe as headless...
Because of this, and with no AMD GPUs available at the moment I used a natively compatible NVidia card instead. The build was completed with the iGPU but it really is not recommended.
Installation:
OpenCore 0.6.8 - was used for this build.
macOS Big Sur 11.3 - was used for this build
Partition and format a 16GB or 32GB USB memory stick with the GUID scheme and HFS+ file system:
With the Big Sur installation package in your Applications folder run the following Terminal command to create a USB installer stick:
Once completed you need to mount the hidden EFI partition on the USB stick using EFI Mounter v3.1 from our Downloads section. To make sure you are mounting the correct partition, check with Disk Utility. In this example the disk has the identifier of disk3 so the EFI partition we want to mount is disk3s1 and you will see this in the EFI Mounter selection window:
The EFI partition will probably already contain an Apple folder. If you are going to use the EFI archive I've attached to this post, stick to the correct folder structure:

You can of course use your own if you would prefer.
Once done check your BIOS settings:
1. To access Setup, press and hold Delete on a USB Keyboard while the system boots. At the main screen Press F6 to toggle Advanced mode.
2. Advanced / CPU Configuration / CFG Lock = Disabled.
3. Advanced / Chipset Configuration / Primary Graphics Adapter = PCIe
4. Advanced / Chipset Configuration / Above 4G Decoding = Enabled
5. Advanced / Chipset Configuration / VT-d = Disabled
6. Advanced / USB Configuration / XHCI Hand-off = Enabled
7. Security / Secure Boot = Disabled
8. Save and exit.
Now on reboot, by pressing the BIOS boot selector key (F11) when the ASRock splash screen comes up, you can choose and boot the installer. Once the installer screen loads use Disk Utility to prepare your destination drive as GUID and HFS+ format. Then select your destination drive when you proceed to install and let it run its course.
Post Installation:
Attached is an EFI folder that will work for the main installation as well as the installer, so use the same technique I mention above copy it into your destination drive's EFI partition. It will give you audio and USB, it will give you Ethernet on "en0" and it will boot. YOU will need to refresh/enter your own SMBIOS details as the ones included are dummies. YOU will need to edit the itlwm.kext to include your own SSID Internet access details as I explain in the paragraph below.
As the necessary work has already been done in the EFI I’ll run through what’s there so you know a little more if you wish to create your own.
ACPI:
SSDT-AWAC.aml - needed to boot reliably
SSDT-EC.aml - dummy embedded controller
SSDT-PLUG.aml - CPU power management
Kexts:
IntelMausi.kext - LAN Ethernet support
itlwm.kext - Intel Wireless support **
Lilu.kext - Vital plug-in manager
Whatevergreen.kext - Graphics plug-in for Lilu.
SMCProcessor.kext
SMCSuperIO.kext
USBPorts.kext - USB port configuration file
VirtualSMC.kext
AppleALC.kext - Audio chipset activation
Drivers:
CrScreenshotDxe.efi - Screengrab utility for OpenCore
OpenCanopy.efi - The main Graphical User Interface for OpenCore
OpenHfsPlus.efi - File system compatibility for older macOS versions
OpenRuntime.efi - The main OpenCore runtime, unsurprisingly
** To make the itlwm.kext work with your wireless network you need to manually add in the SSID name and password you wish to log on to. Highlight the kext, right-click on it and “Show Package Contents”. Edit the Info.plist with a plain text editor. Search for “WiFi_1” and overwrite the placeholders with your password and SSID. Save and exit the kext. There is an app available from the developer called Heliport which handles the connection if you would rather use that.
config.plist :
We are using an iMac18,3 System-Defintion.
We are emulating an older CPU with a Fake CPUID.
A Few notes about USB:
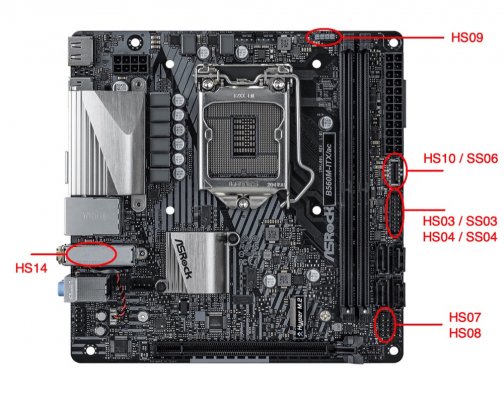
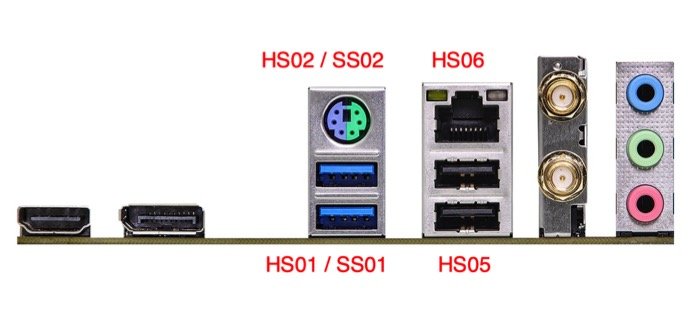
The B560 chipset only has 12x USB ports of which 6x can be USB3. However ASRock have labelled some of them counter-intuitively:
A Type-C USB port is available but only through the new-style front-panel header, HS10/SS06. You will need an adapter cable for this. This port is a “switchable” one.
The LED RGB connector takes up USB port HS09.
The Bluetooth wireless uses port HS14 - which, yes, is odd considering we only have 12x ports maximum.
What Works:
Audio - Line out
Audio - HDMI
Ethernet
WiFi & BT
Sleep/Wake
What Doesn’t Work:
Continuity and Handoff
Safari DRM video - Due to the System-definition being used.
iGPU with acceleration. Works without.
Links:
OpenCore - AppleALC - Lilu - Whatevergreen etc and a lot of other cool stuff:

Intel Wireless:

 github.com
In future updates:
I will detail how the USB ports were mapped. I had to exclude five to keep within our 15-limit.
Big Thanks to the Tonymacx86 Admins and fellow Mods who know what I've been through getting this build to press.


Gigabyte ASRock B560M-ITX/ac Motherboard with HDMI & DisplayPort Video output
https://www.amazon.co.uk/dp/B08XNJDGQZ/?tag=tonymacx86-21
Are you a human?
Intel Core i3-10320 3.8GHz Comet Lake Processor
https://www.amazon.co.uk/dp/B086M4KSMW/?tag=tonymacx86-21
Are you a human?
Zotac GT710 2GB GDDR3 Graphics Card
https://www.amazon.co.uk/dp/B01AZ7W88O/?tag=tonymacx86-21
Are you a human?
CORSAIR Vengeance LP 32GB (2 x 16GB) DDR4 3000 Memory
https://www.amazon.co.uk/dp/B07B2Y6H1M/?tag=tonymacx86-21
Are you a human?
Crucial MX500 250GB SATA SSD
https://www.amazon.co.uk/dp/B0764WCXCV/?tag=tonymacx86-21
CORSAIR CX500M 500W 80-PLUS BRONZE Semi Modular PSU
Are you a human?
MetallicGear Neo Mini ITX v2 Silver Computer Case
https://www.amazon.co.uk/dp/B07XCNJFQN/?tag=tonymacx86-21
Are you a human?
UpHere CPU Fan Cooler 5 Direct Contact Heat Pipes 120mm PWM Fan
https://www.amazon.co.uk/dp/B08MX66LDQ/?tag=tonymacx86-21
Noctua NF-P12 redux 1300RPM PWM 120mm Fan 4-Pin
https://www.amazon.co.uk/dp/B07CG2PGVG/?tag=tonymacx86-21
Are you a human?
ARCTIC P12 PWM - 120 mm Case Fan with PWM
https://www.amazon.co.uk/dp/B07GB6SJHW/?tag=tonymacx86-21
StarTech.com 1 Port SATA to eSATA Slot Plate Bracket
https://www.amazon.co.uk/dp/B000GX4C7I/?tag=tonymacx86-21
Already Owned:
Apple Magic Mouse 1 - No longer available new but …
https://www.amazon.co.uk/dp/B016MUCHTS/?tag=tonymacx86-21
Apple Wired USB Keyboard - No longer available new
Acer 24” R241Y HD Monitor - No longer available new
Western Digital 500GB Black SATA 3.5” Hard-Disk - No longer available. BYO.
EDIT 30th April 2021: Update concerning the Zotac GT710 GPU.
It was discovered that the Zotac GT710 2GB GDDR3 GPU caused artefacts and editing problems in photographs when using the Preview or Photos app. My fellow Mods tested other brands such as MSI and Asus and this problem doesn't affect them, so is probably a Zotac VBIOS issue. Please bear this in mind when choosing your own GPU.
Comments:
This is a brand-new budget build using a 500-series Intel motherboard and Comet Lake CPU.
I began the build as a proof-of-concept, so a couple of things to note:
Comet Lake CPUs might use the same UHD 630 iGPUs as in previous generations, but actually they have a different Device-ID and so far no-one I've seen or read about has genuinely made them output display with full acceleration in a 500-series board, only in the 400-series. Maybe as headless...
Because of this, and with no AMD GPUs available at the moment I used a natively compatible NVidia card instead. The build was completed with the iGPU but it really is not recommended.
Installation:
OpenCore 0.6.8 - was used for this build.
macOS Big Sur 11.3 - was used for this build
Partition and format a 16GB or 32GB USB memory stick with the GUID scheme and HFS+ file system:
With the Big Sur installation package in your Applications folder run the following Terminal command to create a USB installer stick:
Code:
sudo /Applications/Install\ macOS\ Big\ Sur.app/Contents/Resources/createinstallmedia --volume /Volumes/USB /Applications/Install\ macOS\ Big\ Sur.app --nointeractionOnce completed you need to mount the hidden EFI partition on the USB stick using EFI Mounter v3.1 from our Downloads section. To make sure you are mounting the correct partition, check with Disk Utility. In this example the disk has the identifier of disk3 so the EFI partition we want to mount is disk3s1 and you will see this in the EFI Mounter selection window:
The EFI partition will probably already contain an Apple folder. If you are going to use the EFI archive I've attached to this post, stick to the correct folder structure:
You can of course use your own if you would prefer.
Once done check your BIOS settings:
1. To access Setup, press and hold Delete on a USB Keyboard while the system boots. At the main screen Press F6 to toggle Advanced mode.
2. Advanced / CPU Configuration / CFG Lock = Disabled.
3. Advanced / Chipset Configuration / Primary Graphics Adapter = PCIe
4. Advanced / Chipset Configuration / Above 4G Decoding = Enabled
5. Advanced / Chipset Configuration / VT-d = Disabled
6. Advanced / USB Configuration / XHCI Hand-off = Enabled
7. Security / Secure Boot = Disabled
8. Save and exit.
Now on reboot, by pressing the BIOS boot selector key (F11) when the ASRock splash screen comes up, you can choose and boot the installer. Once the installer screen loads use Disk Utility to prepare your destination drive as GUID and HFS+ format. Then select your destination drive when you proceed to install and let it run its course.
Post Installation:
Attached is an EFI folder that will work for the main installation as well as the installer, so use the same technique I mention above copy it into your destination drive's EFI partition. It will give you audio and USB, it will give you Ethernet on "en0" and it will boot. YOU will need to refresh/enter your own SMBIOS details as the ones included are dummies. YOU will need to edit the itlwm.kext to include your own SSID Internet access details as I explain in the paragraph below.
As the necessary work has already been done in the EFI I’ll run through what’s there so you know a little more if you wish to create your own.
ACPI:
SSDT-AWAC.aml - needed to boot reliably
SSDT-EC.aml - dummy embedded controller
SSDT-PLUG.aml - CPU power management
Kexts:
IntelMausi.kext - LAN Ethernet support
itlwm.kext - Intel Wireless support **
Lilu.kext - Vital plug-in manager
Whatevergreen.kext - Graphics plug-in for Lilu.
SMCProcessor.kext
SMCSuperIO.kext
USBPorts.kext - USB port configuration file
VirtualSMC.kext
AppleALC.kext - Audio chipset activation
Drivers:
CrScreenshotDxe.efi - Screengrab utility for OpenCore
OpenCanopy.efi - The main Graphical User Interface for OpenCore
OpenHfsPlus.efi - File system compatibility for older macOS versions
OpenRuntime.efi - The main OpenCore runtime, unsurprisingly
** To make the itlwm.kext work with your wireless network you need to manually add in the SSID name and password you wish to log on to. Highlight the kext, right-click on it and “Show Package Contents”. Edit the Info.plist with a plain text editor. Search for “WiFi_1” and overwrite the placeholders with your password and SSID. Save and exit the kext. There is an app available from the developer called Heliport which handles the connection if you would rather use that.
config.plist :
We are using an iMac18,3 System-Defintion.
We are emulating an older CPU with a Fake CPUID.
A Few notes about USB:
The B560 chipset only has 12x USB ports of which 6x can be USB3. However ASRock have labelled some of them counter-intuitively:
A Type-C USB port is available but only through the new-style front-panel header, HS10/SS06. You will need an adapter cable for this. This port is a “switchable” one.
The LED RGB connector takes up USB port HS09.
The Bluetooth wireless uses port HS14 - which, yes, is odd considering we only have 12x ports maximum.
What Works:
Audio - Line out
Audio - HDMI
Ethernet
WiFi & BT
Sleep/Wake
What Doesn’t Work:
Continuity and Handoff
Safari DRM video - Due to the System-definition being used.
iGPU with acceleration. Works without.
Links:
OpenCore - AppleALC - Lilu - Whatevergreen etc and a lot of other cool stuff:
Intel Wireless:
GitHub - OpenIntelWireless/itlwm: Intel Wi-Fi Drivers for macOS
Intel Wi-Fi Drivers for macOS. Contribute to OpenIntelWireless/itlwm development by creating an account on GitHub.
In future updates:
I will detail how the USB ports were mapped. I had to exclude five to keep within our 15-limit.
Big Thanks to the Tonymacx86 Admins and fellow Mods who know what I've been through getting this build to press.


Attachments
Last edited:

