Thanks again, I edited my BIOS to match your suggestions and attached screenshots.
I noticed the menus slightly changed and the boot options reduced to 5. In the Clover graphics settings, nothing is selected by default. So I tried the default settings, with WEB drivers selected and both WEB and inject NVidia selected, all resulting in the same (or very similar) KP.
I attached the last KP with WEB drivers selected.
Thank you for the explanations but I’m not sure to fully understand, so I hope I’m not doing anything wrong.
View attachment 342696 View attachment 342697 View attachment 342698 View attachment 342699
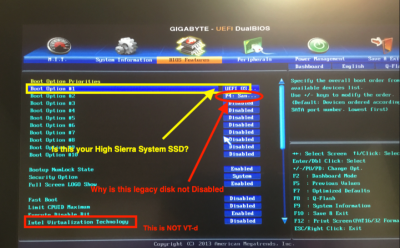
Edit : my SSD with the corrupted High Sierra install is the 256gb Sandisk one
I have no idea if you're active on this thread, Bolos, but I'll continue for anyone who comes across this thread in the future, if not you.
1) I believe the best way to proceed is to make all changes on the EFI>Clover folder in the EFI partition of your
High Sierra installer USB drive, which you should have inserted into a USB port. To mount and open this folder, use Clover Configurator's Mount EFI. Choose the correct EFI from the list.
2) However, you can use MultiBeast to further the install if you wish. On the build page of MultiBeast be sure to choose the drive to install to, the HS installer flash drive, or the HDD/SSD you installed HS to, if you wish.
3) But I really suggest you follow this method, and if you do, you'll see why.
4) One caveat: I use my BIOS bootloader (F12) to choose my USB flash drive with Clover, then I choose my target High Sierra drive and boot into it. I can defend this method. One, I have many internal and external drives--Mac, Windows, data, Ubuntu, Mint. Two, this approach to the install is similar to the "Vanilla" method you saw on ******. I don't agree with the idea that placing our Clover install on the EFI partition of our boot drive is a problem; it clearly isn't. But I don't believe that installing kexts to Library/Extensions or System/L/E is a good idea; and in High Sierra it's not recommended. (Formerly RehabMan et. al. advised otherwise).
5) The third reason for using the USB flash drive to boot into our HDD/SSD High Sierra partition is that it makes everyday, every update, changes a lot easier. When you change any of the components of the Clover install, Clover, the config.plist, kexts or drivers, you can revert back easily, even on another computer, to your previous EFI folder by replacing it on the flash drive. The fourth reason is that it just works, so why not? I do not use APFS yet, but it's said that, I believe, the APFS driver (APFS.efi or ApfsDriverLoader-64) must be installed on the drive with an APFS High Sierra partition, in >EFI>Clover>Drivers64UEFI. No problem, see 6) below.
6) When you're done with the setup of the Clover folder on your flash drive,
you can simply copy that EFI folder to the EFI partition of your boot HDD/SSD by just replacing the old one. The Apple files seen inside the old one will regenerate in the new EFI folder automatically, leaving your new Clover folder inside as it is.
Right, Phase Two.
If you already updated the Clover installation on your macOS High Sierra installer USB drive, skip #7 and 8 here. If at anytime you used MultiBeast, make sure all the drivers and kexts described in the posts before are still present in the USB drive's EFI partition.
7) Use the Clover r4630 installer in "Install Folder" to UPDATE the Clover on the flash drive's EFI. Be sure you are install to the USB Flash drive by using
Change install location... If you want you could choose
Customize in the Clover installer to select the drivers to install, once again; but you can just move the Drivers64UEFI folder in the EFI folder in your "Install Folder" later if you wish.
8) After you update Clover on the USB flash drive, you can move the Drivers64UEFI folder from the EFI folder in your "Install Folder" if you didn't put the drivers in during the update. Then put the latest kexts you downloaded before and move them to the USB flash drive's EFI>EFI>Clover>Kexts>
Other folder. (The other folders inside the Kexts folder, 10.12, 10.13 etc. should be discarded.)
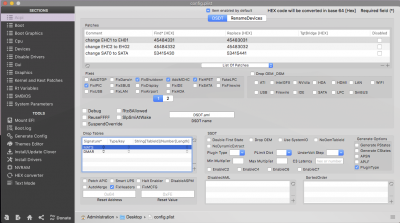
9) So we've updated Clover and the Drivers64UEFI and Kexts folders on the flash drive. Now let's tackle the Clover config.plist. With Clover Configurator and the flash drive's EFI partition mounted and open, drag the enclosed config.plist from the Clover folder to the ICON of Clover Configurator in the DOCK, and bang the plist opens the configuration panels in Clover Configurator.
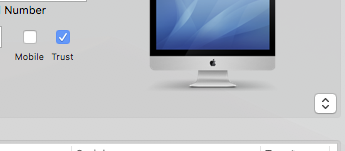
10) I'm sure you know that you have to set up the SMBIOS in that panel. But do it
exactly as described in this guide:
https://www.tonymacx86.com/threads/an-idiots-guide-to-imessage.196827/
When you're done you will have a proper SN and will be able to use the App Store, iMessage, and much more properly. It's very important to do this. It's not hard. BE SURE TO MAKE SURE "TRUST" IS CHECKED IN THE SMBIOS PANEL WHEN YOU HAVE IT FILLED OUT.
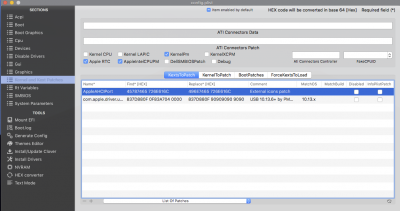
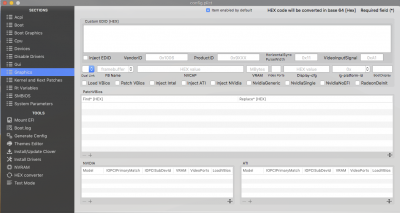
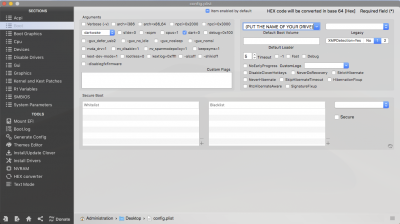
11) Now the rest of the panels for the config.plist. Because we're both Gigabyte Z87 I'm going to put pics of my panels (except for my filled out SMBIOS panel). Just copy what you see in your Clover Configurator. I think that will work for you. The operative word is
think. Probably. The only issue that stands out is that I have an SSDT for CPU power in my Clover folder. If you want to do the same, use this guide, which is NOT hard to follow:
https://www.tonymacx86.com/threads/quick-guide-to-generate-a-ssdt-for-cpu-power-management.177456/
12a) It's best for you to NOT install your graphics card before you have tested all this by restarting without it. So in that case: 1) Under "System Parameters" you will NOT have NvidiaWeb checked yet (assuming you even need the web drivers for your card; you may not, I don't know).
YOU SHOULD ADD IntelGraphicsFixup.kext
Releases · lvs1974/IntelGraphicsFixup · GitHub to flashdrive>EFI>EFI>Clover>Kexts. I would not add WhateverGreen.kext for now. You can substitute for it later. You
probably need to check
Inject Intel in "Graphics." It's been so long, I don't remember. (When you're booting through the Clover bootloader on your flash drive you can add a boot flag to inject intel if you need to--see
https://www.tonymacx86.com/threads/how-to-enter-edit-boot-flags-in-clover.174319/.)
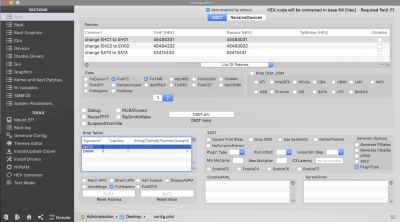
12b) Here are my Clover Configuration pics for the Clover config.plist:


13) Any time you make changes this way to your Clover config.plist always "SAVE" the changes. Don't make 13) unlucky by forgetting!