Contribute
Register

UniBeast: Install OS X El Capitan on Any Supported Intel-based PC

Status
Not open for further replies.
I finally got it running, but a couple of things did not go smoothly:

I had always used Chimera up until El Capitan, so this was my first Clover experience.

I had to disable EIST and C1, C3 in the BIOS or I got AICPM.kext KP. All of those options worked perfectly in any other build of OSX with Chimera. And yes, turbo still works as well.

The first time i tried to install El Capitan (not a clean install, upgrade from 10.10) the Apple Installer failed with a "cannot update extensions error" and left me with nothing bootable. Thankfully, just running the install again resulted in a success.

I also use HDMI audio, and thankfully using "Kextdrop" and HDMIAudio kext on this site worked perfectly. No need to mount the EFI partition; Kextdrop does that automatically apparently.

Here's the link on this site for the HDMIAudio kext:

https://www.dropbox.com/s/9xenemmfwa1ee7b/HDMIAudio-1.1.dmg?dl=0

I tried using MacPro5,1 but it went back to imac 12,2 guess I didnt save properly in CloverConfig.

The latest Nvidia web drivers work perfectly.

Itunes DRM-protected movies/video still work fine with my Z68/2600K/GTX 680 in El Cap.

Thanks a million for the guide!
 
Open from EFI/EFI/CLOVER/
Save to EFI/EFI/CLOVER/
Ignore OEM folder and config.plists

Very good. Thank you for clearing that up.
 
I managed to install El Capitan and Windows 10 with "1 Hard drive, 2 partitions, Legacy(Bios) and a Nvidia GPU" setup. However, i had to do a few modifications to the guide. At first, i couldn't get the installer to boot and then it removed my Windows booting system, so here what i did. I will put in bold some steps that people could need with other types of systems as well, so they manage to make it work too.

1. Boot bios and set AHCI instead of IDE, save changes and reboot (you shoud have this already on, but just in case some of you miss this step).

* If for some reason you have forgotten to do this step prior to installing Windows 10, there's a fix to be able to boot after switching to AHCI. Check google about "IDE to AHCI after installing Windows 8".

2. Put Windows DVD ( in my case, i used Windows 10 ) and launch install. At the partition menu, i removed my old Windows partition and created a new one. When you create a new partition, by default, Windows create a "Reserved System" partition of 500mb. This is what we're going to use to make this whole thing work. So now, with your 2 new partitions created, remove the one we just did and instead "expand" the Reserved System partition to your desired windows partition size. Now, Make another partition for Mac Os. We should now have only 2 partition: Reserved System and a new one for mac os.

* I recommend to use this type of Windows installation or else you will probably be unable to install "Combined Windows 10 Updates" due to the bootable sector being modified by Clover, this make sure that the bootable sector is on Windows partition just like we will do on MacOS with Clover.

3. Select Reserved System partition to install Windows normally and follow the on-screen instructions.

4. Once in Windows, go into the "Disk Manager" (right click the start button) and go rename the Reserved System partition to the name you want it to appear on your futur Clover bootloader. Also make sure to format the Mac Os partition to whatever (ntfs or fat32) and rename it as you like. You might also want to do the ClockFix so Windows keep the right time after installing MacOS (check google for that fix). Finally do all windows updates and this is it for Windows part.

5. Reboot and use the USB you made from this guide and boot on MacOS installation.

*Nvidia Users* The guide says to inject Nvidia drivers on UniBeast 6.0.0, in a mather of fact you don't have to and in most cases it won't work. Instead we will use the flag "nv_disable=1" on Clover bootloader to get into the installer. On Clover screen, go in option and in the flags section (the 2nd) press enter and add the said flag without the quotes. Then return and boot as normally. You will have to do this every time you reboot until you install Nvidia 10.11 drivers and then once you installed it, you will have to add "nvda_drv=1" flag instead of the other one to be able to boot into MacOS (you can add this with Clover Configurator so it automatically do it on every reboot).

*MBR Hard Drive* aka "Can't install due to system not being GUID error"
Once again this guide doesn't says anything about this important step. If you installed Windows first, there's bigs chances that your system is MBR and to be able to install El Capitan you will need customized files on your USB key to make it work. Check google about "El Capitan MBR Patch" to find the files and "Mac OS MBR Patch" to find how to fix it, in both case the 1st link you find should do it.

*Return to Windows after installation boot failure* If for any reason you still can't get into the installer and that now you get the error "No Bootable Partition Found" or something simillar and of course, you did install Windows without the "System Reserved" partition here what to do. Insert Windows DVD and use the "Repair my computer" button to go into the "Terminal option (Command Prompt)". For some reason the bootable USB made your Windows partition inactive so type this into the terminal (this assume that you are doing this on your 1st hard drive, if this is not the case, use "list disk" and "list partition" commands to find your Windows partition).

diskpart
select disk 0
select partition 1
active

Now reboot and you should be able to boot into Windows if you remove the USB key from your computer. However, this won't work if you are using the normal "System Reserved" partition. Instead you can try to use the tool to repair the booting operations (it's located at the same place you picked the terminal option) and hope this work for you, but as usually, it probably won't.

6. Install El Capitan and use the guide for the rest.
 
Which are the bootlegs for installing OS X El Capitan on my hardware?
I've tried to insert the yosemite's bootflags but don't works so can't start the os x installation.
Can anyone help me please?

My hardware:
Cpu: intel I7 3930K
MB: GIGABYTE X79S UP5 WIFI rev. 1.0
Ram: Corsair 16GB 1600 Mhz
Gpu: Gigabyte GeForce GTX 770 2GB
SSD: Samsung 840 Evo 500GB
 
Is it necessary to totally erase the destination drive if you already have Yosemite installed and just want to update? I'd like to avoid that if possible...
 
Hi !

Everything is fine about the Mac OS X El Capitan installation on my GA-Z77-DS3H rev 1.0 + Core i5 3570k

Things are becoming tricky with the post installation part. I followed the steps, including the installation of the essential kext with CustoMac Essentials.pkg but i can't connect to the internet : network preferences does't show any ethernet port.

I tried to put this kexts in the EFI volume (EFI/CLOVER/kexts/10.11), but it still doesn't work.

What did i miss ?

Thank you for your work !

same here on H77-D3H

Ethernet no worky :(
 
I wanted to install this on an older HP RP5700 pc.
Specs:
  • Intel Core2Duo E6400
  • OEM HP motherboard
  • 4GB DDR2
  • No external graphics
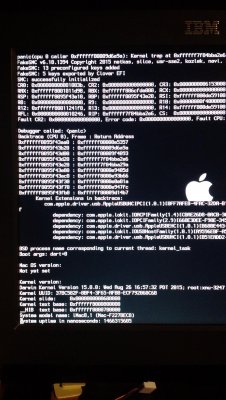
I can't even get to installation. I get the apple logo and then in a flash I get this screen:
IMG_20151002_214946470.jpg
I found something about booting with -x, but I don't manage how to do this. Anyone can help me?
I'm so sorry if this is a stupid question, but this is my first try.
I also found something about iBoot. Should I consider using this? However iBoot only goes up to Snow Leopard if I understood correctly?

Thanks so much for any response.
 
Is it necessary to totally erase the destination drive if you already have Yosemite installed and just want to update? I'd like to avoid that if possible...

I did not erase my destination drive. I successfully installed El Capitan onto my existing Yosemite drive. All of my apps and settings survived the update.
 
Status
Not open for further replies.
Back
Top