Contribute
Register

Ulysses's G5 Mod with Original Fans & Layout using Laserhive's Low 120mm mATX kit,

Status
Not open for further replies.
Joined
May 13, 2010
Messages
26
Motherboard
Asus P6T
CPU
i7
Graphics
Nvidia 770 2gb
Mac
  1. 0
Classic Mac
  1. 0
Mobile Phone
  1. 0
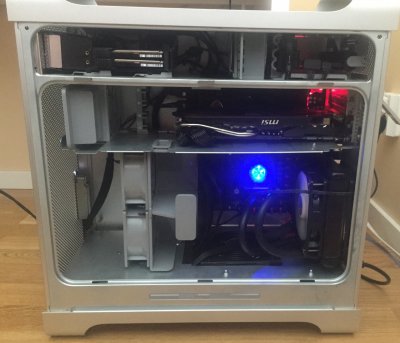
The main case mod goals i had in mind.

To use the G5 fans.
To keep the same airflow.
Not take out the top shelf
Balancing keeping the G5 as original as I can without compromising on the build.


The core mods that i made: (beyond fitting laser hive's 120 low mATX Kit):
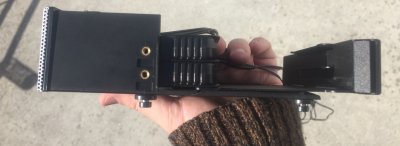
G5 Fan Mod Control & 5.25" Fan Controller & 2x 2.5" HDD Caddy in optical bay.
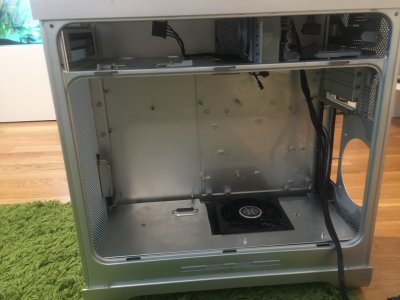
PSU Fitting.
Middle Shelf.


Will break in down in detail in the following posts.

First I have to say the inspiration came from reading a lot of awesome mods on and ideas this site. If I used your idea without giving you credit. Let me know and will put it here (and sorry i missed it)

I used the same 3.5 to 2 x 2.5" adaptors from icy dock that stiligFox's here http://www.tonymacx86.com/powermac-g5/152927-stiligfoxs-powermac-g7.html Such a neat idea I had to use it.
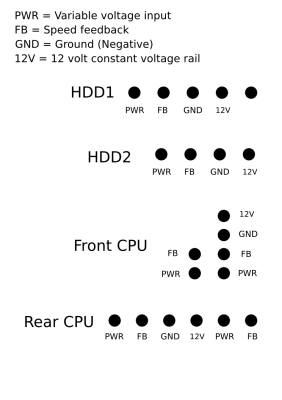
I also got the pinout from for the G5 fan from sheriff here. Without that info i would not have even considered using the g5 fans.
http://www.tonymacx86.com/powermac-g5/69889-info-g5-fans-2.html

I've enjoyed making this one and learned a lot of lesson from my earlier mod.
http://www.tonymacx86.com/powermac-g5/154451-2004-g5-atx-conversion-using-bitfenix-neos-case.html
And a lot more from reading the forums.
 

Attachments

  • G5 1 Side.jpg
    G5 1 Side.jpg
    320.8 KB · Views: 1,336
  • G5 2 Side Cover off.jpg
    G5 2 Side Cover off.jpg
    282.8 KB · Views: 1,376
  • G5 3 CPU Cover off.jpg
    G5 3 CPU Cover off.jpg
    302.6 KB · Views: 3,844
The G5 fans.
They are Delta fans. They are not silent, but, they push a lot of air. Very high CFM. If you modify like PWM fans with a controller and not like standard PC Fan. They can be run at 5v relatively quietly.


I searched the forums and found a pinout guide on an old thread. http://www.tonymacx86.com/powermac-g5/69889-info-g5-fans.html. Thanks to “sheriff.”

I then wired up an old fan controller to test out how they could be controlled.
Each fan needs to have a constant 12v, a variable dC voltage (this might be a true pulsed voltage signal from a g5 motherboard, but, a variable dc voltage from a fan controller does work!)
a sensor pin and ground. I did not use the sensor pin for any of the fans.

If you try using only a variable DC and ground the fan does not spin at 5v it starts at about 7v or 8v and is loud.

I connected up a 8cm noctua 1200 rpm fan for noise and cfm comparison.

So I concluded that Noctuas are quiet and pushed very little air.
the g5 Deltas at 5v push much more air and are only marginally louder than the noctuas are at full 12v to my ears.

But at 12v the g5s fans are so loud you can’t think, they are also ready to take off they push so much air.

This test setup was really to decide if i could cope with the loudness at 5v. I personally think they are quiet enough so long as you rewire them to act like PWM fans.

I planned to use 5 of the original fans. They are all rated at 0.6 amps at 12v. That is a lot of juice for a fan. Most 120mm fans are much lower current rating around 0.20 amps.

So I decided to seek out a fan controller that would work in the 5.25 optical bay, and be able to control 5 high current fans. I settled on the NZXT Sentry Mesh.

5 channels, 30w per channel max, so 2.5amps at 12v per channel.
When it arrived, first things first. Diss-assemble. Spray mesh to match the g5.
https://www.nzxt.com/product/detail/80-sentry-mesh-fan-control.html

I bought 3, 4 PIN PWM fan cable extension.
http://www.akasa.com.tw/update.php?...ype_sub=Fan Cable Adapters&model=AK-CBFA01-30

I then made 4 custom cables.

One cable for the two front fans, one for the PCI-E fan and two for the hard drive fans.

Then I made some custom 4pin fan cables, using the pinouts here.
http://www.tonymacx86.com/powermac-g5/69889-info-g5-fans.html

I made a simple male to female molex cable and took the 12v from that for the constant 12v for all the fans.

I used the variable DC and ground from the fan controller.

I used the female PWM socket from the akasa cables for three for the four pin cables and made a custom connector for the two font cpu fans using the original male connector that attached to the G5 motherboard.

After some soldering and heat shrinking. The cables are made. Great.
Goes without saying, but, when making the cable for the fan controller you really want to be sure that your wiring is correct.
I used an old PSU to be sure. the fan controller and fans were running perfectly before i went anywhere near my shiny new components and PSU. I would urge anyone considering similar mod to do the same. Use a multimeter, check twice.

I then decided after drilling the holes needed to using existing optical drive screws/mounting system, that there is still a lot of space in the optical bay and decided to mount one of my 2.5inch adaptors to it.

After reading stiligFox http://www.tonymacx86.com/powermac-g5/152927-stiligfoxs-powermac-g7-2.html build I had bough two of the Icy Dock Dual 2.5” to 3.5# adaptors. I had planned on using them in the same way as StiligFox had, but wondered if i could squeeze on next to the fan controller.

It worked ands free up a 3.5 for a 3.5 drive if i need it on the original hdd rack.
 

Attachments

  • IMG_6414.jpg
    IMG_6414.jpg
    96.9 KB · Views: 934
  • IMG_6417.jpg
    IMG_6417.jpg
    117.8 KB · Views: 1,070
  • IMG_6446.jpg
    IMG_6446.jpg
    241.9 KB · Views: 948
  • IMG_6451.jpg
    IMG_6451.jpg
    118.6 KB · Views: 848
PSU Fitting.
Next mod was the power supply.
I had discussed some ideas for power supply selection on the forums.
http://www.tonymacx86.com/powermac-...you-do-differently-have-two-g5-cases-mod.html

and here.

http://www.tonymacx86.com/powermac-g5/165212-g5-pc-psu-advice-part-build.html


So I used the Silverstone SX500-LG i had been harping on about.


I also really like a suggestion from minihack to use an angle bracket or acrylic sign standoff to hold up the PSU shelf. To cover the PSU in stead of reusing the old PSU casing.

In the end i did not do this. Simply because I did not have such an angle bracket or long enough standoffs. I also wanted to use the existing PSU fans and did not want to drill more holes for stand offs. Certainly an idea worth exploring more in a future build.

So I recycled that PSU case. Used the original mac power socket some soldering heat shrink and a power cable and its done. For the existing PSU fans. I used a simple molex to dual 5v fan connector cable. I also rewired the fans to make then wired as standard pc fans. For some unknown reason they were wired differently. (Just like every other fan on the G5.)

I cut the PSU case and shelf, sanded them down and then used black tape to cover the edges. Just to keep it neat and avoid an cabling getting caught on any sharp edges.

I made a simple molex adapter the existing g5 two sata and one molex power cable.
 

Attachments

  • IMG_6412.jpg
    IMG_6412.jpg
    233.6 KB · Views: 697
  • IMG_6411.jpg
    IMG_6411.jpg
    207.4 KB · Views: 591
Middle shelf.

I used a simple angle bracket and the existing PCI-E slot makers plastics to get this on the original existing mount points.
I needed to take about 6-7cm off the shelf to ensure it was not too clove to my main board. Out with the jigsaw, cut and sand it down and as I did with the PSU, i used black tape to neatly cover the newly cut edge.

I decided to mount the angle bracket straight onto a convent hole on the rear of the case. I actually used an alternative mounting part for socket 2011 from a space cpu cooler i had lying around to fit onto the mounting bracket.

Keeping the middle shelf was a must to mount the fans and g5 cpu cover correctly.

Of course the shelf needed to go in after the motherboard. which was not great fun. But i took my time to make sure it didn’t drop on the board and it is very secure.
 

Attachments

  • IMG_6467.jpg
    IMG_6467.jpg
    190.6 KB · Views: 416
  • IMG_6465.jpg
    IMG_6465.jpg
    330.3 KB · Views: 427
The rest of the build.

GPU Msi 770 GTX (Already owned)
CPU i7 4970k
MB MSI Z97M Gaming
RAM Crucial Ballistix Elite (16GB)
Water- Cooler SilverStone Tundra SST-TD03-E
Previously owned Samsung SSD Evo 850 & SSHD Seagate 1tb Drives.

I chose the msi motherboard, having previously owned an msi dragon 2 laptop. Really like the built in sound cards and easy overclocking. I also plan on gaming with this rig.

The worst part of the build was mounting my chosen water-cooler. The SilverStone Tundra SST-TD03-E. The mounting system for it is rubbish in my view. It just poorly designed the length of screw dictating the fit. And no thought to what happens when you over tighten and and your screw scratches the radiator. Really frustrating fit to get just right. Got to be a better way to do that. On the plus side the coolers mounting system to the board was good. The copper heat conductive surface of the unit was flawless. Really good build and attention here, but, not on the ****ty mounting system.

So after arguing with it for some time. It fits on the 120mm slot, but had to go without the Laserhive 120mm perforated fan grill. My water-cooler just would not work with it in place. I squarely blame the water-coolers m mounting system for this.
It does fit nicely under the g5 cpu plate.


I setup the machine with BlackCH mods front panel to ATX cable.
Tidy up cables with some cable ties.

It looks great with the acrylic in place too. Shame I need to cut it to fit my gfx card, but, I had anticipated that.

The Fan controller works really well. I never have them on 12v, but, even at 5v my GPu is 10C cooler than it was in my previous mod.
 

Attachments

  • IMG_6489.jpg
    IMG_6489.jpg
    371.5 KB · Views: 446
That is a very beautiful build! I love how clean and original it looks, especially with the G5 CPU cover!

Glad to see another modder use those drive brackets, they really are wonderful!
 
That is a very beautiful build! I love how clean and original it looks, especially with the G5 CPU cover!

Glad to see another modder use those drive brackets, they really are wonderful!

i'll be next on using that drive brackets XD

and yes, it's really a beautiful build. looks clean and original.

i still also have the modded original fans of my G5 so it will stay quiet heheh! :D
 
Thanks for the encouragement and comments stiligFox & voidfahrenheit.

Those icy dock brackets are very nice. Might be a run on them from forum members here. :)
 
Thanks for the encouragement and comments stiligFox & voidfahrenheit.

Those icy dock brackets are very nice. Might be a run on them from forum members here. :)


Im having some trouble getting the wiring. Anyone around to lend a hand. heck even OP


I was later able to correctly get this mod working. I used the same NZXT fan controller.
My advice for anyone would be to not alter the pin order on the fans themselves but rather adapt the pin order on your fan controller side connectors. Since apple used all black cables, its easy to confuse the pin and older discussions on pin order were not always correct.
My mod was with a late 2005 model of the g5.

Let me clarify for others what i found confusing using the above instructions
Then I made some custom 4pin fan cables, using the pinouts here.
http://www.tonymacx86.com/powermac-g5/69889-info-g5-fans.html

I made a simple male to female molex cable and took the 12v from that for the constant 12v for all the fans.

I used the variable DC and ground from the fan controller.

I used the female PWM socket from the akasa cables for three for the four pin cables and made a custom connector for the two font cpu fans using the original male connector that attached to the G5 motherboard.

After some soldering and heat shrinking. The cables are made. Great.
Goes without saying, but, when making the cable for the fan controller you really want to be sure that your wiring is correct.

What I did for my setup was run my 12v constant line (split 4 ways) from the same area as the fan controller. This way, i could sleeve the Variable & ground (from fan controller) with the 12v constant into the connector. Similar to OP i purchased pwm extension cables from amazon and clipped the ends. With this setup, i was successful at connecting the two harddrive fans (spliced together into 4 original 4 pin connector, one gpu fan, 2 instake fans (spliced (pwr or variable 1 pin for the new 4 pin connector following pin diagram) and 2 exhaust fans (same as intake)
 

Attachments

  • 26350-26c56dfe3ab8c15c11314d0e820194ea.png
    26350-26c56dfe3ab8c15c11314d0e820194ea.png
    18.1 KB · Views: 258
  • 20200723_211544.jpg
    20200723_211544.jpg
    119.2 KB · Views: 270
  • 20200724_232032.jpg
    20200724_232032.jpg
    164.9 KB · Views: 275
  • 20200724_232346.jpg
    20200724_232346.jpg
    74.5 KB · Views: 265
Last edited:
I think you did exactly the same thing as i did? But, I get that the colour on the cables can be misleading as the volts dont mind what colour the cable is and it great you took the time to explain with better pictures. :) I hope that helps others too.

What i find strange is that when wired with a controller as you have done, the fans are amazing. Everyone says they are too loud. (becuase they have wired them wrong) and goes on to buy a noctua's that push a fraction of the air. Nothing agsint Noctua, love the cpu coolers, but, honestly theese delta's are awesome and quiet with the option to go up to insane levels of airflow, if you treat them right.
I am going to use another g5 case with these fan for a gaming setup. Make use of that airflow to get some good overclocking.
 
Status
Not open for further replies.
Back
Top