
- Joined
- Jun 10, 2011
- Messages
- 333
- Motherboard
- Gigabyte Z370 Aorus Ultra Gaming 2.0
- CPU
- i7-8700K
- Graphics
- RX 580
- Mac
- Mobile Phone
ultrazone's Coffee Lake Build:
GA-Z370 Aorus Ultra Gaming 2.0 - i7-8700K - 2x RX580 - 32Gb RAM

GA-Z370 Aorus Ultra Gaming 2.0 - i7-8700K - 2x RX580 - 32Gb RAM
Components
Gigabyte Z370 Aorus Ultra Gaming 2.0 Motherboard
https://www.amazon.es/dp/B079NKMRG5/
Intel Core i7-8700K Desktop Processor
https://www.amazon.es/dp/B07598VZR8/
Noctua NH-U9S CPU Cooler
https://www.amazon.es/dp/B00TBHYYFK/
Crucial Ballistix Sport LT 32GB Memory Kit (8Gbx4) DDR4 2400 MT/s
https://www.amazon.es/dp/B01AG9F14Y/
2x Sapphire Pulse Radeon RX 580 8GB GDDR5 Graphics Card
https://www.amazon.es/dp/B071CQ5LRV/
Samsung SSD 960 EVO NVMe M.2 250GB SSD -> macOS
https://www.amazon.es/dp/B01M211K53/
Crucial MX500 1TB 3D SATA 2.5" SSD -> Libraries Drive
https://www.amazon.es/dp/B077SF8KMG/
TOOQ Rack Case 406N (for 19" Rack, ATX, Front Closure With Key)
https://www.amazon.es/dp/B01M062WQY/
Corsair RMx Series PSU RM1000x, 1000W
https://www.amazon.es/dp/B015Q7F5AQ/
Noctua NF-F12 PWM 120mm Case Fan
https://www.amazon.es/dp/B00650P2ZC/
2x Noctua NF-A6x25 PWM 60mm Case Fans
https://www.amazon.es/dp/B00VXTANZ4/
Fosa STW Internal Card Reader (5,25", front panel with USB 3.0, 3.1, eSATA, M2, MSO, SD, MS, XD, 64G CF
https://www.amazon.es/dp/B07BCB1DC8/
SilverStone SST-FS202B Internal Drive Enclosure for 2 x 2.5" HDD/SSD, 3.5" form factor
https://www.amazon.es/dp/B019LS5ULA/
Already Owned
Startech Firewire 400 2 Port PCIe Card
https://www.amazon.es/dp/B00W3E64AG/
LG 34UM59-P LED PC Monitor 34" 2560 x 1080 HDMI
https://www.amazon.es/dp/B06XCLTDZJ/
2x LG 27MP68HM-P 27" IPS Monitor D-Sub/HDMI
https://www.amazon.es/dp/B01AWG4Y3K/
Samsung 850 EVO 500GB 2.5" Internal SSD -> Audio Hard Drive
https://www.amazon.es/dp/B00P73B1E4/
Crucial BX300 480GB 3D NAND 2.5" SSD -> Scratch & Temporary files Hard Drive
https://www.amazon.es/dp/B073W4N5KB/
Kensington Expert Trackball Mouse (USB wired version)
https://www.amazon.com/dp/B00009KH63/
Apple Wired Keyboard (USB with numeric pad)
https://www.amazon.es/dp/B000VLYEL4/
RME Fireface UCX 36-Channel FireWire & USB 2.0 Audio Interface
https://www.amazon.es/dp/B0085U77H6/
Nektar IMPACT LX88+ USB MIDI Controller
https://www.amazon.com/dp/B01LYAA8GN/
RME ARC USB (Remote controller for RME audio interfaces)
https://www.amazon.es/dp/B06XD261FG/
Comments
After six years working with my good-old Z77 + Ivy Bridge system, new software requirements forced me to upgrade to a newer build. What’s more, now I’m editing video in 4K with Final Cut Pro, so the graphics computing performance definitely needed an upgrade. Apart from this fact, I still work in audio production & orchestral mockup composing with Cubase 10 Pro, Pro Tools 2019 and Vienna Ensemble Pro (for loading and managing lots of virtual instruments in both local & network computers).
Within this scenario, my “old” Ivy Bridge system is still working pretty good with macOS Sierra 10.12.6, and now it acts as a slave for this new “master” rig via Vienna Ensemble Pro. In a nutshell, the “slave” rig runs many of my virtual instruments, and thus provides better performance of the new “main” rig, by assuming the needed workload to run such a number of virtual instruments.
When planning this new build, I knew it was going to be necessary to use the most powerful and recent components to date, since that’s what makes a computer usable in the future. I wanted 6 cores with possibility to overclock, lots of RAM and all-SSD storage, to provide faster loading times and avoid noise and temperature within the case.
Regarding the case itself, now I’m using special furniture for audio production that includes room for installing devices in rack format (19”), so the computer is not on a regular PC case, but a 4U rack chassis that is meant to be used in server environments, but for me it is also perfect. This rack case has plenty of room for all the components involved (including a tall Noctua CPU cooler and a pair of Sapphire RX580 graphic cards). The airflow is assured by using a 120mm fan in the front of the case and a couple of 60mm fans in the rear part.
Regarding my choice in main system components (CPU, motherboard and graphic cards), I followed the Buyer's Guide for June 2018. I read on this forum that the Sapphire Radeon RX580 is compatible so I bought a unit, and once it worked I added a second one to improve FCPX performance. I already owned the audio stuff (audio interface + MIDI controllers), which I knew to be compatible since I used these devices in my previous rig without any problem.
It is also worth mentioning that I bought the components during June 2018, and then I started tinkering with this build. In that moment I used High Sierra 10.13.6, but when Mojave 10.14.5 came out I decided to make a new clean install with all the knowledge and experience gathered with this system. So this guide refers to my last clean install of 10.14.5.
Installation
UEFI & BIOS Settings
Let's have a look at the BIOS settings. When talking about this I'll frequently refer to defaults, meaning the default options for that concrete item after loading optimized defaults. I am currently using F11n BIOS version (dated 2018/11/07 at Gigabyte’s support site, https://www.gigabyte.com/Motherboard/Z370-AORUS-ULTRA-GAMING-20-rev-10) and I am running the system at stock speeds.
In this album you will find a screenshot of every BIOS' page, along with comments on the settings applied. Below the screenshots' gallery you will find my BIOS settings, in case you have the same motherboard and BIOS version and want to try them.
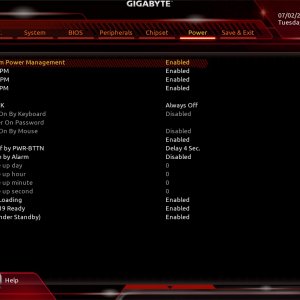


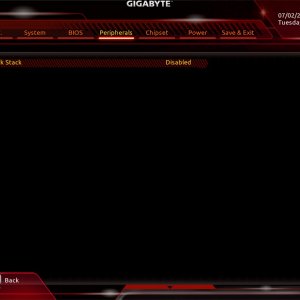
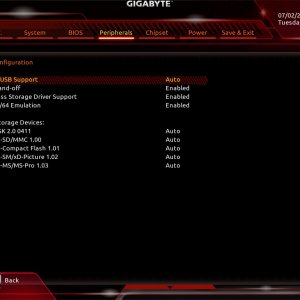
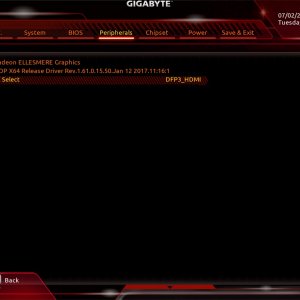
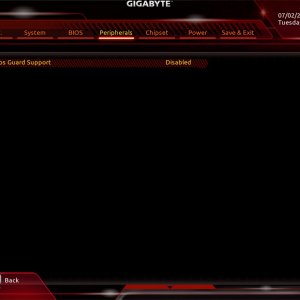

ultrazone's Coffee Lake Build: UEFI & BIOS settings
- ultrazone
- 37
UEFI & BIOS settings used in my Coffee Lake Build
BIOS settings - ultrazone's Coffee Lake Build - F11.mb.zip
Installation Notes
I've followed the official guide for Mojave installation available at https://www.tonymacx86.com/threads/...ojave-on-any-supported-intel-based-pc.259381/, although with some minor changes. Here is the whole process:
- First I followed the guide to create a 10.14.5 USB stick using UniBeast (https://www.tonymacx86.com/threads/...ojave-on-any-supported-intel-based-pc.259381/). UniBeast version was 9.2.0 for Mojave (http://www.tonymacx86.com/downloads).
- During the installation, the motherboard had the following components connected: 32Gb of RAM, SSD drive and one graphic card (AMD RX 580).
- Then I applied the BIOS settings described above.
- Booted the stick (F12 key while booting BIOS). The installation went smoothly.
- Booted the stick again after installation and chose my new installation. The initial configuration went fine and then I used MultiBeast 11.3.0 for Mojave (http://www.tonymacx86.com/downloads). These were my MultiBeast settings:
MultiBeast Settings
Post installation is easy, as this board doesn't require a DSDT. I used the following settings and rebooted following a successful installation.
MultiBeast settings - ultrazone's Coffee Lake Build.mb.zip
Fine tuning
Once the system boots on its own it's time to fine tune all the components. The most critical areas within this point are DSDT, USB configuration, CPU/IGPU/GPU optimisation and sleep.
- Regarding DSDT, all the credit goes to forum user @MaLd0n from another forum. I sent him my raw DSDT extracted with Clover and he sent it back to me perfectly patched. Thanks again my friend!
Here you have my DSDT (you'll find it as well within my EFI folder): DSDT.aml - ultrazone's Coffee Lake Build.zip
And here are the aesthetic results of using a DSDT with this motherboard (of course, apart from other advantages):
- With respect to USB configuration, all the credit goes to @RehabMan for his guide about how to create a custom SSDT for USBInjectAll.kext (https://www.tonymacx86.com/threads/guide-creating-a-custom-ssdt-for-usbinjectall-kext.211311/). First thing to do is to install XHCI-unsupported.kext.zip and USBInjectAll.kext in your preferred location (in my case, /Library/Extensions/). After rebooting the system you're ready for dealing with port discovery. Here you have my findings when dealing with USB port discovery:
Thanks @RehabMan for the guide itself and for your continued support in the forum!
- CPU/IGPU/GPU optimization is always challenging, but it wasn't like that this time... I found several guides which pointed me in the right direction. Here they are:
* macOS Native CPU/IGPU Power Management -> https://www.tonymacx86.com/threads/macos-native-cpu-igpu-power-management.222982/
In this guide you'll find all the necessary information to properly configure your CPU and your IGPU (if you use it). This configuration is achieved with a mixture of settings (correct SMBIOS for your CPU & motherboard and various settings within the ACPI section of your config.plist).
The guide also contains a way to diagnose if the settings are applied correctly, so doing the effort to figure out your settings is time well spent.
* macOS Native Discrete GPU Power Management -> https://www.tonymacx86.com/threads/macos-native-discrete-gpu-power-management.247479/
This guide contains everything related to macOS Native Discrete GPU Power Management. As well as in the case of macOS Native CPU/IGPU Power Management, this configuration is achieved with a mixture of settings (correct SMBIOS for your CPU & motherboard, correctly recognised graphic adapter in System Profiler, XCPM enabled and correct graphic adapter ACPI name). Once you have all these items ready, you have to modify a given kext with your info and then you have to install it in your preferred location (for me, /Library/Extensions).
Just like in the case of macOS Native CPU/IGPU Power Management, there is a way to diagnose if the settings have been correctly applied. Investing time on macOS Native Discrete GPU Power Management is a good thing, since you'll save energy (your discrete graphic adapter will throttle when necessary) and reduce noise & temperature within the case (very important in a home studio environment in southern Spain!).
Here goes my dAGPM.kext, in case you want to use it as an example:
dAGPM.kext.zip - ultrazone's Coffee Lake Build
It is also worth mentioning that I have the IGPU configured in headless mode. In the case of this motherboard & CPU, this is achieved with a proper system definition (iMac18,3 in my case), IGPU enabled in BIOS, correct FakeID for your IGPU ("0x059128086" in my case) and correct ig-platform-id for your IGPU ("0x59120003" in my case). All these settings are applied via config.plist, and once you enable headless mode for your IGPU you'll get huge benefits:
iMacs with Radeon and IGPU graphics use the Intel IGPU in headless mode all the time to help accelerate certain tasks...
macOS is very well optimised to get the most out of the hardware features Intel baked into their IGPU's.
So big thank you to @toleda for his guide and help through these years!
- Finally, sleep was the last piece of the puzzle. Even with DSDT, USB customization and CPU/IGPU/GPU optimization, the machine refused to sleep. It was like an instant wake: everything stopped but in a second or two it woke up by itself again. The solution this time was to apply a couple of patches from @RehabMan repo and since then I haven't had a problem. Thanks again RehabMan!
Clover Configurator
Almost all of the post-install settings (except the execution of MultiBeast) have been done with Clover Configurator. Here you have my config.plist for you to check my settings:
config.plist - ultrazone's Coffee Lake Build.zip
For those of you who prefer looking at Clover Configurator's screenshots rather than dealing with config.plist, here you have an album containing all my settings. Each of the screenshots has its own comments regarding the selected options and a brief explanation about it:
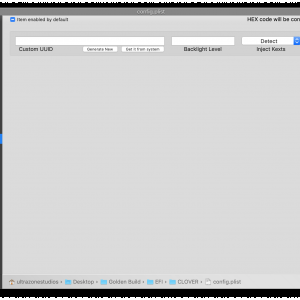
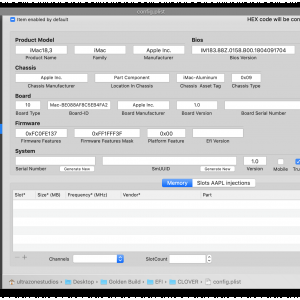


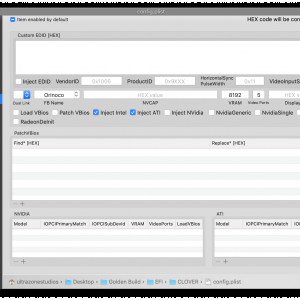


ultrazone's Coffee Lake Build: Clover Configurator
- ultrazone
- 13
Screenshots from my setup in Clover Configurator
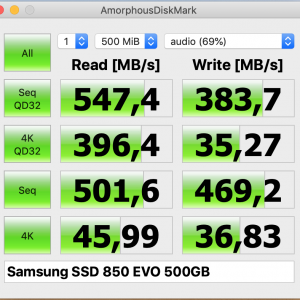
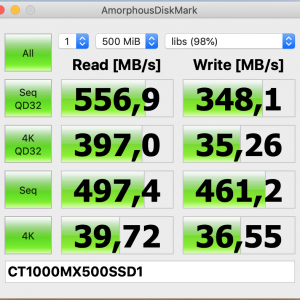
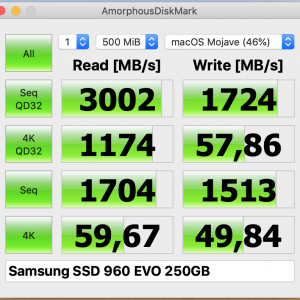
Benchmarks
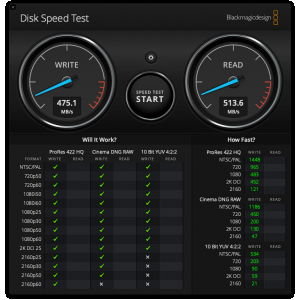
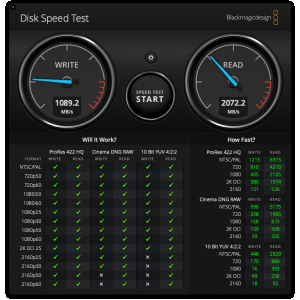
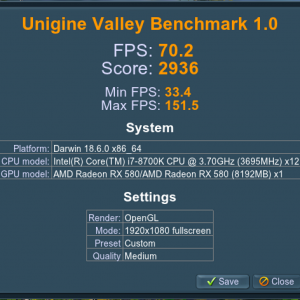
In order to benchmark CPU & GPU performance, I've used GeekBench 4 (for CPU & GPU, both Metal and OpenCL), CineBench R15 (for CPU & GPU OpenGL), LuxMark 3.1 for OpenCL using both graphic cards and Unigine Valley 1.0 for OpenGL. Regarding disk performance I've used BlackMagic's DiskSpeedTest and AmorphousDiskMark. These are my findings:


ultrazone's Coffee Lake Build: Benchmarks
- ultrazone
- 13
Here you'll find screenshots from my benchmark session with this build.
Files
- BIOS settings - ultrazone's Coffee Lake Build - F11.mb.zip
- MultiBeast settings - ultrazone's Coffee Lake Build.mb.zip
- DSDT.aml - ultrazone's Coffee Lake Build.zip
- dAGPM.kext.zip - ultrazone's Coffee Lake Build
- EFI folder - ultrazone's Coffee Lake Build.zip
- config.plist (Clover) - ultrazone's Coffee Lake Build.zip
- XHCI-unsupported.kext.zip
- EFI folder - OpenCore 0.5.5.zip
- config.plist (OpenCore) - ultrazone's Coffee Lake Build.zip
Final Thoughts
This build performs really well, and with the help of many users from this forum it has been taken to an "almost-perfect-state-of-function". Thanks everyone in the forum and keep up the good work!
If you have any question and/or suggestion, please let me know! Here you have some more pictures of the build... Thanks for reading!
P.D.: During the next days I'll be posting some more files and details about the build... thanks for your patience!
Attachments
-
BIOS settings - ultrazone's Coffee Lake Build - F11.mb.zip1.7 KB · Views: 581
-
MultiBeast settings - ultrazone's Coffee Lake Build.mb.zip143.4 KB · Views: 485
-
DSDT.aml - ultrazone's Coffee Lake Build.zip33.8 KB · Views: 623
-
ultrazone's Coffee Lake Build - dAGPM.kext.zip2.9 KB · Views: 487
-
EFI folder - ultrazone's Coffee Lake Build.zip3 MB · Views: 687
-
config.plist - ultrazone's Coffee Lake Build.zip2.4 KB · Views: 539
-
XHCI-unsupported.kext.zip2.6 KB · Views: 447
-
EFI-OPENCORE-0.5.5.zip21 MB · Views: 800
-
config.plist21.3 KB · Views: 510
Last edited: