- Joined
- Apr 29, 2012
- Messages
- 8
- Motherboard
- MSI MPG Z490 Gaming EDGE WiFi
- CPU
- i5-10400F
- Graphics
- RX 5700 XT
- Mac
- Mobile Phone
ToastChem Build - GA-Z68MA-D2H-B3 - Core i7-2600K - HD6870
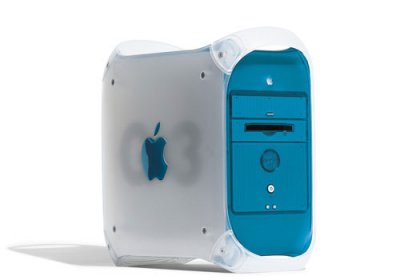
G3 Powermac.jpg
At last I took the final leap and ordered the following parts and built my first Hackintosh. Nothing special about the components - several others have posted the same components, but the use of an old G3/G4 case was a challenge and since everyone mods the case differently I thought I'd share my own innovations. I am heavily in debt to MacBane who showed that large heatsinks and PSU's can live side by side on the cabinet door of a G4, however, I mounted the PSU inside the cabinet on a shelf, so less weight on the door.
Components:
Motherboard Gigabyte GA-Z68MA-D2H-B3
CPU Intel Core i7-2600K
Memory Vengence LP CML8GX3M2A1600C9 4 x 4Gb
CPU Cooler Scythe Mugen 3
PSU Corsair HX650W Pro
Fans Scythe Gentle Typhoon
HDD 3 x Samsung F3 HD103SJ 1TB SATAII 32MB Cache 7200RPM
GPU XFX Radeon HD6870 Double Dispersion
Already Owned:
Case G3 Blue & White shells on a G4 metal chassis (My G3 350MHz machine died so I bought a cheap damaged G4 400MHz on eBay and retained the Blue and White panels, Keyboard and mouse from the G3 - quite an upgrade for £25 )
Monitor LG Flatron Wide 19"
Speakers Original Apple Design Powered Speakers (bought with the G3)
Comments
A PowerPC G4 400MHz is very nearly useless nowadays, but the G3 Blue & White case still has a certain charm and is quite compact, so I wanted to put a serious, powerful system into a small space and still be a quiet, daily use machine. The parts were all about fast processors with big coolers and slow quiet fans - perhaps even allowing for some over clocking. The machine was to replace a G5 Dual 2.5GHz PowerMac which, not being Intel, would not run the most recent versions of software. Also, some gaming and also to run Windows 7 to use specialist software for chemical plant control (not available on MacOSX), so multi boot required.
To do this, I gutted the G4 case, removed the shelf, the drive bays and PSU (cutting the back panel off the PSU so I could mount an 80mm fan on the rear panel grill). Changed the mounting supports for the motherboard, and mounted the GA-Z68MA-D3H-B3 motherboard in place. With the Mugen 3 being so large and HD6870 being the full width of the motherboard I only had a 4 inch wide strip down the left side of the case to fit a Fan (new hole cut in the floor of the case), the PSU (sitting on a small custom shelf 2 inches over the fan) and 2 of the hard disk drives (mounted above the cutback remains of the old DVD/Zip disk drive bay). I will be monitoring their temps as they don't have good air flow up there.
Some things didn't go to plan - No room for the side intake fan, required the new fan and new hole in the base (I had hoped to keep the box intact). I had to wire a new passthrough plug for the monitor since I forgot to buy a PSU with a similar socket and plug on the back panel. Also, the fit was too close for the external sockets back plate to fit, so I am making a blue plastic one using the metal original as a template, which I will then trim the metal plate and fix in place using the plastic over plate, should make for a neat finish.
Some things went very well - I had an old dead PC and took the front panel lights and switches off it and mounted them in the G4's front panel (hot wiring to the original G4 start switch) and even have a working disk drive LED in a green/blue colour, looks good and of course the other end had the correct block connector already wired for the mATX mother board. This saved a bunch of time.
Result:
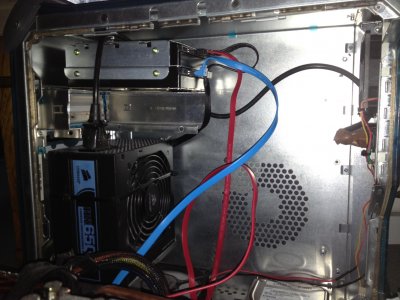
G4In.jpg
The photo of the insides - It worked out pretty well a straight run of TonyMacx86 guide for the unibeast install of Lion via USB stick drive (Would not have done this without all your hard work), then updated to 10.7.3 with the combo updater and finally did 10.7.4 with another combo updater with adding the ssdt file for over clocked 2600k. Very quiet, processor temps are around 34°C idle and 65°C under stress with just a murmur of fans, while over clocked to 4.2GHz and getting Geekbench results of 13729 and 78fps on the Unigine graphics benchmark. Dual monitor works, ethernet works, mother board temperature sensors required the Kozlek HW sensors patch, but work well. Sleep/wake works flawlessly. Very happy with the machine - only 1 Kernel Panic to date, and no obvious cause, so not too worried. Curiously wake from sleep won't wake my G5's keyboard, but does wake the machine, if the keyboard is plugged direct into a USB2 port, but if the keyboard is in the powered hub, then all works OK (do not get this behaviour with the old G3 original keyboard which works if connected to port or hub - perhaps it uses less power??)
I put Windows 7 on one of the hard drives again using a USB stick, not flawless, but followed a fairly standard procedure:
- Format a USB stick on an Windows 7 machine and make the partition active and copy the install files over
- Format the HDD as an NTFS drive with 2 partitions (320Gb and 650Gb) make 320Gb active (unless I did this the Windows 7 installer would not recognise the drive)
- Disconnect the Mac drives
- Boot from the USB stick and when the W7 installer loads use Shift-F10 to get the command line and use DiskPart to re-format the drive and make the 320Gb partition active.
- Re-fit all the drives and re-order the BIOS order of the drives to make the MacOS load first
- I had a few problems booting using multi-beast as initially the Windows part would not boot without the black screen complaining that the boot had failed, but all worked after a few repeats of these steps.
The To Do List
Must make a backplate. Maybe put the disk activity LED in place of one of the reset switches on the front panel. Possibly put another fan under the GPU (temps got to 68°C during benchmarking and over clocking). Fit a PCIx firewire card and finally squeeze a USB/Firewire/eSATA/card reader into the 5.25 inch drive bay (hidden by the pull down door).
Overall very happy at this point - I had to move to the PowerMac 3.1 system description to avoid the popping sound problem. But all seems good now. Let me know if you want more pics and I can try to add them.
G3 Powermac.jpg
At last I took the final leap and ordered the following parts and built my first Hackintosh. Nothing special about the components - several others have posted the same components, but the use of an old G3/G4 case was a challenge and since everyone mods the case differently I thought I'd share my own innovations. I am heavily in debt to MacBane who showed that large heatsinks and PSU's can live side by side on the cabinet door of a G4, however, I mounted the PSU inside the cabinet on a shelf, so less weight on the door.
Components:
Motherboard Gigabyte GA-Z68MA-D2H-B3
CPU Intel Core i7-2600K
Memory Vengence LP CML8GX3M2A1600C9 4 x 4Gb
CPU Cooler Scythe Mugen 3
PSU Corsair HX650W Pro
Fans Scythe Gentle Typhoon
HDD 3 x Samsung F3 HD103SJ 1TB SATAII 32MB Cache 7200RPM
GPU XFX Radeon HD6870 Double Dispersion
Already Owned:
Case G3 Blue & White shells on a G4 metal chassis (My G3 350MHz machine died so I bought a cheap damaged G4 400MHz on eBay and retained the Blue and White panels, Keyboard and mouse from the G3 - quite an upgrade for £25 )
Monitor LG Flatron Wide 19"
Speakers Original Apple Design Powered Speakers (bought with the G3)
Comments
A PowerPC G4 400MHz is very nearly useless nowadays, but the G3 Blue & White case still has a certain charm and is quite compact, so I wanted to put a serious, powerful system into a small space and still be a quiet, daily use machine. The parts were all about fast processors with big coolers and slow quiet fans - perhaps even allowing for some over clocking. The machine was to replace a G5 Dual 2.5GHz PowerMac which, not being Intel, would not run the most recent versions of software. Also, some gaming and also to run Windows 7 to use specialist software for chemical plant control (not available on MacOSX), so multi boot required.
To do this, I gutted the G4 case, removed the shelf, the drive bays and PSU (cutting the back panel off the PSU so I could mount an 80mm fan on the rear panel grill). Changed the mounting supports for the motherboard, and mounted the GA-Z68MA-D3H-B3 motherboard in place. With the Mugen 3 being so large and HD6870 being the full width of the motherboard I only had a 4 inch wide strip down the left side of the case to fit a Fan (new hole cut in the floor of the case), the PSU (sitting on a small custom shelf 2 inches over the fan) and 2 of the hard disk drives (mounted above the cutback remains of the old DVD/Zip disk drive bay). I will be monitoring their temps as they don't have good air flow up there.
Some things didn't go to plan - No room for the side intake fan, required the new fan and new hole in the base (I had hoped to keep the box intact). I had to wire a new passthrough plug for the monitor since I forgot to buy a PSU with a similar socket and plug on the back panel. Also, the fit was too close for the external sockets back plate to fit, so I am making a blue plastic one using the metal original as a template, which I will then trim the metal plate and fix in place using the plastic over plate, should make for a neat finish.
Some things went very well - I had an old dead PC and took the front panel lights and switches off it and mounted them in the G4's front panel (hot wiring to the original G4 start switch) and even have a working disk drive LED in a green/blue colour, looks good and of course the other end had the correct block connector already wired for the mATX mother board. This saved a bunch of time.
Result:
G4In.jpg
The photo of the insides - It worked out pretty well a straight run of TonyMacx86 guide for the unibeast install of Lion via USB stick drive (Would not have done this without all your hard work), then updated to 10.7.3 with the combo updater and finally did 10.7.4 with another combo updater with adding the ssdt file for over clocked 2600k. Very quiet, processor temps are around 34°C idle and 65°C under stress with just a murmur of fans, while over clocked to 4.2GHz and getting Geekbench results of 13729 and 78fps on the Unigine graphics benchmark. Dual monitor works, ethernet works, mother board temperature sensors required the Kozlek HW sensors patch, but work well. Sleep/wake works flawlessly. Very happy with the machine - only 1 Kernel Panic to date, and no obvious cause, so not too worried. Curiously wake from sleep won't wake my G5's keyboard, but does wake the machine, if the keyboard is plugged direct into a USB2 port, but if the keyboard is in the powered hub, then all works OK (do not get this behaviour with the old G3 original keyboard which works if connected to port or hub - perhaps it uses less power??)
I put Windows 7 on one of the hard drives again using a USB stick, not flawless, but followed a fairly standard procedure:
- Format a USB stick on an Windows 7 machine and make the partition active and copy the install files over
- Format the HDD as an NTFS drive with 2 partitions (320Gb and 650Gb) make 320Gb active (unless I did this the Windows 7 installer would not recognise the drive)
- Disconnect the Mac drives
- Boot from the USB stick and when the W7 installer loads use Shift-F10 to get the command line and use DiskPart to re-format the drive and make the 320Gb partition active.
- Re-fit all the drives and re-order the BIOS order of the drives to make the MacOS load first
- I had a few problems booting using multi-beast as initially the Windows part would not boot without the black screen complaining that the boot had failed, but all worked after a few repeats of these steps.
The To Do List
Must make a backplate. Maybe put the disk activity LED in place of one of the reset switches on the front panel. Possibly put another fan under the GPU (temps got to 68°C during benchmarking and over clocking). Fit a PCIx firewire card and finally squeeze a USB/Firewire/eSATA/card reader into the 5.25 inch drive bay (hidden by the pull down door).
Overall very happy at this point - I had to move to the PowerMac 3.1 system description to avoid the popping sound problem. But all seems good now. Let me know if you want more pics and I can try to add them.