kgp
Retired
- Joined
- May 30, 2014
- Messages
- 6,743
- Motherboard
- ASUS WS X299 Sage 10G
- CPU
- i9-7980XE
- Graphics
- Vega 64
- Mac
- Mobile Phone
@GDS and @kgp I keep getting an error in terminal for the bios modification, even after I used your code with my username and the new patcher file name. So I have decided to do it using clover configurator, but im having trouble with that now. I cant seem to find the cpu modification part. Im going to try to implement instructions from a youtube video with yours and see if I have any luck. Thank you both for your help, its greatly appreciated!
 Ok... lets make it idiot proofed!
 Another update of the UEFI patch BIOS section....
BIOS patching procedure (optional, not required):
1.) Download and unzip the CodeRush's UEFI patch (attached towards the bottom of this guide) to your Desktop.
2.) To patch the latest BIOS for your ASUS mobo, download the most actual BIOS version from the ASUS mobo support page
(e.g., follow the subsequent link to obtain the latest BIOS Version for the Asus X99-A II).
3.) Unzip the bios file and copy the CAP file into the UEFIPatch directory on your Desktop.
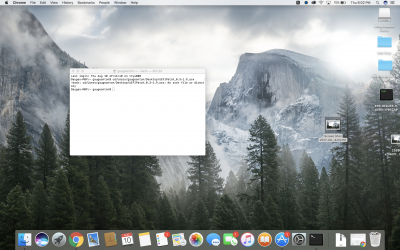
4.) Open a terminal; type "cd " and drag the "UEFIPatch"-folder on your Desktop into the Terminal window and press "Enter".
One can also use the terminal command equivalent:
Note that this step is important to successfully execute the UEFI-Patch procedure! You must be in the UEFIPatch directory on your terminal, in order to successfully execute step 5.) below!
Code:
cd ~/Desktop/UEFIPatch_0.3.9_osx/5.) Once in the UEFIPatch directory on your terminal, drop the "UEFIPatch"-executable into the terminal window; Also drop
the most actual BIOS CAP file into the terminal window; Press enter to execute the "UEFIPatch"-procedure.
The equivalent terminal command is
by assuming that you want to patch the latest X99-A-II-ASUS-1701.CAP BIOS-files for the ASUS X99-A II. For other mobos, please adapt the adequate BIOS CAP-filename in the command!
During the patch procedure, you will see something like the following message, which can be simply ignored:
6.) You will now find a ***.CAP.patched BIOS-file in the UEFIPatch folder, which is your patched (MSR 0xE2 unlocked) BIOSThe equivalent terminal command is
Code:
./UEFIPatch X99-A-II-ASUS-1701.CAPDuring the patch procedure, you will see something like the following message, which can be simply ignored:
Code:
parseImageFile: Aptio capsule signature may become invalid after image modifications
parseSection: section with unknown type 52h
parseFile: non-empty pad-file contents will be destroyed after volume modifications
parseSection: section with unknown type 52h
parseFile: non-empty pad-file contents will be destroyed after volume modifications
patch: replaced 6 bytes at offset F69h 0FBA6C24400F -> 0FBA7424400F
Image patchedfile.
7.) Rename the ***.CAP.patched BIOS file to X99A2.CAP, the required filename for the ASUS X99-A II BIOS Flashback
procedure. Note that the required filename varies for each ASUS mobo. For details see the ASUS BIOS Flashback filename convention.
8.) Copy the X99A2.CAP (or it's derivative in case you use a different ASUS mobo) to a FAT-formatted USB2.0 storage device.
9.) Shut-down your hack, connect the USB2.0 storage device to the USB-port assigned to the ASUS BIOS Flashback procedure
(see the mobo manual for details). Press the BIOS-Flashback button for three seconds until the flashback-led starts to blink, indicating that the BIOS Flashback is in progress. Release the button. The locations of the BIOS-Flashback button and the USB-port assigned to the BIOS-Flashback procedure on the ASUS X99-A II are indicated in the figure below:
View attachment 252635
10.) Wait until the Flashback-led stops blinking and turns off, indicating that the BIOS Flashback process as been successfullyView attachment 252635
completed. You now successfully installed the most actual patched BIOS, compatible with native OSX/MacOS power management.
11.) Boot your system and apply the BIOS settings described in my guide.
") , and I didn't have to take it all the way out just disconnect the header cable. Thank God esle I would have had to re-instal my somewhat rigged GPU support brace.
, and I didn't have to take it all the way out just disconnect the header cable. Thank God esle I would have had to re-instal my somewhat rigged GPU support brace.