
- Joined
- Aug 30, 2016
- Messages
- 186
- Motherboard
- Asus MAXIMUS XI HERO
- CPU
- i7-8700K
- Graphics
- RX5700 XT
- Mac
- Classic Mac
- Mobile Phone
Tazling's Build "Gigi":
Core i7-6700K - Asus Maximus VIII GENE - 16GB RAM - Asus GeForce GTX970 4GB
Core i7-6700K - Asus Maximus VIII GENE - 16GB RAM - Asus GeForce GTX970 4GB
Completed Build
UPDATE:
UPDATE:
Components
ASUS ROG Maximus VIII Gene mATX LGA1151 Z170 Skylake DDR4 CrossFireX/SLI USB3.1
https://www.amazon.com/MAXIMUS-VIII-GENE-LGA1151-Motherboard/dp/B012NH1MCM/
http://www.newegg.ca/Product/Product.aspx?Item=9SIA7RD3GG4951
INTEL® CORE™ I7-6700K Processor 8M Cache 4GHZ Base 4.2GHZ Turbo FC-LGA1151 Retai
https://www.amazon.com/Intel-Unlocked-Skylake-Processor-BX80662I76700K/dp/B012M8LXQW/
http://www.newegg.ca/Product/Product.aspx?Item=N82E16819117559
Noctua NH-C14S 140mm SSO2 C-type Premium Quiet CPU Cooler, 1x140mm NF-A14PWM
https://www.amazon.com/Noctua-Premium-Cooler_Retail-Cooling-NH-C14S/dp/B00XUV3JTK/
http://www.newegg.ca/Product/Product.aspx?Item=9SIA92H3B82038
Corsair Vengeance Lpx 16GB (2X8GB) DDR4-2400MHZ C14 Memory Kit 1.2V
https://www.amazon.com/Corsair-Vengeance-3200MHz-PC4-25600-Memory/dp/B0143UM4TC/
http://www.newegg.ca/Product/Product.aspx?Item=N82E16820233859
Samsung 850 EVO 500GB M.2 SATA3 (3.16" X 0.87" X 0.06") Solid State Drive (SSD)
https://www.amazon.com/Samsung-850-EVO-Internal-MZ-N5E500BW/dp/B00TGIW1XG/
http://www.newegg.ca/Product/Product.aspx?Item=N82E16820147399
Seagate Barracuda 1TB 7200RPM 64MB SATA 6Gbps 3.5IN Internal Hard Drive - OEM
https://www.amazon.com/Seagate-Desktop-3-5-Inch-Internal-ST1000DM003/dp/B005T3GRNW/
http://www.newegg.ca/Product/Product.aspx?Item=9SIAA404M67547
ASUS GeForce GTX 970 Strix OC 1253MHZ 4GB 7.0GHZ GDDR5 2xDVI HDMI DisplayPort PC
https://www.amazon.com/GeForce-Overclocked-256-bit-DisplayPort-Graphics/dp/B00NJ9BJ8G/
http://www.newegg.ca/Product/Product.aspx?Item=N82E16814121899
Ion Cables 10FT HDMI to DVI Cable Black
http://www.newegg.ca/Product/Product.aspx?Item=N82E16812117551
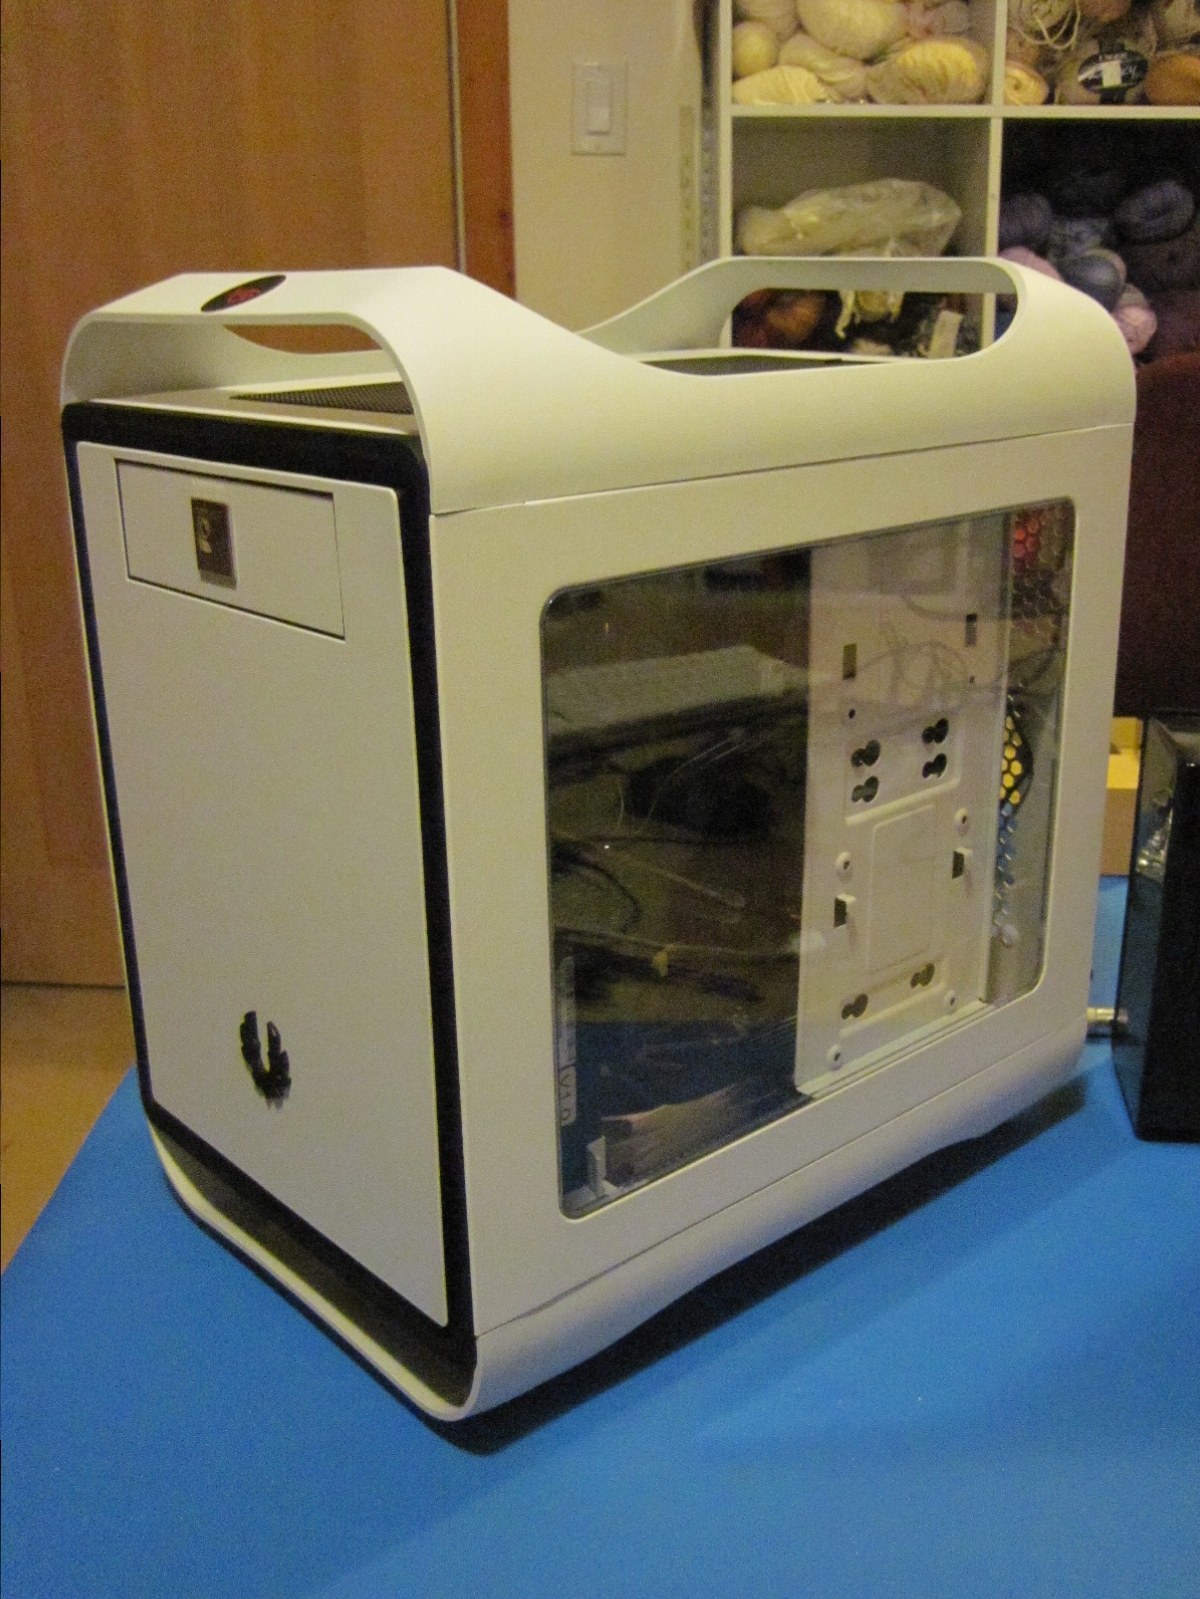
Bitfenix Prodigy M mATX Fyberflex Tower Case Window White 1X5.25 4X3.5INT No PS
https://www.amazon.com/BitFenix-Power-Supply-MicroATX-BFC-PRM-300-KKXSK-RP/dp/B00G489XDW/
http://www.newegg.ca/Product/Product.aspx?Item=N82E16811345031
Silverstone Strider ST70F-PB 700w ATX 18DBA Silent 120mm Fan 54A 80+ Bronze Modu
https://www.amazon.com/Silverstone-80PLUS-Bronze-Modular-ST70F-PB/dp/B00S5V5C4A/
Silverstone PP05-E Short Cable Set for Silverstone Modular PSU PP05-E
https://www.amazon.com/SilverStone-Technlogy-Flexible-Modular-PP05-E/dp/B00H7Y3I4M/
http://www.newegg.ca/Product/Product.aspx?Item=N82E16812162043
Noctua NF-F12 PWM 120mm Case Fan (x 4)
https://www.amazon.com/Noctua-NF-F12-PWM-Cooling-Fan/dp/B00650P2ZC/
http://www.newegg.ca/Product/Product.aspx?Item=9SIAB984BD9433
Arctic Cooling MX-4 Thermal Compound Paste NON-ELECTRICAL Conductive 4 Gram
https://www.amazon.com/ARCTIC-Performance-Compound-Interface-Material/dp/B0045JCFLY/
http://www.newegg.ca/Product/Product.aspx?Item=9SIA9H53FP5255
[NOTE in some cases the exact same part did not show up when searching Newegg, so I picked the next closest thing for the link. Read those part numbers carefully...]
[NOTE to fellow Canadians: both Amazon and Newegg charge outrageous shipping fees, at least to my rural area. I no longer deal with either of 'em unless absolutely forced to do so (i.e. no one else offers the item I need). So I got 90 pct of this build kit from NCIX; good selection, reasonable prices, free shipping on large orders, very quick delivery.]
Already Owned
Monitor 1: Samsung S27C350 1080p
Monitor 2: LG Ultrawide 25UM65 2560x1080 (21:9)
Apple USB wired keyboard
Razer Death Adder Gaming Mouse
Logitech Extreme 3D Joystick
DrivingForce GT USB wheel and pedals
Various Seagate USB portable drives
Apple SuperDrive
Saitechi 12-port USB hub
NOTE: much of this Already Hardware is obsolete by now and is best sought on Ebay, refurb or used.
Comments
My goal was to build a moderately beastly gaming Mac. I am embarrassingly addicted to Euro Truck Simulator 2 and my 2013 iMac's GPU, with only 1GB VRAM, was starting to feel the strain when playing ETS2 with ProMods. FPS was getting irritatingly low at times. But I couldn't see buying yet another iMac just to get more GPU power. I was feeling rather fed up with Apple's increasingly "shrink wrapped" systems design (sometimes impossible, or at least very onerous and/or risky, to disassemble and upgrade).
In the course of hunting for possible upgrade paths for my partner's even older iMac (512MB VRAM, ouch), I discovered the term "Hackintosh" ... and a whole new world opened up before me! Having built a few systems many years ago (more or less around the time that Noah was building the Ark) I thought it would be fun to play with some modern technology.
All I knew to start with was that I wanted a GPU with gobs of VRAM (the resource being gobbled up by ETS2), and an mATX sized box rather than a clunky great tower. -- In hindsight, assembly might have been easier (less cussing and fewer skinned knuckles) if I had used a full-sized case and ATX board. However, I'm fairly pleased with the Apple-like looks of the finished system. The skinned knuckles are already healing but the aesthetic satisfaction should last a while.
I did a lot of reading for a few weeks, mostly at tonymacx86 but also on other fora where Hackintoshes are discussed. I read hundreds of product reviews and compiled lists of parts and prices. I wanted to keep the total budget down around $2000 CAD, but of course it went a bit over by the time I was done. Members of this forum were incredibly helpful and patient with my ignorant questions. I found that pastrychef's GENE build was about as close to my own proposed build as I could reasonably expect, and that this build in turn was based on Stork's. So I used pastrychef's and Stork's notes as my guide.
The build was both more and less difficult than I had anticipated. Being an old bench tech I rolled out my largest antistat mat, took my shoes off and stood on the bare concrete floor, wore cotton, etc. The tools needed were surprisingly few and simple, and the standardized/modular parts were impressively easy to assemble.
The very first thing I did was install four Noctua fans into the case, with airflow vertical from bottom to top. This would have been pretty straightforward if I had not been tempted to try their "no screws" silicone connectors. These are little golf-tee-like things that you pull through the holes in two mating surfaces; the elasticity of the silicone then weakly clamps the two items together. They seem quite adequate for something as light as the fans. However I quickly learned that quite a strong pull was needed and that needle-nose pliers were indicated; and it was just not possible to bring pliers to bear on some of the connectors due to the cramped space inside the case. After a lot of cussing and wrestling with the case on my lap, I gave up and used the standard screws. I hope this may serve as a warning to others; I don't think the niftiness of the silicone connector doodads is worth the wrestling match to install them.
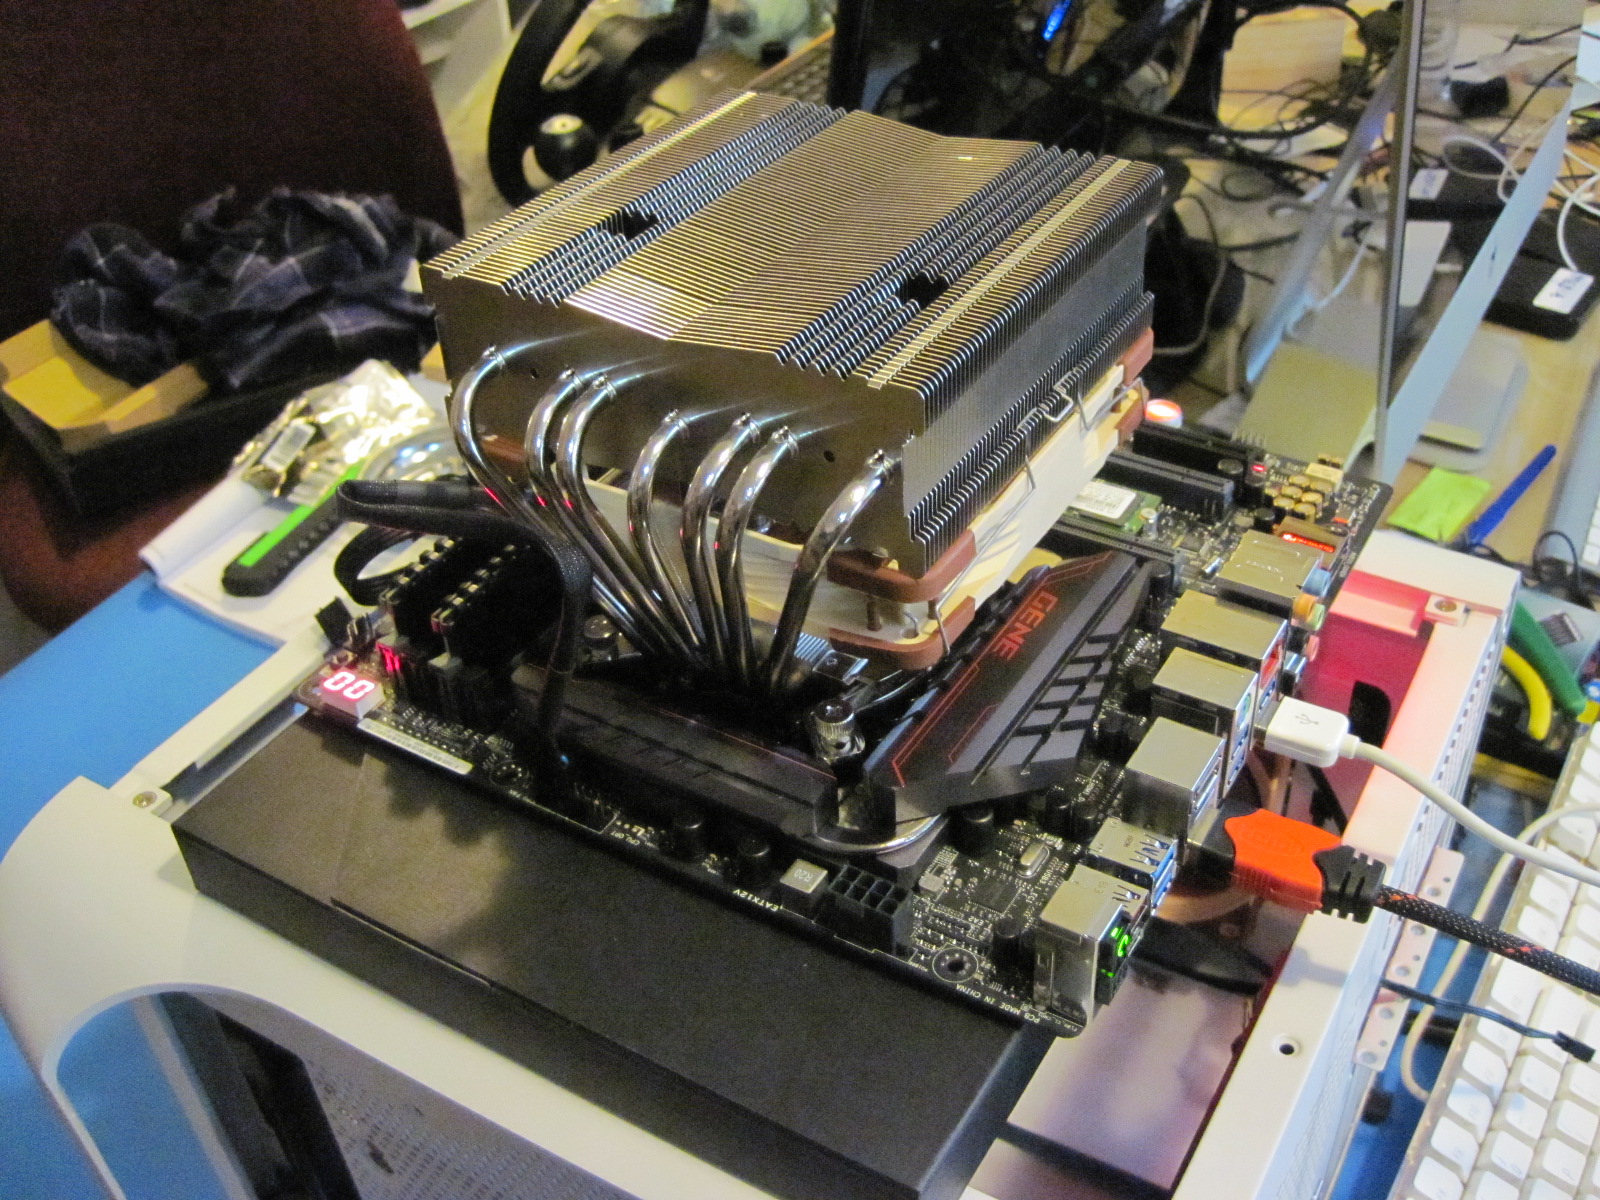
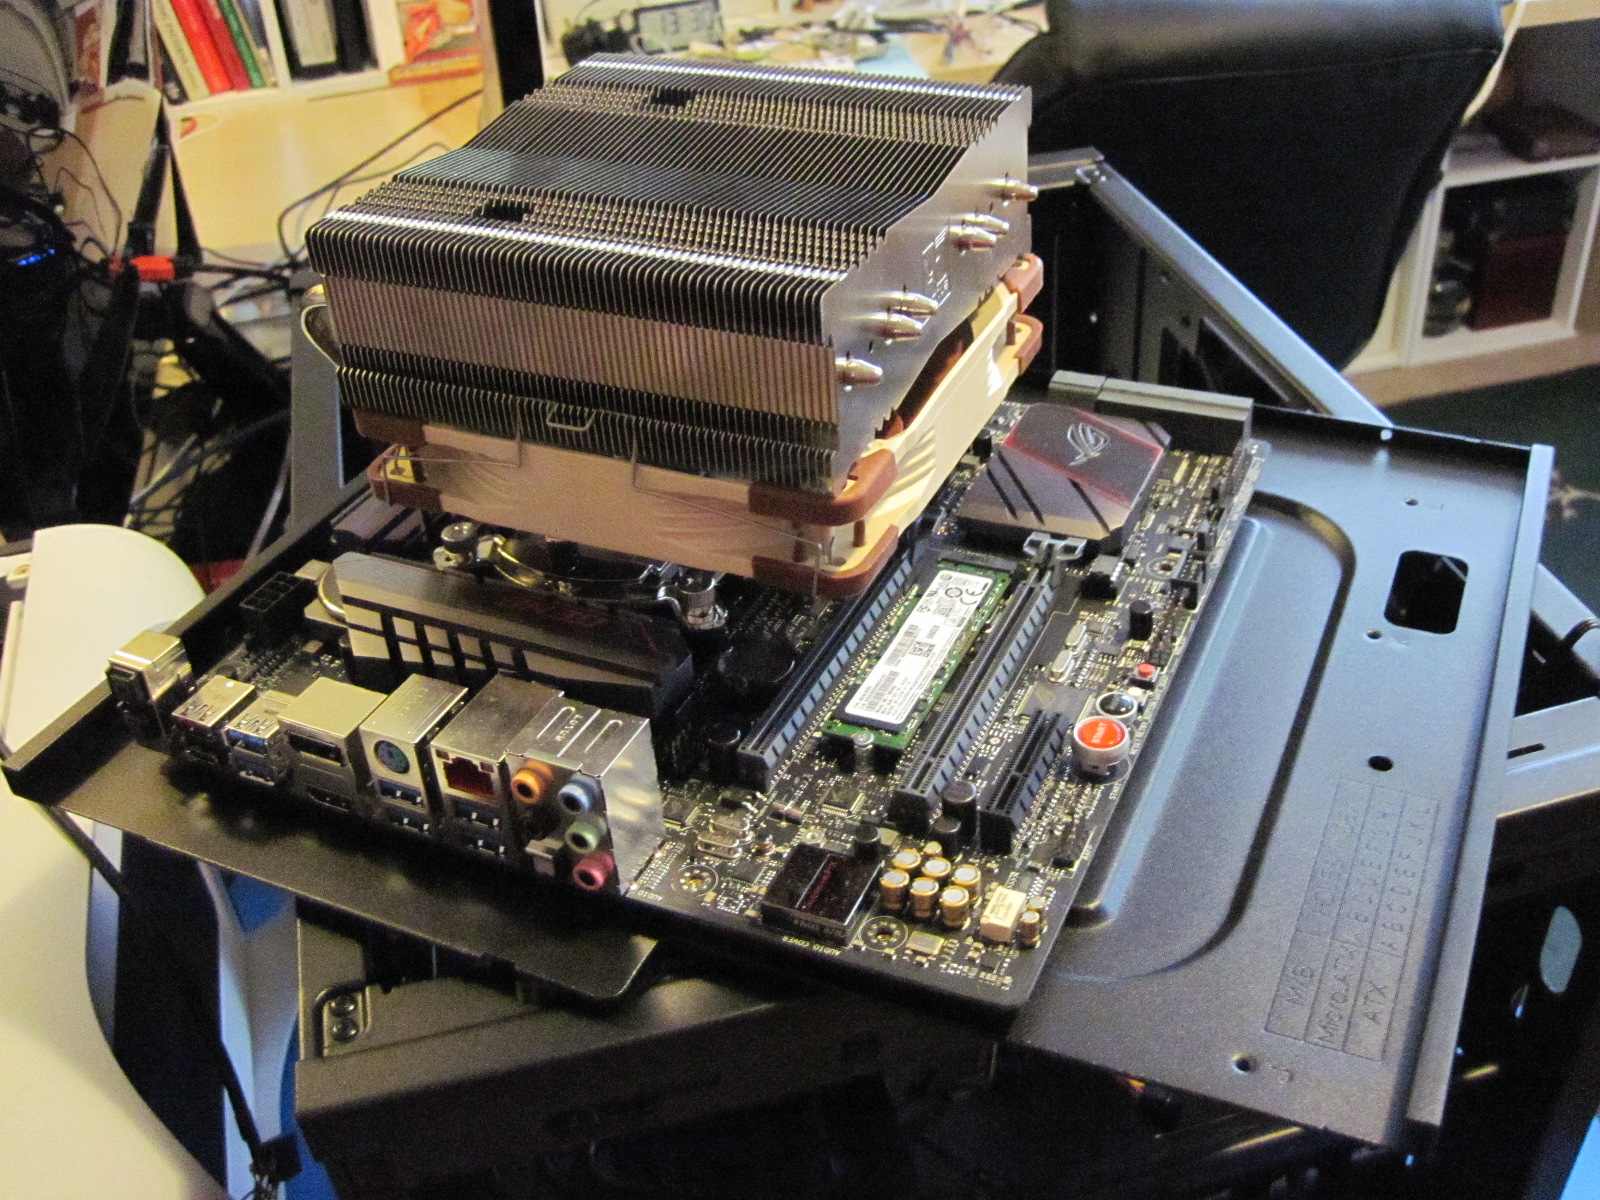
The first real shock was the size and steampunk style of the CPU cooler. Unpacked it and my jaw dropped: holy cow. this thing's intimidating! Assembly however was almost uneventful; aside from the fear factor of handling the valuable i7 and mobo, both Asus' and Noctua's directions were quite clear and well illustrated.
The first hitch was in that same Noctua cooler. Two cutouts are provided in the cooling fin array so that you can get a long Phillips screwdriver down between the fan blades to the spring-loaded mounting screws at the base. On the unit that I had, one of the spiral reinforcing ribs of the fan body blocked the screwdriver access through one of the cutouts. I tried remounting the fan, rotating it, etc, but could not get a clear shot at that screw. In the end I used diagonal cutters to snip away a little arc of plastic from that rib so that the screwdriver would line up (just barely) with the screw. This seemed like an odd manufacturing/design oversight in an otherwise high-quality cooling fan.
It was all plain sailing after that until the motherboard had to drop into the case. It's a tight fit, and getting all the standoffs secured was fiddly work. The GTX970 GPU was so big that I had to remove the 5.25in drive bay from the case to get the giant card in there. The Noctua cooler blocks the other full size PCI slot and the GPU blocks the mini slot, so effectively the mobo is reduced to just one PCI slot.
The 970 was so long that the connector end just about touched the metal of the case. The Prodigy M case has an interesting "no screws" arrangement for clamping the slot/connector panels on installed PCI cards into their places; rather than one screw per card, there's a nifty little bent metal piece with locating pins that clamps them all down at once. Nice feature, but... this piece would not fit back in with the GTX970 installed, so I had to lose it and all the other slot covers. Oh well. It took a #6 stainless machine screw and nut to secure the card when the clamping bracket was not present.
Getting the cables connected was also fiddly and at times frustrating. My hands are not large, but I found it pretty challenging fumbling around in the dark depths of the mATX case. I echo the appreciation of other builders for Asus GENE's "all in one" cable header that collects all the silly little 1-2 pin connectors for front panel lights etc, making it so much easier to plug/unplug them as a bloc. I also appreciate the advice of those who told me to get the short cable set! Only one cable (8 pin power to the motherboard) was a little too short, and I had to use a standard long cable there.
Lastly the HDD support panel went on. This was an odd feature; it came off easily enough, but when reinstalling it I found it very difficult to get the screws lined up with the holes in the panel, almost as if it had expanded a little when released from the case. I had it on and off a few times, so had plenty of occasion to curse its recalcitrance.
In just one (long) afternoon and evening, I had got all the components into the case! I left power-up for the following morning.
Power-up was eventful; I didn't get every cable correct, being so new to this generation of technology. The good thing was that having to pull the motherboard a couple of times and set it up on its box for open-air testing, I became less intimidated by it and more confident about my antistat precautions, handling, etc. Eventually -- a couple of stupid errors later -- I was rewarded by seeing the American MegaTrends splash screen on the Samsung monitor (connected to the motherboard's native HDMI port). Yippee! Ready to install OS X.
Installation Notes
I followed Tony's generic guide and Stork's notes. I got confused a couple of times, but managed to figure it out eventually by googling. I found that all the "beast" tools worked perfectly, that all kexts were available where linked to, and that all this potentially ugly and hair-tearing low level config was made very simple and easy thanks to Tony and the gang.
One suggestion I do have for Tony's guide -- for the complete n00b like myself -- is that in step 6 it might be nice to add, after the introductory sentence, "If you do not do this, your target drive will NOT APPEAR as a possible destination for the OSX install; you will only see your USB stick." This is quite obvious to me now, of course; but the first time through I was thrown by the "nonexistence" of my internal drives, and didn't immediately understand that the format instructions apply even to drives you can't see in the Installer screen. I discovered the truth by googling for "Clover can't see my drives"; it turned out that others had become confused in the same way at the same point in the process. After a successful format, of course, all was well.
I used the NVMeGeneric kext, without any of the subsequent patches or hacks recommended by Stork, and it is working fine; my M2 SSD is my boot disk and has worked from the git-go. I did not install the "proper" power management (yet). I also skipped Codec Commander until later (when I was reminded of it by having no audio output after waking from sleep).
The Asus BIOS Flashback feature was a real plus; seems like even a bricked mobo should be recoverable by this means. I followed Stork's BIOS settings very carefully. It took me a while to figure out that I couldn't fix the (wrong) date/time in the BIOS without enabling Admin Password, but eventually I got through all of that and set all the options as recommended.
I did not boot with nv_disable=1, despite having an nVidia card. On first boot I found that the default monitor changed to the nVidia HDMI port. (This was confusing at first, staring at a black screen and fearing that something had gone horribly wrong, but the Aha moment came quickly). The HDMI port on the GTX970 worked fine even before the Web Drivers were installed. So I booted OS X for the first time with the console on my GTX970. The screen image was a little stretched but correct.
I followed Stork's instructions http://www.tonymacx86.com/threads/s...s-viii-gene-i5-6600k-gigabyte-gtx-950.181272/ for MultiBeast configuration. Then I installed the NVIDIA Web Drivers. I made the SSD bootable per instructions... removed the USB stick... booted one more time and... wow... up came OS X 10.11.6 on my Samsung monitor in correct aspect ratio. Great moment!
After that, I just had to replicate some of the hacks I have made to my original iMac. For example, if you want the LG ultrawide display to work at its native res with HDMI, you have to disable SIP and install Floris' Mac Pixel Clock Patch https://github.com/Floris497/mac-pixel-clock-patch-V2 to overcome Apple's silly limitations on video formats, plus SwitchResX to set custom parameters for that monitor. After retracing those steps with the new machine I had perfect UW video 2560x1080 using the HDMI port on the GTX970, and perfect 1080p on the console (Samsung monitor) on a DVI port (using DVI-HDMI adapter cable). And still one unused DVI port on the GTX970! There's no room on my work table for a third monitor, but it's nice to know it's possible.
After getting to this point I restored my user context and apps from the original iMac to the new Hackintosh using Migration Assistant and an up-to-date Time Machine backup disk. This is a slow process, so I went to bed. The next morning when I woke up, I rebooted the Hackie and -- yes! -- logged into OS X as myself, and saw the exact same desktop I've been staring at for a year or two now.
I'm really impressed. Every app I have tested worked the first time. The only further hack was to add the CodecCommander kext (oversight from the initial install) when I noticed no audio after a sleep. It is actually kind of spooky how perfectly everything runs on the new platform. Except for being faster, I can't tell it apart from the old iMac; in fact I would get confused at times with the various keyboards and screens, and forget which machine I was typing at
")
That (third) evening of the Great Hackintosh Build Project, I fired up Euro Truck Simulator and greatly daring, set the graphics quality to Ultra
And it worked just like it always has, only prettier and faster. Not even any glitches with USB support. All my USB devices except the Apple SuperDrive are working fine.If I had known it was this easy to build a Hackintosh I would never have bought a refurb 2013 iMac about 18 months ago. I would confidently recommend any semi-geeky person to give it a try; my own experience confirms that you don't have to be a hard core geek to succeed. I'm delighted with the education I've received in modern PC hardware, with the quality of the user community, and with the finished product.
Why did I name my rig "GiGi"? Well, I thought of Genie (as in ASUS GENE). And then I thought of "Jean Genie," as in the Bowie song. But that was kind of long, and Gigi was a famous Contessa 32 (a sailboat of the same model as mine). Also, I kept saying "wow" and "gee" as I saw how fast it was and how well OS X ran. So, well, "GiGi" it was. I guess you had to have been there.
The only unresolved issues as of today are:
No WIFI (I think I'll try a bridge to fix that problem -- no cranky USB drivers involved).
No Bluetooth (ordered a recommended dongle for that).
Apple's SuperDrive doesn't work with the Hackie (fix: get a cheap generic external DVD burner).
I had my NVIDIA driver get corrupted today, not sure why.
Unable as yet to test XPLANE-10 (long story, see other post).
Benchmarks

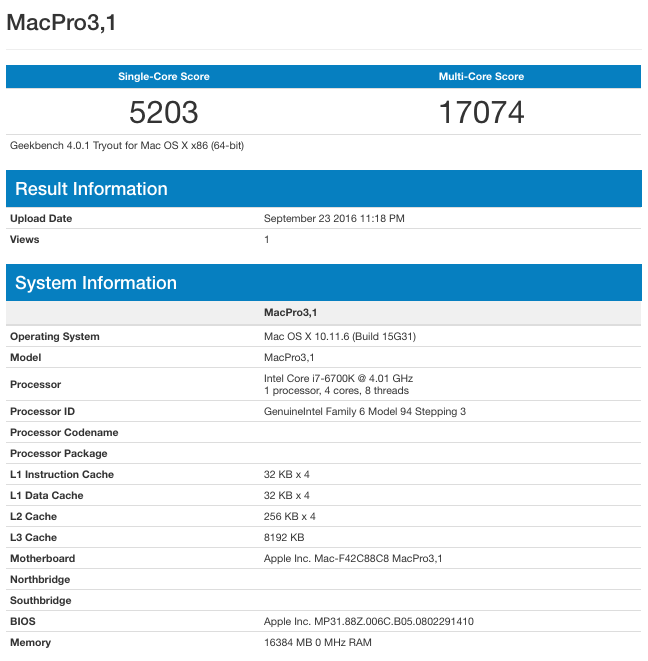
UPDATES:
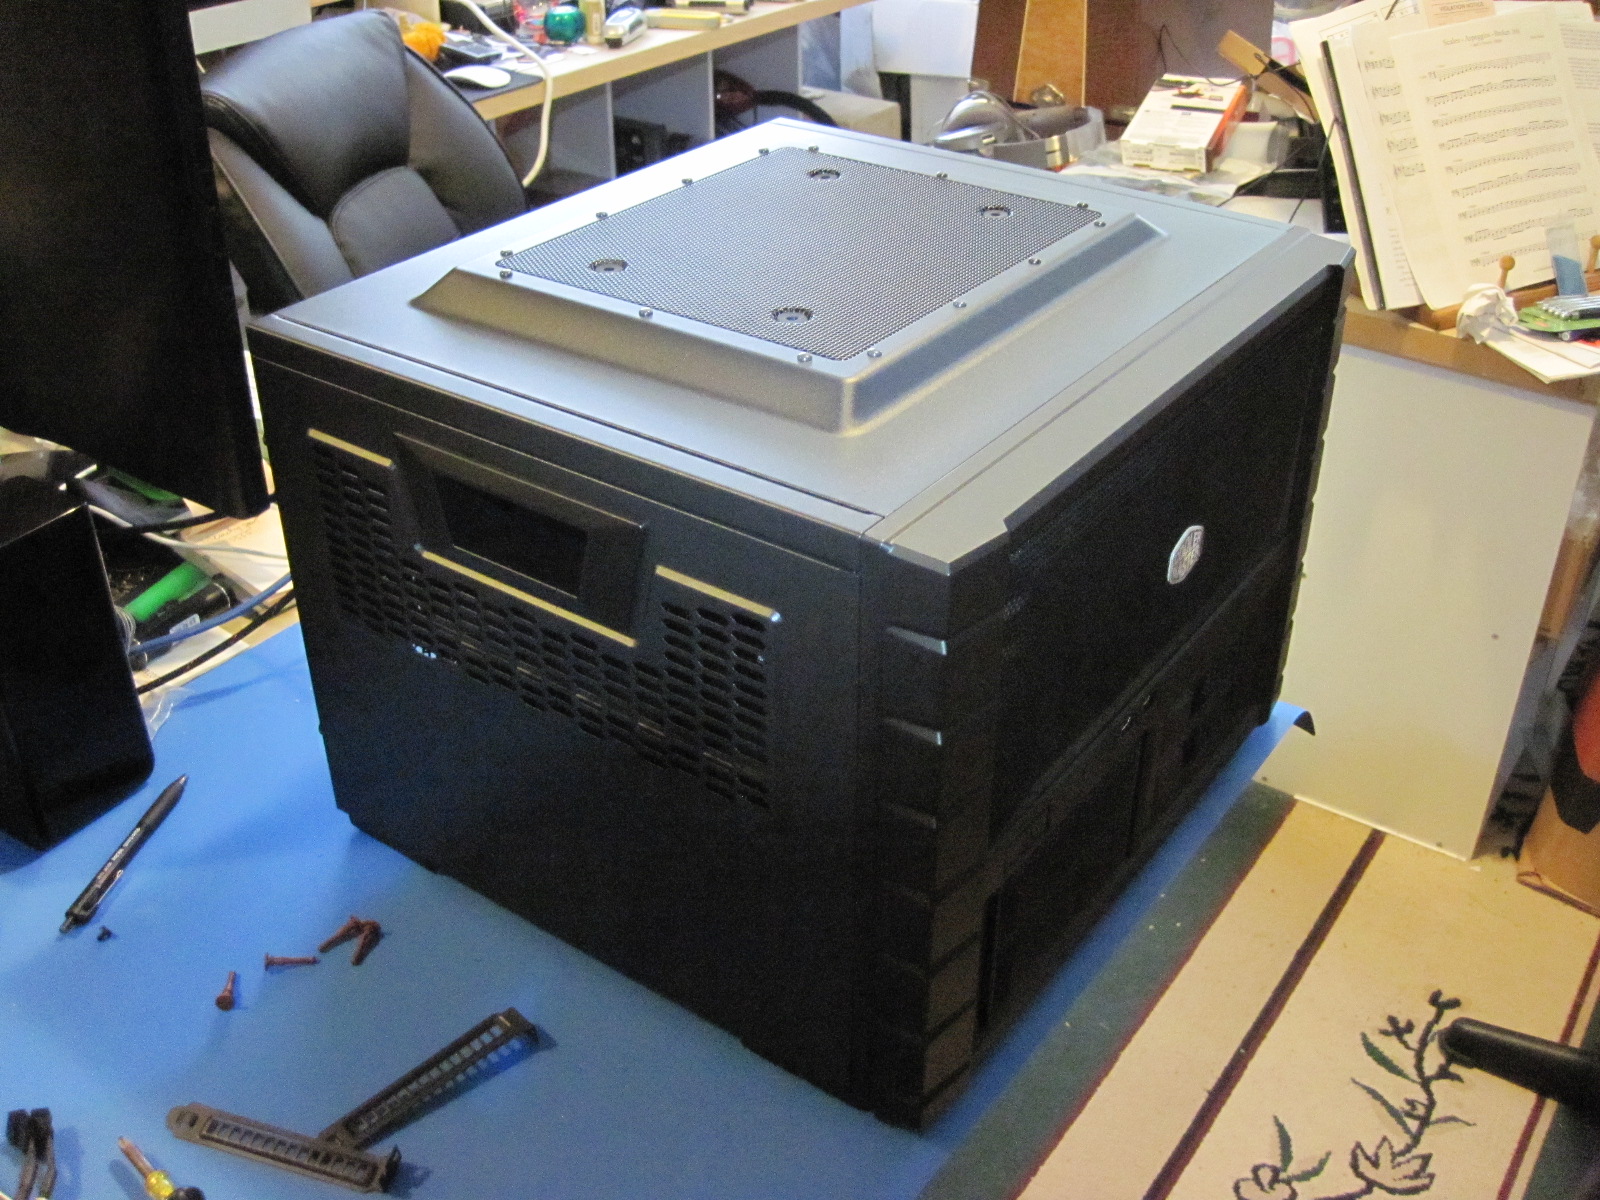
Oct 3 2016: due to flakiness of the Strix GTX970 (see https://www.tonymacx86.com/threads/resolved-nvidia-related-kernel-panic-chronic-severe.203212/) and after brief discussion on the GeForce owners' forum, I have decided to move GiGi's guts into a horizontal-mobo case. I chose the HAF XB by CoolerMaster (http://www.coolermaster.com/case/lan-box/haf-xb/) because of its maintainability features and 2-chamber design. It's quite a bit bigger than my Prodigy and not as pretty imho, but apparently the vertical mobo orientation can be a problem with the monstrous, heavy GTX970 card. GiGi has been lying on its side for several days now with zero GPU issues so that's enough proof for me. HAF XB came in the mail today
Oct 3 2016: Received Bluetooth USB adapter, cheapie by "GMYLE". Instant functionality: plug it in and Shazzam, working BT. Apple devices (magic trackpad, mouse, keyboard) all recognised and pair immediately.
http://www.ebay.ca/itm/121999508824?_trksid=p2057872.m2749.l2649&ssPageName=STRK:MEBIDX:IT
(later
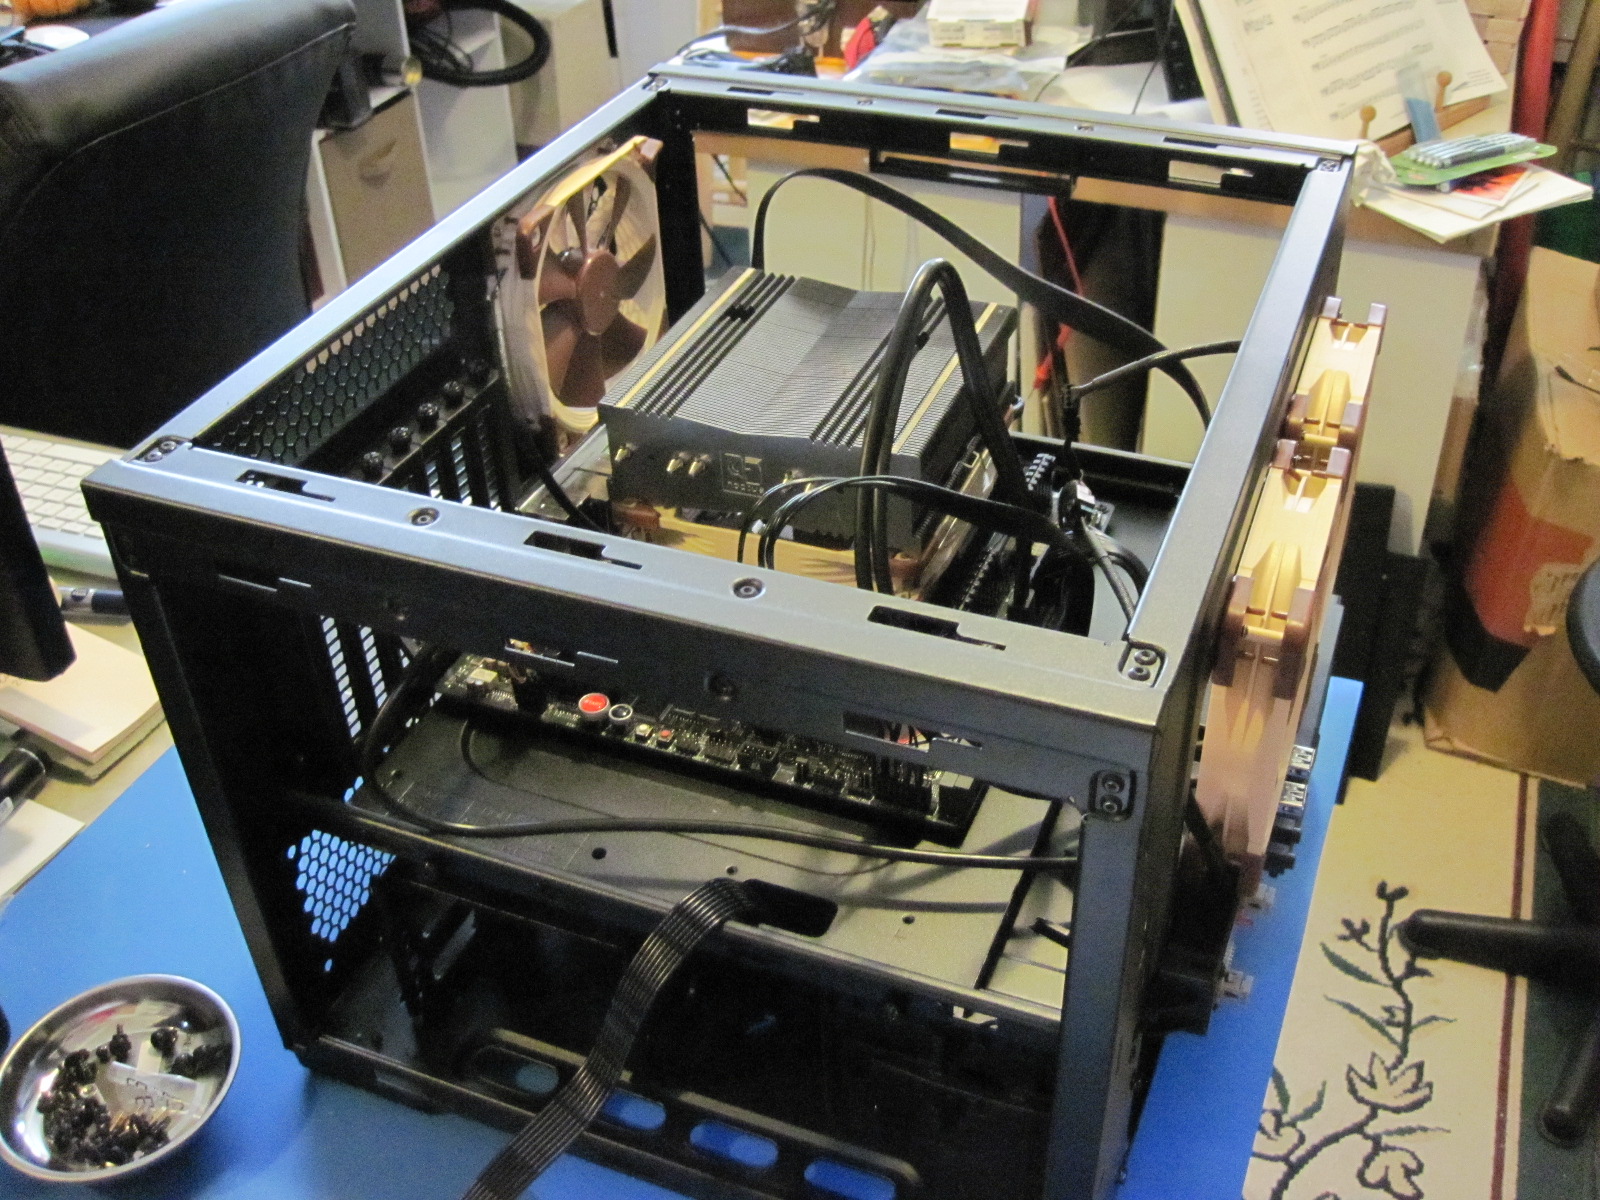
Well, it was nice while it lasted. The BT devices did not come back gracefully after a sleep or reboot. This seems to be a known problem, and I'll apply the recommended kext. However, there's yet more trouble in river city if you have 2 macs both with bluetooth enabled, fighting over the BT peripherals. Endless headaches. To solve this problem I installed Synergy (http://symless.com/synergy/), a cheap app that allows you to control N client macs with the kbrd/mouse/trackpad/ouijaboard of one server mac. I can leave BT enabled on the old iMac, disabled on the new Hackie, but use my fancy Apple Magic This&thats with either host. For $10 it's a cheap fix.Oct 9 2016: Took a few days to get a round tuit, but GiGi's guts are now successfully transferred into the new HAF XB box. I like this case. It's big and kind of clunky, but the maintainability and ease of installation are worth the size imho. For example, here's the mobo tray:
With the side and top covers off, the machine is exposed and you can get at most cables and connectors without any further disassembly. Disk drives live in "the basement" (a lower compartment with optional fans of its own); the PS air intake has a (slide-in) filter easily removed and cleaned with no disassembly at all. The mobo and GPU have a whole airy compartment of their own.
This is an easy case to like. The build quality seems quite high. Little details add up; the plastic port cover plate snapped easily into place instead of requiring extreme force; holes in removable parts all line up properly when re-assembled; everything looks very "finished". The plastic lever-lock mechanism for the SATA drive trays feels a little light/cheesy, but that was the only thing that struck me as less than Industrial Strength. Cable routing is a piece-o'-cake, because the designers left adequate space all around the mobo tray. Building GiGi into the case was so easy compared to squeezing it into the Prodigy, it seemed almost effortless by comparison. No struggle involved. The manual is not quite so user-friendly as the one for the Prodigy case, but it's admirably complete. (You may need reading glasses if you're my age
as the print and diagrams are very small.)I liked the elegant small form factor of the Prodigy case, and the window was cute; but on the whole I would not recommend it for any build with a big heavy GPU; the vertical mobo seems to be an issue. I think I would recommend the CoolerMaster HAF case for any build, period. It has been criticised (in reviews) for inadequate air cooling, but praised for its liquid-cooling-readiness. I guess I am not demanding all that much from the air cooling, but it seems quite adequate to me; and liquid cooling is always an option. It seems like a case designed for hackers/tweakers/builders, for ease of maintenance and upgrade. The Prodigy case paid a high price for its cute factor by making it tedious and inconvenient, a lot of disassembly, to get at the mobo or gpu once it was buttoned up. Downside: the HAF is so big it has to live on the floor (well, on standoffs for cleaner air):
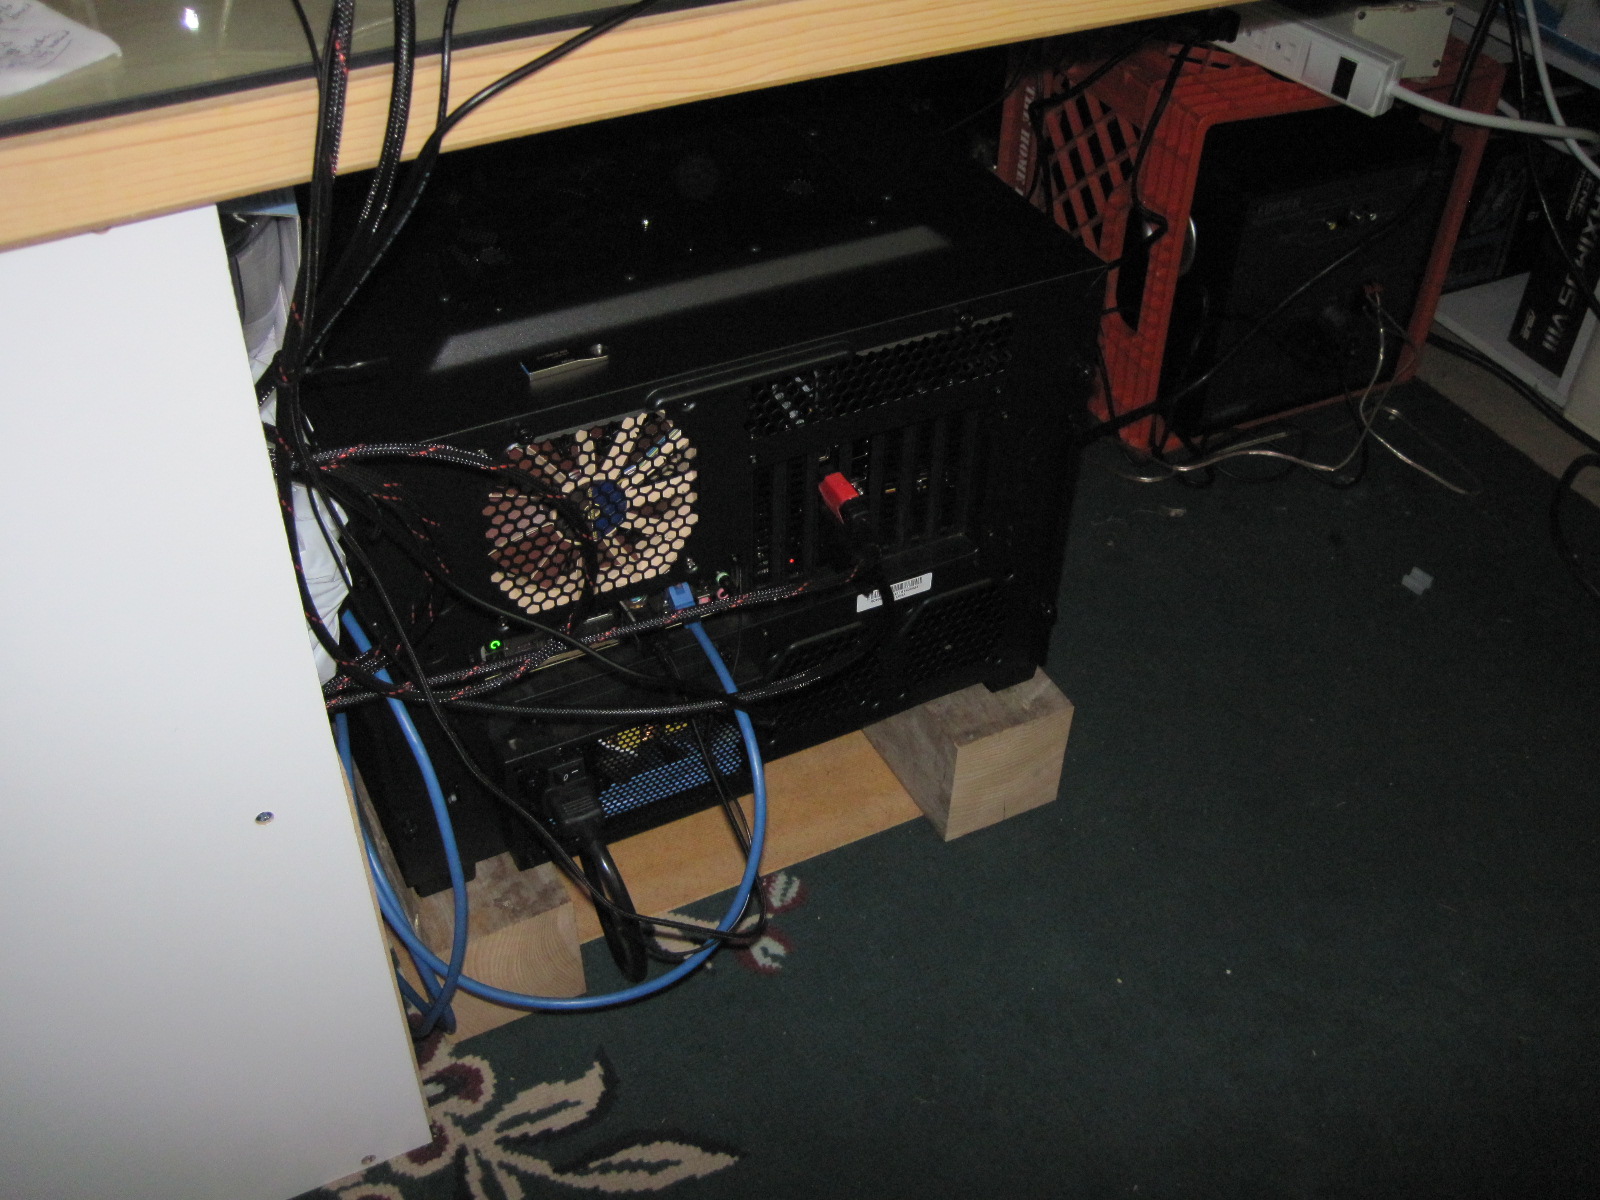
(I'd like to conclude by saying it keeps my feet warm, but GiGi is now running so cool that it really doesn't.)
Last edited: