
- Joined
- Aug 26, 2012
- Messages
- 11
- Motherboard
- GIGABYTE GA-X79-UD5 LGA 2011 SATA 6Gb/s USB 3.0 Extended ATX Intel Motherboard
- CPU
- i7-3930K Sandy Bridge-E 3.2GHz (3.8GHz Turbo) LGA 2011 130W Six-Core Desktop Processor BX80619i73930
- Graphics
- EVGA 02G-P4-2643-KR GeForce GT 640 2GB 128-bit DDR3 PCI Express 3.0 x16 HDCP Ready Video Card
- Mac
- Classic Mac
- Mobile Phone
Ziglen’s Build: i7-3930k - GA-X79-UD5 - GT 640
October 6, 2012
Components
GIGABYTE GA-X79-UD5 LGA 2011 SATA 6Gb/s USB 3.0 Extended ATX Intel Motherboard
http://www.newegg.ca/Product/Product.aspx?Item=N82E16813128531
i7-3930K Sandy Bridge-E 3.2GHz (3.8GHz Turbo) LGA 2011 130W Six-Core Desktop Processor
http://www.newegg.ca/Product/Product.aspx?Item=N82E16819116492
EVGA GeForce GT 640 2GB 128-bit DDR3 PCI Express 3.0 x16 HDCP Ready Video Card
http://www.newegg.ca/Product/Product.aspx?Item=N82E16814130795
TP-LINK TL-WDN4800 Wireless N Dual Band network card
http://www.newegg.ca/Product/Product.aspx?Item=N82E16833704133
(NOTE: this device had to be installed after OSX Snow Leopard was successfully installed. Otherwise it was not recognized and could not be used.)
OCZ Vertex 4 SSD 128G SATA III hard drive
http://www.newegg.ca/Product/Product.aspx?Item=N82E16820227791
(NOTE: I had this device installed on a SATA 3GB slot)
CORSAIR HX650 650W Power Supply
http://www.newegg.ca/Product/Product.aspx?Item=N82E16817139012
1 x CORSAIR 4GB (2 x 2GB) 240-Pin DDR3 SDRAM DDR3 1333 Desktop Memory Model CMV4GX3M2A1333C9
http://www.newegg.ca/Product/Product.aspx?Item=N82E16820145278
(NOTE: this memory was purchased specifically for installing OS X Snow Leopard & Mountain Lion. The MoBo requires a minimum of 2 ram modules and OS X would not successfully install if I had more than 4 GB. This ram was installed in slots 1 & 3 – no additional ram was used. Once OSX Mountain Lion was installed & working I upgraded to the following:
2 x CORSAIR Vengeance 32GB (4 x 8GB) 240-Pin DDR3 SDRAM DDR3 1866 Desktop Memory Model CMZ32GX3M4X1866C10
http://www.newegg.ca/Product/Product.aspx?Item=N82E16820233237
(NOTE: this memory is for upgrading – I was unable to successfully install OSX using this ram)
CORSAIR CWCH80 CPU Cooler
http://www.newegg.ca/Product/Product.aspx?Item=N82E16835181016
LG Blu-ray Burner, SATA BDXL,3D Play Back (WH14NS40)
http://www.newegg.ca/Product/Product.aspx?Item=N82E16827136250
IOGEAR GBU521 Bluetooth 4.0 Micro Adapter USB
http://www.newegg.ca/Product/Product.aspx?Item=N82E16833139027
CORSAIR Special Edition White Graphite Series 600T Steel / Plastic ATX Mid Tower Computer Case
http://www.newegg.ca/Product/Product.aspx?Item=N82E16811139005
(Note: this case is awesome but friggin HUGE! You may want to scale down to a smaller model)
Already Owned
Samsung SyncMaster 2493HM
Apple wired keyboard
Microsoft wired mouse
Rocketfish Bluetooth wireless mouse
SanDisk Cruzer Contour 8GB thumbdrive
Software
Snow Leopard : Retail DVD version
Mountain Lion : App Store version
TonyMac Unibeast (& Multibeast)
NOTE: At the time of this writing I have not yet installed MultiBeast. The system works 100% using UniBeast with the option settings I’ve indicate below. I am aware there are others who have been struggling to get their similarly configured systems working so I am posting this now with the intent to update my results further once I have them.
Comments
Objective:
- I wanted my system more advanced than what is currently being sold at the big box stores with the intent that it would have the speed & capability to work for most of the next decade before needing to be replaced.
- At this time I intend to use this system primarily as a database server, for graphic design and desktop publishing, web browsing, the occasional game, and for running multiple virtual operating systems simultaneously. I wanted the ability to dedicate 2 cores to OSX, 2 to Windows & 2 to the database server and use a RAM disk to maximize speed.
- Besides the processor, MoBo & ram, my choice in components was largely driven by what was compatible with each other, with OSX, and what was on sale at the time.
OSX Installation:
First, be aware that I tried for several weeks to get this system to work using 64 gigs of ram & using drives with OS X setup & configured on authentic Macs (I was stubborn & didn’t want to buy additional ram or have to remove the Corsair fan that obstructed access to the ram slots beneath it). Although I could get Snow Leopard to work (it only recognized 4 gigs of the ram), I could not get Mountain Lion to work at all using either a DVD or App Store version. I tried all sorts of methods & settings, combed through tons of posts on TonyMac & other sites but to no avail – I would get a Kernel Panic every time I tried to launch Mountain Lion or its’ installer.
I finally had to admit defeat, purchased 4 gigs of cheap ram to replace my 64 gigs & followed these TonyMac instructions exactly (http://www.tonymacx86.com/61-unibeast-install-os-x-mountain-lion-any-supported-intel-based-pc.html), installing Snow Leopard Retail from scratch all the way through to Mountain Lion from the App Store. (note: the WiFi adapter would NOT work if it was installed before I installed Snow Leopard – it had to be installed afterwards).
The instructions almost worked but again I crashed the moment I tried to boot from the UniBeast Mountain Lion USB drive. I started experimenting with settings once again & by sheer fluke luck happened to try a combination that worked & allowed me to install & run Mountain Lion. From there I started eliminating settings until I came down to the crucial three that were required to prevent Kernel Panics.
Mountain Lion has been running beautifully & blazingly fast since. It sees my ram, recognizes my video card & monitor (including its’ rotate capabilities), can go to sleep & wake (although it only does it from the keyboard, not from the mouse), sees & uses my Bluetooth 4.0, my USB 3.0 ports and my wifi adapter. I haven’t tried to plug any drives or other devices into the USB ports yet or connect to a wired network but will soon. It still doesn’t recognize the processor but doesn’t have a problem using it.
Anyhow, to achieve this result I had to boot using my unibeast thumb drive, select the drive I wished to boot from and then type the following 3 option settings to get it to work (case sensitive – copy or type exactly as below):
PCIRootUID=1 npci=0x3000 acpi=off
That’s it… nothing else was required. I intend to try the same using Multibeast – eyes & fingers crossed.

---------------
October 7, 2012
OK, I've attached a hard drives & an old logitech camera to my USB ports & they both work no problem. In fact OSX recognized the special features of my camera & allowed me to use them. I did a system report & all my usb drives show up including the 3.0. Only thing that isn't working is sound.
Installing Multibeast is proving to be a problem as I get a fail each time I've tried - not sure how to fix this but will search the forums & see what answers I can come up with. (I've tried installing it from Mountain Lion & from an alternative boot drive but to no avail). Multibeast also fouled up my system so I've had to restore my drive each time from the clone I made in order to boot back into Mountain Lion - probably the settings I choose tho they seemed logical to me. Attached is a copy of those settings so if anyone sees a problem please point it/them out to me.
Also not sure how to instruct Multibeast once I do get it working to include the acpi=off switch... can anybody offer some guidance on this?
---------------
October 15, 2012
Overview:
I've been doing a lot of testing & now have 99.5% of everything working (the audio panels at the front of my computer work, the back ones don't). Everything else works great.
I created a DSDT following instructions from the following link that suggested it would solve the back sound panel problem. It didn't but it DID fix the acpi problem that required the "acpi=off" switch when booting (http://legacy.tonymacx86.com/viewtop...=57808&start=0). If anyone has a solution to the back panel sound problem, please leave instructions or a link to it.
The Multibeast problem was it's inability to create a "org.chameleon.Boot.plist" in the Extra folder.
Installation Instructions:
1. Install Mountain Lion and it's 10.8.2 update as per my earlier post.
2. Download & unzip my attached "X79-UD5 Put in Extra folder.zip" file. Copy it's contents into the Extra folder (found in your drive's root - if it's not there create it).
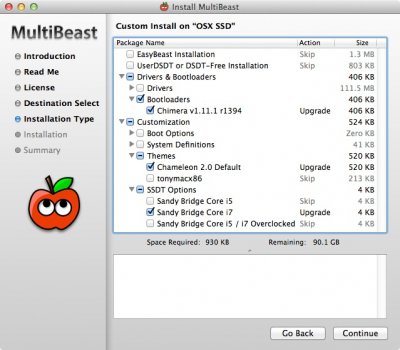
3. Run MultiBeast 5.0.2. and install:
a) Drivers & Bootloaders / Bootloaders / Chimera v1.11.1 r1394
b) Customization / Themes / Chameleon
(optional - I prefer this one because I have a lot of drives & the tonymac theme doesn't display them correctly)
c) Customization / SSDT Options / Sandy Bridge Core i7
It might be necessary to re-copy the "org.chameleon.Boot.plist" file from "X79-UD5 Put in Extra folder.zip" back into the Extra folder if Multibeast changed it.
Incase you choose not to use the DSDT.aml file I created, you will need to edit the "org.chameleon.Boot.plist" with Textedit changing:
<string>PCIRootUID=1 npci=0x3000</string>
to
<string>PCIRootUID=1 acpi=off npci=0x3000</string>
4) Download & place Lorengrin's "smbios.plist" file into the Extra folder.
(http://www.tonymacx86.com/attachment...i-smbios.plist)
5) Download & unzip Lorengrin's "Kexts X79-UD5.zip" file. Place the contents onto your desktop.
(http://www.tonymacx86.com/attachment...ts-x79-ud5.zip)
6) Run KextBeast to install Lorengrin's Kext files.
(http://www.tonymacx86.com/downloads.php?do=file&id=32)
7) Reboot.
That's it. If your system is like mine you should now be up & running
 Attached Files
I've been doing a lot of testing & now have 99.5% of everything working (the audio panels at the front of my computer work, the back ones don't). Everything else works great.
I created a DSDT following instructions from the following link that suggested it would solve the back sound panel problem. It didn't but it DID fix the acpi problem that required the "acpi=off" switch when booting (http://legacy.tonymacx86.com/viewtop...=57808&start=0). If anyone has a solution to the back panel sound problem, please leave instructions or a link to it.
The Multibeast problem was it's inability to create a "org.chameleon.Boot.plist" in the Extra folder.
Installation Instructions:
1. Install Mountain Lion and it's 10.8.2 update as per my earlier post.
2. Download & unzip my attached "X79-UD5 Put in Extra folder.zip" file. Copy it's contents into the Extra folder (found in your drive's root - if it's not there create it).
3. Run MultiBeast 5.0.2. and install:
a) Drivers & Bootloaders / Bootloaders / Chimera v1.11.1 r1394
b) Customization / Themes / Chameleon
(optional - I prefer this one because I have a lot of drives & the tonymac theme doesn't display them correctly)
c) Customization / SSDT Options / Sandy Bridge Core i7
It might be necessary to re-copy the "org.chameleon.Boot.plist" file from "X79-UD5 Put in Extra folder.zip" back into the Extra folder if Multibeast changed it.
Incase you choose not to use the DSDT.aml file I created, you will need to edit the "org.chameleon.Boot.plist" with Textedit changing:
<string>PCIRootUID=1 npci=0x3000</string>
to
<string>PCIRootUID=1 acpi=off npci=0x3000</string>
4) Download & place Lorengrin's "smbios.plist" file into the Extra folder.
(http://www.tonymacx86.com/attachment...i-smbios.plist)
5) Download & unzip Lorengrin's "Kexts X79-UD5.zip" file. Place the contents onto your desktop.
(http://www.tonymacx86.com/attachment...ts-x79-ud5.zip)
6) Run KextBeast to install Lorengrin's Kext files.
(http://www.tonymacx86.com/downloads.php?do=file&id=32)
7) Reboot.
That's it. If your system is like mine you should now be up & running
- X79-UD5 Put in Extra folder.zip (12.0 KB, 2 views)

----------------
October 16, 2012
I updated my Mountain Lion USB installion drive with the attached file (contains a modified "org.chameleon.Boot.plist" and the SleepEnabler.Kext file). This allows my USB drive to operate without having to type in the boot codes AND prevents my hackintosh from hanging should it happen to go to sleep after I booted from it.
Instructions:
1) Download & run the "ShowAllFiles" application so you can see the files on your USB drive.
(http://www.tonymacx86.com/downloads.php?do=file&id=142)
2) Unzip the attached file.
3) Place the "org.chameleon.Boot.plist" into the Extra folder on your USB drive (overwrite the one already there - make a backup of that one if you wish). Authenticate as necessary.
4) Place the "SleepEnabler.kext" into the Extra/Extensions folder on your USB drive.
That's it, your USB drive should now boot without a problem if you have a setup similar to mine.
On a separate note for those interested, I tried using the new version of Multibeast (5.1.1) today with both my original DSDT and the one I updated with the hopes it would fix my back panel sound. I regret to report that not only did in NOT work for me, it disabled all sound capabilities I had acquired up to this point.
After further reading I acknowledge it is possible there were Kexts in my Extensions folder that may need removing first but that will have to wait for another day. If anyone else tries this & gets it working please let me know (my thanx in advance).
- X79-UD5 USB Boot drive update.zip (27.4 KB, 0 views)
----------------
October 18, 2012
The multibeast settings I showed previously were the wrong ones. The ones I used are now attached.
----------------
October 19, 2012
Seems the links for the files I attached above are no longer working as a result of consolidating all my posts into one. I've struck out the comments referring to them above & have re-uploaded them.
Attachments
Last edited by a moderator:
