- Joined
- May 23, 2015
- Messages
- 9
- Motherboard
- Gigabyte GA-X99-UD5 WiFi
- CPU
- i7 5820K
- Graphics
- EVGA GeForce GTX 960
- Mac
- Classic Mac
- Mobile Phone
[SUCCESS] Yosemite 10.10.3 Gigabyte GA-X99-UD5 WiFi, i7 5820k @4.0GHz, GTX 960
Components
CPU: Intel Core i7 6-Core 5820k @ 3.3ghz (I plan on overclocking this later, but I need another cable - will get into that later}
http://www.newegg.com/Product/Product.aspx?Item=N82E16819117402
CPU Cooler: Corsair H100i GTX 70.7 CFM Liquid Cooler
http://www.newegg.com/Product/Product.aspx?Item=9SIA0AJ2U00828
Motherboard: Gigabyte GA-X99-UD5 WIFI EATX LGA2011-3 Motherboard
http://www.newegg.com/Product/Product.aspx?Item=N82E16813128750
Memory: Crucial Ballistix Sport 32GB (4 x 8GB) DDR 4-2400 Memory
http://www.newegg.com/Product/Product.aspx?Item=N82E16820148867
HD: Samsung 850 EVO-Series 250GB 2.5" SSD
http://www.newegg.com/Product/Product.aspx?Item=N82E16820147372
HD: Samsung 850 EVO-Series 500GB 2.5" SSD
http://www.newegg.com/Product/Product.aspx?Item=N82E16820147373
Graphics: EVGA GeForce GTX 960 2GB SuperSC ACX 2.0+Video Card
http://www.newegg.com/Product/Product.aspx?Item=N82E16814487091
Case: Corsair 500R
http://www.newegg.com/Product/Product.aspx?Item=N82E16811139009
PSU: Corsair RM 750W
http://www.newegg.com/Product/Product.aspx?Item=N82E16817139055
Extra: Syba 3 Port Firewire 1394B/1394A PCI-Express 1.1 x1 Card
http://www.amazon.com/gp/product/B006DQ0KD2/
Comments
I decided to buy this system after seeing Colton328's success with a similar setup : http://www.tonymacx86.com/yosemite-...x-gtx-970-ga-x99-ud4-yosemite-hackintosh.html
This is my first hackintosh, and I bought it knowing I might run into issues with X99 and other things. I find challenges like this fun! I ended up using a different method, due to some issues I was having with the one Colton328 used & my desire to get iMessage working. It took a few days, but I'm mostly where I want to be.
What works:
CPU, Ethernet, the graphics card w/web drivers, app store/iMessage, USB Ports & connected storage, firewire
What's not working:
Onboard audio - I'm sure this can be fixed but I'm using the Firewire to plug into a Saffire 14 pro interface. WiFi (I don't even know why I got the UD5, so long $40). I'm sure there are ways to get both of these working, but there's no need for me to do so.
Assembly
1. Motherboard in. Of note, the mobo came with the version 8 drivers. I upgraded to version 9 immediately.

2. PSU + 120mm intake fan (bottom) & Hard Drives in (Had to run to Fry's to get 2 2.5 -> 3.5 rack converters)

3. Not really an update, I just thing this graphics card looks awesome

4. Graphics card in

5. CPU + CPU cooler in. I had to mount the fans on top because of the way the case was built. Basically just long screws through the fan into the radiator from the top. Pretty easy.
Important! Had to plug in the 8 pin (4x2) 3 to 1 converter that came with the mobo BEFORE installing the radiator. There was not enough room to plug it in with the radiator installed (and I had to take it out to get mine on).

6. Cables tidy'd up. I did a bit more tidying after this. to get the ones running around the side sitting flush.

7. Here's the 8 pin (4x2) 3 to 1 converter that came with the motherboard. The power supply only came with 1 of the connectors that allowed me to plug into this and I couldn't find any male to male 4x2 cables. Fortunately Corsair support is awesome. I opened a ticket with them and they sent another one to me no questions asked. In order to plug in the 3rd I'm going to have to use the last 2 3x2 ports on my PSU, run them both to a 2x(3x2) to (4x2) adapter. The guide on the motherboard says not to overclock until that has happened. I'm still waiting for that cable to arrive, so I'll get to the overclocking once that happens.
If anyone knows where I can find the 4x2 male to male cables, please post a link!

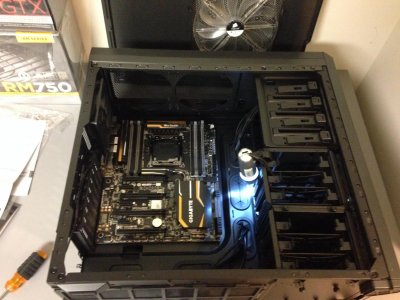
8. All put together

Some Cabling notes:
My last computer build was in 2007, so it's been a while. My first thought was "holy crap kids have this easy." It seemed like everything that took a lot of work back in the day (see water cooling) was pretty much plug and play. It's really awesome!
Case cabling was super easy. There was one cable coming out of the front fan controls that I couldn't quite figure out where it went. It turns out it plugs into the large fan on the side of the case. Other than that you just plug the power in. Easy mode!
CPU cooler cabling was interesting. It comes with 3 fan cables. 2 of them are attached and should take the inputs from the fans on the top of the case. There's a 3rd that plugs into the CPU fan spot on the mobo. Lastly there's the USB, which just goes into one of the USB ports. (Anyone remember when you had to set up your own reservoir/radiator to water cool? Man, times have changed. It's awesome!) Once again, easy mode.
Installation:
Now for the difficult part!
I first tried the method Colton linked, and the boot flags he used were a HUGE help in troubleshooting issues & getting into the OS. After not being able to get it booted reliably, and reading up a bit, I decided to switch over to Bob Roche's UniBeast -> Clover method. I'm linking the video first, but take a look below the video for a few tweaks I had to do to his process:
Installation - Initial Boot with UniBeast:
In the video he just uses the boot flags:
I had to use:
Other than that the initial install follows the video almost exactly, minus the Clover installation (below)

Installation - Clover:
The only important difference between the clover install in the video and the one I did is that I unchecked the "ONLY install UEFI boot partition". I didn't select an MBR option (since the disk isn't formatted MBR), and only checked "CloverEFI 64-bits SATA" for the CloverEFI dis. The rest of the options were the same.
For some reason without these checked my Mobo would NOT boot from the partition. It would see the partition as bootable, but when I selected it I would get a repeated error along the lines of "Please insert a valid boot drive and hit any key."
Also of note, I couldn't get the themes to install afterwards. You might want to select them on the install if you want to use them.
Boot parameters were pretty straightforward:

Installation - NVidia Drivers:
You'll have to boot with nv_disable=1 set until you've installed the nVidia web drivers. For these I used 346.01.02f02 drivers: http://www.nvidia.com/download/driverResults.aspx/84213/en-us
From there I upgraded to 346.01.02f04 without issue: http://www.nvidia.com/download/driverResults.aspx/85588/en-us
I'm sure you could just install the upgraded drivers directly without any problems, too, but I couldn't find them online at the time.
Important!
I had to select the latest iMac 14,2 profile in Clover instead of the Mac Pro. Without these settings my system would not boot, except with nv_disable=1.
Installation - iMessage Fix:
I couldn't see anything in the rules against posting from insanelymac.com, so please let me know if this isn't allowed. I followed this guide to fix my iMessage. After following this exactly and copying over the settings from my MBP I was able to get iMessage working flawlessly.
http://www.insanelymac.com/forum/topic/302347-clover-imessagefacetime-fix-for-yosemite/
All Done

Ignore the Macintosh HD 250. It was left over from my first attempt using the UniBeast->Chimera method. I'm reformatting that to install windows. I also PhotoShopped out (on my new install, woo!) the test number I used.
Bonus, the firewire card didn't require any extra modifications. It worked right out of the box. I had to install my Saffire Control Panel in order to get the audio working through it, but that's really easy.
Additional - Restore from Time Machine:
I also restored from my Macbook Pro back up on time machine. It worked like a charm! I had to reauthorize a few of my plug ins (component, au), and a few programs but for the most part everything copied over great.
I'm running a full backup now & I have a W8 flash drive ready to go to install to my 250 GB drive. I expect that will be incredibly easy, and not really worth posting progress here.
Benchmarks
Geekbench:
I'll re-run after I overclock it:

Update - Overclocking:
I pretty much followed this guide exactly:
[video=youtube;Ikq6CJBv_uA]https://www.youtube.com/watch?v=Ikq6CJBv_uA[/video]
Stable overclock @4.0 GHz

Unigine:

I'd love to say that I can help with your own builds, but honestly I'm a complete newbie when it comes to hackintoshing (is that the right way to say it?). I spent lots of hours digging around to find different settings to use & solutions to the problem (that iMac 14,2 instead of Mac Pro drove me nuts for a little bit). I figured I'd post my successful build here in case anyone else is looking at similar hardware.
GDIBass' Build: Gigabyte GA-X99-UD5 WiFi, i7-5820K, GTX 960
Components
CPU: Intel Core i7 6-Core 5820k @ 3.3ghz (I plan on overclocking this later, but I need another cable - will get into that later}
http://www.newegg.com/Product/Product.aspx?Item=N82E16819117402
CPU Cooler: Corsair H100i GTX 70.7 CFM Liquid Cooler
http://www.newegg.com/Product/Product.aspx?Item=9SIA0AJ2U00828
Motherboard: Gigabyte GA-X99-UD5 WIFI EATX LGA2011-3 Motherboard
http://www.newegg.com/Product/Product.aspx?Item=N82E16813128750
Memory: Crucial Ballistix Sport 32GB (4 x 8GB) DDR 4-2400 Memory
http://www.newegg.com/Product/Product.aspx?Item=N82E16820148867
HD: Samsung 850 EVO-Series 250GB 2.5" SSD
http://www.newegg.com/Product/Product.aspx?Item=N82E16820147372
HD: Samsung 850 EVO-Series 500GB 2.5" SSD
http://www.newegg.com/Product/Product.aspx?Item=N82E16820147373
Graphics: EVGA GeForce GTX 960 2GB SuperSC ACX 2.0+Video Card
http://www.newegg.com/Product/Product.aspx?Item=N82E16814487091
Case: Corsair 500R
http://www.newegg.com/Product/Product.aspx?Item=N82E16811139009
PSU: Corsair RM 750W
http://www.newegg.com/Product/Product.aspx?Item=N82E16817139055
Extra: Syba 3 Port Firewire 1394B/1394A PCI-Express 1.1 x1 Card
http://www.amazon.com/gp/product/B006DQ0KD2/
Comments
I decided to buy this system after seeing Colton328's success with a similar setup : http://www.tonymacx86.com/yosemite-...x-gtx-970-ga-x99-ud4-yosemite-hackintosh.html
This is my first hackintosh, and I bought it knowing I might run into issues with X99 and other things. I find challenges like this fun!
I ended up using a different method, due to some issues I was having with the one Colton328 used & my desire to get iMessage working. It took a few days, but I'm mostly where I want to be.What works:
CPU, Ethernet, the graphics card w/web drivers, app store/iMessage, USB Ports & connected storage, firewire
What's not working:
Onboard audio - I'm sure this can be fixed but I'm using the Firewire to plug into a Saffire 14 pro interface. WiFi (I don't even know why I got the UD5, so long $40). I'm sure there are ways to get both of these working, but there's no need for me to do so.
Assembly
1. Motherboard in. Of note, the mobo came with the version 8 drivers. I upgraded to version 9 immediately.
2. PSU + 120mm intake fan (bottom) & Hard Drives in (Had to run to Fry's to get 2 2.5 -> 3.5 rack converters)
3. Not really an update, I just thing this graphics card looks awesome
4. Graphics card in
5. CPU + CPU cooler in. I had to mount the fans on top because of the way the case was built. Basically just long screws through the fan into the radiator from the top. Pretty easy.
Important! Had to plug in the 8 pin (4x2) 3 to 1 converter that came with the mobo BEFORE installing the radiator. There was not enough room to plug it in with the radiator installed (and I had to take it out to get mine on).
6. Cables tidy'd up. I did a bit more tidying after this. to get the ones running around the side sitting flush.
7. Here's the 8 pin (4x2) 3 to 1 converter that came with the motherboard. The power supply only came with 1 of the connectors that allowed me to plug into this and I couldn't find any male to male 4x2 cables. Fortunately Corsair support is awesome. I opened a ticket with them and they sent another one to me no questions asked. In order to plug in the 3rd I'm going to have to use the last 2 3x2 ports on my PSU, run them both to a 2x(3x2) to (4x2) adapter. The guide on the motherboard says not to overclock until that has happened. I'm still waiting for that cable to arrive, so I'll get to the overclocking once that happens.
If anyone knows where I can find the 4x2 male to male cables, please post a link!
8. All put together
Some Cabling notes:
My last computer build was in 2007, so it's been a while. My first thought was "holy crap kids have this easy." It seemed like everything that took a lot of work back in the day (see water cooling) was pretty much plug and play. It's really awesome!
Case cabling was super easy. There was one cable coming out of the front fan controls that I couldn't quite figure out where it went. It turns out it plugs into the large fan on the side of the case. Other than that you just plug the power in. Easy mode!
CPU cooler cabling was interesting. It comes with 3 fan cables. 2 of them are attached and should take the inputs from the fans on the top of the case. There's a 3rd that plugs into the CPU fan spot on the mobo. Lastly there's the USB, which just goes into one of the USB ports. (Anyone remember when you had to set up your own reservoir/radiator to water cool? Man, times have changed. It's awesome!) Once again, easy mode.
Installation:
Now for the difficult part!
I first tried the method Colton linked, and the boot flags he used were a HUGE help in troubleshooting issues & getting into the OS. After not being able to get it booted reliably, and reading up a bit, I decided to switch over to Bob Roche's UniBeast -> Clover method. I'm linking the video first, but take a look below the video for a few tweaks I had to do to his process:
[video=youtube;CjMXkB2wMWE]https://www.youtube.com/watch?v=CjMXkB2wMWE[/video]
Installation - Initial Boot with UniBeast:
In the video he just uses the boot flags:
Code:
npci=0x000I had to use:
Code:
npci=0x2000 nv_disable=1 -f -x -vOther than that the initial install follows the video almost exactly, minus the Clover installation (below)
Installation - Clover:
The only important difference between the clover install in the video and the one I did is that I unchecked the "ONLY install UEFI boot partition". I didn't select an MBR option (since the disk isn't formatted MBR), and only checked "CloverEFI 64-bits SATA" for the CloverEFI dis. The rest of the options were the same.
For some reason without these checked my Mobo would NOT boot from the partition. It would see the partition as bootable, but when I selected it I would get a repeated error along the lines of "Please insert a valid boot drive and hit any key."
Also of note, I couldn't get the themes to install afterwards. You might want to select them on the install if you want to use them.
Boot parameters were pretty straightforward:
Installation - NVidia Drivers:
You'll have to boot with nv_disable=1 set until you've installed the nVidia web drivers. For these I used 346.01.02f02 drivers: http://www.nvidia.com/download/driverResults.aspx/84213/en-us
From there I upgraded to 346.01.02f04 without issue: http://www.nvidia.com/download/driverResults.aspx/85588/en-us
I'm sure you could just install the upgraded drivers directly without any problems, too, but I couldn't find them online at the time.
Important!
I had to select the latest iMac 14,2 profile in Clover instead of the Mac Pro. Without these settings my system would not boot, except with nv_disable=1.
Installation - iMessage Fix:
I couldn't see anything in the rules against posting from insanelymac.com, so please let me know if this isn't allowed. I followed this guide to fix my iMessage. After following this exactly and copying over the settings from my MBP I was able to get iMessage working flawlessly.
http://www.insanelymac.com/forum/topic/302347-clover-imessagefacetime-fix-for-yosemite/
All Done
Ignore the Macintosh HD 250. It was left over from my first attempt using the UniBeast->Chimera method. I'm reformatting that to install windows. I also PhotoShopped out (on my new install, woo!) the test number I used.
Bonus, the firewire card didn't require any extra modifications. It worked right out of the box. I had to install my Saffire Control Panel in order to get the audio working through it, but that's really easy.
Additional - Restore from Time Machine:
I also restored from my Macbook Pro back up on time machine. It worked like a charm! I had to reauthorize a few of my plug ins (component, au), and a few programs but for the most part everything copied over great.
I'm running a full backup now & I have a W8 flash drive ready to go to install to my 250 GB drive. I expect that will be incredibly easy, and not really worth posting progress here.
Benchmarks
Geekbench:
I'll re-run after I overclock it:
Update - Overclocking:
I pretty much followed this guide exactly:
[video=youtube;Ikq6CJBv_uA]https://www.youtube.com/watch?v=Ikq6CJBv_uA[/video]
Stable overclock @4.0 GHz
Unigine:
I'd love to say that I can help with your own builds, but honestly I'm a complete newbie when it comes to hackintoshing (is that the right way to say it?). I spent lots of hours digging around to find different settings to use & solutions to the problem (that iMac 14,2 instead of Mac Pro drove me nuts for a little bit). I figured I'd post my successful build here in case anyone else is looking at similar hardware.