
- Joined
- Nov 8, 2011
- Messages
- 53
- Motherboard
- GA-Z77-DS3H ver1.1
- CPU
- i5 3570K
- Graphics
- Intel HD 4000
- Mac
- Mobile Phone
[Success] The Phantom Build i5 3570k - Gigabyte Z77-DS3H - Visiontek AMD Radeon 6870 1gb - 16gb Ram
CPU - Intel i5 3570K
http://www.newegg.com/Product/Product.aspx?Item=N82E16819116504
Mobo - Gigabyte GA-Z77-DS3H Rev 1.1 F9 BIOS
http://www.newegg.com/Product/Product.aspx?Item=N82E16813128547
CPU Cooler - Cooler Master Hyper 212 Plus
http://www.newegg.com/Product/Product.aspx?Item=N82E16835103065
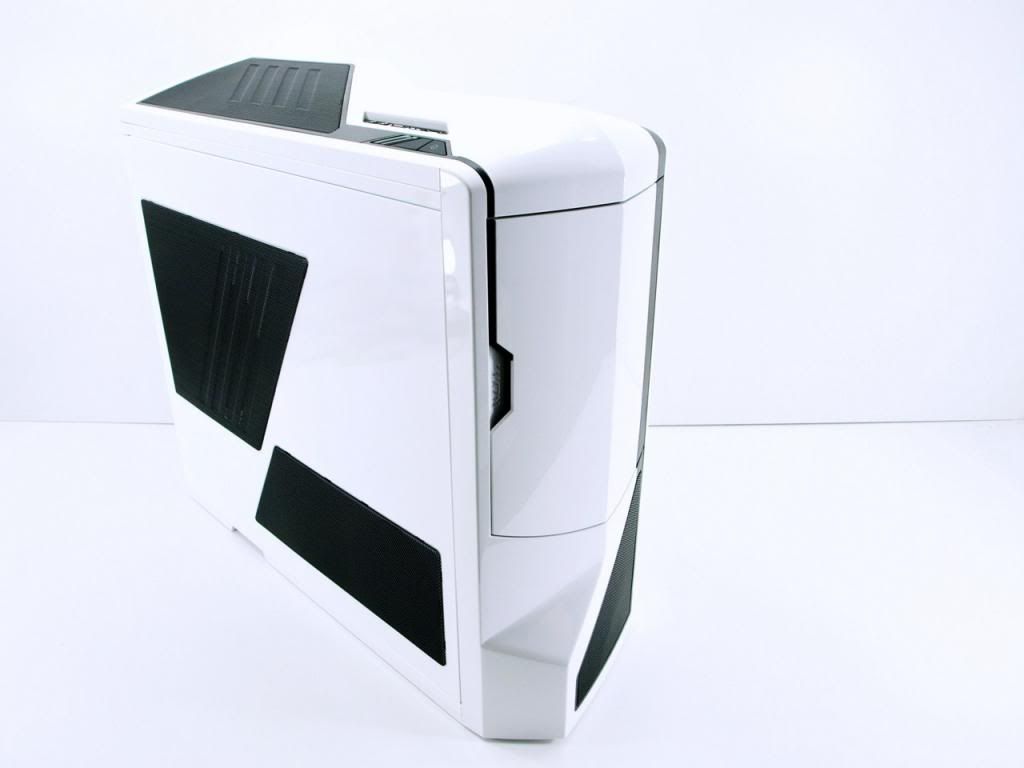
Case - NZXT Phantom
http://www.newegg.com/Product/Product.aspx?Item=N82E16811146087
Memory - Corsair Vengeance DDR3 16GB (8gb x 2)
http://www.newegg.com/Product/Product.aspx?Item=N82E16820233218
Power Supply - Raidmax Blackstone RX-700AC 700W Modular
http://www.newegg.com/Product/Product.aspx?Item=N82E16817152042
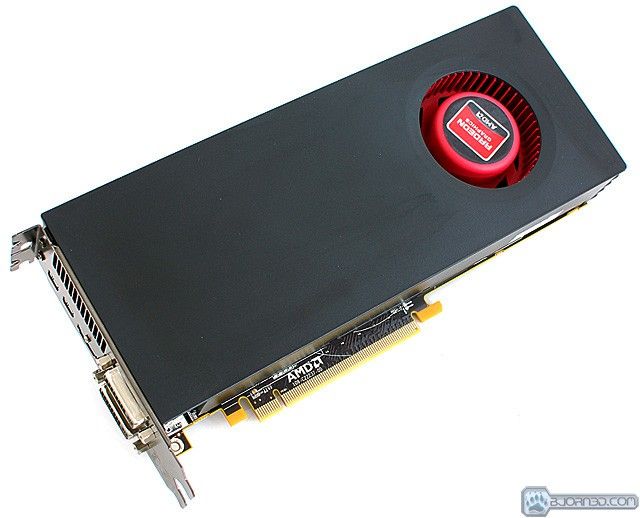
Graphics - Visiontek ATI 6870 1GB 256 Bit DDR5
http://www.amazon.com/dp/B0048773MY/
SSD - Crucial V4 CT128V4SSD2 128GB
http://www.newegg.com/Product/Product.aspx?Item=N82E16820148585
HDD - Western Digital 1TB Green
http://www.newegg.com/Product/Product.aspx?Item=N82E16822136939
Mini PCI-E to PCI-E Adapter
http://www.amazon.com/dp/B007Q5N6QW/
Card Reader - Rosewill RCR-IC002 74-in-1 USB 2.0 3.5" Internal Card Reader
http://www.newegg.com/Product/Product.aspx?Item=N82E16820223109
3.5" to 5.5" Mounting kit
http://www.newegg.com/Product/Product.aspx?Item=N82E16817990023
OS - Apple Mountain Lion 10.8
http://itunes.apple.com/us/app/os-x-mountain-lion/id537386512?ls=1&mt=12
Already Owne
Apple Airport card
http://www.amazon.com/Apple-Airport-Extreme-Wireless-Upgrade/dp/B0012YYITW/ref=sr_1_4?ie=UTF8&qid=1359659537&sr=8-4&keywords=apple+airport+card
USB Flash Drive - Sandisk 8gb
http://www.newegg.com/Product/Product.aspx?Item=N82E16820171497
Apple USB Keyboard
http://www.amazon.com/dp/B005DLDTAE/
Mouse - Logitech Wireless Mouse
Comments
This is my 2nd build with the Z77-DS3H, and it happens to be Rev 1.1 this time with the BIOS at F9. I liked this motherboard because sleep, audio, and network adapter works right out of the box, no DSDT required. I was originally using the HD4000 graphics but came across a deal on the Visiontek 6870 and was able to get it up and running 100% in Mountain Lion 10.8.2
Setting up the UniBeast Drive:
Part 1: Setting up the UniBeast Drive
1. Insert your UniBeast Flash Drive into a working Mac. Maybe your MacBook Pro, working Lion installation, etc. More info here : http://www.tonymacx86.com/61-unibeast-install-os-x-mountain-lion-any-supported-intel-based-pc.html
2. Run this command in terminal to unhide files "defaults write com.apple.finder AppleShowAllFiles 1" (copy and paste that into terminal and hit enter)
3. Force Finder to quit. You can do this in activity monitor. It will automatically restart.
4. Open Finder and navigate to your UniBeast Drive
5. Navigate to System/Library/Extensions
6. MAKE A BACKUP OF the kext "ATI6000Controller.kext" and then DELETE it off the USB flash drive.
Part 2: Installation Process: (used onboard graphics DVI first to get everything loaded before installing 6870)
1. Check your Motherboard revision and download the latest drivers from Gigabytes website if needed. I didn't have to
2. BIOS setup, load optimized defaults, and then set SATA to run AHCI, set internal graphics to 64MB, saved and exit.
3. Plug in the flash drive in the back of the computer, make sure it's not a USB 3.0 port, fire it up and hit f12 for boot options, boot into your flash drive, and install Mountain Lion.
4. Once installed, reboot the system, boot into the Unibeast flash drive again, use GraphicsEnabler=No if needed at the Chimera screen before it boots by hitting any key on your keyboard. The command will have to be like this -GraphicsEnabler=No
5. Copy the ATI6000Controller.kext to your desktop, run KextBeast to install the kext. Power off and install the 6870 graphics card. Power up and disable your on board graphics in the Bios, set to Peg graphics as primary.
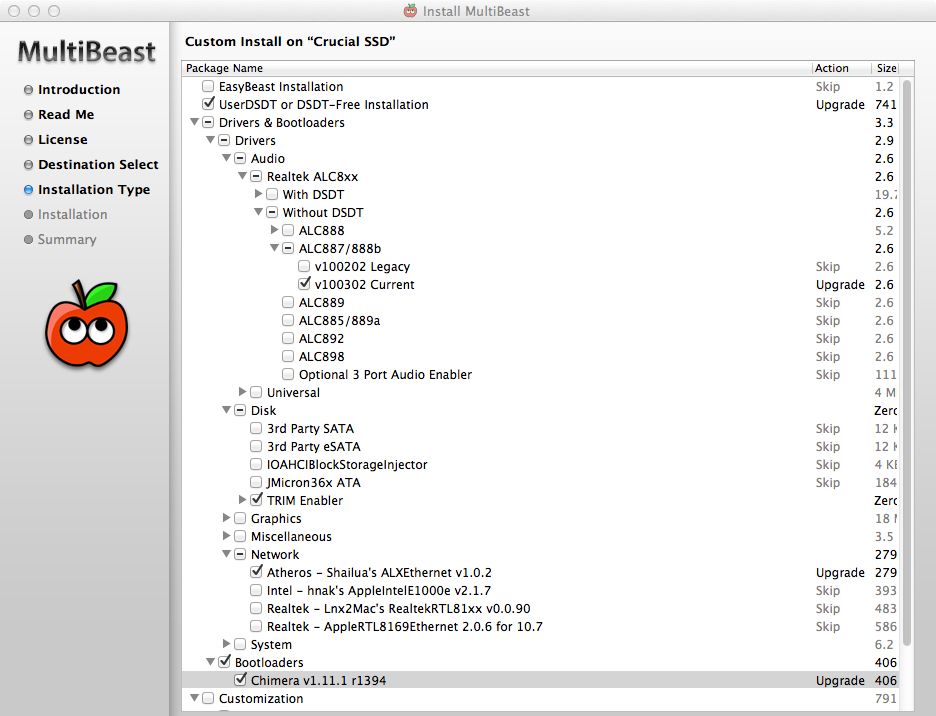
6. Reboot into Mountain Lion again with your UniBeast flash drive, run MultiBeast and check off the following items as pictured below.
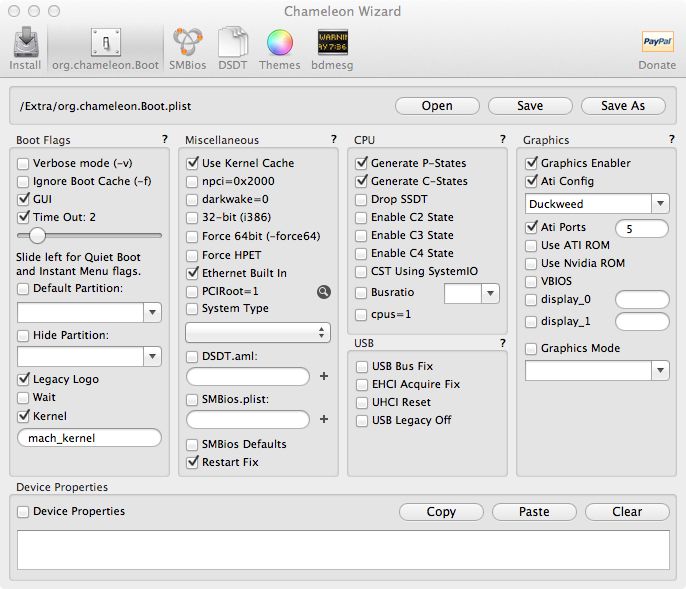
7. Reboot again and you won't need your UniBeast flash drive anymore, download Chameleon Wizard from here: http://www.tonymacx86.com/downloads.php?do=cat&id=10
8. You will need to check off the following to get the 6870 to show up properly in the About this Mac: Graphics Enabler=Yes, AtiConfig=Duckweed, AtiPorts=5. Save
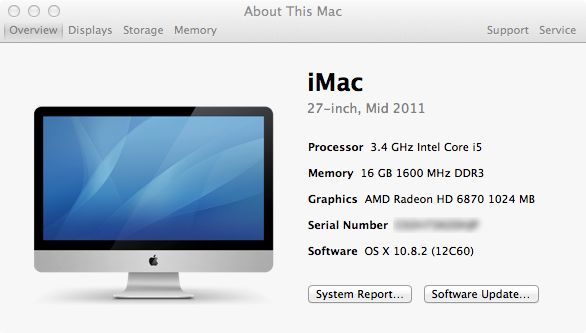
9. Select the SMBios tab in the Chameleon Wizard and hit edit. Select the pre made SMBioses and select the iMac 12,2 and save. Reboot
10. Now you should be fully functional 100% into Mountain Lion with everything working.
Here's my org.chameleon.Boot.plist in root hard drive in Extras
<key>AtiConfig</key>
<string>Duckweed</string>
<key>AtiPorts</key>
<string>5</string>
<key>EthernetBuiltIn</key>
<string>Yes</string>
<key>GenerateCStates</key>
<string>Yes</string>
<key>GeneratePStates</key>
<string>Yes</string>
<key>GraphicsEnabler</key>
<string>Yes</string>
<key>Kernel</key>
<string>mach_kernel</string>
<key>Legacy Logo</key>
<string>Yes</string>
<key>Theme</key>
<string>LoginToLion</string>
<key>Timeout</key>
<string>2</string>
<key>UseKernelCache</key>
<string>Yes</string>
Graphics: AMD Radeon 6870 Working & dual monitor working. I don't have the space so I'm just using one.
Audio Rear: Working
Wired Network adapter: Working
Wireless Network: Working
Sleep & Wake: Working
USB 3.0 ports - Working USB 3.0 devices only
Geekbench score 11,072
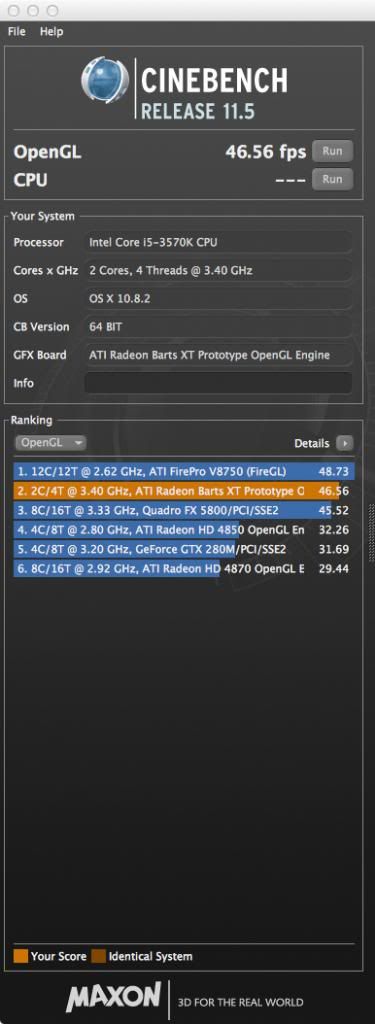
Cinebench score open GL 46.56 fps
Additional resources
http://www.tonymacx86.com/mountain-...mountain-lion-6xxx-gpu-issues-fix-inside.html <--- AMD Radeon 6870
http://www.tonymacx86.com/mountain-lion-desktop-support/61216-10-8-how-enable-hd4000-17.html <--- HD4000 Graphics
http://www.tonymacx86.com/61-unibeast-install-os-x-mountain-lion-any-supported-intel-based-pc.html<--- UniBeast Setup
http://www.gigabyte.us/support-downloads/download-center.aspx?kw=z77-ds3h<--- Gigabyte Motherboard Firmware updates


Updated to Sierra - see my comment on the 2nd page. Thanks
The Phantom Build: i5 3570K - Gigabyte Z77-DS3H Rev1.1 F9 - Visiontek AMD Radeon 6870
Components
CPU - Intel i5 3570K
http://www.newegg.com/Product/Product.aspx?Item=N82E16819116504
Mobo - Gigabyte GA-Z77-DS3H Rev 1.1 F9 BIOS
http://www.newegg.com/Product/Product.aspx?Item=N82E16813128547
CPU Cooler - Cooler Master Hyper 212 Plus
http://www.newegg.com/Product/Product.aspx?Item=N82E16835103065
Case - NZXT Phantom
http://www.newegg.com/Product/Product.aspx?Item=N82E16811146087
Memory - Corsair Vengeance DDR3 16GB (8gb x 2)
http://www.newegg.com/Product/Product.aspx?Item=N82E16820233218
Power Supply - Raidmax Blackstone RX-700AC 700W Modular
http://www.newegg.com/Product/Product.aspx?Item=N82E16817152042
Graphics - Visiontek ATI 6870 1GB 256 Bit DDR5
http://www.amazon.com/dp/B0048773MY/
SSD - Crucial V4 CT128V4SSD2 128GB
http://www.newegg.com/Product/Product.aspx?Item=N82E16820148585
HDD - Western Digital 1TB Green
http://www.newegg.com/Product/Product.aspx?Item=N82E16822136939
Mini PCI-E to PCI-E Adapter
http://www.amazon.com/dp/B007Q5N6QW/
Card Reader - Rosewill RCR-IC002 74-in-1 USB 2.0 3.5" Internal Card Reader
http://www.newegg.com/Product/Product.aspx?Item=N82E16820223109
3.5" to 5.5" Mounting kit
http://www.newegg.com/Product/Product.aspx?Item=N82E16817990023
OS - Apple Mountain Lion 10.8
http://itunes.apple.com/us/app/os-x-mountain-lion/id537386512?ls=1&mt=12
Already Owne
Apple Airport card
http://www.amazon.com/Apple-Airport-Extreme-Wireless-Upgrade/dp/B0012YYITW/ref=sr_1_4?ie=UTF8&qid=1359659537&sr=8-4&keywords=apple+airport+card
USB Flash Drive - Sandisk 8gb
http://www.newegg.com/Product/Product.aspx?Item=N82E16820171497
Apple USB Keyboard
http://www.amazon.com/dp/B005DLDTAE/
Mouse - Logitech Wireless Mouse
Comments
This is my 2nd build with the Z77-DS3H, and it happens to be Rev 1.1 this time with the BIOS at F9. I liked this motherboard because sleep, audio, and network adapter works right out of the box, no DSDT required. I was originally using the HD4000 graphics but came across a deal on the Visiontek 6870 and was able to get it up and running 100% in Mountain Lion 10.8.2
Setting up the UniBeast Drive:
Part 1: Setting up the UniBeast Drive
1. Insert your UniBeast Flash Drive into a working Mac. Maybe your MacBook Pro, working Lion installation, etc. More info here : http://www.tonymacx86.com/61-unibeast-install-os-x-mountain-lion-any-supported-intel-based-pc.html
2. Run this command in terminal to unhide files "defaults write com.apple.finder AppleShowAllFiles 1" (copy and paste that into terminal and hit enter)
3. Force Finder to quit. You can do this in activity monitor. It will automatically restart.
4. Open Finder and navigate to your UniBeast Drive
5. Navigate to System/Library/Extensions
6. MAKE A BACKUP OF the kext "ATI6000Controller.kext" and then DELETE it off the USB flash drive.
Part 2: Installation Process: (used onboard graphics DVI first to get everything loaded before installing 6870)
1. Check your Motherboard revision and download the latest drivers from Gigabytes website if needed. I didn't have to
2. BIOS setup, load optimized defaults, and then set SATA to run AHCI, set internal graphics to 64MB, saved and exit.
3. Plug in the flash drive in the back of the computer, make sure it's not a USB 3.0 port, fire it up and hit f12 for boot options, boot into your flash drive, and install Mountain Lion.
4. Once installed, reboot the system, boot into the Unibeast flash drive again, use GraphicsEnabler=No if needed at the Chimera screen before it boots by hitting any key on your keyboard. The command will have to be like this -GraphicsEnabler=No
5. Copy the ATI6000Controller.kext to your desktop, run KextBeast to install the kext. Power off and install the 6870 graphics card. Power up and disable your on board graphics in the Bios, set to Peg graphics as primary.
6. Reboot into Mountain Lion again with your UniBeast flash drive, run MultiBeast and check off the following items as pictured below.
7. Reboot again and you won't need your UniBeast flash drive anymore, download Chameleon Wizard from here: http://www.tonymacx86.com/downloads.php?do=cat&id=10
8. You will need to check off the following to get the 6870 to show up properly in the About this Mac: Graphics Enabler=Yes, AtiConfig=Duckweed, AtiPorts=5. Save
9. Select the SMBios tab in the Chameleon Wizard and hit edit. Select the pre made SMBioses and select the iMac 12,2 and save. Reboot
10. Now you should be fully functional 100% into Mountain Lion with everything working.
Here's my org.chameleon.Boot.plist in root hard drive in Extras
<key>AtiConfig</key>
<string>Duckweed</string>
<key>AtiPorts</key>
<string>5</string>
<key>EthernetBuiltIn</key>
<string>Yes</string>
<key>GenerateCStates</key>
<string>Yes</string>
<key>GeneratePStates</key>
<string>Yes</string>
<key>GraphicsEnabler</key>
<string>Yes</string>
<key>Kernel</key>
<string>mach_kernel</string>
<key>Legacy Logo</key>
<string>Yes</string>
<key>Theme</key>
<string>LoginToLion</string>
<key>Timeout</key>
<string>2</string>
<key>UseKernelCache</key>
<string>Yes</string>
Graphics: AMD Radeon 6870 Working & dual monitor working. I don't have the space so I'm just using one.
Audio Rear: Working
Wired Network adapter: Working
Wireless Network: Working
Sleep & Wake: Working
USB 3.0 ports - Working USB 3.0 devices only
Geekbench score 11,072
Cinebench score open GL 46.56 fps
Additional resources
http://www.tonymacx86.com/mountain-...mountain-lion-6xxx-gpu-issues-fix-inside.html <--- AMD Radeon 6870
http://www.tonymacx86.com/mountain-lion-desktop-support/61216-10-8-how-enable-hd4000-17.html <--- HD4000 Graphics
http://www.tonymacx86.com/61-unibeast-install-os-x-mountain-lion-any-supported-intel-based-pc.html<--- UniBeast Setup
http://www.gigabyte.us/support-downloads/download-center.aspx?kw=z77-ds3h<--- Gigabyte Motherboard Firmware updates
Updated to Sierra - see my comment on the 2nd page. Thanks
Last edited: