UPDATE:
1) Returned the GPU, getting a new option.
2) Using HD4600 onboard graphics. HDMI Audio enabled.
3) Updated HDMI audio section
4) Updated Build section
Spballer,
Thank you for this great guide. I am surprised it is not a Golden Build yet. You chose your components very well, your directions are crystal clear, and you are very responsive to the thread's progress.
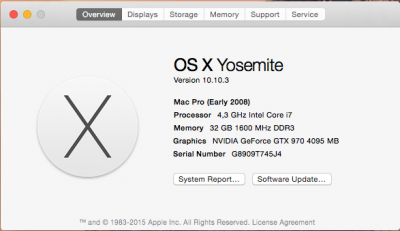
My build is 100% operative, with everything except iMessage working. HDMI audio yes. Most recent Nvidia driver 346.01.01f01. Unibeast+Multibeast USB and Yosemite 10.10.2 with security update 2015-003.
I followed your guide almost exactly. There are a few things I wanted to note and suggest, because it would help others who were in my position.
I have slightly different needs so I chose a different motherboard, among other things:
THE BUILD
MOBO: GA Z97X-UD7 TH
Having Thunderbolt is necessary for my video editing work.
I understand having two PCIe x16 for future SLI, so I may switch to the Gaming GT if and when I can transition to USB3 drives.
PROCESSOR: i7 4790K
CPU Fan: Cooler Master EVO 212
Big upgrade vs. the stock Intel fan.
GPU: EVGA GTX 970 SC ACX 2.0 RETURNED
It runs quieter and was a good deal on Newegg.
The card had far too much coil whine while gaming on the Windows boot, so I had to RMA for a refund. And for overclockers: It was also voltage locked, and you could not overclock the memory without crashing. I do not recommend this card.
Investigating a new GPU option. Will update.
RAM: Crucial Ballistix Tactical 32GB (8GBx4)
Better deal on Newegg at the time.
STORAGE: Samsung 850 EVO 250GB (Mac); Samsung PM851 250GB (Windows)
Definitely don't need 1TB for how many apps I actually run, and the cost vs. performance of the EVO over the PRO was the deciding factor.
I also did a dual boot with an SSD that I got for free. It holds its own.
ADDITIONAL STORAGE: HGST/Hitachi 7K3000 2TB x2 in Raid 0 Striped 32KB.
Software Raid via Disk Utility. 270MB/s read&write. The fun part for me was buying a bag of rubber bands and tying a suspension system inside my case for both drives to reduce vibration noise!
VIDEO EDITING SETUP: 2x old G-DRIVE 2TB 7200 in Raid 0 Striped 32KB via eSATA
I had to get an eSATA to USB 3.0 adapter, but I've put these two drives in a software Raid 0, too.
BACKUP STORAGE: Seagate Expansion 4TB
Warning: Loud drive! Also no On/Off switch.
I've split the drive into four partitions: a 300GB section for CarbonCopyClone of the Mac SSD, a 1.7TB section for Time Machine, 1 TB of exFAT for Windows boot, and 1TB of HFS+ for the Mac boot.
PSU: Corsair TX 950
One of the components I would actually like to downgrade. It is "loud", with a fan that always runs. It is the PSU of my older Windows-only computer. I packed away most of the old parts and cannibalized the PSU, case, and case fans.
CASE: Cooler Master HAF 932
Old case, does the job. Little too big for my taste.
INPUT DEVICES: Logitech K400, Amazon Basics Mouse
I have a number of other peripherals but these two are what I am using at the moment. The Logitech is a must-buy because it is one of two all-in-one options for a Mac. It's significantly cheaper than its brother the K820, and it does the job. The keys will drive you a little crazy since they're quite wonky and cheap feeling, and the trackpad with its plastic touch is occasionally frustrating (hence the Amazon Basics mouse, I switch between the two) - but all in all it does the job.
I highly recommend remapping some of the shortcuts with the K400 in the Keyboard panel of System Preferences. Some of the function keys don't work, and the ones that do
don't do what they should do. Since you don't have multi-touch gestures with this trackpad, I mapped essentials like Launchpad, Mission Control, Notification Center, etc to function keys that do work but
don't do what they should do.
In Windows 8, the keyboard works like a dream. So yes, the K400 is a great buy.
DISC DRIVE: LG WH14NS40 BluRay Writer Drive
It was a good deal and I needed one for work.
TV: Panasonic Viera 50" Plasma ST50
Great TV that I've been using for 2.5 years. One of the reasons I've been using a HDTV-PC, and having to work with wireless devices when not gaming. A little buzz when it's on a white screen (often). Planning to upgrade to a 4K LED TV in the near future.
AV RECEIVER: Sony STRDH520 7.1 3D
Kind of a clunker that I got with the TV. Planning to upgrade to a mid-range system with the new TV sooner rather than later.
I have a 5.1 setup and this is THE REASON I needed HDMI audio.
COMING IN THE MAIL:
IOGear Bluetooth 4.0 USB dongle
Phantek 140mm SP&HP fans - replacing my old case fans, which are too loud
New GPU, TBD
NOTES ABOUT THE YOSEMITE INSTALL:
MULTIBEAST: for Ethernet driver select Intel 3.0.1
GPU Driver: 346.01.01f01 works perfectly with 10.10.2 + Security update 2015-003.
GPU Not Recognized: While still plugged into the HDMI port of my motherboard, I installed the web drivers and rebooted only to see that I could not get the Mac to recognize the card as GTX 970. It kept saying "NVIDIA Chip Set". I spent a little while troubleshooting it but the answer was obvious: don't worry. Just plug into the GTX 970, go through the BIOS changes, reboot and select the Web Driver: only then will your Mac recognize the card as a GTX 970.
HDMI Audio for GTX 970: I am surprised this is not included in the guide, and it was the sole reason my installation took 12 hours instead of 2. Toleda's guides are excellent but they are not the easiest to read and follow.
Below is how I got it working under Chimera 4.0.1 for the GTX 970. Skip ahead for instructions on how to enable for HD4600.
1) In the "HDMI Audio AppleHDA" thread by Toleda follow the SSDT directions for the 9 series. Or, just do the following:
2) Go to
https://github.com/toleda/audio_hdmi_9series/tree/master/ssdt_9series and download the three zip files.
3) Go to Extra as per the 9 series SSDT guide for Chimera. (or Command+Spacebar and search "Extra")
4) Extract the zip file "audio 1" and rename the SSDT to "SSDT.aml". Put it in the Extra folder.
5) Extract the zip file "audio 2" and rename the SSDT to "SSDT-1.aml". Put it in the Extra folder. This step is probably not necessary, but didn't seem to do harm. Will investigate soon.
6) Extract the zip file "lpc" and rename the SSDT to "SSDT-2.aml". Put it in the Extra folder. NOT NECESSARY, but didn't seem to do harm.
7) Reboot.
8) Verify HDMI audio in the System Preference panel Audio.
9) Party!
HDMI Audio for HD4600: If you're like me and in limbo waiting for a new GPU (as of April 8th 2015), you will be using the onboard graphics from the Z97, the Intel HD4600. Enabling the audio is a different procedure than above, though it shouldn't interfere with your new GTX 970 GPU's HDMI audio when you do get it - I will post an update when I do.
In the "HDMI Audio AppleHDA" thread by Toleda follow the DSDT directions for the 9 series. Please note that in addition to the DSDT edit, you have to install the kext edits under column 5 which includes the Framebuffer and the AppleHDA. Unfortunately I don't have a shortcut for this process. There are many steps. Hopefully the following tips should help you, but only if you have the exact mobo that I do (Gigabyte Z97X-UD7 TH). Chances are a number of other Z97 mobos can work with these settings and kexts, YMMV.
- During the MaciASL compiles, make sure you are pointed at the correct repo (9 series, the exact URL to add in Sources is
https://raw.githubusercontent.com/toleda/audio_hdmi_9series/master )
- During the MaciASL compile, only use Clean Compile then the Audio 1 patch, together. Applying Audio 2 will give you tons of errors (201 to be exact in my case).
- FRAMEBUFFER: You want the Azul "C". Download
the Azul "C" package. Click View Raw to download the zip. Extract. Install as per the HD4600 Framebuffer PDF.
- APPLEHDA: Download
the AppleHDA kext. Click View Raw to download the zip. Extract. Install.
- Don't forget to Rebuild Cache at the very end using DPCIManager.
NOTES ABOUT THE WINDOWS INSTALL:
Windows 8.1 Professional was easy to install. I recommend a separate SSD, and this is how I did it:
1) Load the DVD in your DVD drive, and restart.
2) Hit Delete when you see the Gigabyte logo.
3) Go to the BIOS settings and switch from "Legacy and UEFI" to "Legacy Only". Save and exit.
4) Hit F12 when you see the Gigabyte logo.
5) Choose the DVD drive to boot from.
6) Install Windows.
7) Make sure you switch the BIOS back to "Legacy and UEFI".
8) Change the boot order to your liking. I chose to put my Mac SSD first.
9) Whenever you want to boot into Windows, you must restart, hit F12 at the Gigabyte logo and choose the Windows SSD (usually listed first for some reason, do not choose UEFI).
If there is a better way to boot into Windows, please let me know.
THUNDERBOLT
You'll need to boot into Windows and install the Thunderbolt drivers by Gigabyte. Then it will work on your Mac boot.
It's been fun and challenging, and I will keep you all posted about future success/failures with Yosemite updates and patches.
Otherwise, I am interested in any advice and improvements you guys can suggest for my build.
Thanks, good luck and take care.


