- Joined
- Sep 7, 2010
- Messages
- 35
- Motherboard
- Gigabyte GA-Z390-Designare
- CPU
- i7-9700K
- Graphics
- WX8200
- Mac
- Mobile Phone
Components
Gigabyte GA-Z170X-DESIGNARE Motherboard
Amazon US Newegg US
Intel Core i7 6700K 4.00 GHz Processor, Socket
Amazon US Newegg US
Corsair Vengeance LPX 16GB (2x8GB) DDR4 DRAM 3000MHz Memory (CMK16GX4M2B3000C15W)
Amazon US Newegg US
Crucial MX200 M.2 500GB SATA 6Gbps Solid State Drive
Amazon US Newegg US
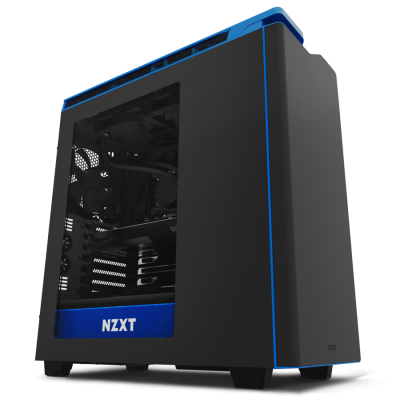
NZXT H440 Mid Tower Computer Case
Amazon US Newegg US
NZXT Kraken X62 All-in-One 280mm CPU Liquid Cooling System
Amazon US Newegg US
NZXT Puck - Cable Management and Headset-Mounting Solution
Amazon US Newegg US
ICY DOCK EZ-FIT 2.5" to 3.5" PRO SSD/HDD Mounting Kit
Amazon US Newegg US
ICY DOCK Dual Bay 2.5" to 3.5" SSD Trayless Hot-swap Dock
Amazon US Newegg US
ICY DOCK 2.5” to 3.5" SSD Dock Trayless Hot-Swap Dock
Amazon US Newegg US
JXSZ USB Hub
Amazon US
My Wifi/Bluetooth Solution
Wifi PCIe adapter, PCI-E 1X Adapter + 4 x Wireless Antenna USB Cable
eBay US
Antenna Wires - 2 x 4" M.2 IPEX U.fl/IPEX to RP-SMA Female Pigtail Mini PCIe Wifi MHF4 MHFIV - Bought 2 sets
eBay US
Apple Wifi Card - BCM943602CS Wireless Wifi Card For Apple A1398, A1425, A1502
eBay US
Already Owned
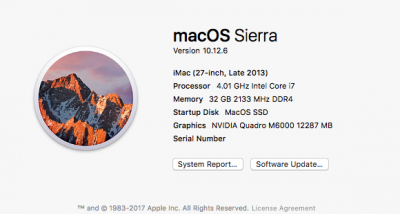
Nvidia Quadro M6000 12GB 384-bit GDDR5
Amazon US Newegg US
Thermaltake Toughpower Grand Power Supply 850W
Amazon US Newegg US
Intel DC S3500 SSDSC2BB800G401 2.5" 800GB SATA 6Gb/s MLC Solid State Drive
Amazon US Newegg US
Alternative Wifi/Bluetooth Solution
Broadcom BCM943602CDP wireless wifi Card WIRELESS WIFI BLUETOOTH AIRPORT CARD - Apple iMac 27” A1419 Late 2015 653-00005
eBay US
Wifi PCIe adapter - 1 Set BCM94360CD BCM94331CD to PCI-E 1X Adapter + 4 x Wireless Antenna USB Cable
eBay US
Comments
First I'd like to thank Cmfusco11, Saganic0, BoomR for there User Build post and and tonymacx86 Skylake Thunderbolt 3 Test Build. Their work was the basis for my build. It took all four build instructions to complete this build. For this reason I've taken the key parts from all four builds and complied them into this one GA-Z170X-DESIGNARE user build guide.
My last hackintosh build was based on the GA-X79-UD5 and was in service for over 5 years and it was time for an upgrade. My Hackintosh builds are always dual boot with Windows and MacOS. The main reason for this is that I need a Windows to run my CAD programs. Otherwise I would only use MacOS. The Windows and CAD hardware requirements drove most of my GA-Z170X-DESIGNARE motherboard and Nvidia Quadro M6000 selections. Clearly these two components needed to still be compatible with MacOS.
Installation
Since still plan to run a dual boot Windows 10 and Sierra setup.
Windows Install (Ignore if this if not running dual Boot mode)
I started off by installing Windows 10 on the M.2 device. After installing Windows I updated my board BIOS to F21.
Update your BIOS
You might want to consider updating your BIOS. Before starting the next section update Gigabyte Z170X-Designare BIOS to F21 or greater (not addressed here) http://download.gigabyte.eu/FileList/BIOS/mb_bios_ga-z170x-designare_f21.zip
UEFI Settings
During start up press Del key several times during start up/splash screen.
Load the following BIOS settings:
Loaded optimized default ————————SAVE & EXIT TAB
BIOS Features > Boot Option #1 > UEFI USB Drive
BIOS Features > Windows 8/10 Features > Other OS
BIOS Features > Storage Boot Option Control > UEFI Only
Peripherals > Intel(R) Thunderbolt > Security Level - [No Security]
Peripherals > Super IO Configuration > Disable
Peripherals > XHCI Hand-off > Enable
Chipset > VT-d > Disabled
Chipset > Wake on LAN - [Disabled]
SAVE & EXIT
Thunderbolt
You need to follow tonymac86's guide in flashing the Thunderbolt ports in Windows 10! He wrote the guide for the Z170X-UD5-TH which I have quoted below!
Sierra Installation
I followed Cmfusco11's Build: GA-Z170X-UD5 TH - i7-6700K guide. The key parts are listed here:
STEP 1: Open MultiBeast.
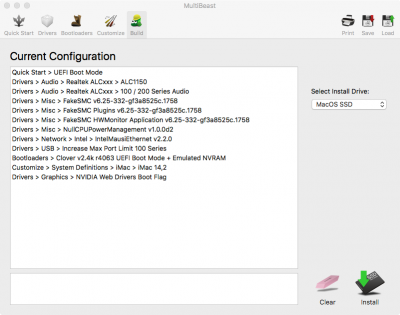
STEP 2: Select the following in MultiBeast:
-Quick Start > UEFI Boot Mode
-Drivers > Audio > Realtek Audio ALC1150
-Drivers > Audio > 100 / 200 Series Audio
-Drivers > Misc > FakeSMC v6.25-332-gf3a8525c.1758
-Drivers > Misc > FakeSMC Plugins v6.25-332-gf3a8525c.1758
-Drivers > Misc > FakeSMC HWMonitor Application v6.25-332-gf3a8525c.1758
-Drivers > Misc > NullCPUPowerManagement v1.0.0d2
-Drivers > Network > Intel > IntelMausiEthernet v2.2.0
-Drivers > USB Increase Max Port Limit 100 Series
-Bootloaders > Clover v2.4k r4063 UEFI Boot Mode + Emulated NVRAM
-Customize > System Definitions > iMac > iMac 14,2
-Customize > Graphics > NVIDIA Web Drivers Boot Flag
The above NVIDIA Web Drivers Boot Flag will fix the default graphics driver issue, which sets the default macOS driver every time you restart, never enabling the NVIDIA card properly.
STEP 3: Save the MultiBeast .mb file to the USB drive.
STEP 4: Verify the proper install drive is selected, then select Install.
STEP 5: Once complete, Restart Computer
Finishing Up
STEP 1: At boot screen select Sierra.
STEP 2: Open USB and run Nvidia Drivers
STEP 3: After installed restart computer & remove USB.
STEP 4: During Gigabyte boot screen press DEL several times to get back into BIOS
STEP 5: Go under BIOS Features TAB and change Boot Option #1 to UEFI Sierra drive
STEP 6: Save and exit.
What Works
Updated to MultiBeast 9.2. Now that I've been running for a while on my new mackintosh, I've notice a few things that I still need to fix. I updated to MultiBeast 9.2, but I'm still have a few issues. I can't seem to setup Apple Watch unlock your mac, due to a communication problem, even with the Apple BCM943602CS Wifi/BlueTooth Card. I've also noticed that the audio will not work sometimes after waking from a sleep and requires a reboot to restore. However the system hangs during shutdown and requires a hard power cycle. All not critical problems just annoying. I have confirmed that iMessage works the few times that I've used it.
Gigabyte GA-Z170X-DESIGNARE Motherboard
Amazon US Newegg US
Intel Core i7 6700K 4.00 GHz Processor, Socket
Amazon US Newegg US
Corsair Vengeance LPX 16GB (2x8GB) DDR4 DRAM 3000MHz Memory (CMK16GX4M2B3000C15W)
Amazon US Newegg US
Crucial MX200 M.2 500GB SATA 6Gbps Solid State Drive
Amazon US Newegg US
NZXT H440 Mid Tower Computer Case
Amazon US Newegg US
NZXT Kraken X62 All-in-One 280mm CPU Liquid Cooling System
Amazon US Newegg US
NZXT Puck - Cable Management and Headset-Mounting Solution
Amazon US Newegg US
ICY DOCK EZ-FIT 2.5" to 3.5" PRO SSD/HDD Mounting Kit
Amazon US Newegg US
ICY DOCK Dual Bay 2.5" to 3.5" SSD Trayless Hot-swap Dock
Amazon US Newegg US
ICY DOCK 2.5” to 3.5" SSD Dock Trayless Hot-Swap Dock
Amazon US Newegg US
JXSZ USB Hub
Amazon US
My Wifi/Bluetooth Solution
Wifi PCIe adapter, PCI-E 1X Adapter + 4 x Wireless Antenna USB Cable
eBay US
Antenna Wires - 2 x 4" M.2 IPEX U.fl/IPEX to RP-SMA Female Pigtail Mini PCIe Wifi MHF4 MHFIV - Bought 2 sets
eBay US
Apple Wifi Card - BCM943602CS Wireless Wifi Card For Apple A1398, A1425, A1502
eBay US
Already Owned
Nvidia Quadro M6000 12GB 384-bit GDDR5
Amazon US Newegg US
Thermaltake Toughpower Grand Power Supply 850W
Amazon US Newegg US
Intel DC S3500 SSDSC2BB800G401 2.5" 800GB SATA 6Gb/s MLC Solid State Drive
Amazon US Newegg US
Alternative Wifi/Bluetooth Solution
Broadcom BCM943602CDP wireless wifi Card WIRELESS WIFI BLUETOOTH AIRPORT CARD - Apple iMac 27” A1419 Late 2015 653-00005
eBay US
Wifi PCIe adapter - 1 Set BCM94360CD BCM94331CD to PCI-E 1X Adapter + 4 x Wireless Antenna USB Cable
eBay US
Comments
First I'd like to thank Cmfusco11, Saganic0, BoomR for there User Build post and and tonymacx86 Skylake Thunderbolt 3 Test Build. Their work was the basis for my build. It took all four build instructions to complete this build. For this reason I've taken the key parts from all four builds and complied them into this one GA-Z170X-DESIGNARE user build guide.
My last hackintosh build was based on the GA-X79-UD5 and was in service for over 5 years and it was time for an upgrade. My Hackintosh builds are always dual boot with Windows and MacOS. The main reason for this is that I need a Windows to run my CAD programs. Otherwise I would only use MacOS. The Windows and CAD hardware requirements drove most of my GA-Z170X-DESIGNARE motherboard and Nvidia Quadro M6000 selections. Clearly these two components needed to still be compatible with MacOS.
Installation
Since still plan to run a dual boot Windows 10 and Sierra setup.
Windows Install (Ignore if this if not running dual Boot mode)
I started off by installing Windows 10 on the M.2 device. After installing Windows I updated my board BIOS to F21.
Update your BIOS
You might want to consider updating your BIOS. Before starting the next section update Gigabyte Z170X-Designare BIOS to F21 or greater (not addressed here) http://download.gigabyte.eu/FileList/BIOS/mb_bios_ga-z170x-designare_f21.zip
UEFI Settings
During start up press Del key several times during start up/splash screen.
Load the following BIOS settings:
Loaded optimized default ————————SAVE & EXIT TAB
BIOS Features > Boot Option #1 > UEFI USB Drive
BIOS Features > Windows 8/10 Features > Other OS
BIOS Features > Storage Boot Option Control > UEFI Only
Peripherals > Intel(R) Thunderbolt > Security Level - [No Security]
Peripherals > Super IO Configuration > Disable
Peripherals > XHCI Hand-off > Enable
Chipset > VT-d > Disabled
Chipset > Wake on LAN - [Disabled]
SAVE & EXIT
Thunderbolt
You need to follow tonymac86's guide in flashing the Thunderbolt ports in Windows 10! He wrote the guide for the Z170X-UD5-TH which I have quoted below!
STEP BY STEP THUNDERBOLT 3 SETUP:
STEP 1: Download Windows 10 Trial mode and install to disk. (Activation not required)
https://www.microsoft.com/en-us/software-download/windows10/
STEP 2: Download and Install Thunderbolt FW Update Tool for Z170X-Designare
http://download.gigabyte.eu/FileList/Utility/mb_utility_thunderbolt-fw_z170x-designare.zip
STEP 3: Navigate to This PC > Local Disk > Program Files (x86) > GIGABYTE > FlashTBT > FlashTBT_100
STEP 4: Run FlashTBT_100 Application
STEP 5: Shut down computer and unplug power cable for 30 seconds
Sierra Installation
I followed Cmfusco11's Build: GA-Z170X-UD5 TH - i7-6700K guide. The key parts are listed here:
MultiBeast SettingsSTEP 1: This is a 10.12.6 build
Start by downloading macOS Sierra on a existing Mac or Hackintosh from App Store.
After you are done, you will have a new app in your Applications called “install macOS Sierra”
STEP 2:
Insert USB 2.0 or 3.0 into a empty USB drive on your computer.
Do a spotlight search for DISK UTILITY or open Open /Applications/ Utilities/ Disk Utility
Select the USB drive to the left.(NOT 2nd drop down window) *VERY IMPORTANT DO NOT SELECT YOUR CURRENT HARD-DRIVE*
Erase button at top middle
Name is Sierra, Format : OS X Extended (Journaled), Scheme : GUID Partition Map
Erase
Step 3:
Click link and Log in to Tonymacx86 site or register, then download UniBeast latest version 7.1.1. https://www.tonymacx86.com/resources/categories/tonymacx86-downloads.3/
At top right of page then click download button.(You must make a account on tonymacx86 site to download)
Click Continue, Continue, Continue, Continue, Agree.
Pick the USB and then Continue.
Select Your Sierra OS X
Select UEFI Boot Mode
Select nothing for Graphic injects
You should have at Summary: USB, Sierra, UEFI Boot Mode then continue.
At this time it will start copying the files and building your OS X it may take anywhere from 10 minute to a whole Hour depending on your USB and Computer. DO NOT TOUCH OR MOVE THE WINDOWS. JUST WAIT.
Step 4:
Click link to download latest version of MultiBeast and then drag that to your USB. I used version 9.1.0. http://www.tonymacx86.com/resources/categories/tonymacx86-downloads.3/
Click link to download latest version of Nvidia Drivers and then drag that to your USB. I used WebDriver-378.05.05.25f01 http://www.nvidia.com/download/driverResults.aspx/107807/en-us
Step 5:
Plug USB into computer you wish to install OS X Sierra on.
Step 6:
During new load screen select Boot Mac OS X From USB.
Choose your language.
At top menu bar choose Utilities and Disk Utility
Highlight the drive you wish to install Sierra on (Make sure you don’t pick your USB drive)
Erase drive
Name is Sierra, Format : OS X Extended (Journaled), Scheme : GUID Partition Map
Close Disk Utility
Continue with installation and select Sierra as your drive you wish to install OS X too.
Computer will take about 15 minutes to install the OS X to the drive then restart
Step 7:
At boot screen select the New Sierra option usually at the right.
Finish OS X installation steps with your personal information like WiFi, computer name, & iCloud.
Step 8:
USB drive should open if not open it.
STEP 1: Open MultiBeast.
STEP 2: Select the following in MultiBeast:
-Quick Start > UEFI Boot Mode
-Drivers > Audio > Realtek Audio ALC1150
-Drivers > Audio > 100 / 200 Series Audio
-Drivers > Misc > FakeSMC v6.25-332-gf3a8525c.1758
-Drivers > Misc > FakeSMC Plugins v6.25-332-gf3a8525c.1758
-Drivers > Misc > FakeSMC HWMonitor Application v6.25-332-gf3a8525c.1758
-Drivers > Misc > NullCPUPowerManagement v1.0.0d2
-Drivers > Network > Intel > IntelMausiEthernet v2.2.0
-Drivers > USB Increase Max Port Limit 100 Series
-Bootloaders > Clover v2.4k r4063 UEFI Boot Mode + Emulated NVRAM
-Customize > System Definitions > iMac > iMac 14,2
-Customize > Graphics > NVIDIA Web Drivers Boot Flag
The above NVIDIA Web Drivers Boot Flag will fix the default graphics driver issue, which sets the default macOS driver every time you restart, never enabling the NVIDIA card properly.
STEP 3: Save the MultiBeast .mb file to the USB drive.
STEP 4: Verify the proper install drive is selected, then select Install.
STEP 5: Once complete, Restart Computer
Finishing Up
STEP 1: At boot screen select Sierra.
STEP 2: Open USB and run Nvidia Drivers
STEP 3: After installed restart computer & remove USB.
STEP 4: During Gigabyte boot screen press DEL several times to get back into BIOS
STEP 5: Go under BIOS Features TAB and change Boot Option #1 to UEFI Sierra drive
STEP 6: Save and exit.
What Works
- Sleep and wake
- USB 3.0
- Bluetooth
- Audio
- Ethernet
- NVIDIA M6000
- NVIDIA Web drivers activated
- Thunderbolt 2 working. Not hot-swapping/plugging of TB devices (I Only have TB2 devices to test with)
- App Store/iCloud
- Shut-down
- iMessages- Updated 09/15/17
- Both Ethernet Ports
- Apple Watch unlock your mac - Updated 09/15/17
- Occasionally lose audio after waking from sleep and shutdown hang - Updated 09/15/17
- Dual Ethernet Ports?
Updated to MultiBeast 9.2. Now that I've been running for a while on my new mackintosh, I've notice a few things that I still need to fix. I updated to MultiBeast 9.2, but I'm still have a few issues. I can't seem to setup Apple Watch unlock your mac, due to a communication problem, even with the Apple BCM943602CS Wifi/BlueTooth Card. I've also noticed that the audio will not work sometimes after waking from a sleep and requires a reboot to restore. However the system hangs during shutdown and requires a hard power cycle. All not critical problems just annoying. I have confirmed that iMessage works the few times that I've used it.
Last edited:


