
- Joined
- Nov 2, 2016
- Messages
- 4
- Motherboard
- GA-Z170X-Gaming 5
- CPU
- i7 6700
- Graphics
- Gigabyte GTX 960 Overclocked
My Build: Gigabyte Z170x Gaming 5, i7 6700, 16GB, GTX 960 , Skylake iMac 14,2

Components:
Intel i7-6700 Skylake Processor
https://www.amazon.co.uk/dp/B0136JONG8/?tag=tonymacx86-21
https://www.amazon.com/dp/B010T6DJCU/?tag=tonymacx86com-20
https://www.newegg.com/Product/Product.aspx?Item=N82E16819117560
Gigabyte Z170X Gaming 5 Motherboard/B]
https://www.amazon.co.uk/dp/B013E37HUA/?tag=tonymacx86-21
https://www.amazon.com/dp/B012N6EW6G/?tag=tonymacx86com-20
https://www.newegg.com/Product/Product.aspx?Item=N82E16813128836
Corsair Vengeance 16GB DDR4 Ram (I have 4x 4gb sticks but I can't find amazon link, this is equal to)
https://www.amazon.co.uk/dp/B01HKF4ZUI/?tag=tonymacx86-21
https://www.amazon.com/dp/B01HKF4ZUI/?tag=tonymacx86com-20
http://www.newegg.com/Product/Product.aspx?Item=N82E16820236076
Gigabyte GTX 970
https://www.amazon.co.uk/dp/B0113WFGZM/?tag=tonymacx86-21
https://www.amazon.com/dp/B013LDXEMS/?tag=tonymacx86com-20[/B]
http://www.newegg.com/Product/Product.aspx?Item=N82E16814125807
NZXT H440 2015 Mid Tower Case
https://www.amazon.co.uk/dp/B015XQL3S8/?tag=tonymacx86-21
https://www.amazon.com/dp/B015401I06/?tag=tonymacx86com-20
http://www.newegg.com/Product/Product.aspx?Item=N82E16811146217
EVGA SuperNova 750 80+
https://www.amazon.co.uk/dp/B01AHRQW5W/?tag=tonymacx86-21
https://www.amazon.com/dp/B00IKDETOW/?tag=tonymacx86com-20
http://www.newegg.com/Product/Product.aspx?Item=N82E16817438017
WD Blue 500GB HDD x2
https://www.amazon.co.uk/dp/B00461G3MS/?tag=tonymacx86-21
https://www.amazon.com/dp/B00461G3MS/?tag=tonymacx86com-20
http://www.newegg.com/Product/Product.aspx?Item=N82E16822136769
SanDisk 16GB USB 3.0 Flash Drive
https://www.amazon.co.uk/dp/B00DQG9DDU/?tag=tonymacx86-21
https://www.amazon.com/dp/B00DQG9DDU/?tag=tonymacx86com-20
Coolmaster Hyper 212 Evo CPU Cooler
https://www.amazon.co.uk/dp/B0068OI7T8/?tag=tonymacx86-21
https://www.amazon.com/dp/B005O65JXI/?tag=tonymacx86com-20
http://www.newegg.com/Product/Product.aspx?Item=N82E16835103099
Hue + Lighting
https://www.amazon.co.uk/dp/B018YZ0H1O/?tag=tonymacx86-21
https://www.amazon.com/dp/B018YZ0H1O/?tag=tonymacx86com-20
http://www.newegg.com/Product/Product.aspx?Item=N82E16811997138
Comments
This was originally built as a windows PC for gaming, but my needs changed and I got back into video editing. I was taught FCP as an editor so I needed OSX to edit. It just happened that the build I had was able to be made into a Hackintosh. It was a challenge getting the Unibeast USB but I managed to get it created and installed OS X Sierra.
Installation:
This guide is a bit long, but learn from my 4-5 weeks of trial and error. I got it down to a working every time setup. Follow what I have done and you'll be ok.
STEP 1 - Preparation:
- Started by downloading macOS Sierra from the App Store.
- Format the USB drive by using Disk Utility. Click on your USB, click Erase, Name it whatever you like (I called mine Sierra USB) and set the USB to OSX Extended (Journaled) , with a GUID Partition Map as the scheme and click Erase. This will prepare your USB to receive the files needed.
- When the Sierra installer download is complete, close the window that pops up and download the following from tonymacx86's downloads section: UniBeast 7 and MultiBeast 9.0.1
- If you are using a build like mine now would also be a good time to download the Nvidia web drivers from here; Nvidia Web Driver - 367.15.10.25f02 Note: you may have to do this later and find a specific driver if for your build if this doesn't work for you.
- Download Clover Configurator from: http://www.osx86.net/files/file/49-clover-configurator/ This will help you mount your EFI partition and setup your config.plist file later.
- Download CloverALC-120v1.0d from here: https://github.com/toleda/audio_CloverALC/blob/master/audio_cloverALC-120.command.zip This will help get your on board audio working later
- Run UniBeast and follow the on screen instructions. Make sure you set UEFI Boot Mode. I didn't have to set anything at graphics configuration at this point. Unibeast will take some time on the Copying Files screen, but leave it alone until it is complete.
- Drag MultiBeast , Clover Configurator , CloverALC-120 command and Nvidia Web Drivers over to your completed USB drive.[/B]
STEP 2 - BIOS Setting:
- Insert your USB. Restart your PC and hit the DEL key at the splash screen to enter the BIOS settings. Note: My BIOS Version was F2, and audio didn't work until I updated to F5. That is a whole different process however ( Google - Flashing BIOS to see how to do that)
- Load Optimised Defaults This will give you a clean slate to start from. Make sure that you look through your settings and set them to:
XMCI Hand-off - Enabled
Super IO Configuration - Disabled
VT-d - Disabled
Windows 8.10 Features - Other OS
Storage Boot Option Control - UEFI Only
Audio Controller - Enabled
Super IO Configuration - Disabled
VT-d - Disabled
Windows 8.10 Features - Other OS
Storage Boot Option Control - UEFI Only
Audio Controller - Enabled
STEP 3 - Installing Sierra:
- When the PC is rebooting hold the F12 key to bring up the Boot Menu. Select your USB Drive and wait until you see the Clover Menu
- From this menu you should use the arrow keys on your keyboard to navigate to boot from USB. (usually the far most left icon) Click this
- You'll be met with the Sierra installer. Pick your language and proceed to the next screen.
- At the top of the screen click Tools > Disk Utility. And format the HD you wish to install Sierra onto. I made a simple OS X Extended Journaled partition called Sierra and then you can close Disk Utility and continue as normal
- Once installed the PC will reboot. Let it reboot and this time you will see a new option at the Clover Menu. This is your Sierra install, and the one you'll be using most to boot into. Select this and wait for the computer to load.
- From the desktop open your USB drive using finder and Drag the contents we placed on here in STEP 1 onto the desktop (or into a file of your choice) Then remove the USB Drive
- Run MultiBeast and set it up as the following:
Quick Start - UEFI Boot Mode
Audio - Realtek Audio ALC1150 & 100 series Audio (it is important we use both)
Misc - Fake SMC (all3 options)
Network - IntelMausiEthernet v2.2.0
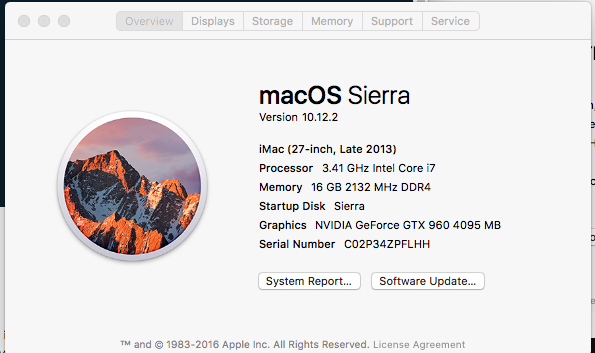
Customise - System Definition 14,2
Build - Review and click install (make sure its set to install on your HD not USB) - Here I restarted my PC (you don't have to but it applies settings better) Everything will not work at this point but its okay. We're not done.
- Now wait for the PC to reboot and then install the Nvidia Web Drivers.
- Next, run Clover Configurator. Under tools on the left panel click Mount EFI Partition. The circle at the bottom centre should go green.
- On the top bar click File > Open > Then navigate to EFI > EFI > CLOVER > Config.plist
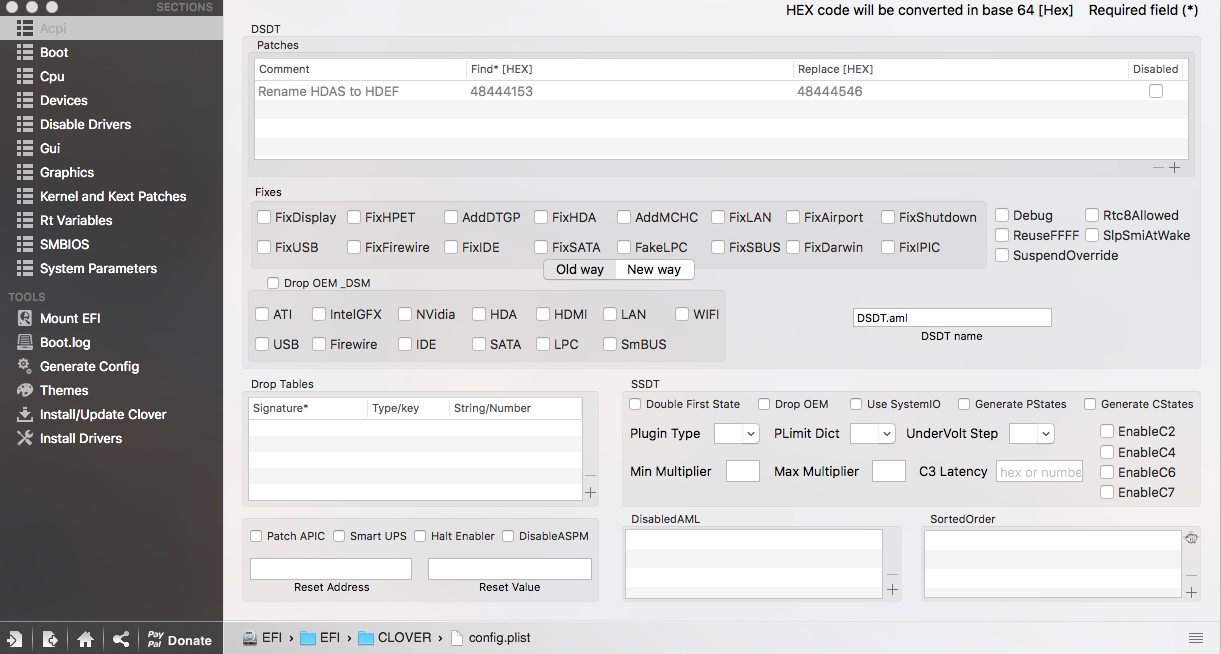
- From here click ACPI and under DSDT Patches click the + on the right. Under comment write 'Rename HDAS to HDEF' , under Find* [HEX] write 48444153 and under Replace [HEX] write 48444546. Like this:
- Navigate to Boot and tick the arguments Kext-dev-mode=1 and rootless=0 . These may be not required but they work for me. The rest of mine I turned off.
- Next navigate to Devices and under the USB Box tick Inject , Add ClockID and Fix Ownership. Set the Audio dropdown to 1
- Navigate to System Paramenters and tick the Inject System ID and Nvidia Web boxes here.
- Close Clover Configurator and click OK at the prompt
- Now run the CloverALC-120 command. It will open terminal and ask you to pick a codec. Mine was ALC1150 , type Y to the next prompts making sure that the audio layer is set to 1
- When the command has finished, close terminal and reboot the computer.
- You should have a running Mac, with On board audio and graphics drivers working.
What Works/Does Not:
What works:
On board Audio Input and output (front and back)
USB 3.0
Ethernet
USB ports
Graphics Card GTX 960 + HDMI Audio
USB Mic
Sleep/Wake
*EDIT* FaceTime works also.
USB 3.0
Ethernet
USB ports
Graphics Card GTX 960 + HDMI Audio
USB Mic
Sleep/Wake
*EDIT* FaceTime works also.
Not working or Not Tested
iMessage (although there is a fix on Tonymacx86 ) I just don't use it.
I really hope that this guide/setup helps you out. Let me know if you run into any issues and I'll try my best to help. This was my first real build so my knowledge isn't extensive but I'll do what I can.
Last edited:
")