
- Joined
- Oct 25, 2010
- Messages
- 81
- Motherboard
- Z97N-WIFI
- CPU
- i7 4790K
- Graphics
- HD 4600
- Mac
- Classic Mac
- Mobile Phone
[SUCCESS] PhillyKing's Mac Daddy Pro Look-alike Build > Gigabyte Z97N-WIFI > HD4600 > Yosemite 10.10.5 (Clover Install)
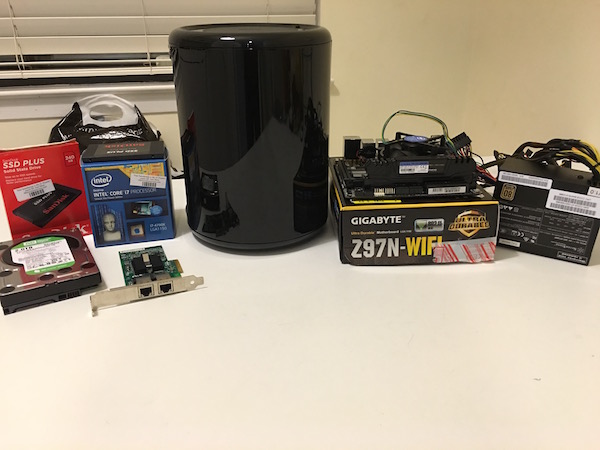
Components
iMagic Pi Mini-ITX Case > ebay Search
Gigabyte GA-Z97N-WIFI (rev 1.1) LGA 1150 Mini-ITX Intel Motherboard > Amazon || NewEgg
Intel i7-4790K Devil's Canyon Quad-Core 4.0 Ghz Unlocked Processor with HD4600 Intel Integrated Graphics > Amazon || NewEgg
Zalman CNPS8900 Quiet 110mm Ultra Quiet Slim CPU Cooler > Amazon || NewEgg
SanDisk SSD Plus 240GB SATA III 6Gb/s SSD > Amazon || NewEgg
EVGA 16GB (8GBx2) DDR3-1600 (PC3-12800) CL 9 Desktop Memory Kit > Amazon
SilverStone SFX ST30SF 300W Power Supply (Update: Removed) > Amazon || NewEgg
Already Owned
Western Digital Caviar Green 2 TB Desktop Hard Drive > Amazon || NewEgg
Broadcom BCM94322HM8L Dual Band 802.11a/g/n 300Mbps mini PCI-E WiFi WLAN > Amazon || NewEgg
Comments
Other Important Info
Background
You can skip this if not interested but just some background as to why i just made this build. I had been using a Mac Mini as our home machine as well as my Plex server (storage held separately). As I recently ramped up my Plex environment and expanded my "user base", i was transcoding and converting via Handbrake everyday. The mini was unable to keep up and i routinely was getting skipping in Plex. Handbrake was also dying a slow death as my FPS was usually in the single digits when converting my Blu Rays. I also wanted to run pFsense in a VM so needed more RAM. So I decided it was time to build a dedicated machine and upgrade in a big way. I briefly considered a Mac Pro but the price silliness ended that journey quickly. But if I was going to build something, I wanted it to look good next to the TV and damn, I really liked that Mac Pro case. After doing my research, I stumbled upon the iMagic Pi Case. It was PRETTY but I was skeptical as you can only buy it on eBay and the company doesn't even have a website. But i found some Korean-site reviews which actually made the case seem like a plausible housing for my hackintosh. And with that solved, I started to assemble the components.
A few key notes. I was planning on running this headless (and thus no Graphics card, just the on-board graphics) as it was going to be a Firewall/Transcoding/Encoding monster and I also wanted something rock stable and solid. Thus for now, I have shied away from Skylake which is why I ended up going with the Haskell/Devils Canyon chip and Z97 motherboard. You can see my build, install and results below.
Hardware
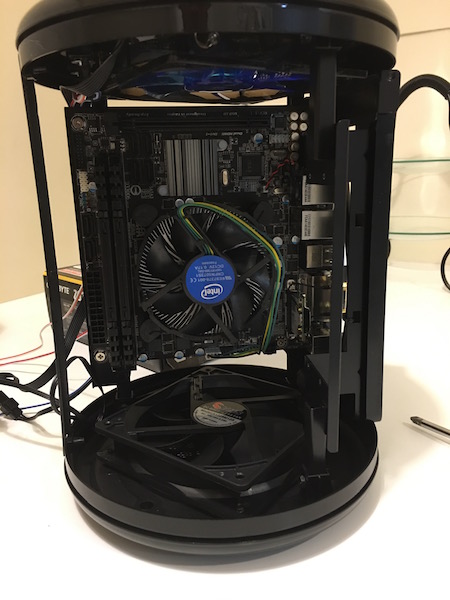
Just a quick word on this. Component selection was important for the iMagic Pi. This case is actually highly functional but as with all small cases, to get exactly what i wanted, i needed to make some mods. Ill put more info at the end but the only hardware mod that is important for the O/S is that the Intel WIFI/BT chip that came with the GA-Z97 I could not get working. So, I took a previous half height Broadcom card I owned any inserted the instead into the MB. I think I may have flashed it at some point so that it would show up as an Airport card.
BIOS
All stock except:
F7 Bios update (came with F6)
Peripherals>Initial Display Output>IGFX
Installation
I wanted to be on the cutting edge and use Clover so I followed Tonymac's El Capitan installation guide here. Below are some options/mods I used in the process:
UniBeast (6.1.1)
Step 1: Selected Yosemite as my OS
Step 2: Chose UEFI Boot mode
Step 3: Did not choose any graphics options
Step 4: Drag El Capitan onto the USB
Post Installation with MultiBeast
Quick Start > UEFI Mode
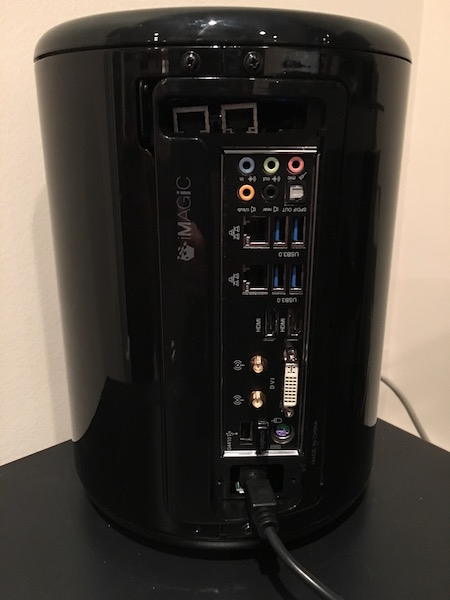
Audio > Realtek ALC892
Network > Realtek > RealtekRTL8111
Boot loaders > Clover v2.3 UEFI
Customize > iMac > iMac 14,2
IMPORTANT IN MY BUILD: DO NOT REBOOT YET
I needed to modify the clover config.plist in order to boot. Not even safe mode worked. Make this edit before you restart.
Clover config.plist edit
Step 1: Edit the boot arguments (<key>Boot</key>, then under <key>Arguments</key>) and add: kext-dev-mode=1. Note: I only had one entry there by default, dart=0. You can just add the above next to it. Separate with a space.
Step 2: Now reboot your computer and you should have your build working.
More on the iMagic Pi Case Set-up and Install
This case has a very solid build to it. There is only one real flimsy part and that is the divider the door wings slide into but it is still solid. The finish is fantastic. It's that glossy piano black, and it happens to match my 8-year old Samsung; see all my pics below. As I am sure you are wondering, the temps also concerned me and upon some initial testing, my CPU with the stock cooler was running hotter than I would have liked but not bad. But under load, it just couldn't handle it (100C+). So I replaced with the best low profile (60mm and less is what you need for this case) I read about which was the Zalman CNPS8900. This reduced my Idle temps by 6C and my load temps by 20C. However, as a consequence, my SFX Silverstone no longer fit. It was really really close and it is spec'd at 60mm which is what the directions say is the max height. I perhaps could have modded the Zalman fins a bit but instead, i decided to replace the Silverstone with an old Pico PSU I had from my previous Logic Supply case. That PSU is rated at 150W which should be sufficient in my system since I am not using a graphics card and my HDs draw low power.
UPDATE: Nope, I was wrong. I underpowered my system. I have since replaced with this great 250w - nanoATX PSU from HDPlex
Rather than go through my whole build, i posted pics below. If anyone is interested, I can update this section in more detail with all the other build decisions I made.
Here is a link to a Korean review which goes through disassembly/assembly in depth: iMagic Review and Setup
Results
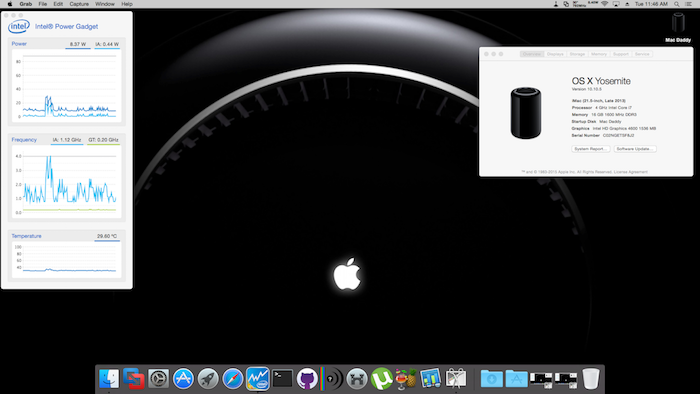
Temps: Surprisingly cool. Machine now idles at 29/30C and under load (via a BR encode) never reached higher than 78C. Considering its a mini case with a mini cooler, this is very acceptable for me and better than my mac mini.
Geekbench: 4735 Single core, 17575 Multi core
Handbrake Encoding: Unscientific test but on my mini, a BR rip and encode to the AppleTV 3 preset took 3H, 45M at 9.5 Avg FPS and on my Mac Daddy Pro rig it took 52M at 49 Avg FPS. Thats a monster improvement.
Some Pics of it all

PhillyKing's Mac Daddy Pro Look-alike Build (Clover): GA-Z97N-WIFI > Core i7-4790K > HD4600 > YOSEMITE 10.10.5
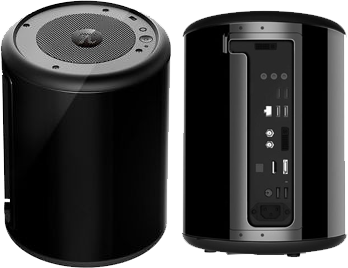
iMagic Pi Mini-ITX Case
iMagic Pi Mini-ITX Case
Components
iMagic Pi Mini-ITX Case > ebay Search
Gigabyte GA-Z97N-WIFI (rev 1.1) LGA 1150 Mini-ITX Intel Motherboard > Amazon || NewEgg
Intel i7-4790K Devil's Canyon Quad-Core 4.0 Ghz Unlocked Processor with HD4600 Intel Integrated Graphics > Amazon || NewEgg
Zalman CNPS8900 Quiet 110mm Ultra Quiet Slim CPU Cooler > Amazon || NewEgg
SanDisk SSD Plus 240GB SATA III 6Gb/s SSD > Amazon || NewEgg
EVGA 16GB (8GBx2) DDR3-1600 (PC3-12800) CL 9 Desktop Memory Kit > Amazon
SilverStone SFX ST30SF 300W Power Supply (Update: Removed) > Amazon || NewEgg
Already Owned
Western Digital Caviar Green 2 TB Desktop Hard Drive > Amazon || NewEgg
Broadcom BCM94322HM8L Dual Band 802.11a/g/n 300Mbps mini PCI-E WiFi WLAN > Amazon || NewEgg
Comments
Other Important Info
- Yosemite 10.10.5 downloaded from Mac App Store
- El Capitan Multi-Beast & Latest UniBeast
Background
You can skip this if not interested but just some background as to why i just made this build. I had been using a Mac Mini as our home machine as well as my Plex server (storage held separately). As I recently ramped up my Plex environment and expanded my "user base", i was transcoding and converting via Handbrake everyday. The mini was unable to keep up and i routinely was getting skipping in Plex. Handbrake was also dying a slow death as my FPS was usually in the single digits when converting my Blu Rays. I also wanted to run pFsense in a VM so needed more RAM. So I decided it was time to build a dedicated machine and upgrade in a big way. I briefly considered a Mac Pro but the price silliness ended that journey quickly. But if I was going to build something, I wanted it to look good next to the TV and damn, I really liked that Mac Pro case. After doing my research, I stumbled upon the iMagic Pi Case. It was PRETTY but I was skeptical as you can only buy it on eBay and the company doesn't even have a website. But i found some Korean-site reviews which actually made the case seem like a plausible housing for my hackintosh. And with that solved, I started to assemble the components.
A few key notes. I was planning on running this headless (and thus no Graphics card, just the on-board graphics) as it was going to be a Firewall/Transcoding/Encoding monster and I also wanted something rock stable and solid. Thus for now, I have shied away from Skylake which is why I ended up going with the Haskell/Devils Canyon chip and Z97 motherboard. You can see my build, install and results below.
Hardware
Just a quick word on this. Component selection was important for the iMagic Pi. This case is actually highly functional but as with all small cases, to get exactly what i wanted, i needed to make some mods. Ill put more info at the end but the only hardware mod that is important for the O/S is that the Intel WIFI/BT chip that came with the GA-Z97 I could not get working. So, I took a previous half height Broadcom card I owned any inserted the instead into the MB. I think I may have flashed it at some point so that it would show up as an Airport card.
BIOS
All stock except:
F7 Bios update (came with F6)
Peripherals>Initial Display Output>IGFX
Installation
I wanted to be on the cutting edge and use Clover so I followed Tonymac's El Capitan installation guide here. Below are some options/mods I used in the process:
UniBeast (6.1.1)
Step 1: Selected Yosemite as my OS
Step 2: Chose UEFI Boot mode
Step 3: Did not choose any graphics options
Step 4: Drag El Capitan onto the USB
Post Installation with MultiBeast
Quick Start > UEFI Mode
Audio > Realtek ALC892
Network > Realtek > RealtekRTL8111
Boot loaders > Clover v2.3 UEFI
Customize > iMac > iMac 14,2
IMPORTANT IN MY BUILD: DO NOT REBOOT YET
I needed to modify the clover config.plist in order to boot. Not even safe mode worked. Make this edit before you restart.
Clover config.plist edit
Step 1: Edit the boot arguments (<key>Boot</key>, then under <key>Arguments</key>) and add: kext-dev-mode=1. Note: I only had one entry there by default, dart=0. You can just add the above next to it. Separate with a space.
Step 2: Now reboot your computer and you should have your build working.
More on the iMagic Pi Case Set-up and Install
This case has a very solid build to it. There is only one real flimsy part and that is the divider the door wings slide into but it is still solid. The finish is fantastic. It's that glossy piano black, and it happens to match my 8-year old Samsung; see all my pics below. As I am sure you are wondering, the temps also concerned me and upon some initial testing, my CPU with the stock cooler was running hotter than I would have liked but not bad. But under load, it just couldn't handle it (100C+). So I replaced with the best low profile (60mm and less is what you need for this case) I read about which was the Zalman CNPS8900. This reduced my Idle temps by 6C and my load temps by 20C. However, as a consequence, my SFX Silverstone no longer fit. It was really really close and it is spec'd at 60mm which is what the directions say is the max height. I perhaps could have modded the Zalman fins a bit but instead, i decided to replace the Silverstone with an old Pico PSU I had from my previous Logic Supply case. That PSU is rated at 150W which should be sufficient in my system since I am not using a graphics card and my HDs draw low power.
UPDATE: Nope, I was wrong. I underpowered my system. I have since replaced with this great 250w - nanoATX PSU from HDPlex
Rather than go through my whole build, i posted pics below. If anyone is interested, I can update this section in more detail with all the other build decisions I made.
Here is a link to a Korean review which goes through disassembly/assembly in depth: iMagic Review and Setup
Results
Temps: Surprisingly cool. Machine now idles at 29/30C and under load (via a BR encode) never reached higher than 78C. Considering its a mini case with a mini cooler, this is very acceptable for me and better than my mac mini.
Geekbench: 4735 Single core, 17575 Multi core
Handbrake Encoding: Unscientific test but on my mini, a BR rip and encode to the AppleTV 3 preset took 3H, 45M at 9.5 Avg FPS and on my Mac Daddy Pro rig it took 52M at 49 Avg FPS. Thats a monster improvement.
Some Pics of it all
Last edited by a moderator: