Contribute
Register

[SUCCESS] Ongoing Status of Designare Z390 with i7-9700K

Status
Not open for further replies.
Wow. I finally figured out the HDMI problem after trying multiple cables and trying a different monitor (which worked) that left me scratching my head. I have a monitor where you have to select what input to use. I feel dumb but good news, there is nothing wrong with the Sapphire RX 580 after all. Sorry for all the troubles and thank you for consistently trying to help out, @CaseySJ !
 
Last edited:
Can confirm that it still works after waking the computer up from the above scenario. Set my display to turn off after 1 minute, waited until computer went to sleep, woke it up with two space bar presses. Apollo successfully re-connected.
Great!!
Is there a thread where development of the SSDT is happening? Would like to follow along!
I started following KGP's huge thread starting at Page 1144 or earlier. There's a whole flurry of TB-related activity:
https://www.tonymacx86.com/threads/...cessful-build-extended-guide.229353/page-1144

And here's another active thread that I've been monitoring:
https://www.tonymacx86.com/threads/in-progress-ssdt-for-thunderbolt-3-hotplug.248784/
 
Last edited:
Great news for all you UAD users!

My Apollo x8p is working with the current TB3 configuration! Quickly recorded some audio into my DAW and everything looks normal. Will continue to report back.
*solved per post 141*

That's such fantastic news!

Will get on to order parts and build this, with the slight difference i'm going for an i7 8700k, and a Gigabyte Radeon RX 580 Gaming.
 
I was doing a fair bit of stress testing yesterday (had the day off due to some construction work at the house) and noticed that external hard drives were not being ejected prior to Sleep. This is a fairly common problem, and happens on regular Macs as well.

At one point I left the computer idle for 90 minutes, and when I came back there were about 30 repeated "disk not ejected" warnings when the computer woke from sleep. The external drive was nevertheless re-mounted properly.

Fortunately, a little utility called Jettison solves this problem, which I verified moments ago. There's a 15-day trial period and the price is only USD $4.95.

Once installed, it will automatically eject all external disks. You can manually select "eject and sleep" from Jettison's own menu, but that is purely optional.
 
Thank you CaseySJ for making this build possible.

My build consists of the following components:
  • Gigabyte Designare Z390 (already updated to F4, settings according to your recommendations in posting #1)
  • i5-9600K
  • Sapphire Pulse RX 580 8GB (not yet installed)
  • Samsung 960 EVO NVMe M.2 SSD (500GB)
  • G.Skill 2x8GB DDR4 F4-3200C16D-16GVKB
  • be quiet! Straight Power 11 550W
  • Fractal Design Define R6 + Connect D1 (USB 3.1 Gen2)
Bootstick:
  • UniBeast (9.0.0)
  • Mojave 10.14.2
  • Updated the EFI folder using your files provided in posting #116
The system boots and finishes the 1st step of the installation. After reboot the 2nd step of the installation routine starts and the installer displays "About 15 minutes remaining", but the system crashes after a couple of seconds. I've attached some screenshots.

Maybe you or some of the "early adopters" have an idea.

Thanks a lot!
 

Attachments

  • 1.jpg
    1.jpg
    621.6 KB · Views: 121
  • 2.jpg
    2.jpg
    573.1 KB · Views: 114
  • 3.jpg
    3.jpg
    184.9 KB · Views: 125
  • 4.jpg
    4.jpg
    307.2 KB · Views: 116
Last edited:
The system boots and finishes the 1st step of the installation. After reboot the 2nd step of the installation routine starts and the installer displays "About 15 minutes remaining", but the system crashes after a couple of seconds. I've attached some screenshots.
I plan to reinstall Mojave from scratch on a separate SSD in order to create a more complete Build Guide. When I started this build, I knew very little about building a Hackintosh. This means I did not necessarily know what I was doing (I was just blindly following a guide), so now I want to reinstall the O/S from scratch and document every step clearly so others can replicate the task more seamlessly.

With that caveat out of the way, let's try the following:
  • Are you using a USB 2.0 or USB 3.0 flash drive? And in which USB port is it plugged into? And what is the capacity or size of the disk? Please refer to the attached PDF diagram where every port has an HSxx and/or SSxx label.
  • Please ZIP and upload the EFI folder from your USB install disk.
 

Attachments

  • Designare-Z390-IO-Layout.pdf
    1.1 MB · Views: 184
Last edited:
  • Are you using a USB 2.0 or USB 3.0 flash drive? And in which USB port is it plugged into? And what is the capacity or size of the disk? Please refer to the attached PDF diagram where every port has an HSxx and/or SSxx label.
  • Please ZIP and upload the EFI folder from your USB install disk.

Before your hint I've tried already different USB ports, including the USB headers on the motherboard, but I forgot to check the USB 2.0 ports HS09 and HS10.

I'm using
each with a 16GB installation partition. For the EFI partition I've used your "CaseySJ-USB-Installer-EFI-Folder.zip"

Connecting the SanDisk to HS10 worked out! Mission success!

If it's of any help I can try different variations, because I will anyhow try a "plain UniBeast" installation. I'll provide feedback during the weekend.

Thanks
Thanks, and please let us know the outcome of any significant variation. I can add all such lessons learned to the Build Guide, which might be my Christmas break project...

I actually used a Samsung Bar Plus 32GB flash disk (USB 3.0) in one of the USB 3.0 ports controlled by the HS07/SS07 hub, but everything went well. I'll also re-test this when I do the second full install on the same machine.

The TonyMacx86 build guide cautions against the use of flash drives larger than 32GB...
 
In preparation for the Build Guide I did a full installation of Mojave on a spare SSD and documented it fairly well. I found, happily, that this motherboard does not need EmuVariableUEFI-64 for Shutdown, Reboot, and Sleep. It does, however, need OsxAptioFix2Drv-free2000 with slide=0. The build guide will capture this information.

Additionally, I tested 
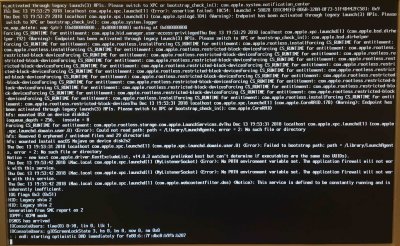
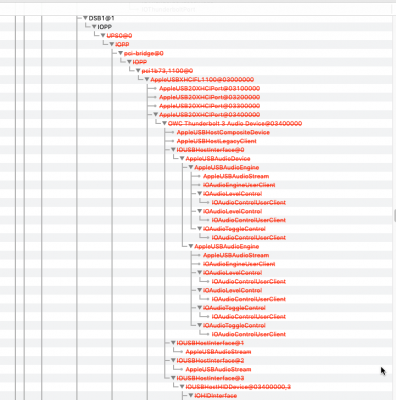
Hot Plug capability for the OWC Thunderbolt 3 Dock as shown in the attached 3 photos:
  1. Initial state of IOReg.
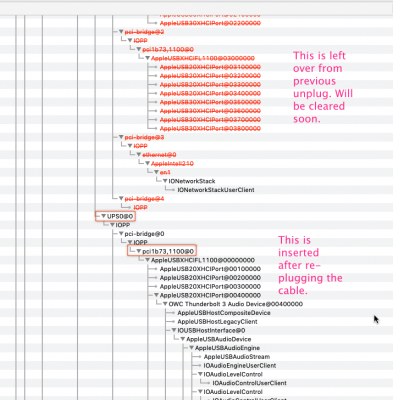
  2. IOReg right after Thunderbolt 3 cable is unplugged.
  3. IOReg state after cable is reinserted.
We can see that the dock connects to DSB1@1 --> UPS0@0. This entire tree get struck out when the cable is unplugged (pic 2). When cable is reinserted, a new UPS0@0 is inserted and all of the functionality is restored. The struck-out tree in Pic 2 remains in the system for a couple of minutes (or so) and is then flushed out.

However, after a wake-from-sleep, Thunderbolt hot plug does not seem to work. This should be okay in most cases because Thunderbolt devices will wake from sleep, but then they will lose hot plug capability. So if your Thunderbolt devices remain plugged in before and after sleep, they will continue to function.

Edit: Sorry, I take that back. Hotplug works even after wake-from-sleep!

Edit 2: To further test hot plug, I rebooted the Hackintosh without the OWC dock. Ran IORegistryExplorer. Then connected the OWC Dock and saw that a new but brief entry appeared under DSB1@1, but not the full subtree. This might be an IORegistryExplorer bug because restarting IORegistryExplorer then showed the full DSB1@1 subtree. So hot plug from scratch also appears to work.
 

Attachments

  • Initial State Screenshot.png
    Initial State Screenshot.png
    114.7 KB · Views: 96
  • Unplugged Screenshot.png
    Unplugged Screenshot.png
    110.3 KB · Views: 113
  • Hotplug.png
    Hotplug.png
    132.6 KB · Views: 122
Last edited:
Update: 12-10-2018: The BCM94360CS2 and PCIe x1 adapter arrived on Sunday. This card works natively out-of-the-box (OOB) and no drivers or kexts are needed. This means no need for AirportBrcmFixup.kext, BrcmFirmwareData.kext, BrcmFirmwareRepo.kext, or BrcmPatchRAM2.kext. See Post #107 for some reboot issues that were encountered. After switching to OsxAptioFix2Drv-free2000, the system seems to finally be booting reliably with no "Couldn't allocate runtime area" errors. Still need to test Continuity/Handoff. However, USB port 14 must be disabled and port 11 must be enabled. This is handled by the attached Custom SSDT SSDT-UIAC-DESIGNARE-Z390-V3. Be careful to copy the .aml file to your CLOVER/ACPI/patched folder. The .dsl file is for reference only -- it provides comments for every port.
  • Status: WiFi/BT working, but further tests pending.
  • Update: 12-12-2018: Based on this post, I think this is a done deal.
  • Status: Fully Working.

@CaseySJ , would you mind clarifying which card you purchased that you're describing here? Is it this one: https://www.amazon.com/dp/B076KBBFV4/?tag=tonymacx86com-20 ?

I want to try to get Wifi working after all.

Thanks!
 
Status
Not open for further replies.
Back
Top