- Joined
- Jan 19, 2013
- Messages
- 68
- Motherboard
- GA-Z97X-UD3H
- CPU
- Core i7 4790K @ 4.7 GHz
- Graphics
- GeForce GTX 770
- Mac
- Classic Mac
- Mobile Phone
[SUCCESS] My first time: Core i7-4790K, GA-Z97X-UD3H, GTX 770

Components
Be Quiet! Silent Base 600 case, without window, silver
US: http://www.amazon.com/quiet-Silent-silver-micro-ATX-mini-ITX/dp/B014VZEAD2/
DE: [AMAZON-de]http://www.amazon.de/Quiet-Silent-Base-600-BG007/dp/B014VZEAD2/[/AMAZON-de]
Intel Core i7-4790K Haswell 4.00 GHz LGA 1150 88W Quad-Core Processor
US: http://www.amazon.com/Intel-BX80646I74790K-i7-4790K-Processor-Cache/dp/B00KPRWAX8/
DE: [AMAZON-de]http://www.amazon.de/Intel-i7-4790K-Prozessor-Sockel-88Watt/dp/B00KPRWAX8[/AMAZON-de]
Gigabyte GA-Z97X-UD3H LGA 1150 Intel Z97 ATX Motherboard
US: http://www.amazon.com/Gigabyte-DDR3-1150-Motherboard-GA-Z97X-UD3H/dp/B00JKCHDC2/
DE: [AMAZON-de]http://www.amazon.de/gp/product/B00K2VRAJ6[/AMAZON-de]
G.Skill RipJawsX DDR3-2400 DIMM CL11-13-13-31 Dual Kit (2x 8GB) RAM
US: http://www.newegg.com/Product/Product.aspx?Item=N82E16820231672&cm_re=G.Skill_RipJawsX-_-20-231-672-_-Product
Cooler Master GM Series Modula 80+ Bronze Power Supply
US: http://www.amazon.com/Cooler-Master-GM-G750M-Generation/dp/B00MAZK8N2/
DE: [AMAZON-de]http://www.amazon.de/Cooler-Master-GM-Stromversorgung-RS750-AMAAB1-EU/dp/B00LF3JL7Y/[/AMAZON-de]
ARCTIC Liquid Freezer 120 CPU-Watercooler (All-In-One solution)
US: http://www.amazon.com/ARCTIC-Performance-Compatible-compound-included/dp/B015E14J9M/
DE: [AMAZON-de]http://www.amazon.de/Leistungsstarker-Wasserk%C3%BChler-fl%C3%BCsterleisem-Kompatibel-W%C3%A4rmeleitpaste/dp/B015E14J9M[/AMAZON-de]
LG 22MP65VQ-P 21.5" 1080p LED IPS monitor
US: not available in the US at this point
DE: [AMAZON-de]http://www.amazon.de/gp/product/B00RXK1V0I[/AMAZON-de]
Apple OS X 10.11.2 "El Capitan" @ Mac App Store
US: Mac App Store Link
DE: Mac App Store Link
Transcent JetFlash 300 16GB USB 2.0 stick for installing OS X
US: http://www.amazon.com/Transcend-JetFlash-Flash-Drive-TS16GJF300/dp/B002Z5FM74/
DE: [AMAZON-de]http://www.amazon.de/Transcend-JetFlash-USB-Stick-Frustfreie-Verpackung/dp/B003VNKNDW/[/AMAZON-de]
Already Owned
Samsung 840 EVO 500GB SSD drive
US: http://www.amazon.com/Samsung-500GB-2-5-Inch-Internal-MZ-7TE500BW/dp/B00E3W19MO/
DE: [AMAZON-de]http://www.amazon.de/Samsung-MZ-7TE500BW-interne-SSD-Festplatte-metallic/dp/B00E3W19MO/[/AMAZON-de]
though you might be better off with the newer model:
Samsung 850 EVO 500GB SSD drive
US: http://www.amazon.com/Samsung-2-5-Inch-Internal-MZ-75E500B-AM/dp/B00OBRE5UE/
DE: [AMAZON-de]http://www.amazon.de/Samsung-MZ-75E500B-EU-interne-schwarz/dp/B00P73B1E4/[/AMAZON-de]
Gigabyte GTX 770 GDDR5-2GB OC WINDFORCE 3X Graphics Card GV-N770OC-2GD
US: http://www.amazon.com/Gigabyte-GDDR5-2GB-WINDFORCE-Graphics-GV-N770OC-2GD/dp/B00D3ES1Q0/
Apple Wired Keyboard with numpad
US: http://www.amazon.com/Apple-Keyboard-Compatible-v-10-6-8-MB110LL/dp/B005DPF08E/
DE: [AMAZON-de]http://www.amazon.de/Apple-MB110D-Keyboard-deutsches-Tastaturlayout/dp/B005DQ0DFI/[/AMAZON-de]
LogiLink BT0015 USB bluetooth dongle V4.0 EDR Class1 Micro
US: http://www.amazon.com/Adapter-Micro-Bluetooth-Class-Netzwerkadapter/dp/B0096Y2HFW/
DE: [AMAZON-de]http://www.amazon.de/gp/product/B0096Y2HFW[/AMAZON-de]
LG Electronics 14X USB 3.0 Super-Multi External Blu-ray Disc Rewriter BE14NU40 (with M-Disc support)
US: http://www.amazon.com/LG-Electronics-Super-Multi-External-BE14NU40/dp/B00ACOQF2Q/
DE: [AMAZON-de]http://www.amazon.de/gp/product/B009D79LZQ[/AMAZON-de]
Comments
This is my first CustoMac build I ever made and I was looking for an upgrade to my aging iMac 27" (late 2009) which was really lacking some key features like USB 3.0 and faster RAM and of course processing power in general. Also the DVD drive had some weird issues where it wouldn't always read a disk. I tried cleaning it with a special cleaning disk but that didn't seem to work.
Since I heard of the hackintosh community here at tonymacx86.com, I decided to read into building a hackintosh and picked my favorite parts from the December 2015 buyer's guide. I added some other parts that I already owned and bought a few others where compatibility didn't matter.
Putting it all together was rather simple since it is all standard ATX stuff and I also picked a simple case that promised a rather quiet operation, more on that later.
Installation
I was already prepared for some praying and tinkering with OS X on "PC hardware" but I was positively surprised with my results. Everything worked nearly perfect out-of-the-box, except for a few issues I was able to solve rather easily.
Case and Cooling
As I already mentioned, I wanted my new system to be a near silent machine, especially when I am not heavily using it. That's why I picked a AIO watercooling solution and the Be Quiet! base. The watercooler keeps my CPU at chilly 27°C while idling and only get's up to 64°C under extended load.
The case comes with two Pure Wings 2 case fans that I moved from front (140mm) to the top and from the back (120mm) to the bottom of the case. This way air is sucked in at the bottom (same like the power supply, which has its own airflow) and exhausted through the top. I had to use cable ties to mount the top fan since the case for some weird reason doesn't offer mounting wholes right under the holes in the top panel, where I wanted to place the fan. The graphics card has three small fans that blow air from inside the case onto the graphics card and mostly out the back.
For maximum cooling I set the watercooler up to suck in air from the back and blow into the case, rather than the other way around. Thanks to the big fan at the top, this warm air should be blown out at the top rather than ending up inside the case. The smaller case fan should provide the graphics card with fresh air from the bottom too as well as providing some airflow to the motherboard.
Quietness
Now how quiet is it really? Well apart from the noisy graphics card's fans (that are still quite audible at idle (850rpm right after booting and around 1300rpm after running for a while), it is quite good.
If I would install a watercooling solution on my graphics card as well, I could imagine my system to be silent, but since I don't have the budget for anything further right now, I will wait and see if it is actually necessary in every-day tasks. So far I don't see a reason to do so.
What is working already:
What is not working yet:
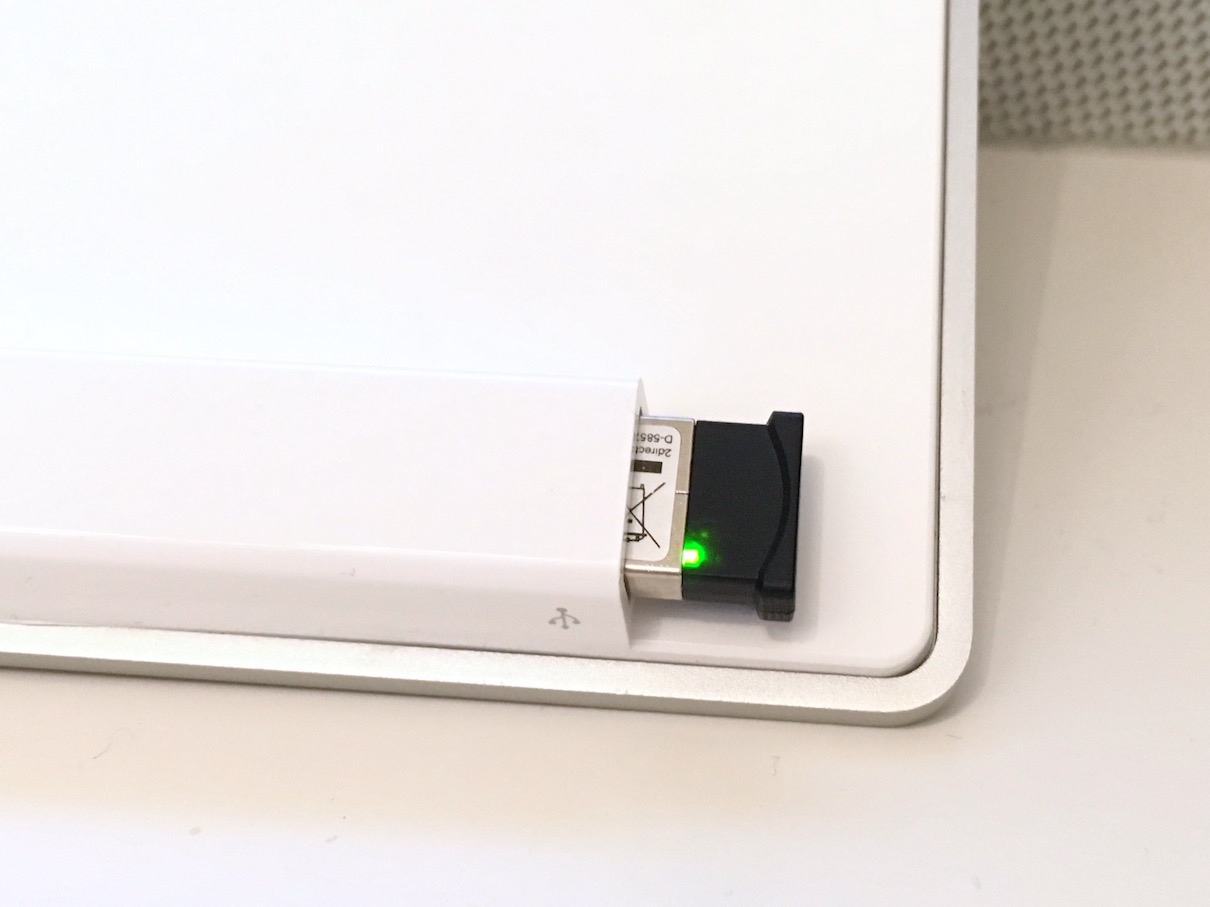
Edit: I forgot to mention a neat little detail about my build/setup. Since the mentioned Bluetooth dongle is so small, it fits perfectly into one of those USB ports on the Apple Keyboard. That way it has a much better signal than if it was plugged into a USB port on the back of the machine and also frees up a port there, since I don't use the second port on my keyboard anyways.
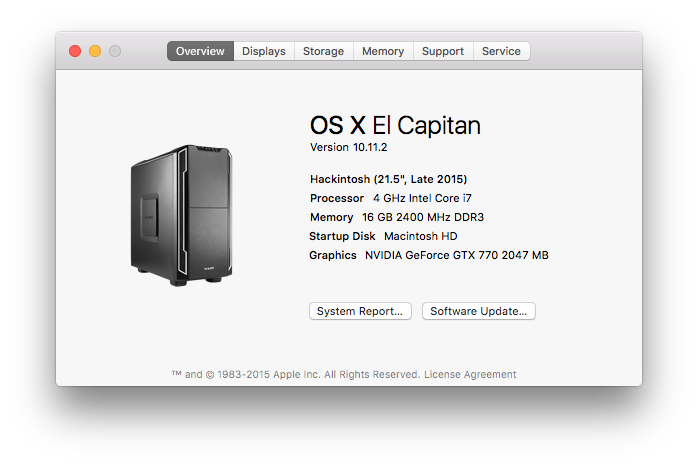
Update: I realized that reading guides and tutorials can yield quite some good results") and my graphics card now shows the correct VRAM after I disabled the standard "InjectNvidia=True" in Clover.
and my graphics card now shows the correct VRAM after I disabled the standard "InjectNvidia=True" in Clover.
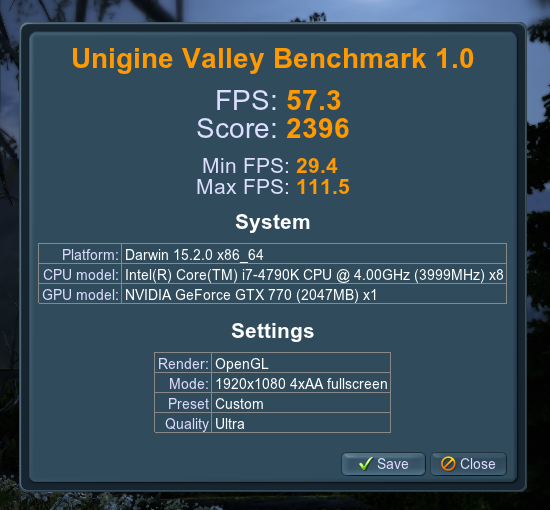
And the benchmark results are also not too bad, temperatures are at 74°C after 1-2 rounds of the benchmark, average fps is around 57.
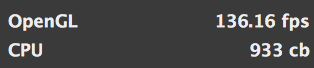
Cinebench:
comfreak's First Build
Core i7-4790K - GA-Z97X-UD3H - 16GB RAM - GTX 770
Core i7-4790K - GA-Z97X-UD3H - 16GB RAM - GTX 770
Components
Be Quiet! Silent Base 600 case, without window, silver
US: http://www.amazon.com/quiet-Silent-silver-micro-ATX-mini-ITX/dp/B014VZEAD2/
DE: [AMAZON-de]http://www.amazon.de/Quiet-Silent-Base-600-BG007/dp/B014VZEAD2/[/AMAZON-de]
Intel Core i7-4790K Haswell 4.00 GHz LGA 1150 88W Quad-Core Processor
US: http://www.amazon.com/Intel-BX80646I74790K-i7-4790K-Processor-Cache/dp/B00KPRWAX8/
DE: [AMAZON-de]http://www.amazon.de/Intel-i7-4790K-Prozessor-Sockel-88Watt/dp/B00KPRWAX8[/AMAZON-de]
Gigabyte GA-Z97X-UD3H LGA 1150 Intel Z97 ATX Motherboard
US: http://www.amazon.com/Gigabyte-DDR3-1150-Motherboard-GA-Z97X-UD3H/dp/B00JKCHDC2/
DE: [AMAZON-de]http://www.amazon.de/gp/product/B00K2VRAJ6[/AMAZON-de]
G.Skill RipJawsX DDR3-2400 DIMM CL11-13-13-31 Dual Kit (2x 8GB) RAM
US: http://www.newegg.com/Product/Product.aspx?Item=N82E16820231672&cm_re=G.Skill_RipJawsX-_-20-231-672-_-Product
Cooler Master GM Series Modula 80+ Bronze Power Supply
US: http://www.amazon.com/Cooler-Master-GM-G750M-Generation/dp/B00MAZK8N2/
DE: [AMAZON-de]http://www.amazon.de/Cooler-Master-GM-Stromversorgung-RS750-AMAAB1-EU/dp/B00LF3JL7Y/[/AMAZON-de]
ARCTIC Liquid Freezer 120 CPU-Watercooler (All-In-One solution)
US: http://www.amazon.com/ARCTIC-Performance-Compatible-compound-included/dp/B015E14J9M/
DE: [AMAZON-de]http://www.amazon.de/Leistungsstarker-Wasserk%C3%BChler-fl%C3%BCsterleisem-Kompatibel-W%C3%A4rmeleitpaste/dp/B015E14J9M[/AMAZON-de]
LG 22MP65VQ-P 21.5" 1080p LED IPS monitor
US: not available in the US at this point
DE: [AMAZON-de]http://www.amazon.de/gp/product/B00RXK1V0I[/AMAZON-de]
Apple OS X 10.11.2 "El Capitan" @ Mac App Store
US: Mac App Store Link
DE: Mac App Store Link
Transcent JetFlash 300 16GB USB 2.0 stick for installing OS X
US: http://www.amazon.com/Transcend-JetFlash-Flash-Drive-TS16GJF300/dp/B002Z5FM74/
DE: [AMAZON-de]http://www.amazon.de/Transcend-JetFlash-USB-Stick-Frustfreie-Verpackung/dp/B003VNKNDW/[/AMAZON-de]
Already Owned
Samsung 840 EVO 500GB SSD drive
US: http://www.amazon.com/Samsung-500GB-2-5-Inch-Internal-MZ-7TE500BW/dp/B00E3W19MO/
DE: [AMAZON-de]http://www.amazon.de/Samsung-MZ-7TE500BW-interne-SSD-Festplatte-metallic/dp/B00E3W19MO/[/AMAZON-de]
though you might be better off with the newer model:
Samsung 850 EVO 500GB SSD drive
US: http://www.amazon.com/Samsung-2-5-Inch-Internal-MZ-75E500B-AM/dp/B00OBRE5UE/
DE: [AMAZON-de]http://www.amazon.de/Samsung-MZ-75E500B-EU-interne-schwarz/dp/B00P73B1E4/[/AMAZON-de]
Gigabyte GTX 770 GDDR5-2GB OC WINDFORCE 3X Graphics Card GV-N770OC-2GD
US: http://www.amazon.com/Gigabyte-GDDR5-2GB-WINDFORCE-Graphics-GV-N770OC-2GD/dp/B00D3ES1Q0/
Apple Wired Keyboard with numpad
US: http://www.amazon.com/Apple-Keyboard-Compatible-v-10-6-8-MB110LL/dp/B005DPF08E/
DE: [AMAZON-de]http://www.amazon.de/Apple-MB110D-Keyboard-deutsches-Tastaturlayout/dp/B005DQ0DFI/[/AMAZON-de]
LogiLink BT0015 USB bluetooth dongle V4.0 EDR Class1 Micro
US: http://www.amazon.com/Adapter-Micro-Bluetooth-Class-Netzwerkadapter/dp/B0096Y2HFW/
DE: [AMAZON-de]http://www.amazon.de/gp/product/B0096Y2HFW[/AMAZON-de]
LG Electronics 14X USB 3.0 Super-Multi External Blu-ray Disc Rewriter BE14NU40 (with M-Disc support)
US: http://www.amazon.com/LG-Electronics-Super-Multi-External-BE14NU40/dp/B00ACOQF2Q/
DE: [AMAZON-de]http://www.amazon.de/gp/product/B009D79LZQ[/AMAZON-de]
Comments
This is my first CustoMac build I ever made and I was looking for an upgrade to my aging iMac 27" (late 2009) which was really lacking some key features like USB 3.0 and faster RAM and of course processing power in general. Also the DVD drive had some weird issues where it wouldn't always read a disk. I tried cleaning it with a special cleaning disk but that didn't seem to work.
Since I heard of the hackintosh community here at tonymacx86.com, I decided to read into building a hackintosh and picked my favorite parts from the December 2015 buyer's guide. I added some other parts that I already owned and bought a few others where compatibility didn't matter.
Putting it all together was rather simple since it is all standard ATX stuff and I also picked a simple case that promised a rather quiet operation, more on that later.
Installation
I was already prepared for some praying and tinkering with OS X on "PC hardware" but I was positively surprised with my results. Everything worked nearly perfect out-of-the-box, except for a few issues I was able to solve rather easily.
- After downloading OS X El Capitan from the Mac App Store on my old iMac, I downloaded UniBeast and MultiBeast 8.0 and formatted the USB stick to "Mac OS Extended" with the GUID partition table.
- I ran UniBeast with the appropriate settings (inject nVidia, non-legacy) and let it copy all the necessary files over to the USB stick.
- After it finished copying the files, I took the USB stick and plugged it into my new machine.
- Before booting from the USB stick, I went into the BIOS (advanced mode) and deactivated the Intel virtualization feature "VT-d" since I heard it might cause some problems, however I didn't try yet if it is actually necessary.. I also changed few more BIOS settings later on: XHCI Mode = Smart Auto, EHCI Handoff = enabled, XHCI Handoff = enabled
- Now it was time to boot from the USB stick, which took a little longer than I was used to from a real Mac, but it worked out fine.
- After the installer loaded, I went into the Disk Utility (see Menu Bar) and formatted my SSD drive to "Mac OS Extended (Journaled)" with the GUID partition table. I closed disk utility and ran the installer like I would on every other Mac too.
- After rebooting I went through the usual setup process of entering my username, password, etc. and eventually landed on the desktop.
- At this point I was happy that I got this far without any problems and I was already ready for some issues and driver installations or something, but it was already working amazingly well.
- For fun I opened Safari to check for a working network connection and to my surprise, it was working!
- To make sure everything else would work too, I ran MultiBeast and set a few options that I think should be enough. I didn't pick the Intel network driver since I already had working networking.
- After applying the patch and rebooting the system, the network wasn't working anymore but the rest did. So I ran MultiBeast again and just checked the Intel network driver by itself, patched and rebooted and now that is working again as well.
- A while later I realized that my USB ports had a weird behavior with USB 3.0 drives. Drives with USB-2.0-only worked fine in all ports but USB 3.0 drives worked only in USB 2.0 ports. So I started reading into a very nice thread about all kinds of El Capitan issues that helped me out.
- All I had to do was to make sure of those previously mentioned BIOS options and install some kext files like explained in this post (list item 1-3): USB Fixes
- After a few days I realized that during the Unigine graphics benchmark the frame rate had some weird drops every 1-2 seconds, basically like a stutter. It was particularly noticeable when the scene would change. Since I was suspecting the graphics drivers to be the reason for that, I started researching into alternative drivers. I first couldn't find any official drivers for my card for Mac but later found the nVidia web drivers which made my graphics experience near perfect, despite being experimental.
Case and Cooling
As I already mentioned, I wanted my new system to be a near silent machine, especially when I am not heavily using it. That's why I picked a AIO watercooling solution and the Be Quiet! base. The watercooler keeps my CPU at chilly 27°C while idling and only get's up to 64°C under extended load.
The case comes with two Pure Wings 2 case fans that I moved from front (140mm) to the top and from the back (120mm) to the bottom of the case. This way air is sucked in at the bottom (same like the power supply, which has its own airflow) and exhausted through the top. I had to use cable ties to mount the top fan since the case for some weird reason doesn't offer mounting wholes right under the holes in the top panel, where I wanted to place the fan. The graphics card has three small fans that blow air from inside the case onto the graphics card and mostly out the back.
For maximum cooling I set the watercooler up to suck in air from the back and blow into the case, rather than the other way around. Thanks to the big fan at the top, this warm air should be blown out at the top rather than ending up inside the case. The smaller case fan should provide the graphics card with fresh air from the bottom too as well as providing some airflow to the motherboard.
Quietness
Now how quiet is it really? Well apart from the noisy graphics card's fans (that are still quite audible at idle (850rpm right after booting and around 1300rpm after running for a while), it is quite good.
If I would install a watercooling solution on my graphics card as well, I could imagine my system to be silent, but since I don't have the budget for anything further right now, I will wait and see if it is actually necessary in every-day tasks. So far I don't see a reason to do so.
What is working already:
- Basically everything
What is not working yet:
- Audio after waking from sleep (still working on that, workaround: no sleep)
About my Mac
MultiBeast 8.0 Configuration for El Capitan
Note: "Misc -> FakeSMC Plugins" and "HWMonitor" are optional and not requiered but allows you to see and control system temperatures and fan speeds.
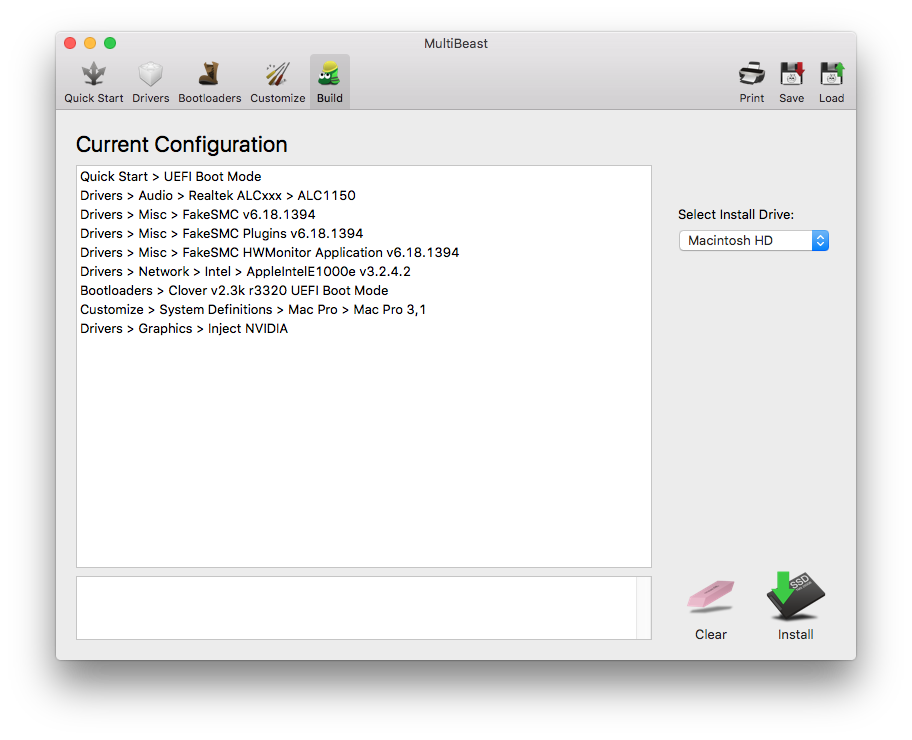
MultiBeast 8.0 Configuration for El Capitan
Note: "Misc -> FakeSMC Plugins" and "HWMonitor" are optional and not requiered but allows you to see and control system temperatures and fan speeds.
Edit: I forgot to mention a neat little detail about my build/setup. Since the mentioned Bluetooth dongle is so small, it fits perfectly into one of those USB ports on the Apple Keyboard. That way it has a much better signal than if it was plugged into a USB port on the back of the machine and also frees up a port there, since I don't use the second port on my keyboard anyways.
Update: I realized that reading guides and tutorials can yield quite some good results
and my graphics card now shows the correct VRAM after I disabled the standard "InjectNvidia=True" in Clover. And the benchmark results are also not too bad, temperatures are at 74°C after 1-2 rounds of the benchmark, average fps is around 57.
Cinebench:
Last edited by a moderator: