
- Joined
- May 8, 2012
- Messages
- 45
- Motherboard
- Gigabyte GA-H170
- CPU
- i7-6700
- Graphics
- EVGA NVIDIA GTX 770 4GB
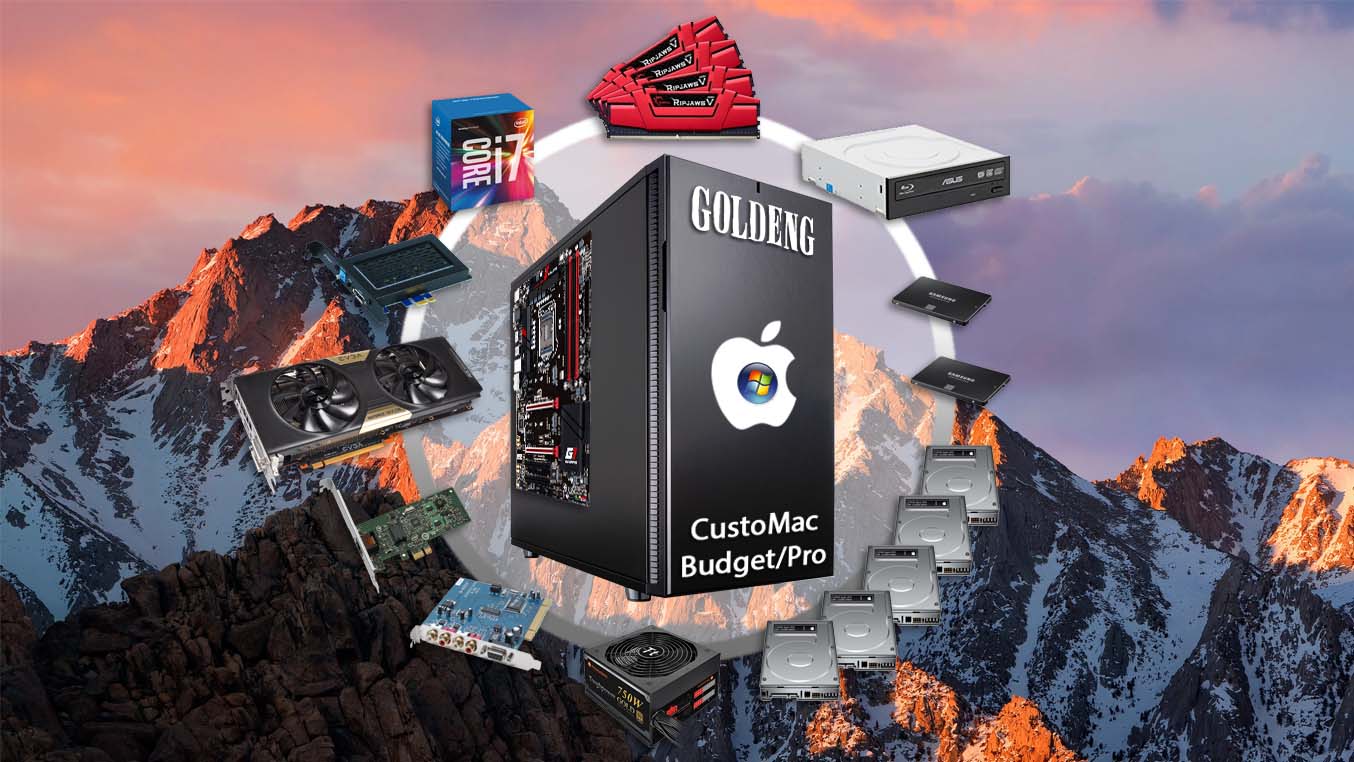
goldeng's Skylake CustoMac Budget/Pro (ATX)
Gigabyte GA-H170-Gaming 3 | i7-6700 | 64GB RAM | NVIDIA Geforce GTX 770 4GB
Multiboot macOS Sierra & Windows 7
Gigabyte GA-H170-Gaming 3 | i7-6700 | 64GB RAM | NVIDIA Geforce GTX 770 4GB
Multiboot macOS Sierra & Windows 7
Components
Gigabyte GA-H170-Gaming 3 Motherboard: Newegg | Amazon
+
Intel® Gigabit CT Desktop Ethernet Adapter: Newegg | Amazon
Intel® 6th Gen (aka Skylake) Core i7-6700: Newegg | Amazon
G.Skill Ripjaws V Series 64GB 2800Mhz (4x16): Newegg | Amazon
Samsung SSD PM871a (MZ7LN512HMJP) 512GB : Amazon
Already Owned
EVGA NVIDIA Geforce GTX 770 SC 4GB: Amazon
Samsung SSD PM851 (MZ7TE512HMHP) 512GB: (out of stock)
ASUS Blu-ray Burner BW-12B1ST: Newegg | Amazon
Thermaltake Toughpower 750W 80 Plus Gold Power Supply (PSU): Newegg | Amazon
Fractal Design Define R5 Black Silent Computer Case: Newegg | Amazon
Mac Box Set (OS X Snow Leopard, iLife, and iWork) Family Pack: eBay
macOS Sierra rescue thumb-drive: pre-made in my previous Hackintosh
*ORICO PCI-Express 5 SATA II Expansion Card (CSA3656-ES5R): (out of stock) <- More information about that one below.
Comments
In my first and previous build which was fun and educating project, I gave notes and some information about each and every piece of hardware that I used, in order to give new members to the Hackintosh community enough information about the importance of each item and why I picked them in particular. So, if you're new to Hackintosh, I suggest to view my previous thread just for the information I provided on the components.
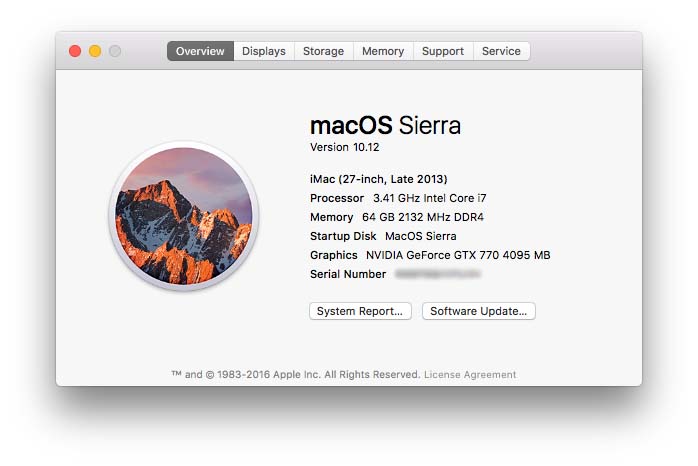
This time, and, after earning knowledge and experience with the Hackintosh community and in MacOS in particular, I decided to replace my current old PC with new hardware. I thought that, if I'm already picking new hardware, then why not to pick something that will work for a Hackintosh too?! So I decided to build this rig as my main and multiboot system that will run both Windows 7 and macOS Sierra, each on a separate disk. I'm very pleased with the final result and really hope that you'd enjoy reading this, not less than I had building it. So let's dig in!
Case
I really like big cases as I'm a nitpick and addicted to cable management. Here I'm using my already owned Fractal Design Define R5. It's a well built case and it meant for those of you who like quiet. I'll quote a little from Fractal Design's product page: It's Optimally designed for silent computing with high density noise-reducing material throughout the case for maximum sound absorption, while not compromising on airflow and cooling capabilities.
And I'll add here, it has plenty of room for your hardware and your hands all together. It looks clean and highly recommended.
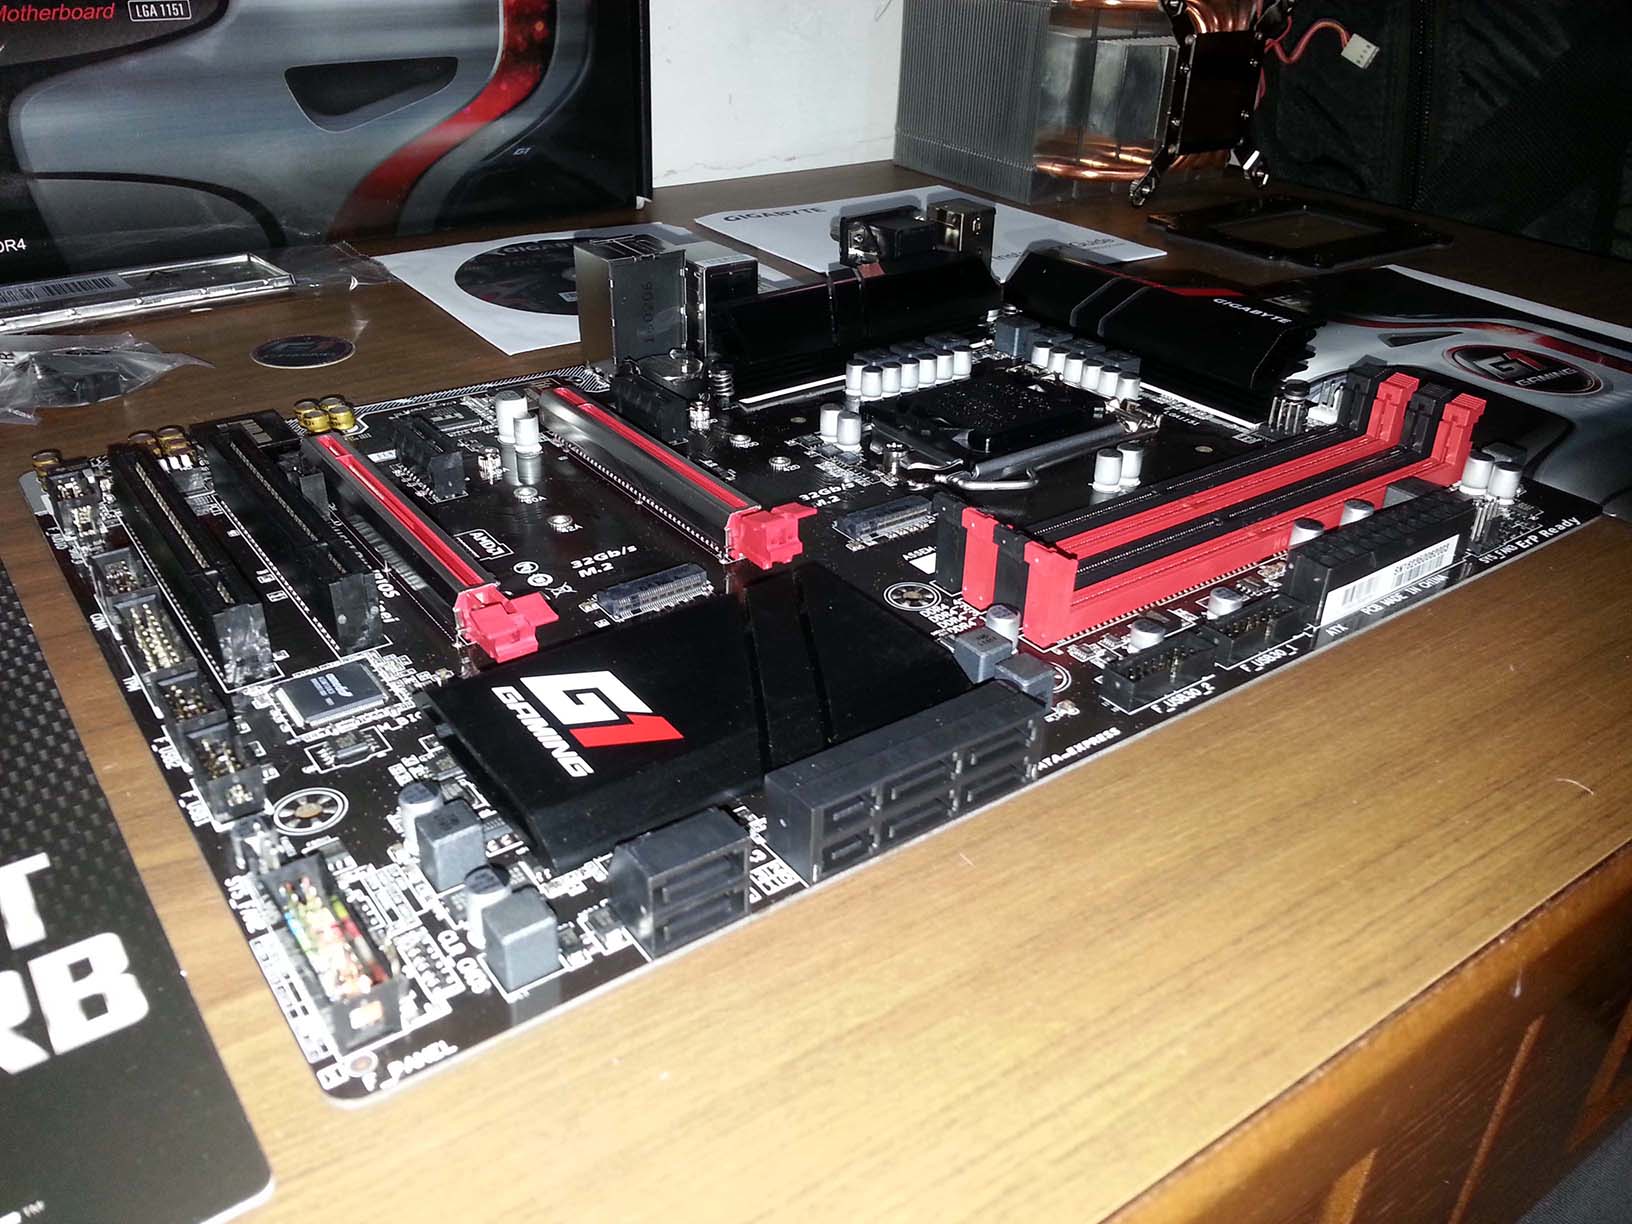
Motherboard
I wanted to pick a latest chip motherboard, but that it would also include one or two of the regular 32bit PCI slots. MacOS doesn't support the 32bit PCI interface, however Windows does and I still have hardware that I'm still willing to be able to use in Windows; such as my professional audio card M-Audio Audiophile 2496 that I use for recording and editing. Unfortunately, the 32bit PCI interface is obsolete in the latest motherboards with the Z170 chip. So I had no other choice but to go with a previous chip instead and found that the H170 Gaming 3 motherboard which has two 32bit PCI slots is a good choice. That said, this motherboard has a little flaw:
This motherboard is equipped with the 'deadly' Killer Ethernet chip. And I'm saying 'deadly' because literally, this chip will kill the entire bandwidth in your house, as it meant to take the highest priority over your network for gaming purposes. And that is not only when your OS is up and running, but even at the very beginning of post installation. For example, I found that when I installed Windows on that particular motherboard, during setup, all other computers and devices in my house had bandwidth troubles communicating with each other and even with surfing the web. That due to that Killer chip. Later on, reading over the internet I found that this is a common issue with the Killer chip that many people are facing. And that's why I decided to disable it in the BIOS and to replace it with a dedicated Ethernet card that I'll cover below.
Ethernet card
For replacing the on-board Killer chip I read that the Intel® Gigabit CT Desktop Ethernet Adapter is a good choice, and that it should also work fine with Hackintosh, after installing the appropriate kext for it. It's an enterprise and well known piece of hardware that you'd mostly find in servers due to its compatibility. Therefore, I highly recommend this card! It comes in both PCI 32bit and PCI-Express interfaces. But I would suggest to go with the PCI-Express one for Hackintosh as the PCI 32bit interface is almost obsolete. And besides, MacOS doesn't support the 32bit PCI interface anyway.
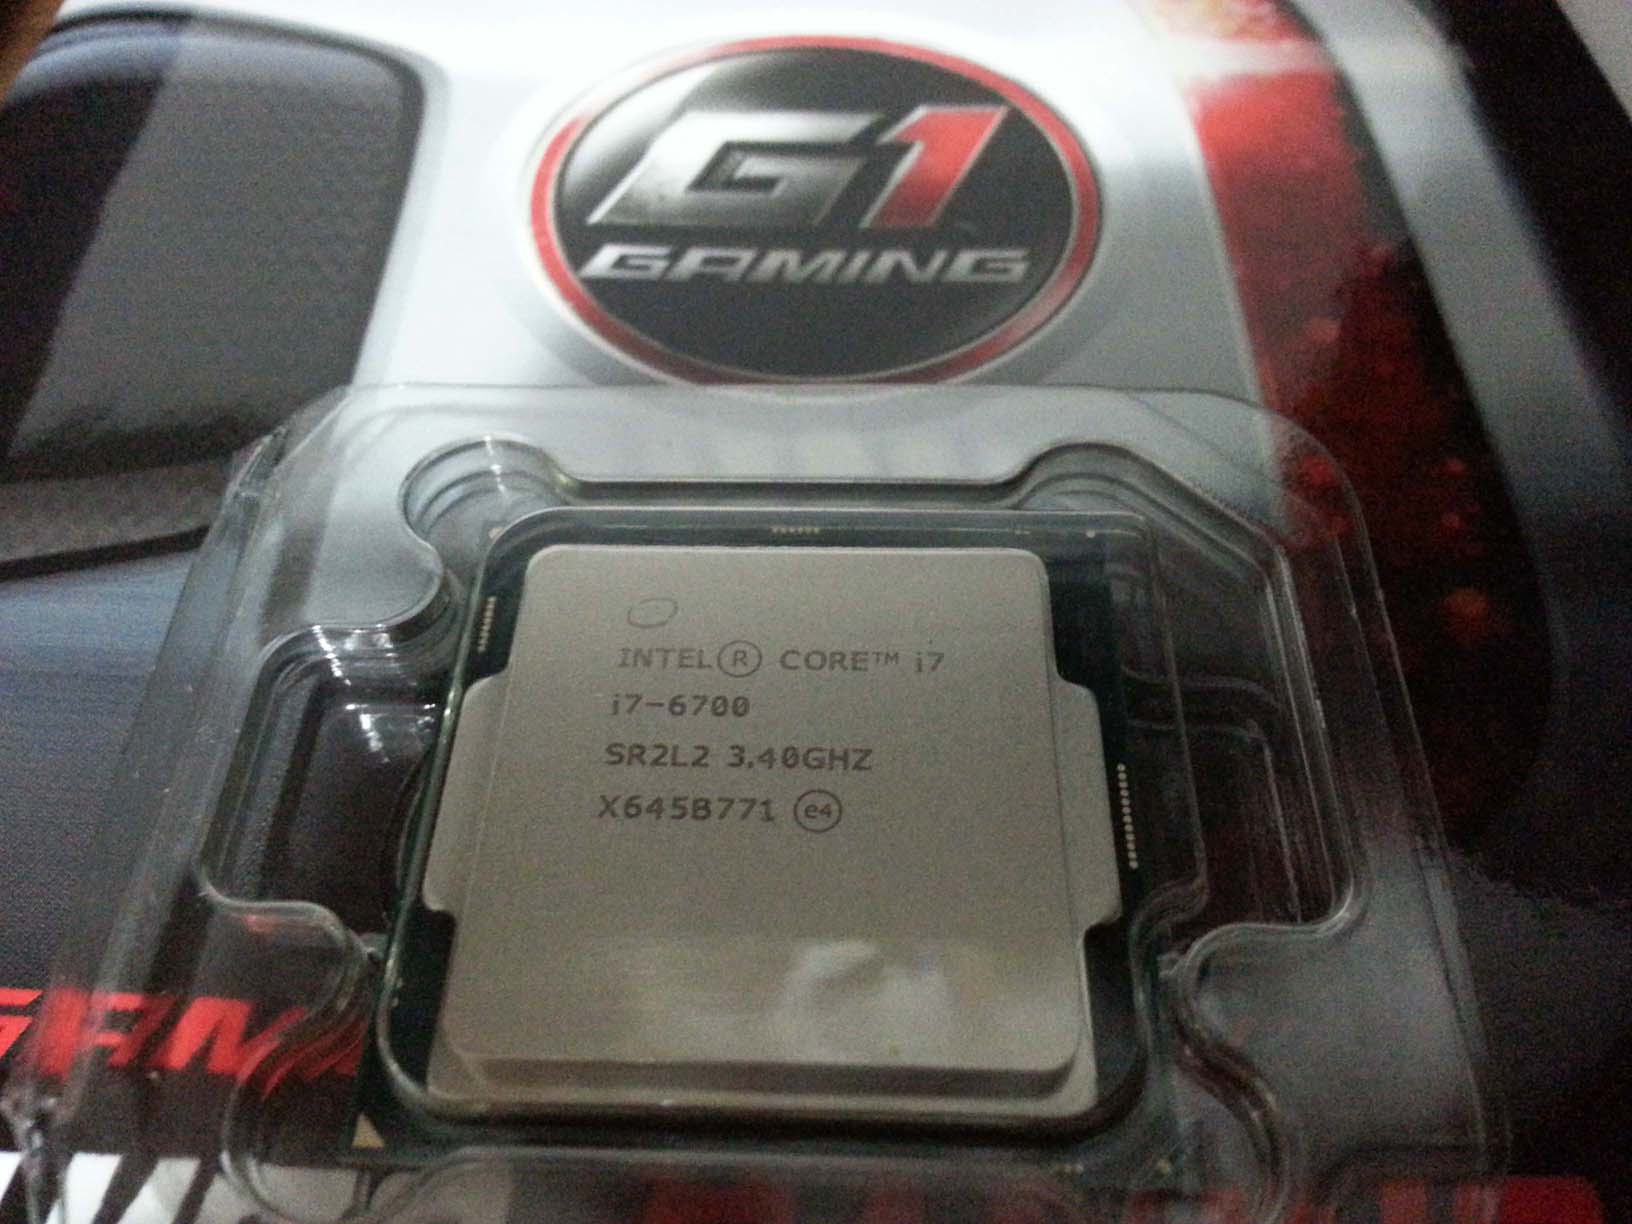
Processor
Not much to say. Intel's i7 6th Generation chip. The regular 'fixed' version, as I don't believe in pushing my systems over the limit. So overclock is a no-no for me, and I also save a few bucks in the wallet as I'm not going to use overclock anyway.
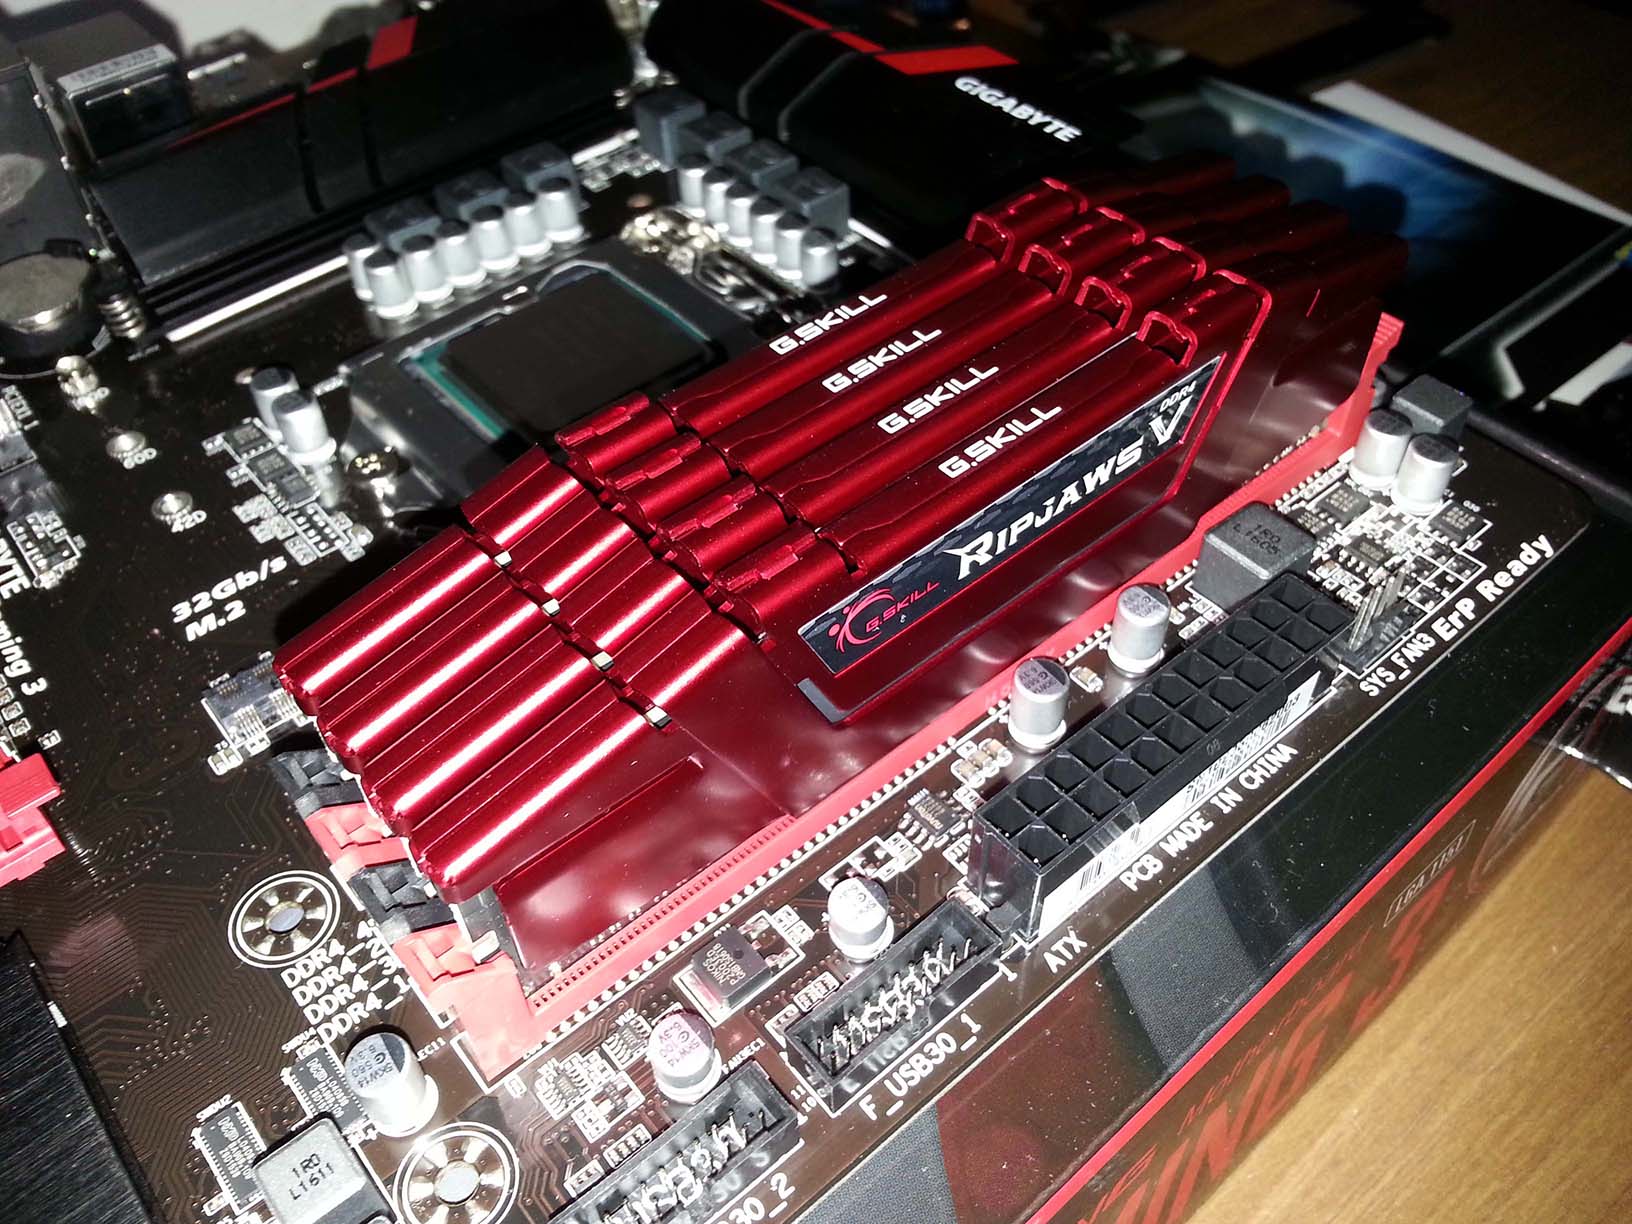
Memory
I decided to go with the maximum amount of RAM that the motherboard can hold. So I picked 4 sticks of 16GB each. Now, the memory sticks that I picked can do 2800Mhz, however the motherboard only support 2133Mhz. But that what was in stock, and the motherboard will work with them as it will utilize only 2133Mhz. Besides they're RED and look very nice on this motherboard.
")
Hard Drive
I use enterprise level SSD models that you'd usually find in workstations/servers and also in Apple's hardware. And by model I'm not just saying the brand 'Samsung', but the model itself which was meant for heavy and load processing.
I already own a 512GB SSD that I used in my old PC, which I will format and install Windows 7 again from scratch. So I only had to purchase another one for MacOS. The exact same model that I had was replaced with a new model so I just picked that. But you could always use the regular 'EVO' models or something similar. They will all work! It's just the question of how long will they work and how will they perform on heavy work, in compare to the enterprise level disks.
PSU
My machine currently contains 5 (out of 8 possible) regular hard drives for data, along with the 2 SSDs, and a strong graphic card. Therefore, it's advised to use a strong power supply. I'm using the already owned one from my old PC which is 1 year old. It's a modular PSU and I really like the way they're built. Highly recommended for the quality and for better cable management.
Optical Drive
My already owned ASUS Blu-ray burner. Nothing special really. It just does the job.
Graphic Card
My already owned EVGA NVIDIA Geforce GTX 770 SC 4GB.
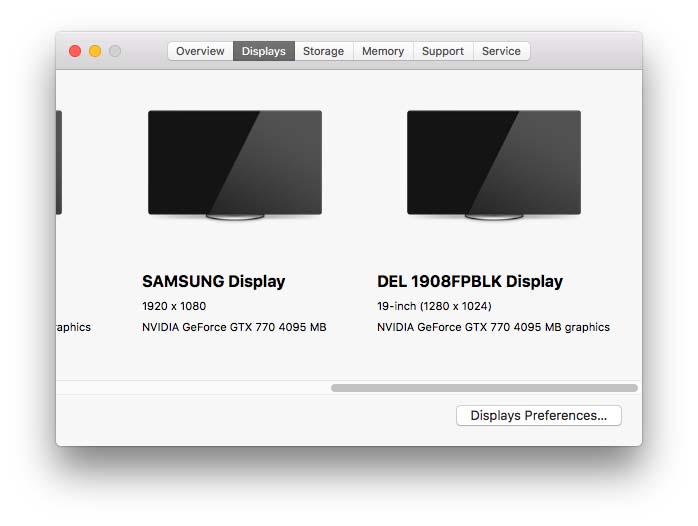
The reason I picked that particular card is that it works great with Adobe's Mercury playback acceleration. It's not officially supported but it works. You just have to add its model to the 'cuda_supported_cards.txt' file in Adobe Premiere's installation folder. But the importance is that it's well supported in MacOS after running MultiBeast. Besides, you can hook to it just like me not 2 but 3(!) monitors for triple monitor setup, in addition to another source like a TV. So, at the baseline you could have up to 4 monitors to working on simultaneously. Very strong piece of hardware.
MacOS Installation Media
I already own a family pack copy of MacOS X Snow Leopard which I used to install the OS on my first CustoMac Mini Deluxe Hackintosh. There I prepared a rescue thumb-drive with macOS Sierra, and I used that one to install this system. So if you need information about how I prepared the thumb-drive please read my previous build thread.
ORICO PCI-Express 5 SATA II Expansion Card
Since I have many hard drives in my system, the available SATA ports on the motherboard weren't enough for me. So I had to find a solution to expand my rig with more SATA ports. I found this ORICO CSA3656-ES5R model on eBay a few years ago and just in case, picked 2 pieces of it. It's a card that uses the JMicron chip (JMB36X) and it has 5 internal SATA II ports that are fed from the PCI-Express interface, and 1 external SATA (eSATA) port that is fed when its internal terminal is hooked to one of the internal SATA ports from the motherboard. It also supports RAID arrays that can be set by a switch at the back of the card. I don't use this card for RAID and only needed it to expand the amount of SATA ports from the motherboard. Fortunately, there is a NO-RAID mode that can be set to achieving that very purpose. Now, the card sort of works under MacOS after installing the driver for MacOS that believe it or not is included in the disc that came with the card! However, it recognizes only one of my drives that connected to it at a time. The second drive that is connected to it isn't showing along with the first one, and it changes every now and then; sometimes only the first drive that connected to it is recognized, and another time only the second drive. I had the same problem in Windows and it was solved after installing the appropriate driver that came with the card. But in MacOS from some reason I haven't managed to solve this yet, even with the stock driver that came with it. Still working on it.
So if you have any experience with expansion interface like this one in MacOS I'd very appreciate if you shared them in the comments below.Summary
What Works:
• Everything that I planned on using with MacOS.
What Doesn't Work (which I planned to use only in Windows anyway):
• My M-Audio Audiophile 2496
• My ORICO PCI-Express 5 SATA II Expansion Card
Installation
MacOS installation is very straightforward and there's really no need for me to repeat the installation steps that were posted here by tonymacx86. The only thing different from a native Mac is that in order to be able to install MacOS on a compatible PC hardware, an additional booting tool is required, and that would be UniBeast. I believe that most of you would probably have a premade installation media of MacOS Sierra by now on a thumb-drive (aka rescue thumb drive). If you don't then you'd need to create one on another Mac or Hackintosh. Instructions can be found here. Although it's about how to download El Capitan and not Sierra, but the idea of how to create the bootable USB with UniBeast after you have the downloaded setup from AppStore is the same. After creating the rescue thumb drive, make sure to go the tonymacx86 download section and to download and copy to it the 'MultiBeast - Sierra Edition’. You're going to need this offline for post installation because you'll probably won't have network working.
I'll begin with the preparation of the BIOS and the installation steps of macOS Sierra first in short. Once the OS is ready and bootable by itself we'll continue with the installation of Windows in short as well, and the tasks needed to be done to make both systems bootable by a selection in the BIOS boot screen:
- Disconnect everything from your machine that is not needed for the setup; that is all USB accessories you have, or even expansion cards that are not required for your computer to boot (although I had my M-Audio and ORICO cards connected when I installed and they didn't cause any issues). But basically, you should leave connected only your keyboard, mouse and your monitor(s). The only USB port that should be occupied is the one with your rescue thumb drive in it.
- Make sure that ONLY the disk you're installing macOS Sierra is connected to the system. When I did this I also disconnected my preinstalled Windows disk so I won't accidentally delete it, although I had to reinstall it anyway. More information about that further on.
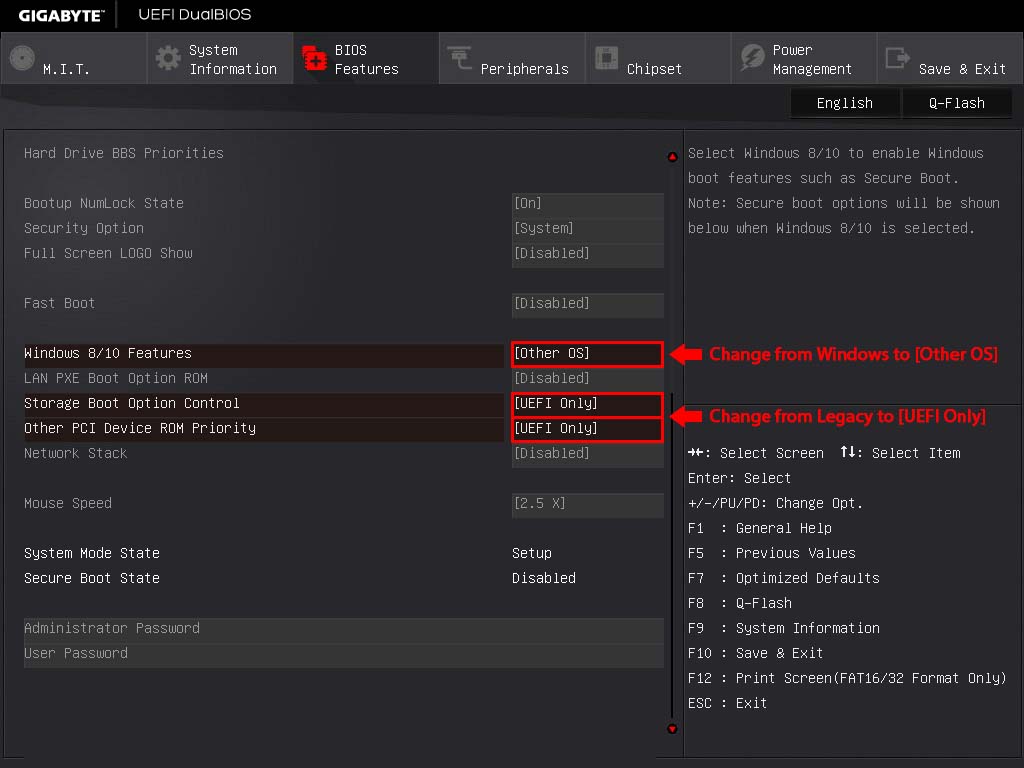
- Enter your BIOS and change the settings as follows (see also screenshots for more information):
BIOS Features -> Windows 8/10 Features: [Other OS]
BIOS Features -> Storage Boot Option Control: [UEFI Only]
BIOS Features -> Other PCI Device ROM Priority: [UEFI Only]
Peripherals -> SATA Mode Selection: [AHCI]
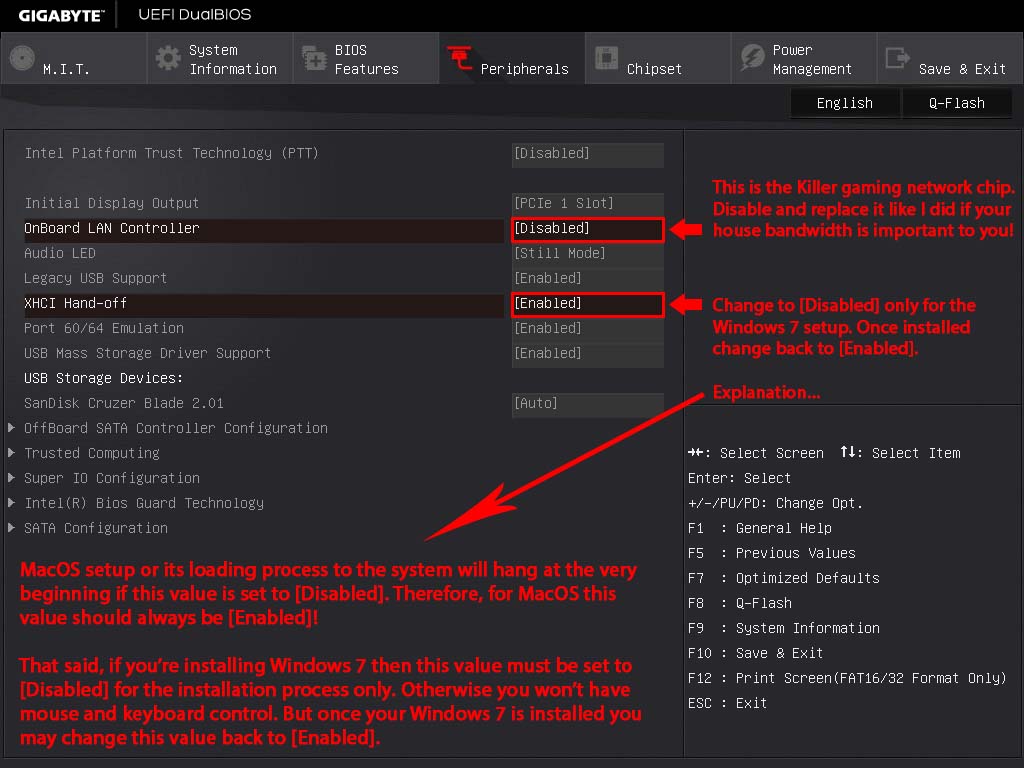
Peripherals -> Intel Platform Trust Technology (PPT): [Disabled]
Peripherals -> OnBoard LAN Controller: [Disabled] <- I disabled this one in my setup as I replaced it with the dedicated Intel CT PCIe Ethernet card because the Killer chip on my H170-Gaming 3 motherboard literally 'KILLED!' the transfer bandwidth in my entire house.
Peripherals -> Legacy USB Support: [Enabled]
Peripherals -> XHCI Hand-off: [Enabled]
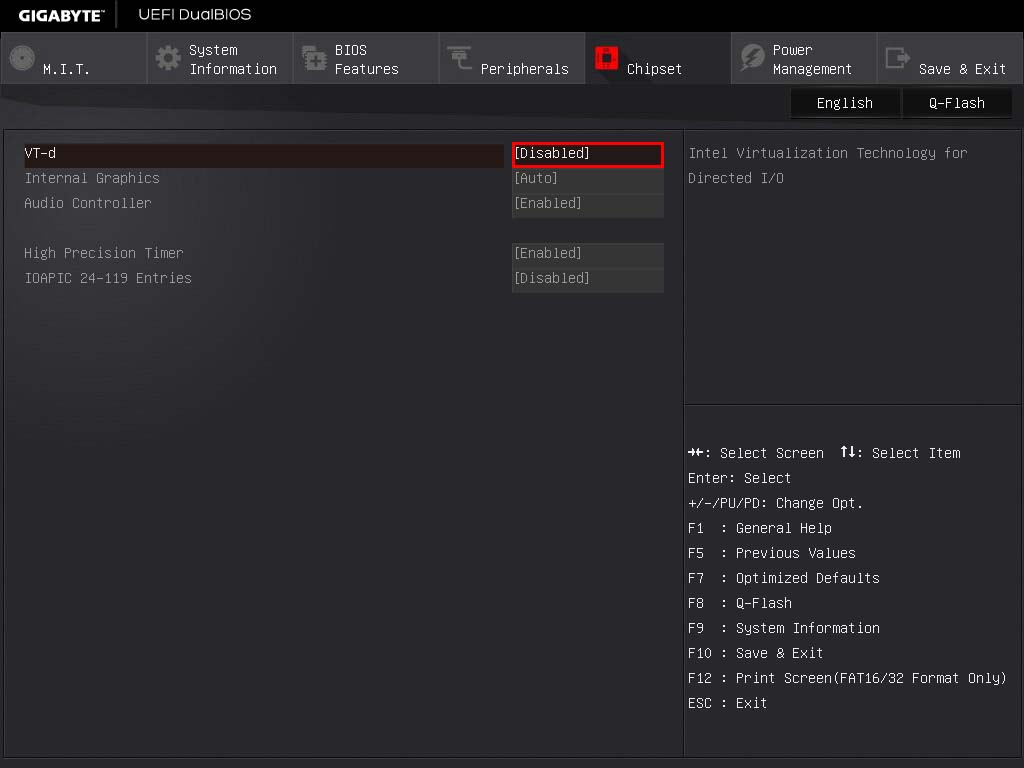
Chipset -> VT-d: [Disabled]
All other BIOS settings remained as they were.
I took stop-watch instances during the entire setup so if you wish to test the timing like me, start and stop your stopwatch when I mention to do so. I'll write down the timing in each step.
- When your BIOS is all set, save all settings and boot from the UEFI partition of your macOS Sierra rescue thumb drive. [start your stopwatch]. The first boot to the macOS Sierra setup will show the apple logo and the loading bar (0:52). About 5-6 seconds later it will bring the grey screen with the mouse pointer (0:58), and then it will go back again to the black screen with the apple logo for more loading. Don't panic. In less than a minute the grey screen with the mouse pointer will show up again (1:59). About 30 seconds later you will be prompt with the macOS Sierra welcome screen (2:30). [Stop and reset your stopwatch].
- Select your language and hit on the arrow icon. Hit Continue. Read the EULA if you must and hit Continue again. Then hit Agree to proceed.
- Continue with the preparation of your disk and complete the installation. Setup should take about 12 minutes to complete (5:30 in my system). Once it's done restart your system. [reset your stopwatch]
Congratulations! The first part of your Hackintosh is behind you! Now let's proceed with the post installation.
- Boot from your rescue thumb drive again, and when the Clover screen appears select your internal HFS disk.
- Complete macOS Sierra Welcome procedure. Eventually you'll get to the desktop.
If you don't see the app dock at the bottom of the screen, restart your system and boot again from the rescue thumb drive. Then on the Clover screen, select your internal HFS disk. Boot time should be about 45 seconds.

Post Installation (installing the kexts/drivers)
- Copy the ‘MultiBeast - Sierra Edition’ folder from the rescue thumb-drive to your macOS Sierra desktop. I copied mine to the rescue thumb drive on another Hackintosh in advanced. In addition, before installing any kexts I highly recommend to make a backup to the ‘Extensions’ folder which lies under /Library, and to keep it somewhere safe. I usually copy it to the desktop so I’ll have it in hand quickly. If anything goes wrong after installing any kexts from MultiBeast, you don’t need to trouble yourself trying to figuring out which kexts that might be causing a problem you need to delete, and which kexts actually came with the system. With that best practice you will always have a backup of the ‘Extensions’ folder just the way it was with a fresh installed system. So if the system doesn’t boot correctly you can boot it again from the rescue thumb-drive, delete the entire ‘Extensions’ folder under /Library, and finally to copy the original one you just backed up from the Desktop.
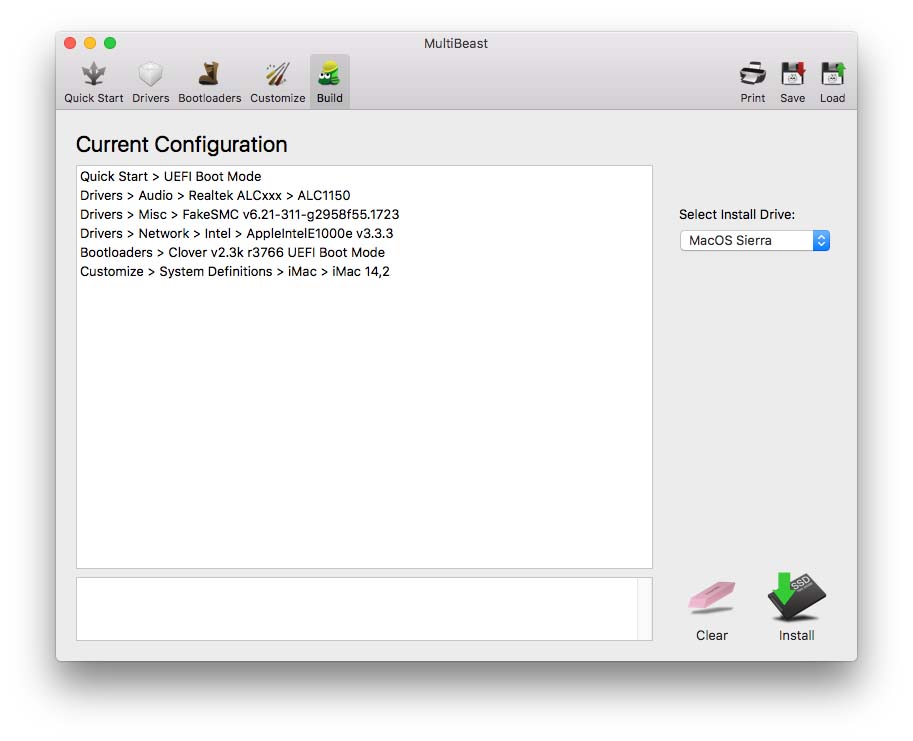
- Run MultiBeast and select the following:
Quick Start:
UEFI Boot Mode
Drivers:
Audio -> Realtek ALCxxx -> ALC1150
Misc -> FakeSMC v6.21-311-g2958f55.1723 <- This one is greyed out and should be selected by default.
Network -> Intel -> AppleIntelE1000e v3.3.3 <- I’m selecting Intel because I disabled and the Killer chip on the motherboard and replaced it with a dedicated Ethernet card.
Bootloaders:
Clover v2.3k r3766 UEFI Boot Mode <- Should be selected by default.
Customize:
iMac -> iMac 14,2 <- Should be selected by default.
Build:
Save your current configuration in the ‘MultiBeast - Sierra Edition’ folder so you’ll have it in hand with all current settings in case you’ll need to reload it and to make adjustments. That way, if something doesn’t fit right you could always load the configuration from this file, make adjustments, re-save and re-launch again.
Hit Install when done.
- Disconnect the rescue thumb drive and restart your system to check if it boots by itself correctly and if your kexts worked.
After the first restart I found that everything works like charm; audio, network, my triple monitors, EVERYTHING! Except for the non supported hardware in MacOS such as the my M-Audio Audiophile 2496 card and the ORICO SATA expansion cards which only shows 1 disk that connected to it at a time.
At that point you can also hook your Windows disk.
To select from which disk you wish to boot, hit F12 on boot for the BIOS boot menu and select the desired disk.
About multibooting Windows and MacOS
If you built a setup like mine and plan to run macOS and Windows in multiboot, you'll find that each time you restart your system, more and more UEFI boot entries for the Hackintosh disk are being added to the boot menu, making it a bit messy to distinguish which one is your Windows disk and which is MacOS. See screenshot:
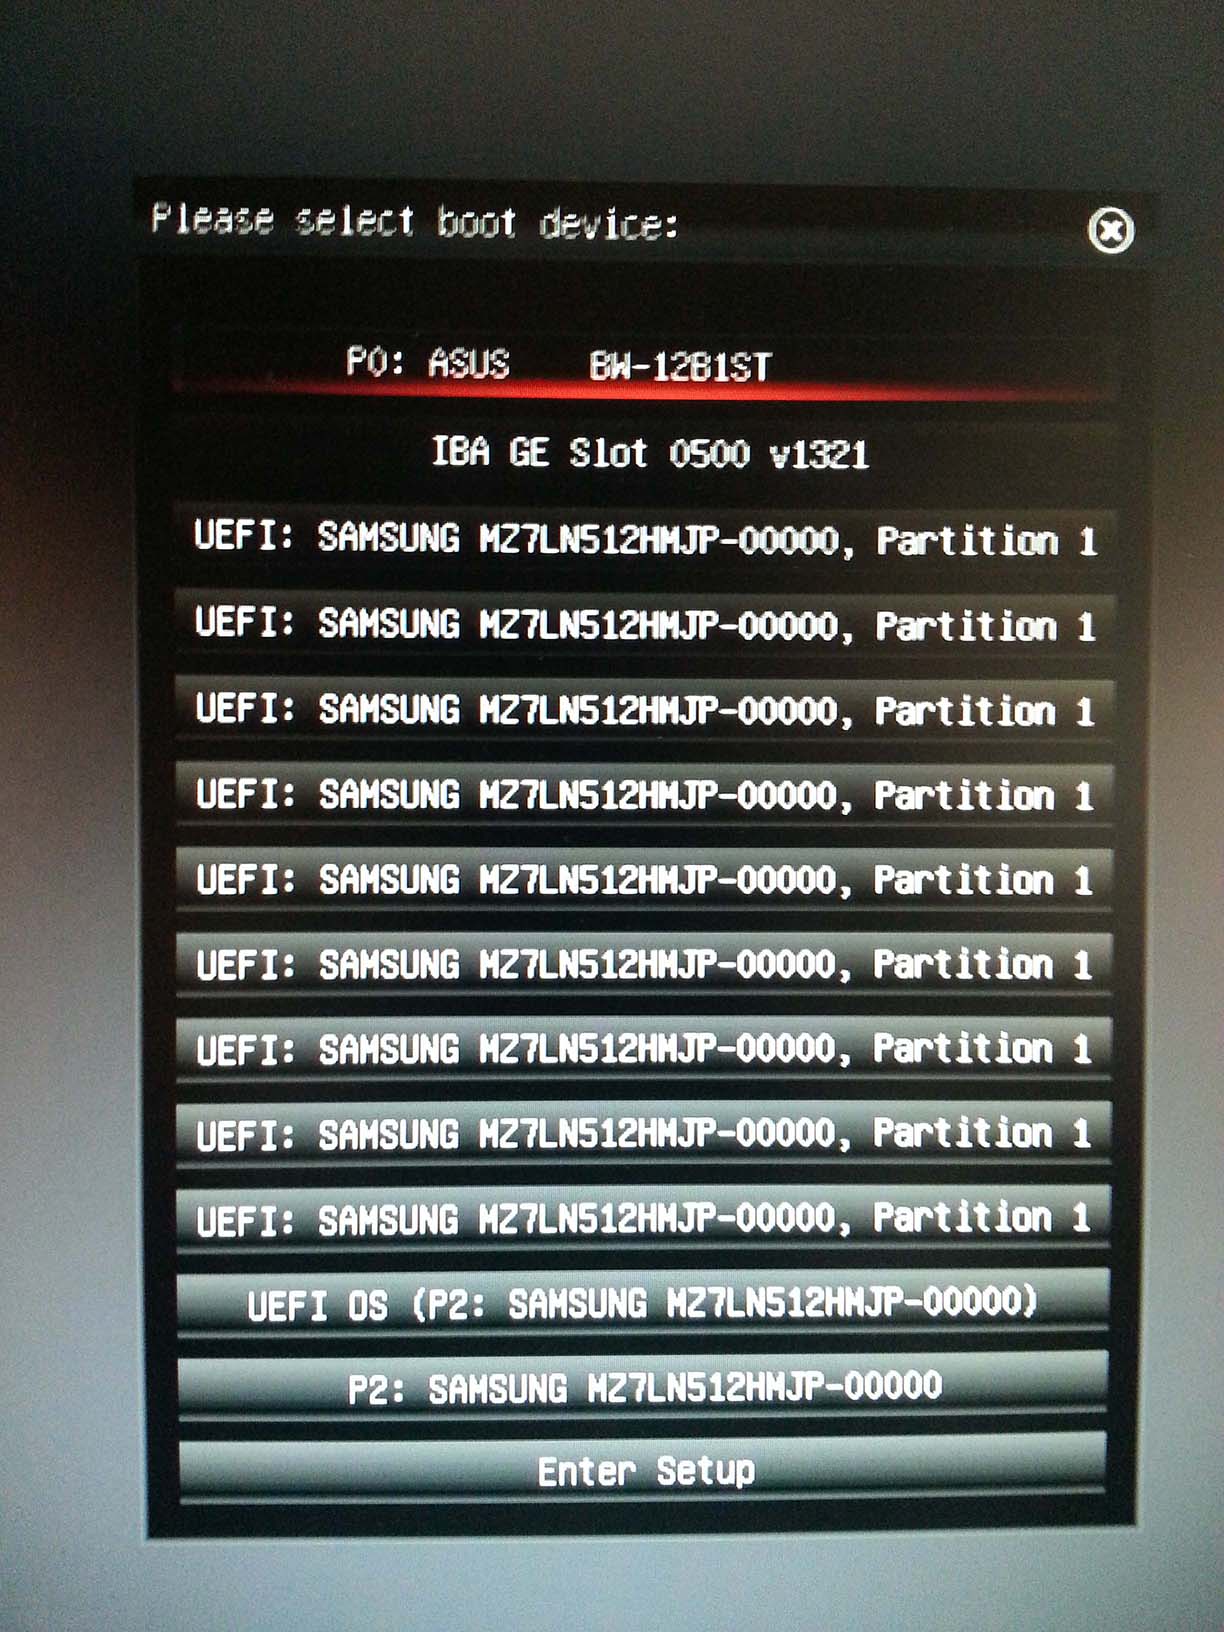
However, all the UEFI entries of the MacOS disk will boot fine into MacOS when you select and launch them. But again, it’s a bit messy and there’s a solution to fix that very problem in a multiboot system:
In order to fix the booting from the EFI partition for both systems in harmony, you will need to install a 3rd party tool in both MacOS and Windows. The tool for Mac is called 'EFI Mounter' and the tool for Windows is called 'EasyUEFI'.
The only problem is that in order to install this tool in Windows, your windows must be installed in UEFI mode (not legacy). And if it's legacy you just won't be able to install this tool in Windows.
To tell whether your Windows is installed in legacy or UEFI you can do one of the following:
First way:
- In Windows, launch Computer Management and go to Disk Management.
- Right click on the disk Windows is installed on (usually Disk 0) and select Properties.
- Go to the Volumes tab and check what’s written next to Partition style. If it says “Master Boot Record (MBR)” then your Windows works in legacy mode. On the other hand, if it says “GUID Partition Table (GPT)” then you’re in UEFI.
Second way:
In Windows, download and try to install the 'EasyUEFI' tool and see if it allows you to install it. If you receive the “EasyUEFI can only install on (U)EFI-based windows operating system” error, then that means that you're in legacy mode. So you'd need to reinstall Windows in UEFI mode to fix the extra boot entries.
Installing Windows in UEFI mode
- Backup whatever you need to keep from your Windows drive.
- Insert your Windows installation disc to your optical drive and restart your system.
- Upon restart, launch your BIOS boot menu (usually by hitting F12) and in the BIOS boot menu results you should see 2 options to boot from your optical drive. Make sure to pick the UEFI option. Right after that you should see the following text: “Press any key to boot from CD or DVD…” If it's in a bright white text then you’re in UEFI mode. If it's in a grayish DOS like color then you’re in legacy mode.
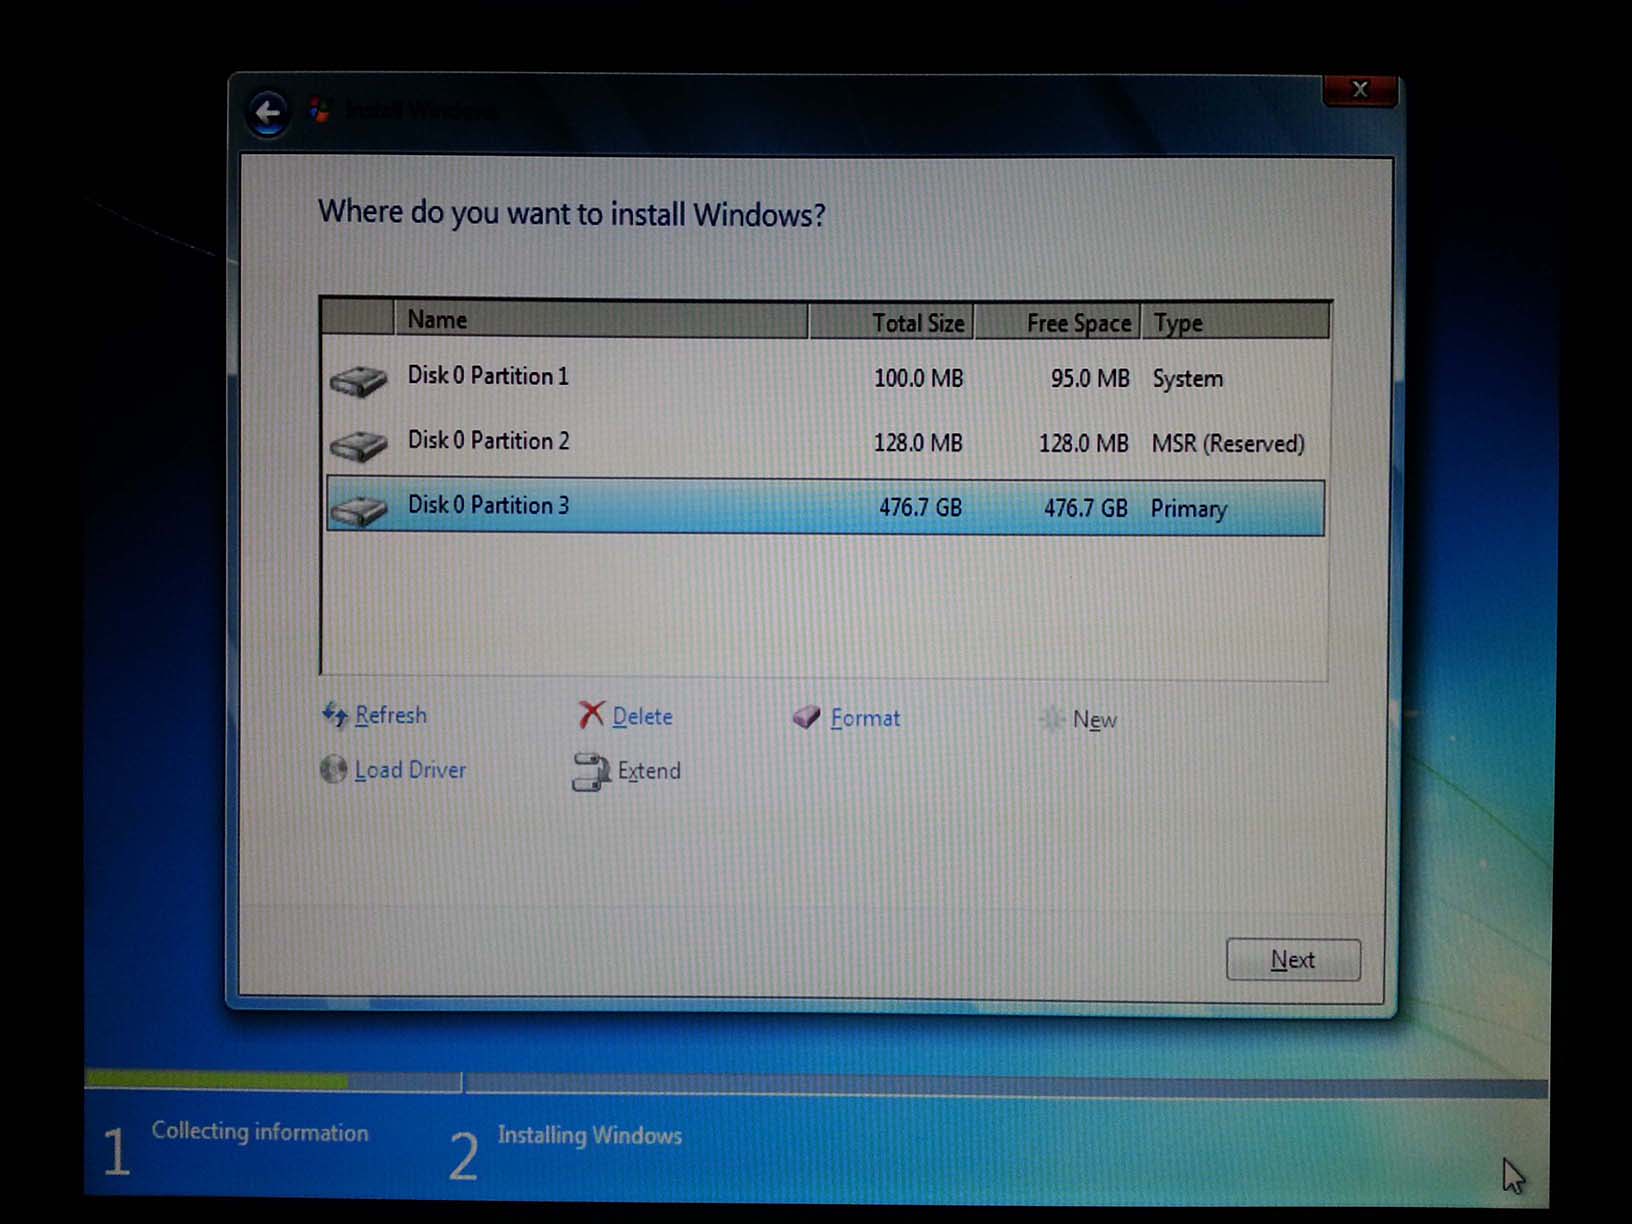
- In Windows setup, when you reach the step where you can format your disk, make sure to delete ALL partitions from the disk if you have previous partitions on it. So eventually you should see your disc with unallocated space.
Once done, hit on the Drive options (advanced) link, select the unallocated space and hit on New to create a partition. You will be prompt with the following message: "To ensure that all Windows features work correctly, Windows might create additional partitions for system files". Right after hitting OK, if you're in UEFI installation you should see 3 partitions as in this screenshot below:
That's saying that you're about to install Windows in UEFI mode. However, if from some reason you see only 2 partitions – one 100MB as System type and another as Primary then you're in legacy mode! Try booting from UEFI again.
- Once installation is complete, shutdown your machine, hook both your MacOS and Windows disks to your system and follow the instructions by @tbjem0013 about how to remove the extra Clover BIOS boot entries. The tools you're going to need are MacMan's version of Koen2X's EFI Mounter v2 for MacOS, and EasyUEFI for Windows (Windows must be installed in UEFI mode for this).
*You can also try following the instructions by @Anachronaut about how to remove the extra Clover BIOS boot entries & Prevent further problems which can work even if Windows is installed in Legacy mode. Though they only worked for me on my first Hackintosh build. It's a trial and error process so try the short way that doesn't require reinstalling of Windows first, and continue to the long way only if the first way didn't work for you.
**Be aware of the following before doing the steps in the link above:
When you rename your BOOT folder in MacOS to LAUNCHER, MacOS will no longer boot by its own when you restart, while Windows will boot normally. That is until you fix the boot entry for MacOS through EasyUEFI from within Windows. Do the steps in the link above and you should be fine. But if something doesn’t work for you with EasyUEFI from within Windows and you need to boot to MacOS again - don’t panic. You could always boot to your Hackintosh from the rescue thumb-drive and to reinstall the booting kext from MultiBeast in order to fix the booting partition.
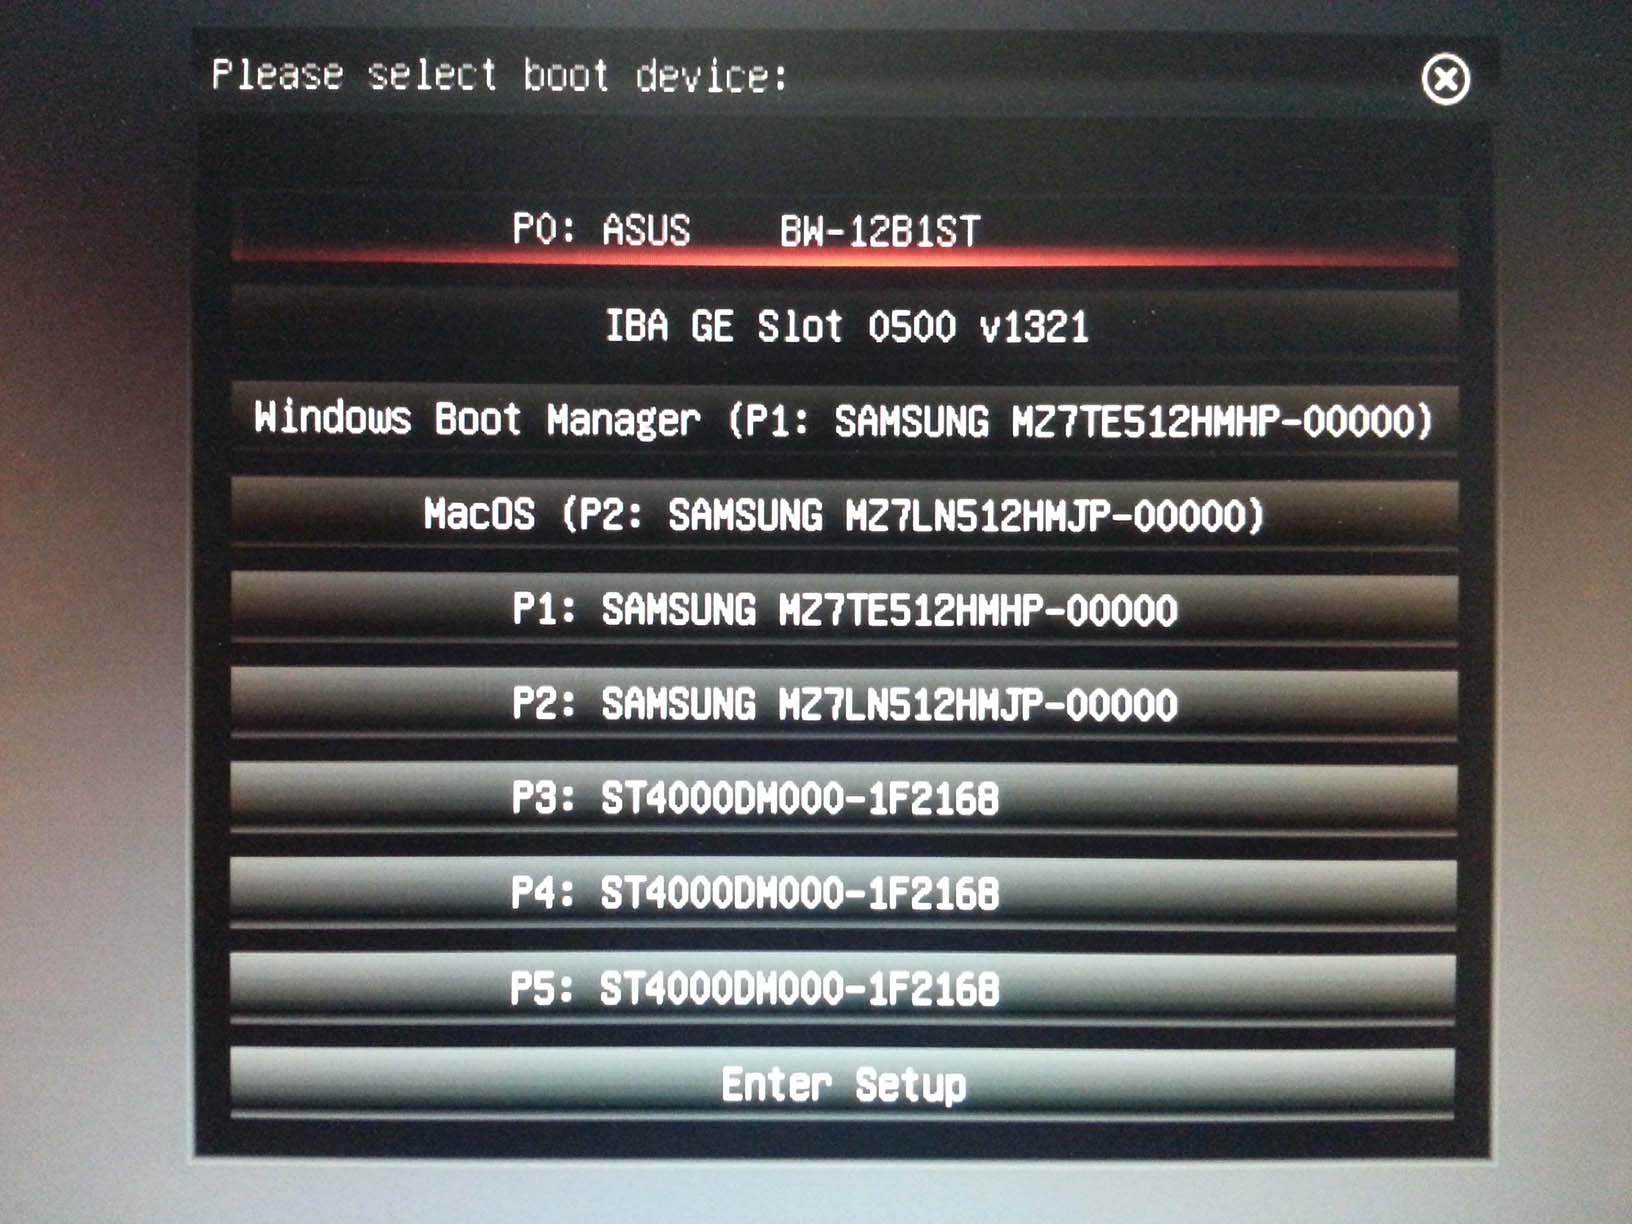
Once you renamed your BOOT folder in MacOS to LAUNCHER and finished configuring the UEFI boot entries through EasyUEFI in Windows you can restart your system. Hit F12 to fire up the BIOS boot entries, and you’ll be prompt with both Windows and MacOS entires to select from, without all the ‘junky’ entries you had before. It should look something like this:
Note: I named my macOS Sierra booting partition as 'MacOS' and left Windows as 'Windows Boot Manager'.
The other entries you see (P1, P2 etc) are my other physical hard drives that are connected to the system (the ones that hooked to my motherboard SATA ports. Whatever hooked to the ORICO expansion card is not showing here).
When removing the extra entries, you should have 2 entries for each of your OS drives. One would be the actual drive next to the 'P' (I guess it's for 'port') and a second entry for its EFI partition. Each EFI entry is follows with the name of the disk it's installed on in brackets.
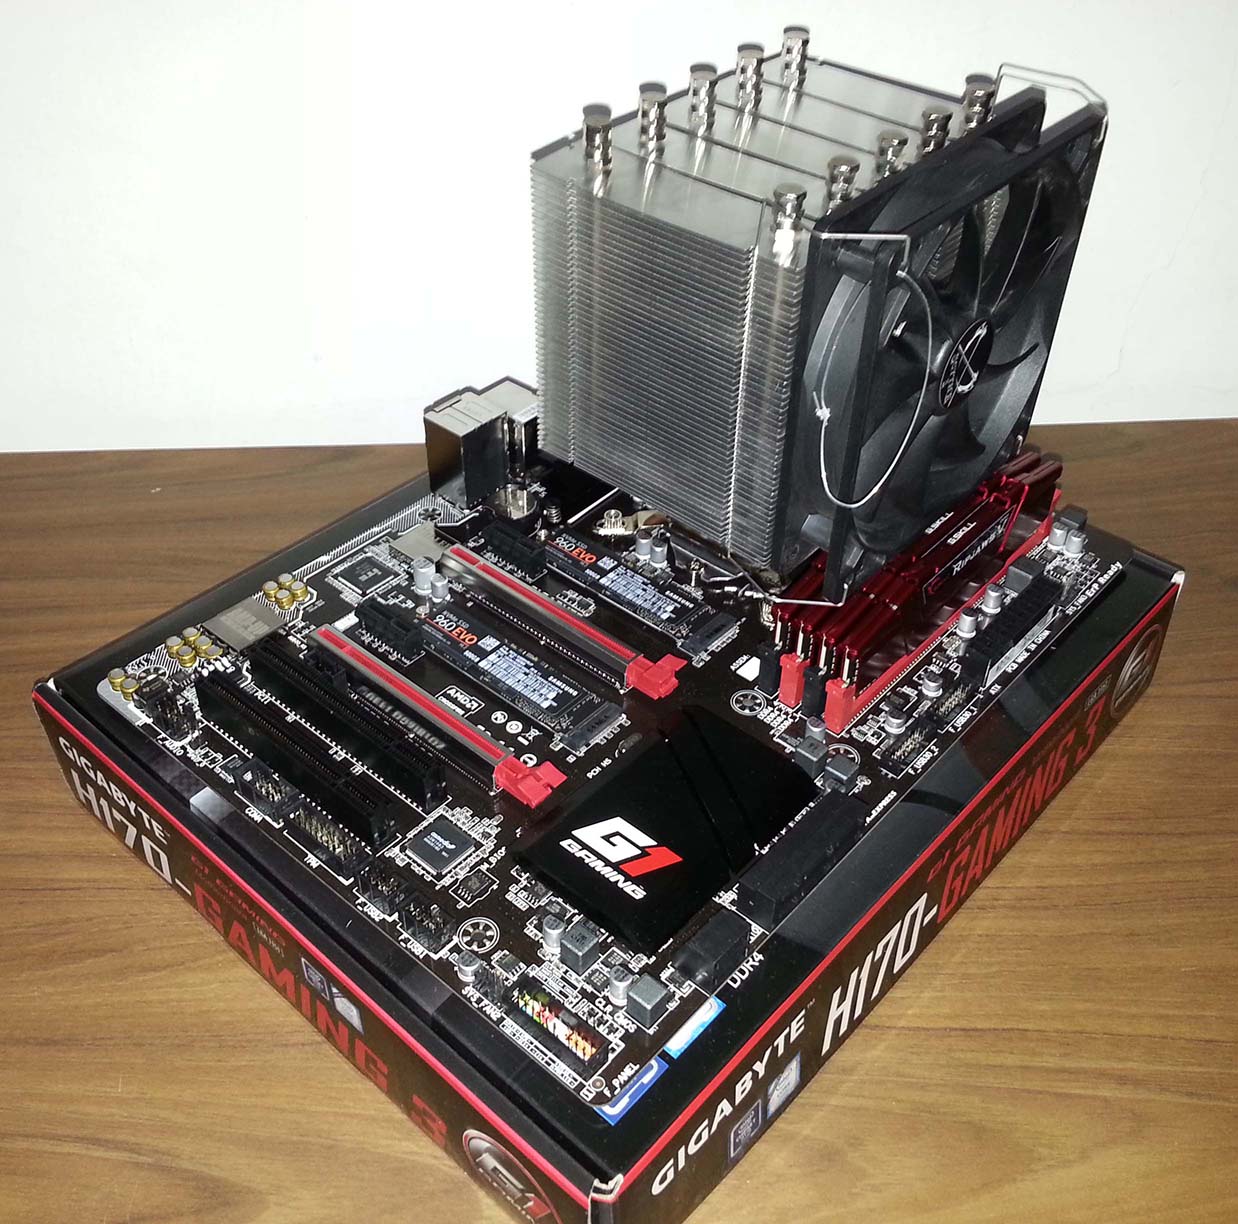
Attached more pictures and screenshots of the system:
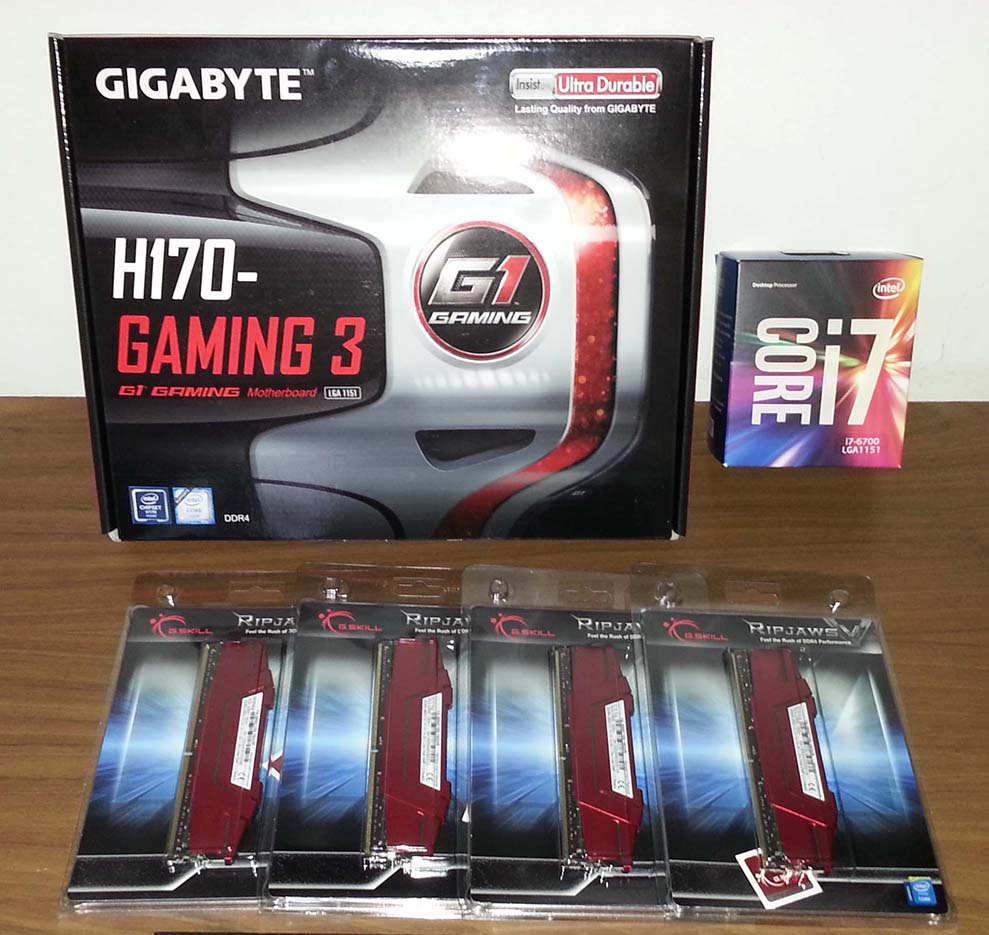
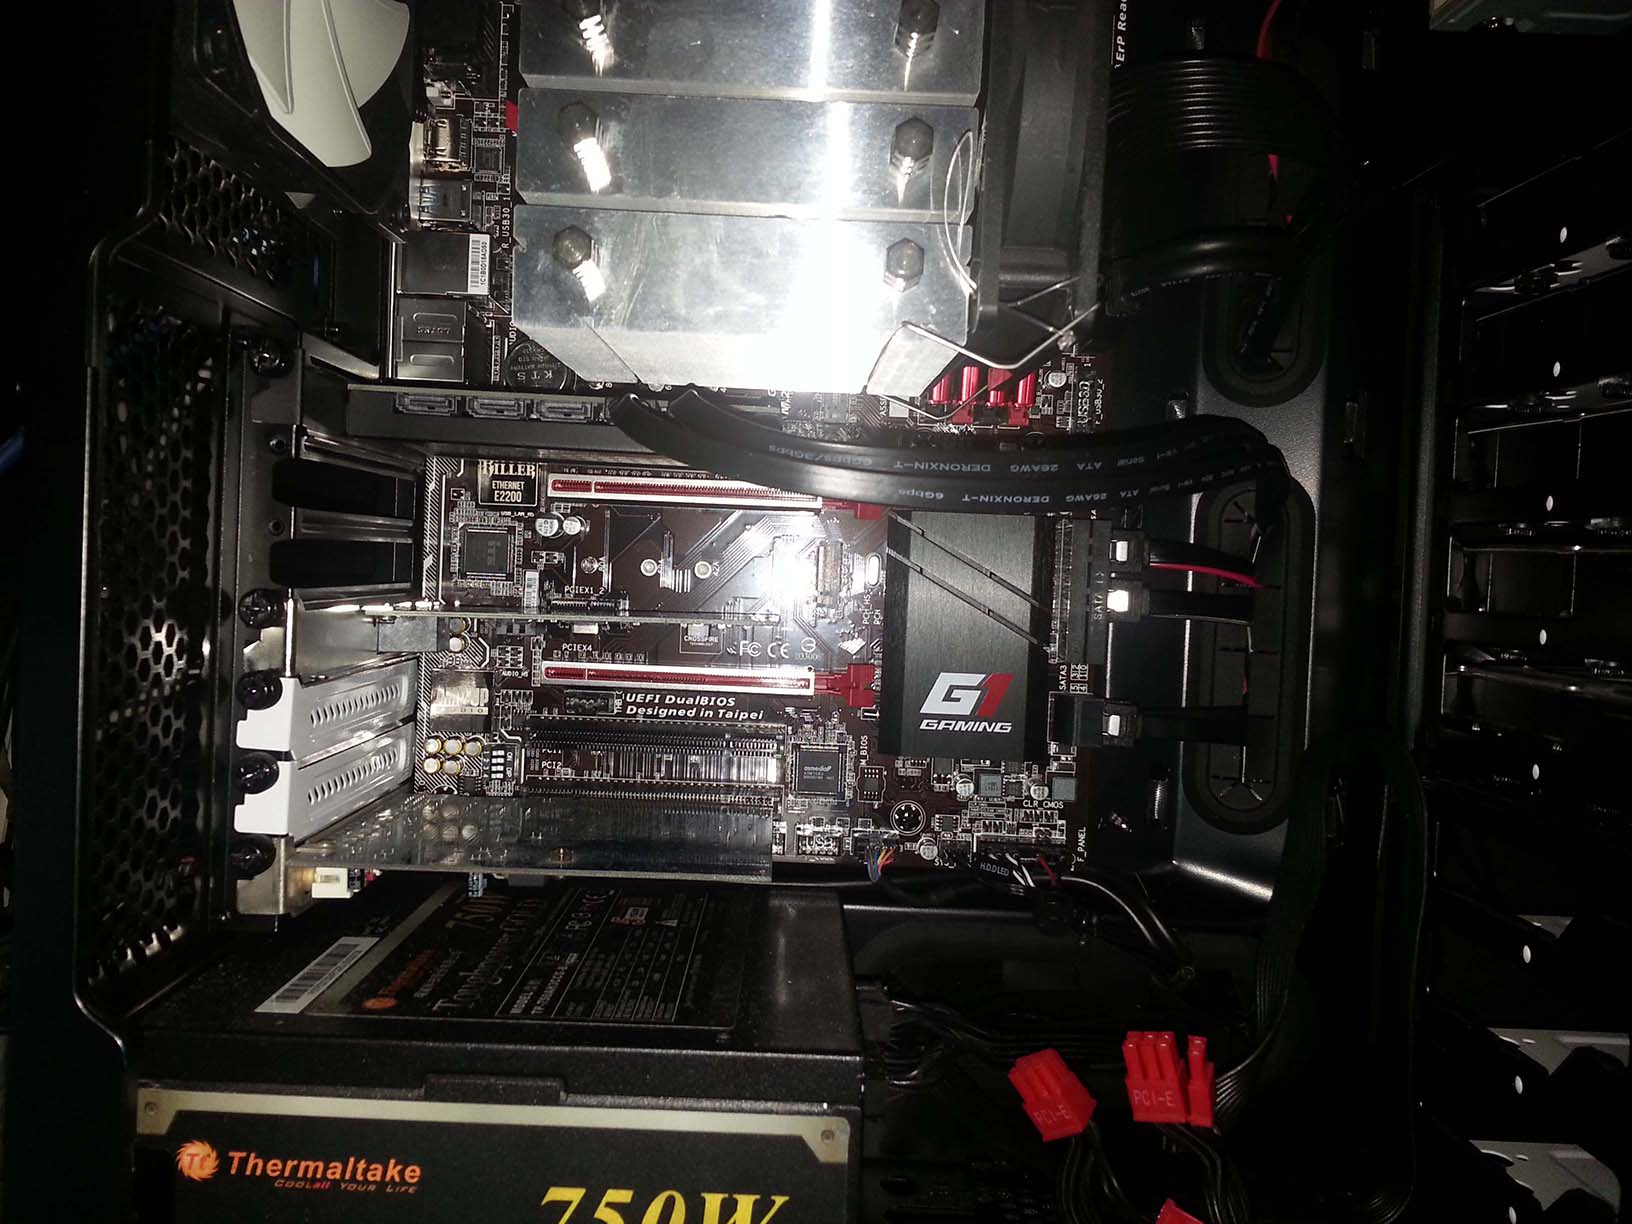
Motherboard, processor and memory.
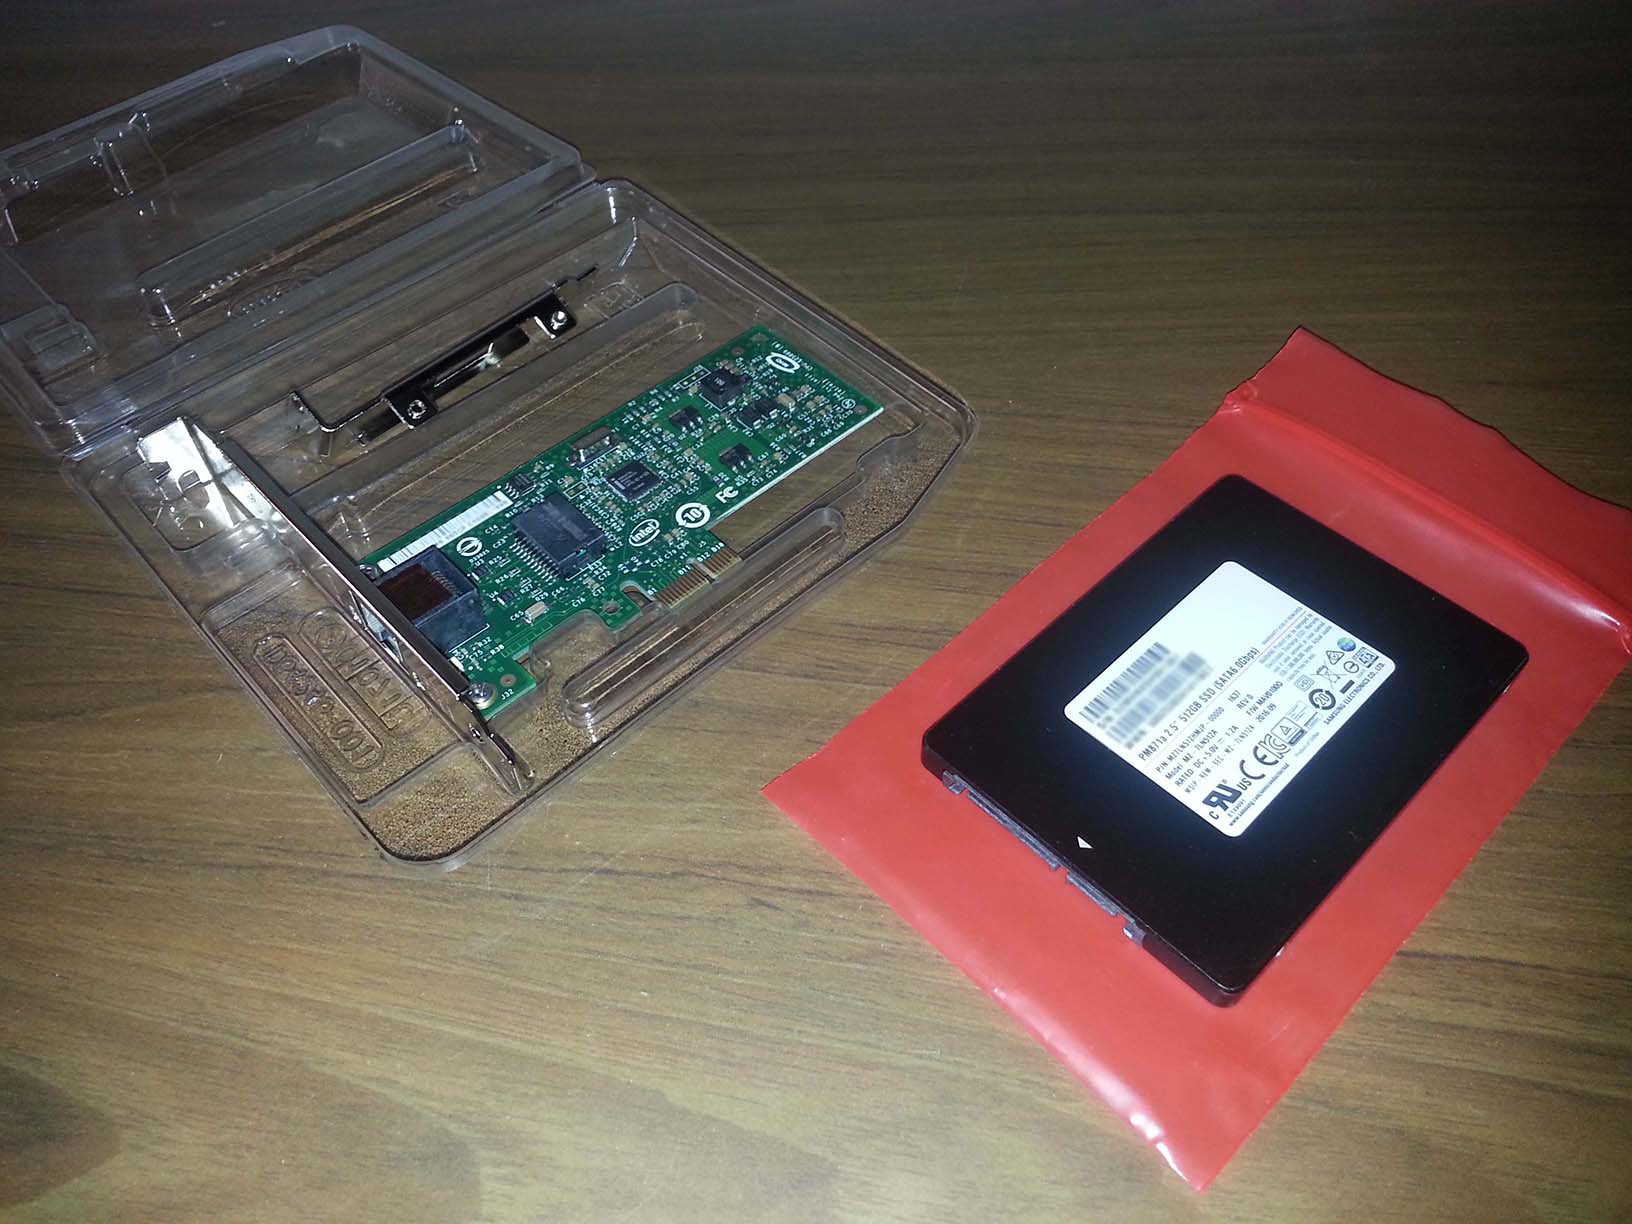
Intel CT Ethernet PCI-Express card and the new SSD disk for MacOS.

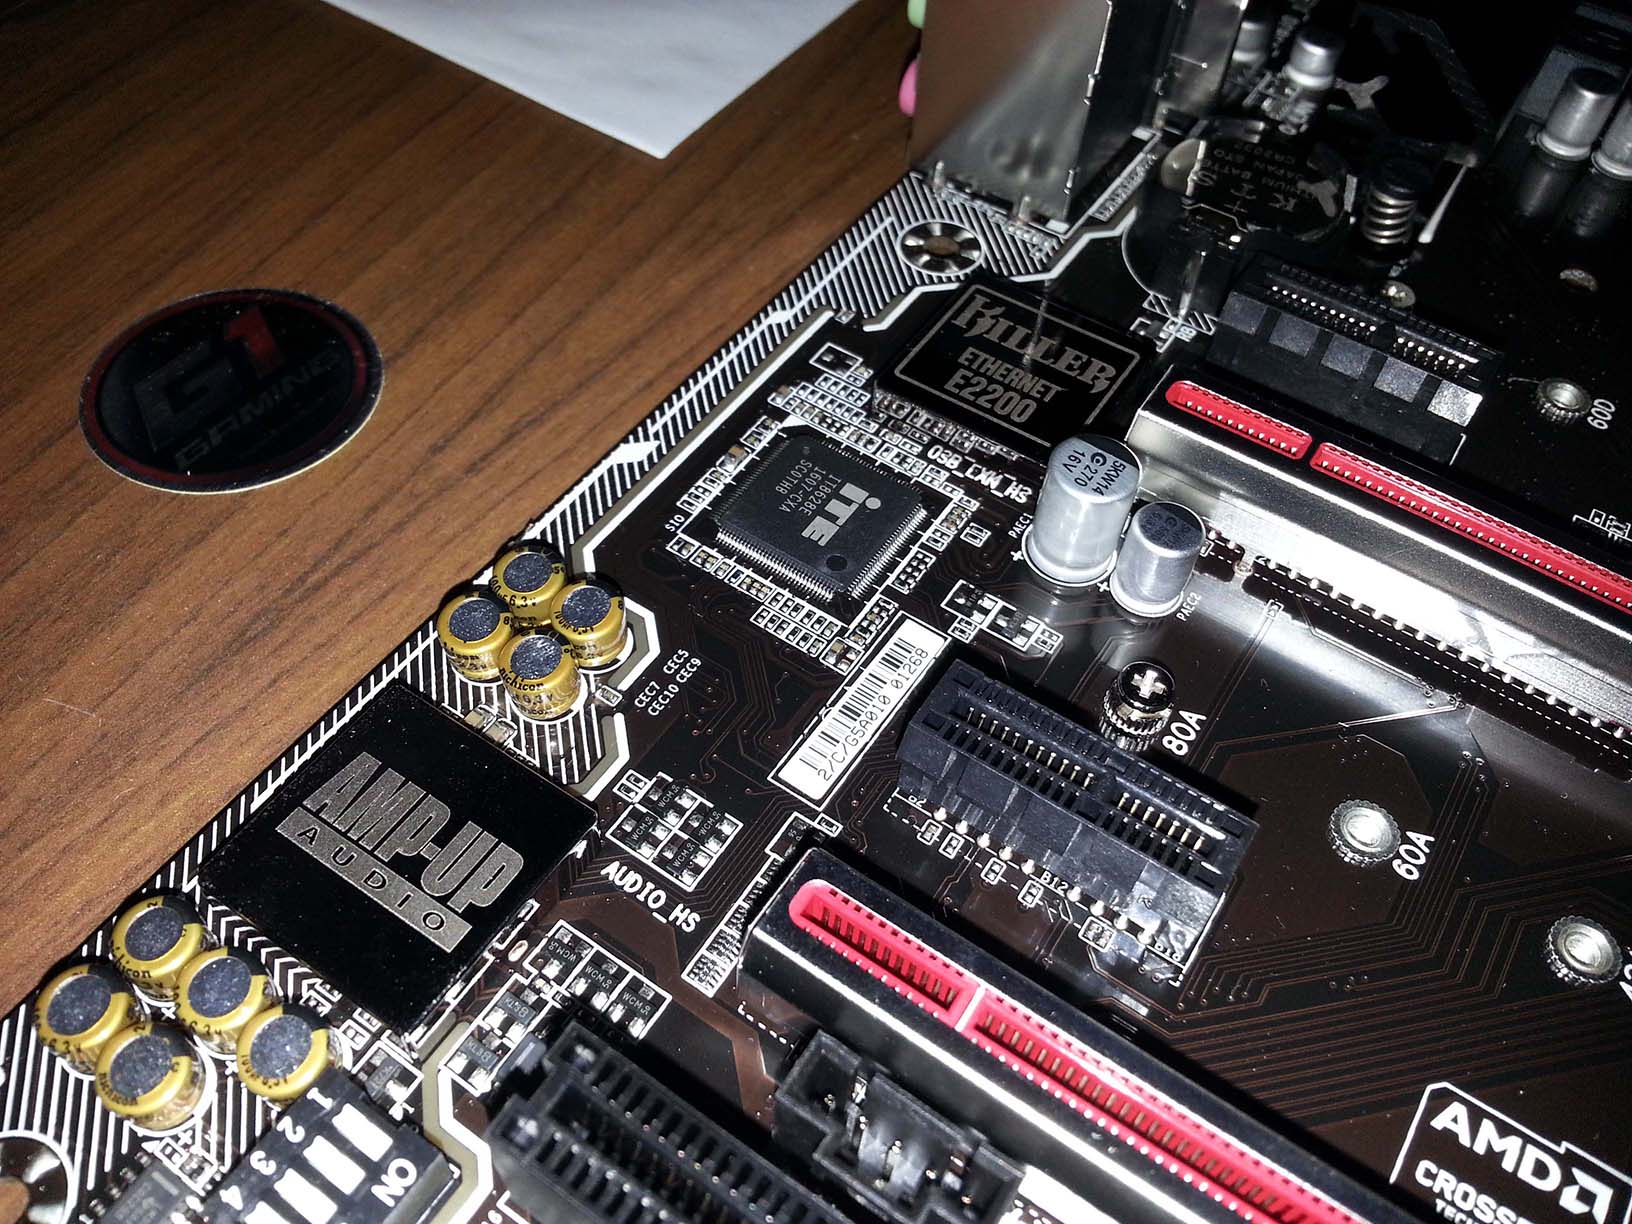
Here are the high quality AMP-UP Audio chip, and the 'deadly' Killer Ethernet chip which just MUST be replaced with a dedicated Ethernet card in my opinion.
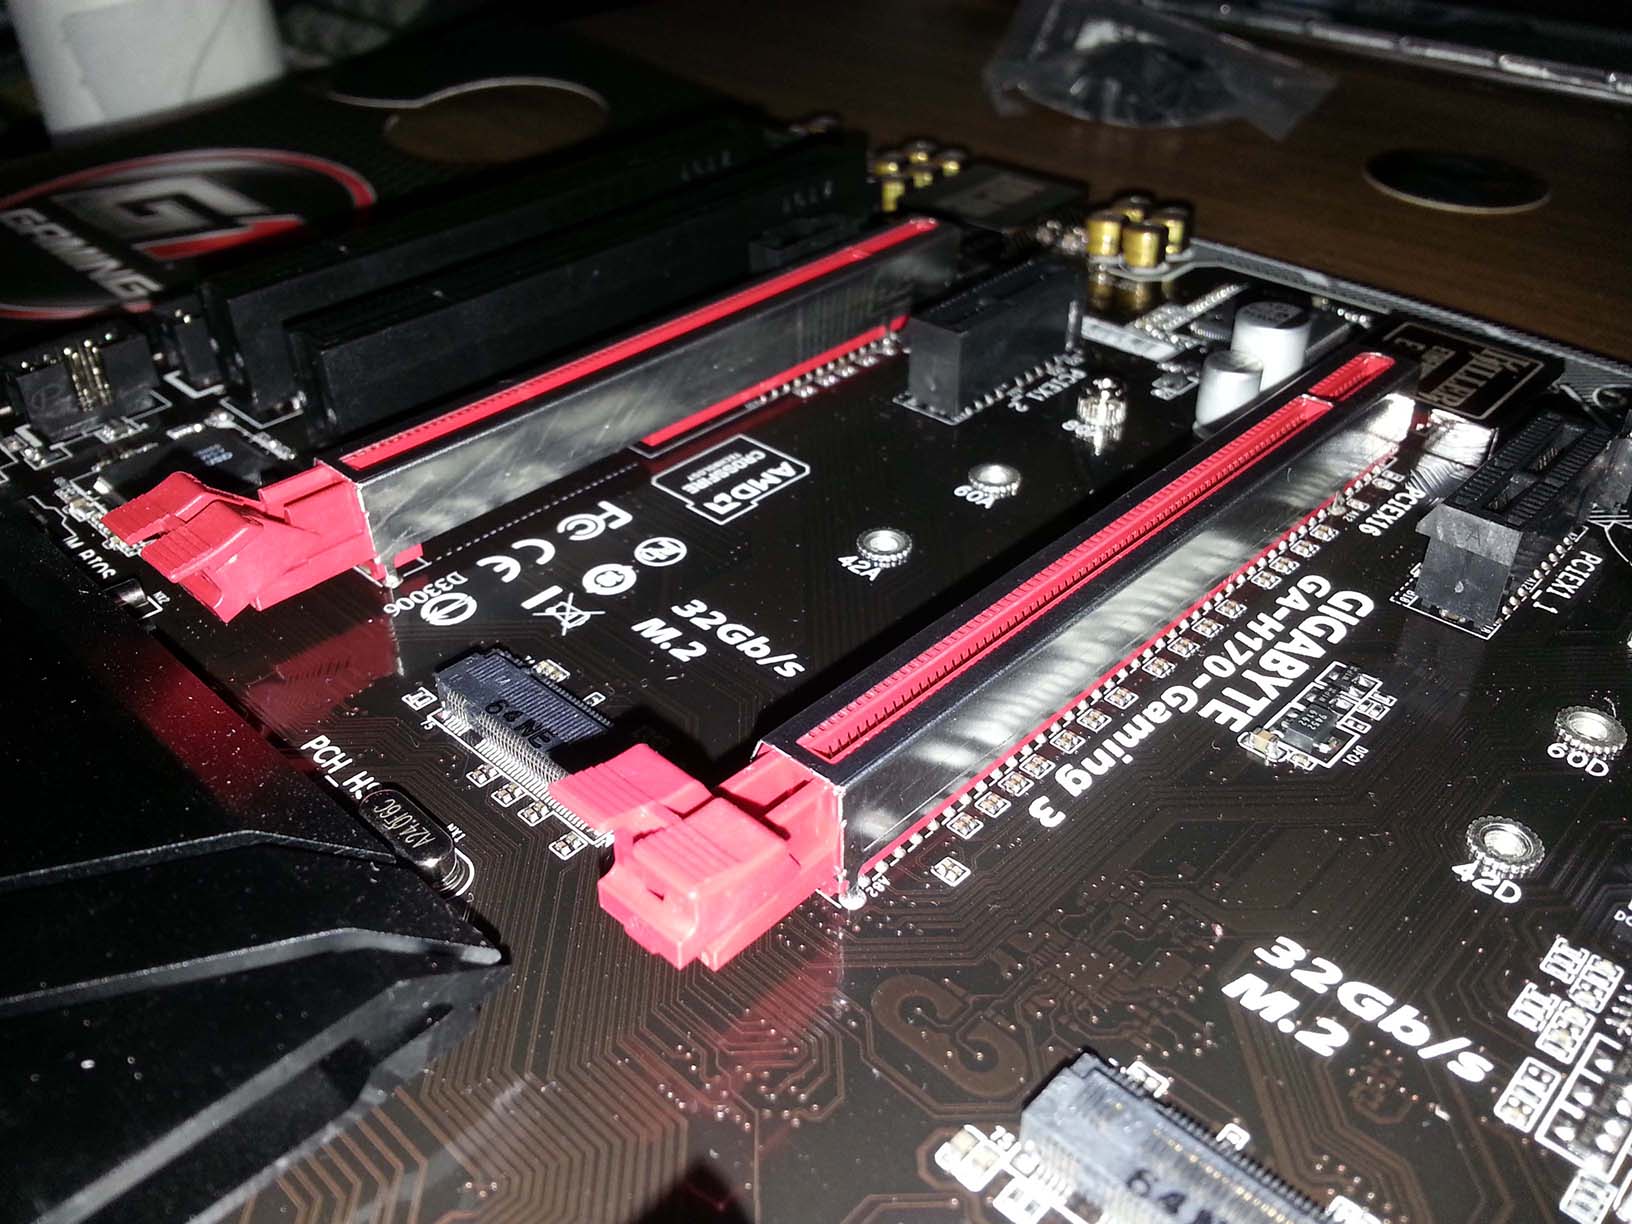
NOTE THE SATA-EXPRESS PORTS! More on that below...


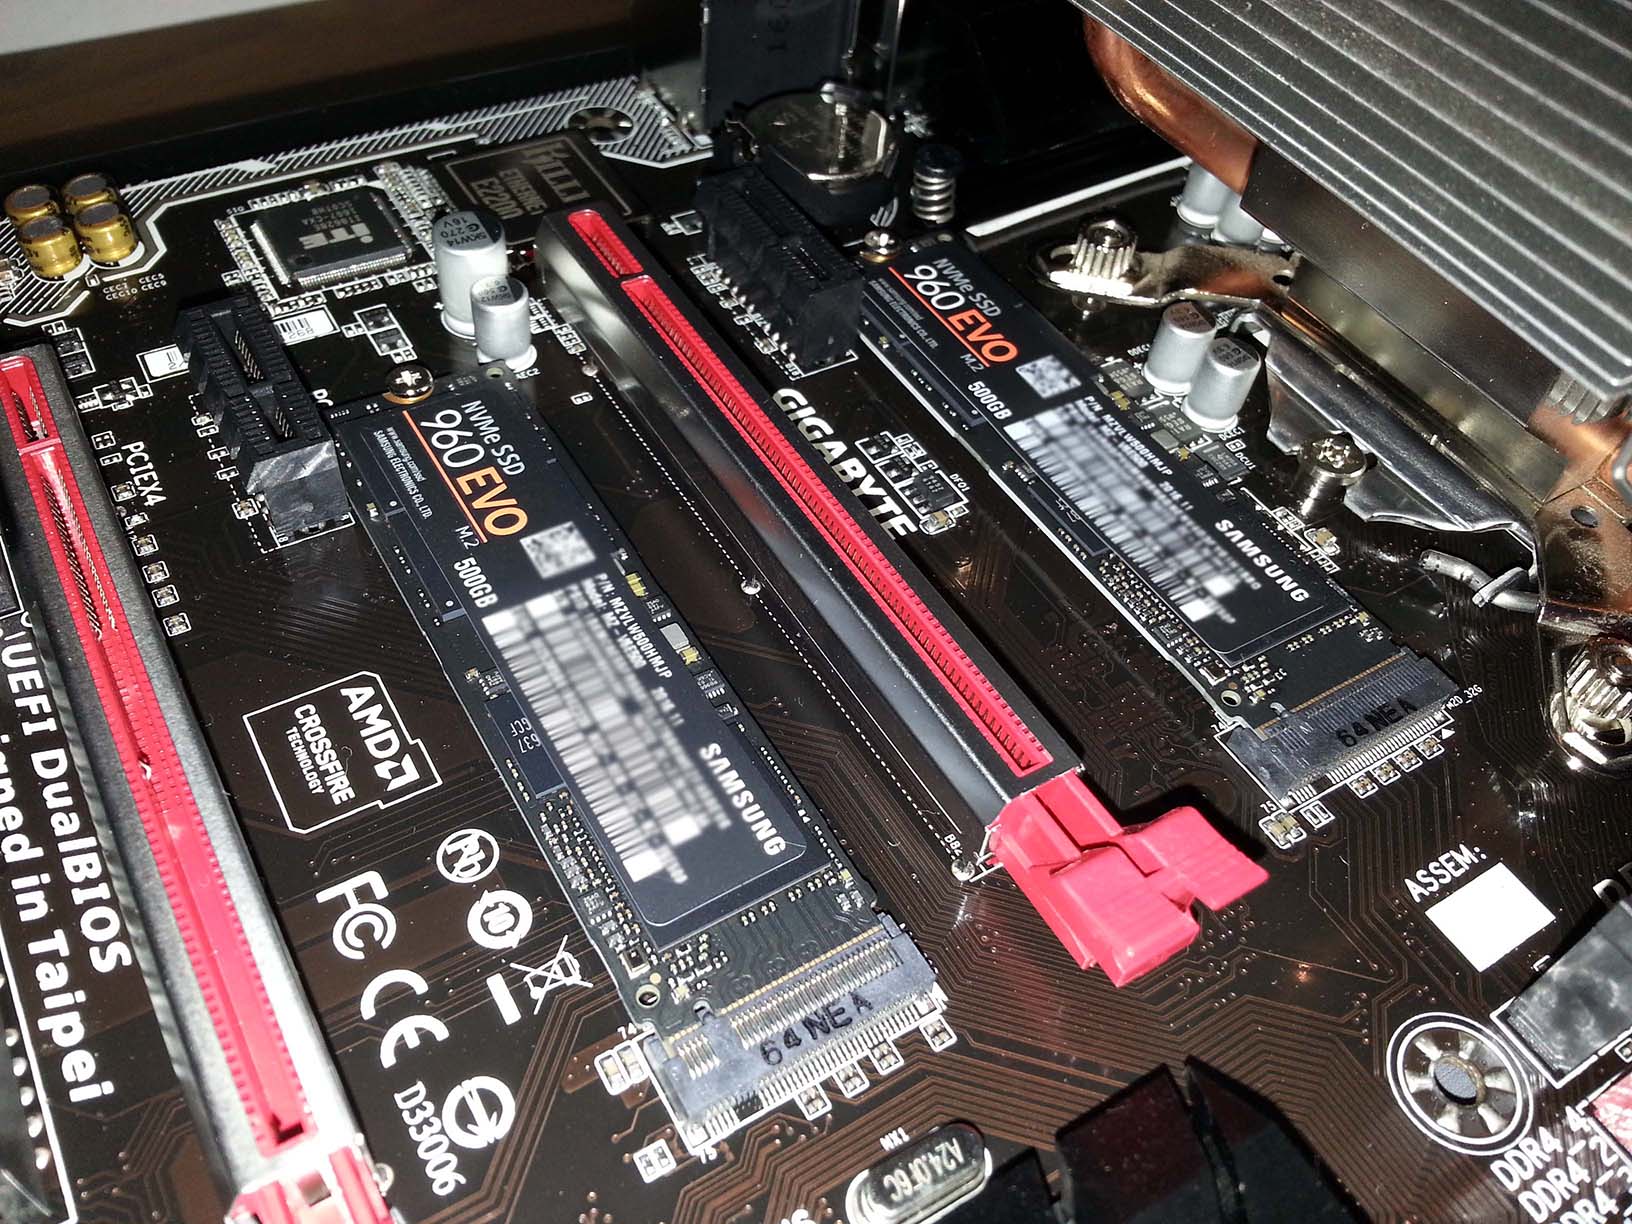
At first I purchased 2 of these NVMe 960 EVO SSDs. Each is 512GB! The NVMe is the protocol that replaces SATA! I planned on installing MacOS on one of the them and Windows on the second. Believe me - you just DON'T want to mess with that technology at the moment. Especially if you're planning on installing Windows 7 on it. Because only Windows 10 setup comes with appropriate drivers to recognize these drivers. And I'm not a big fan of Windows 10. How this sentence goes? "If it ain't broke don't fix it!"
First you'll find that you will need to plant the appropriate NVMe drivers in your Windows 7 installation media, and if you're installing it from a USB3.0 then you'd also have to plant these drivers in the media as well. There are tools to doing this but I found that they're just to complicated to achieving the goal of having Windows 7 on such disk. I made the media successfully but the Windows 7 installation still didn't recognize the drives. Besides, Windows 7 was not designed for such technology and trying to make it work on such would be as if you're trying to install Windows 7 on an IDE drive.
In addition, you'd also find that even MacOS Sierra installation doesn't recognize these drives by default, so additional customization should be made in the installation media for MacOS Sierra too before you could actually have access to these disks.
Eventually and luckily for me, the seller accepted my request to return the drives and instead to pick just a single SSD drive for MacOS, as I already owned my previous SSD that would be for Windows. The regular SATA drivers in this state are the ones to go with if you're willing to have a smooth installation experience. But if you're a hardcore types that like adventures then you can carry on and try your luck with the NVMe technology. I just don't see it that compatible yet. And again, if you're still willing to use Windows 7 like me.
Here is my ORICO SATA II expansion card. Currently only 2 drivers are connected to it.
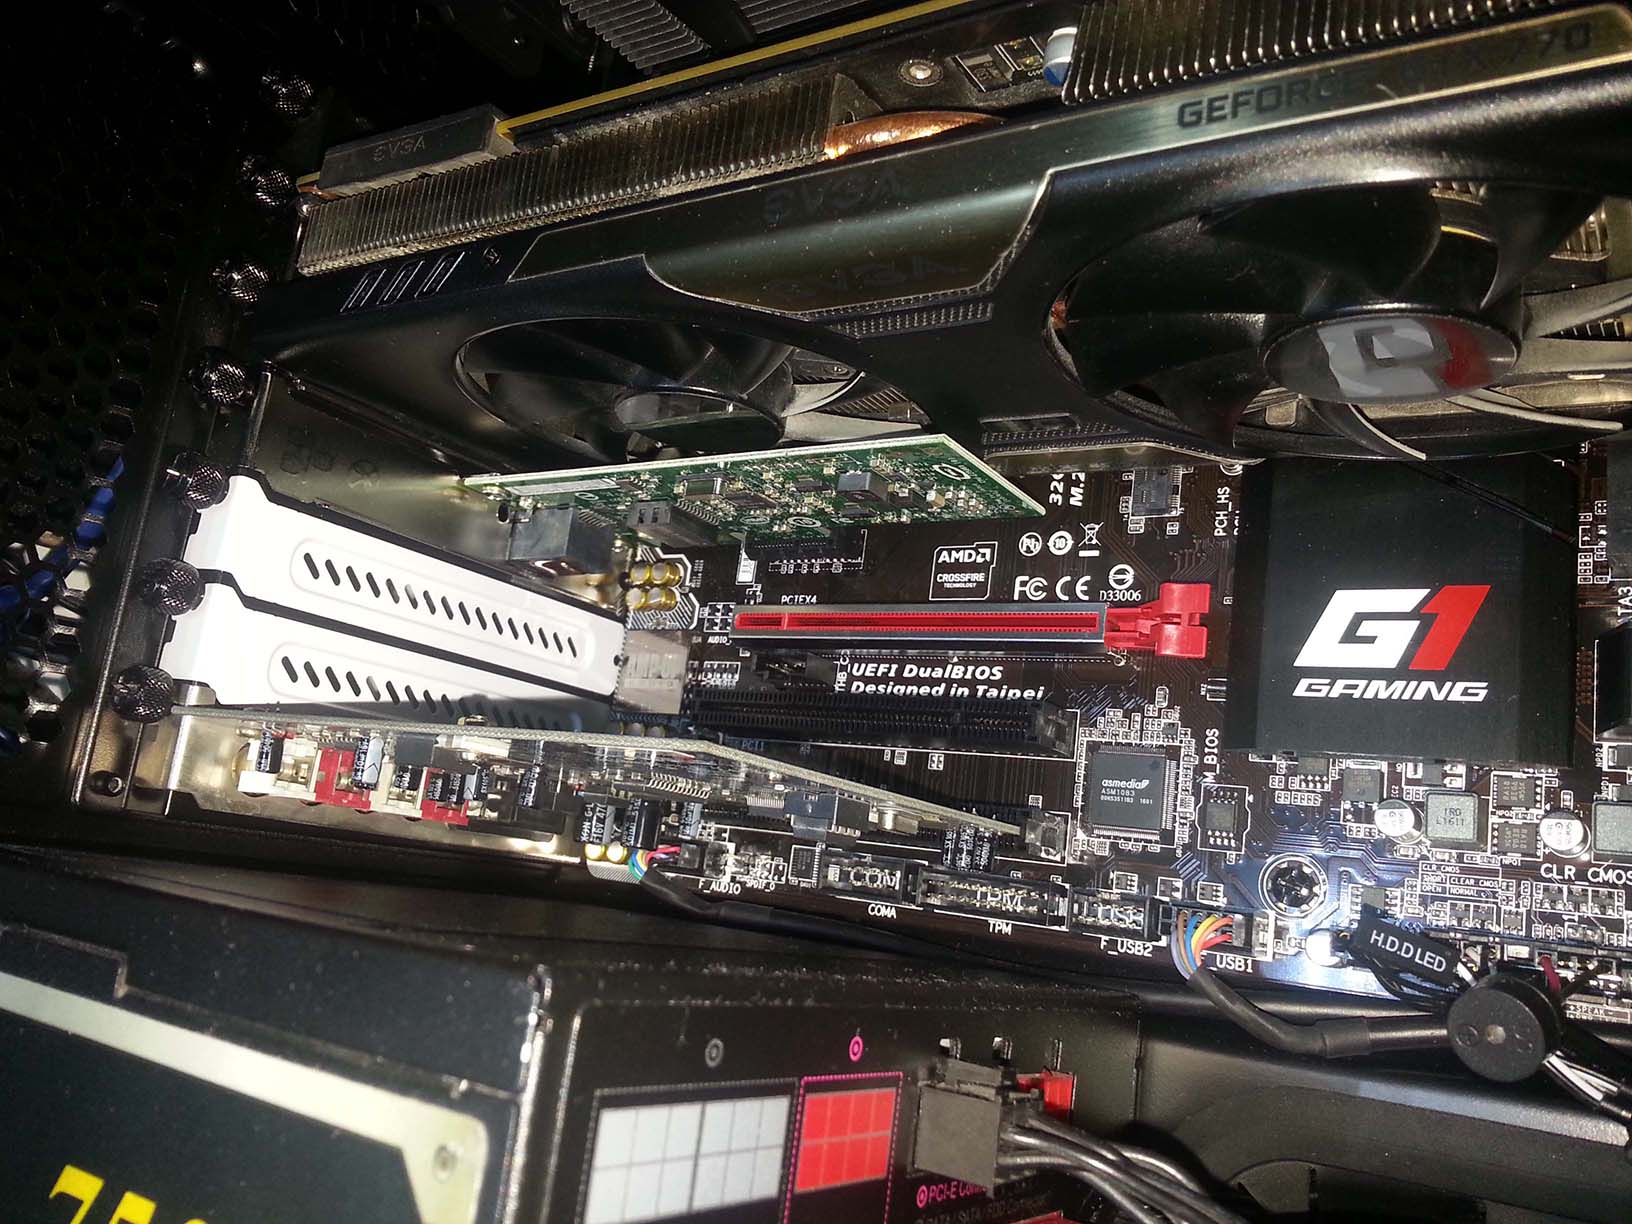
Below the graphic card sits the Intel CT Ethernet card, and at the very bottom PCI slot sits my M-Audio Audiophile 2496.

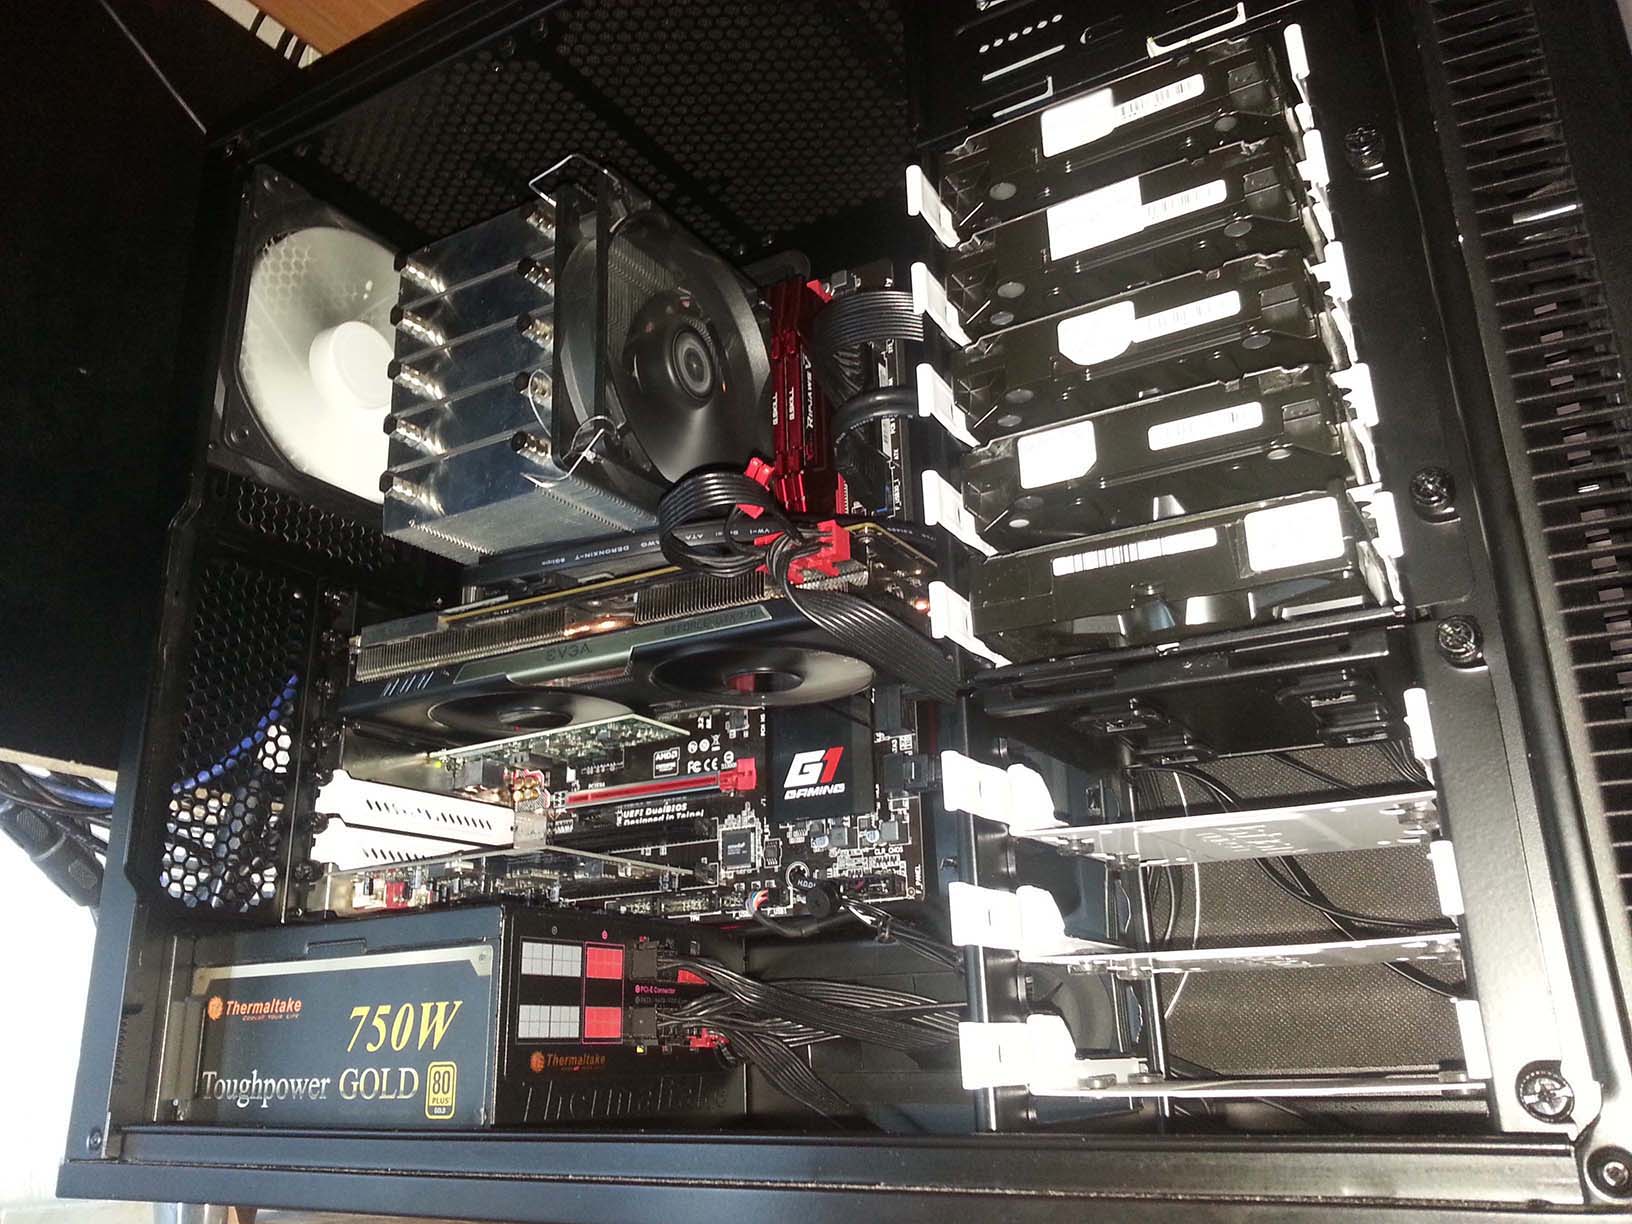
The great thing about this very case is that it has 2 dedicated SSD bays at the back of the motherboard, separating them from the entire regular hard drive cages. And cable management is a must so take your time organizing your rig. You'd have a better air-flow that way.
Below you can see that after installing MultiBeast, macOS Sierra just recognize my triple monitor setup, along with my Samsung TV.


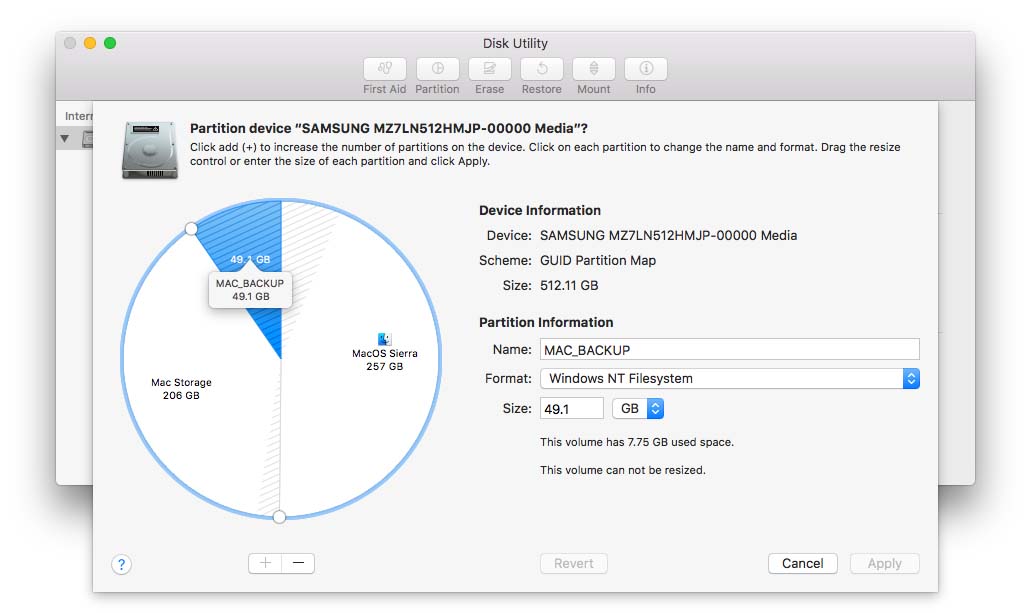
Here I made some changes to the structure of my disks.
I've made a second partition named 'Storage' on the MacOS disk to keep the data of the operation system, such as drivers, installation of tools and apps etc (for the Windows I have a dedicated hard drive as 'Storage'). And another partition to store an image in case that I need to restore my system from that image. Now that's not a must of course. I just like doing this and I'm using a 3rd party independent tool to make the image which is Acronis True Image.


That's the desktop with my MacOS disk and partitions and all physical NTFS Windows drives, apart from a missing drive that is connect to the ORICO expansion card. Currently only the 'GAMES' drive that is connected to it is showing. But it's not stable and changes every now and then.
Below is the MacOS disk and how I divided the partition:


Please note that by design, you cannot actually format a partition in MacOS with the Windows NT Filesystem (NTFS). Nor to write to such disks if you have Windows disks connected to MacOS like I do. To be able to do both I'm using another 3rd party tool, well known to Mac users and it's 'Paragon NTFS'. Not that it gives you write access to NTFS disks, it also adds the option to format a drive in the NTFS file system in MacOS Disk management. It's a pretty cool tool to have and worth what it costs, which is less than $20 and you have it for life. If you install it then it will be added to your System Preferences.
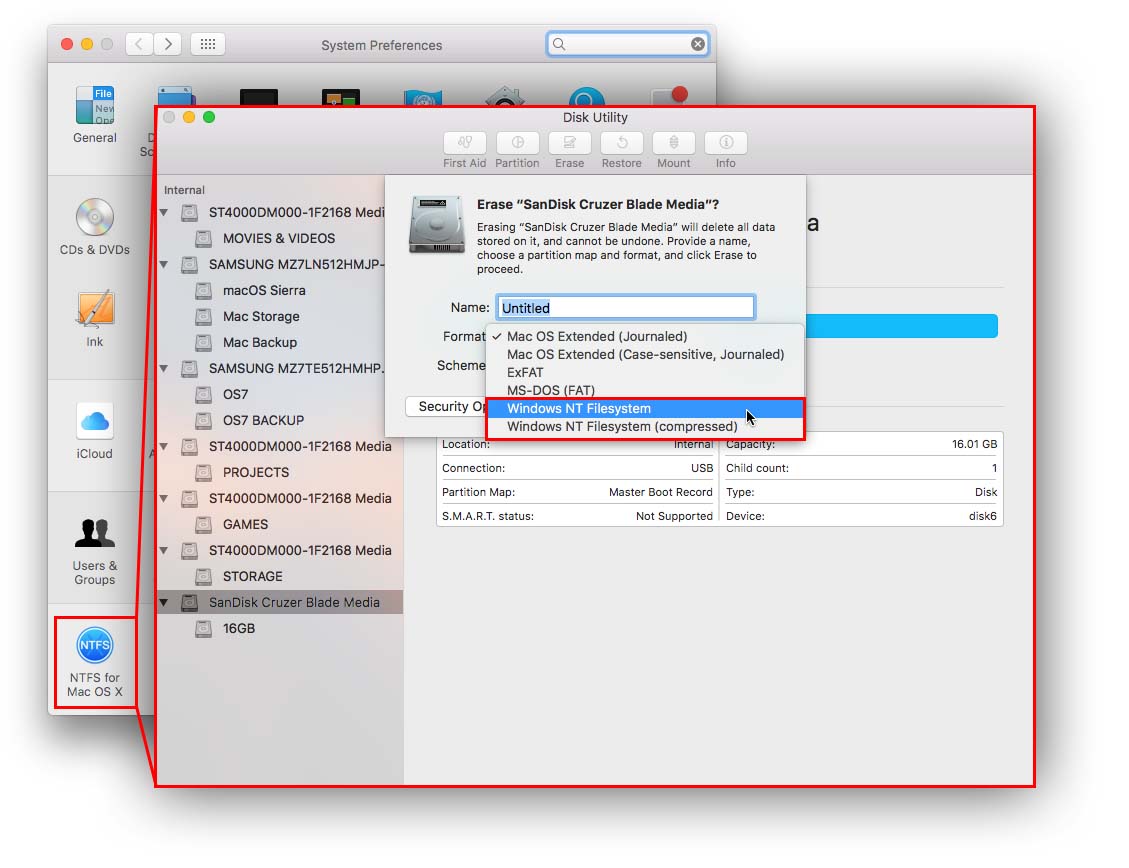
Here I just connected a 16GB thumb drive in order to show you the additional Windows format options that you get when you use Paragon NTFS.
Benchmarks
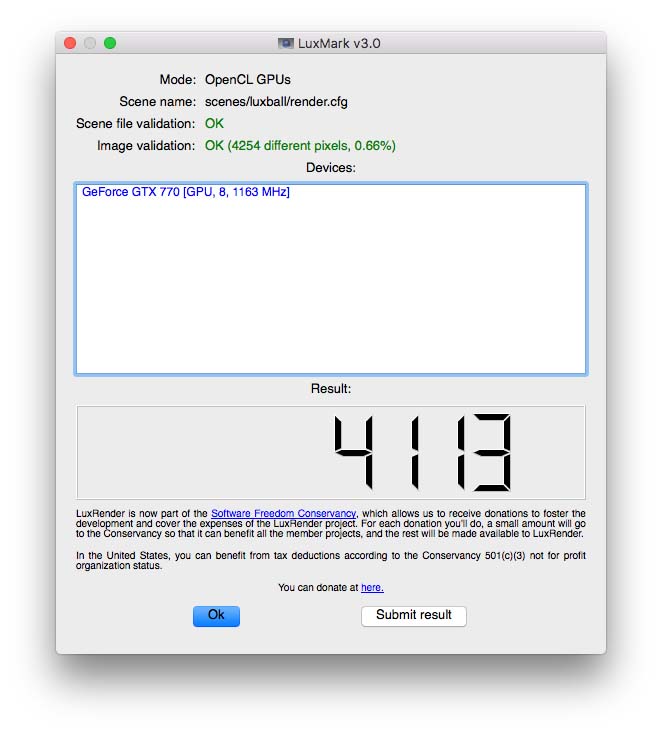
LuxMark (GPU)
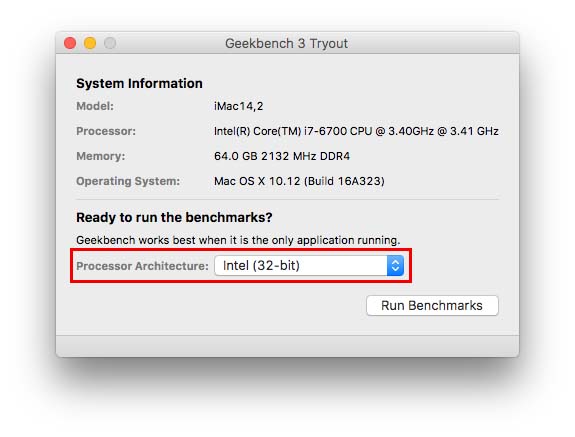
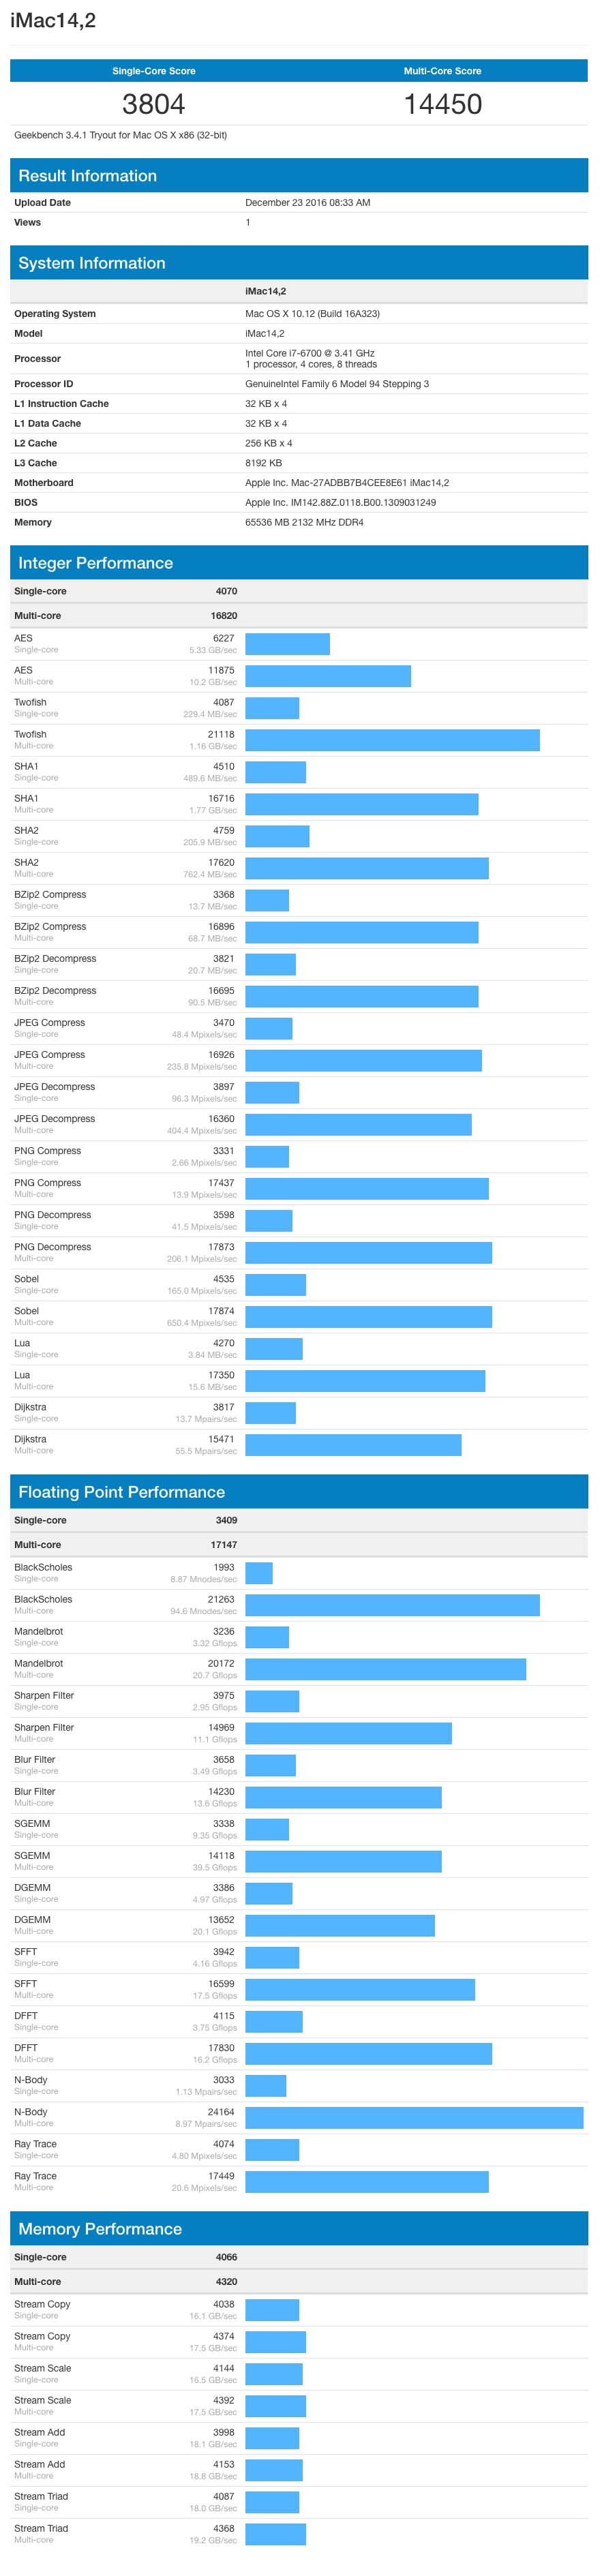
Greekbench 3
I made an image from the web page results so it's a bit long one...
- Note that the Tryout version can only do testing for the 32bit architecture -
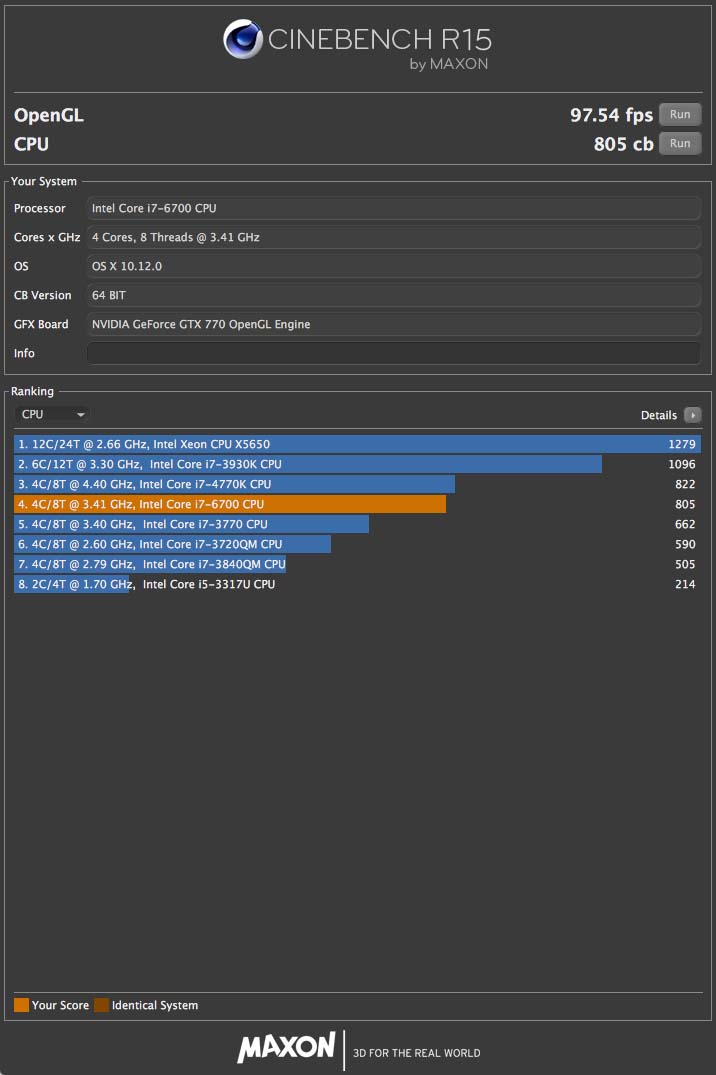
Cinebench R15 (CPU)
Cinebench R15 (GPU)
And finally I also did the BruceX Test for Final Cut Pro X and exported a 5K sequence according to the test steps here: https://blog.alex4d.com/2013/10/30/brucex-a-new-fcpx-benchmark
Greekbench 3
I made an image from the web page results so it's a bit long one...
- Note that the Tryout version can only do testing for the 32bit architecture -
Cinebench R15 (CPU)
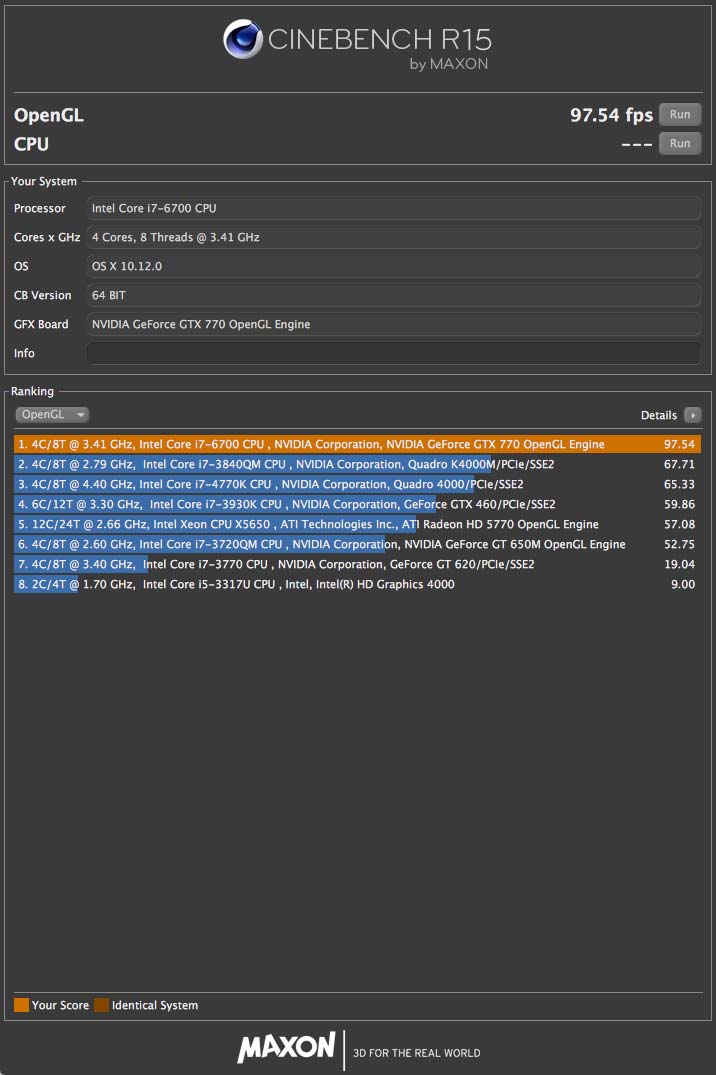
Cinebench R15 (GPU)
The result was 144 seconds (1:44) to export the sequence.
On my CustoMac Mini Deluxe it appears like some results were much better, although it's equipped with older hardware and less memory: i7-4790, HIS ATI Radeon HD 5770 1GB and 16GB of RAM. If you haven't seen my previous post you may find it here.
I really hope you liked my post and that my build was educating for you.
Any feedback, comments and questions are welcome.
Cheers
Last edited: