
- Joined
- May 19, 2012
- Messages
- 30
- Motherboard
- MSI Z97M Gaming
- CPU
- i7 4790K
- Graphics
- MSI GTX 960
- Mac
- Classic Mac
- Mobile Phone
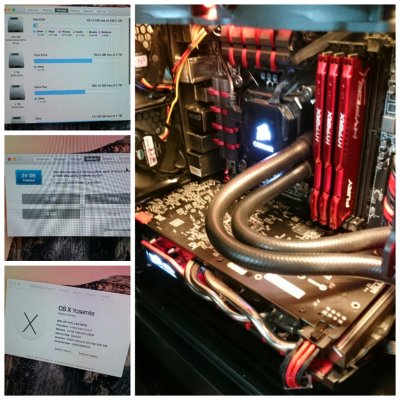
After few months since i purchase my system, finally i have the time and willingness to install OSX 10.10.4 into my system.
Results: Great Success & Fully Compatible!!
Hardware Spec:
Intel i7 4790K
MSI Z97M Gaming
MSI GTX 960 Gaming 2G
Crucial M500 256GB (OSX)
Kingston HyperX Fury 8gb x 3
Corsair Hydro H80i + Few other fans
Transcend 256GB (Win7)
USB Audio Interface Focusrite Scarlett 2i4
Dell U2414H Monitor
TPLink WDN4800 Wireless PCIe card
Orico Usb Bluetooth V4.0
Method:
1. Create Bootable USB Yosemite. Installation using clover by
http://www.tonymacx86.com/yosemite-desktop-guides/144426-how-install-os-x-yosemite-using-clover.html
2. Post Installation using different guide
http://www.tonymacx86.com/yosemite-...-clover-uefi-guide-gigabyte-ga-z77x-ud5h.html
Tools & Apps:
Clover, Yosemite 10.10.4 from App Store, iMac for download and create usb, Clover Configurator Yosemite Edition, Nvidia Web Driver for OSX 10.10.4, multibeast, 16Gb Kingston Usb drive
Summary Step & Notes:
1. Read through and make sure following each detail with patient,
2. Strip down whole system leaving only minimum hardware: mobo, cpu, 1pc of ram & 1 ssd
3. Download Yosemite 10.10.4 from App Store using my iMac
4. Erase 16GB and format into hfs+ extended journaled
5. Run Terminal and copy installer into USB (for me this will take very long time, around 1hr... once completed it will show done. be patient)
6. Run Clover and install it into USB (make sure to follow the instruction and check selection provided) i use intel 4600.plist
7. Change Boot sequence and set it to USB Drive
8. Load to boot the system (it will restart 2 times) be patient even though it says 1 sec remaining the fact is more than 2min
9. Still boot from USB, Installing Yosemite
10. Installation Done and successfully boot into the OS
11. Install Boot loader in the Yosemite drive by using Clover Configurator
12. Reboot, remove usb, install TP Link wireless card and change boot priority in bios, set it to UEFI OS
13. Successfully boot into OS and still using Intel HD4600
14. Download Nvidia web driver and install it. use Clover Configurator to set nvda_drv=1 (you can do this also in clover during boot by press space bar and select single mode verbose)
15. Reboot, Install Graphic Card, Set display setting in bios to PGE instead of IGP
16. Boot in verbose, make sure nvda_drv=1, Once login select and activate Nvidia Graphic Driver selected on icon tray above
17. Install audio Realtek driver using Multibeast
18. Shutdown, Install the rest of hardware (RAM, HDD, Bluetooth, Focusrite USB Audio Interface)
19. Minor Configuration using Clover Configurator
Now I am trying to figure out how to activate my dual boot in clover. Every time i click my windows icon in clover it will not boot, unless i set the boot priority in bios.
I am using separate SDD for my OSX and Win7. Any input will be appreciated.
I hope it helps and Thank you
Attachments

Last edited by a moderator:


