
- Joined
- Jan 28, 2012
- Messages
- 9
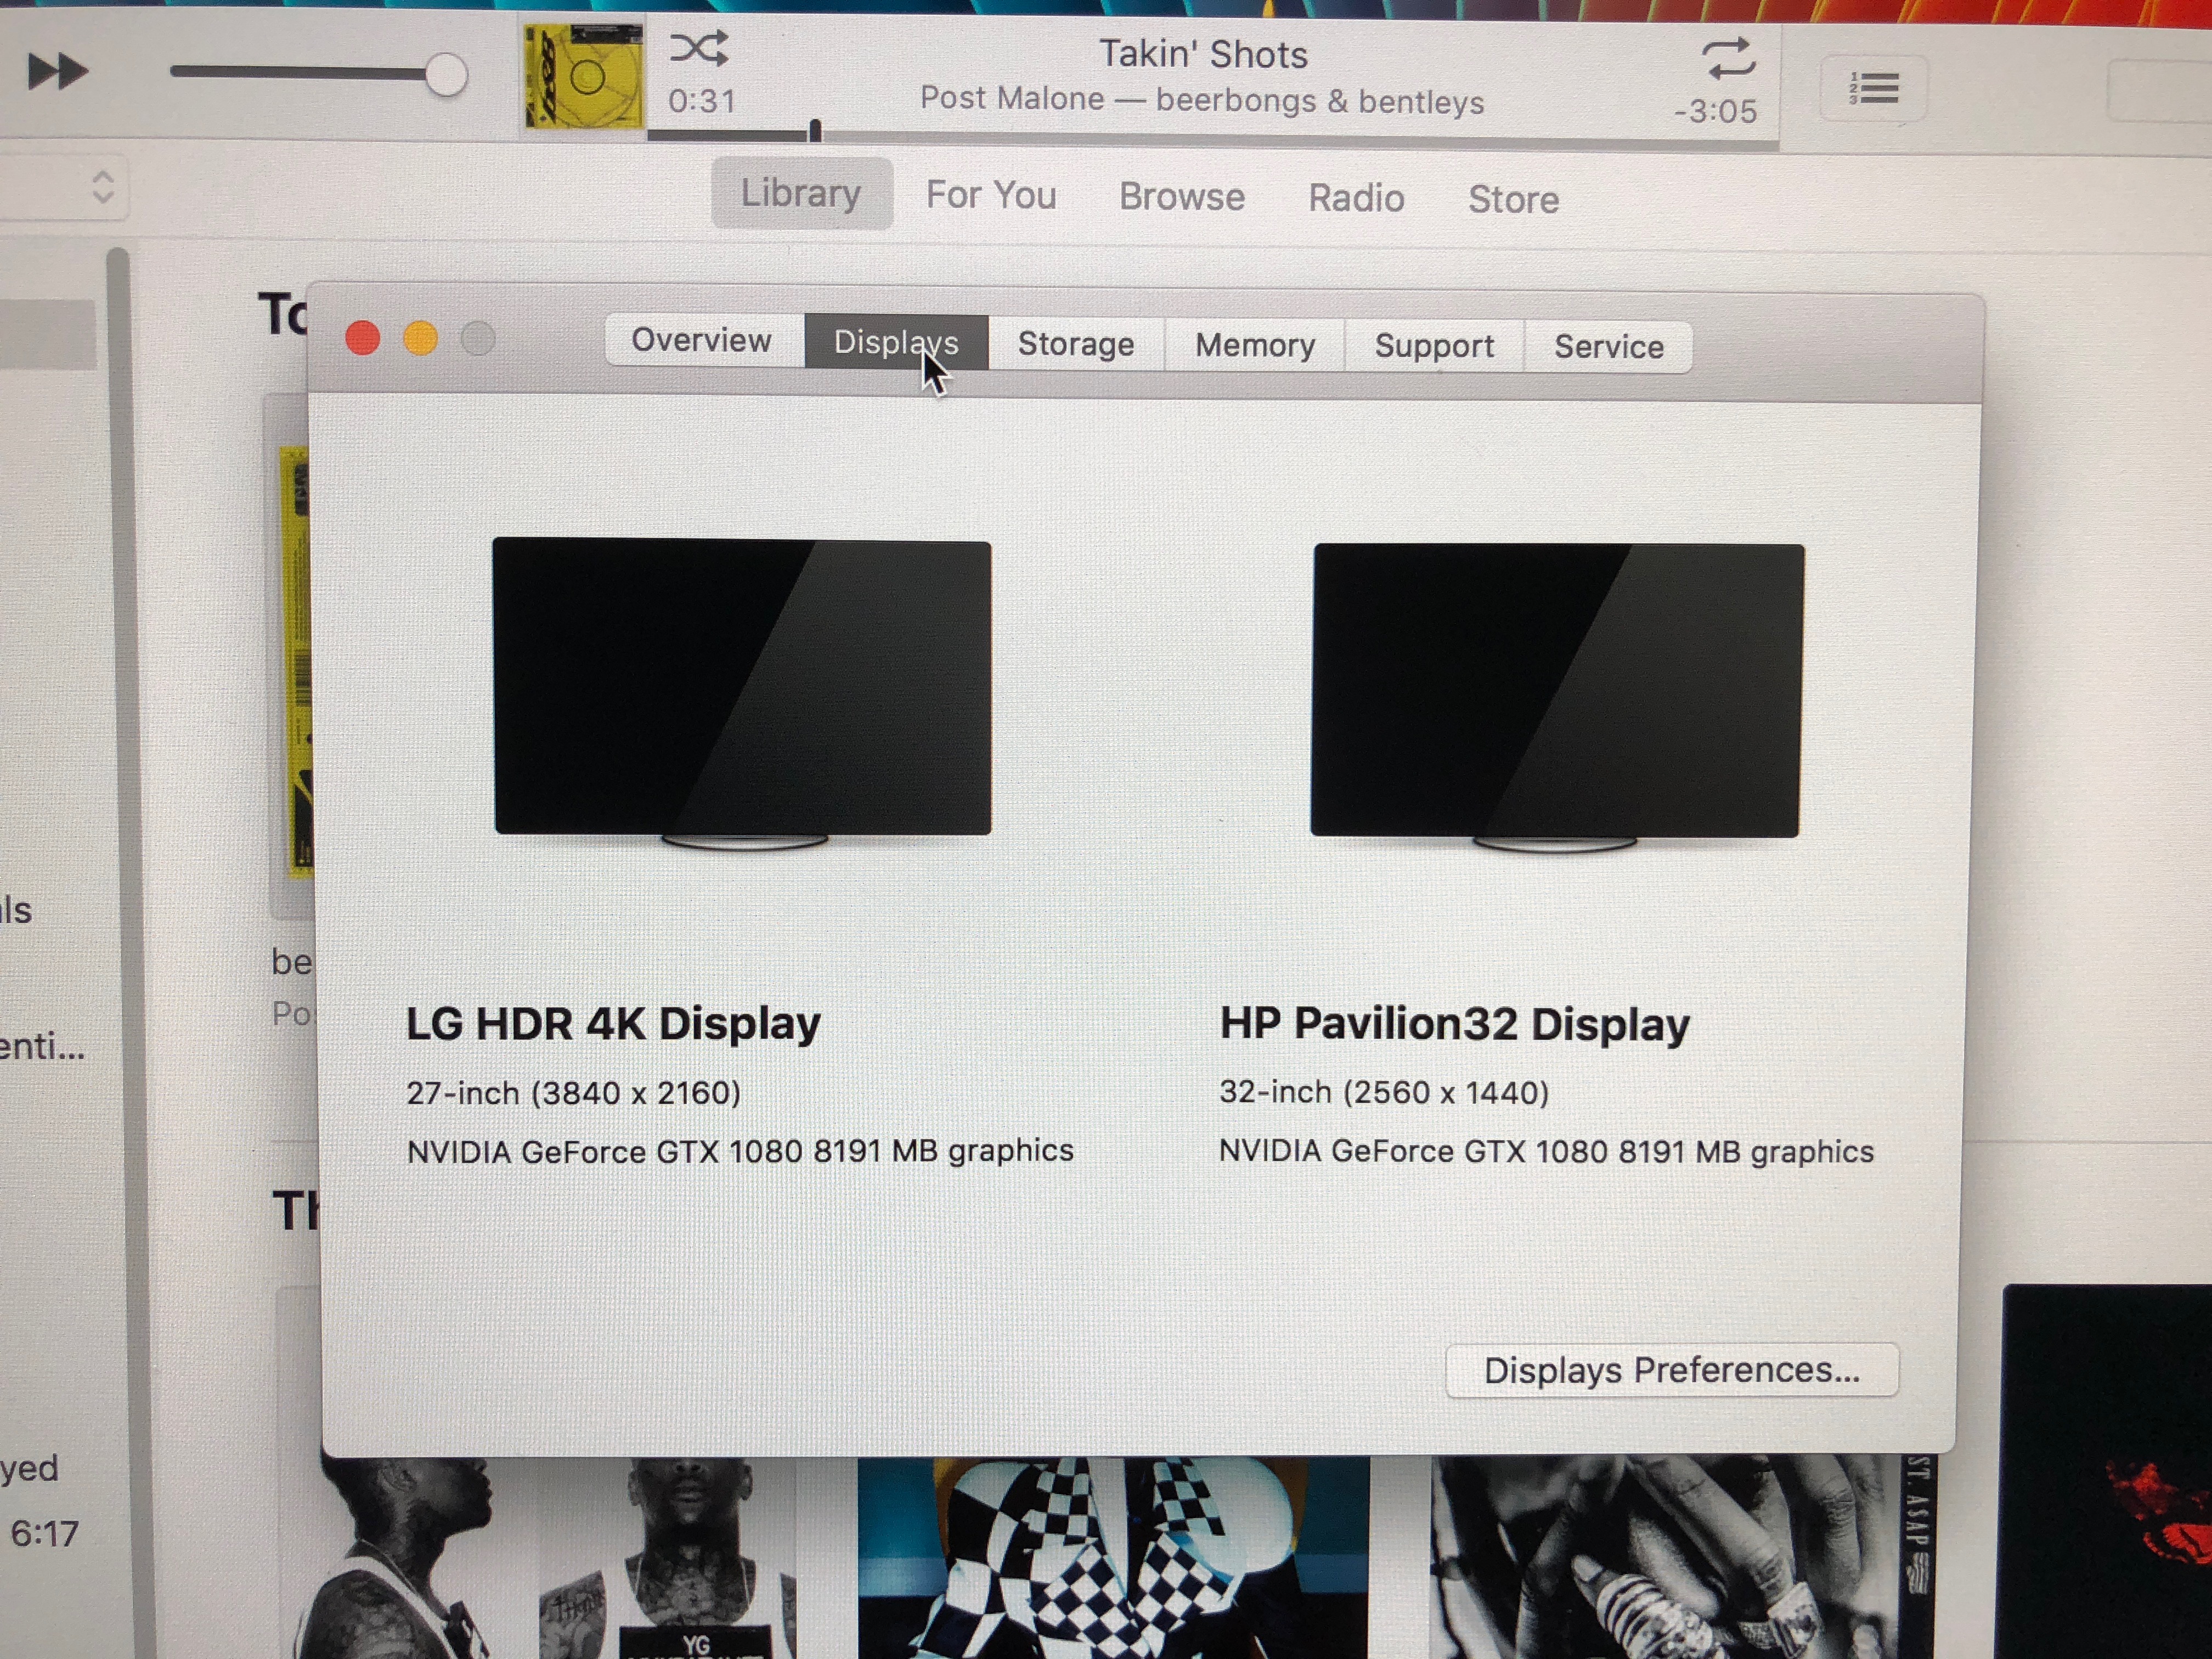
- Motherboard
- MSI Z270 GAMING M6
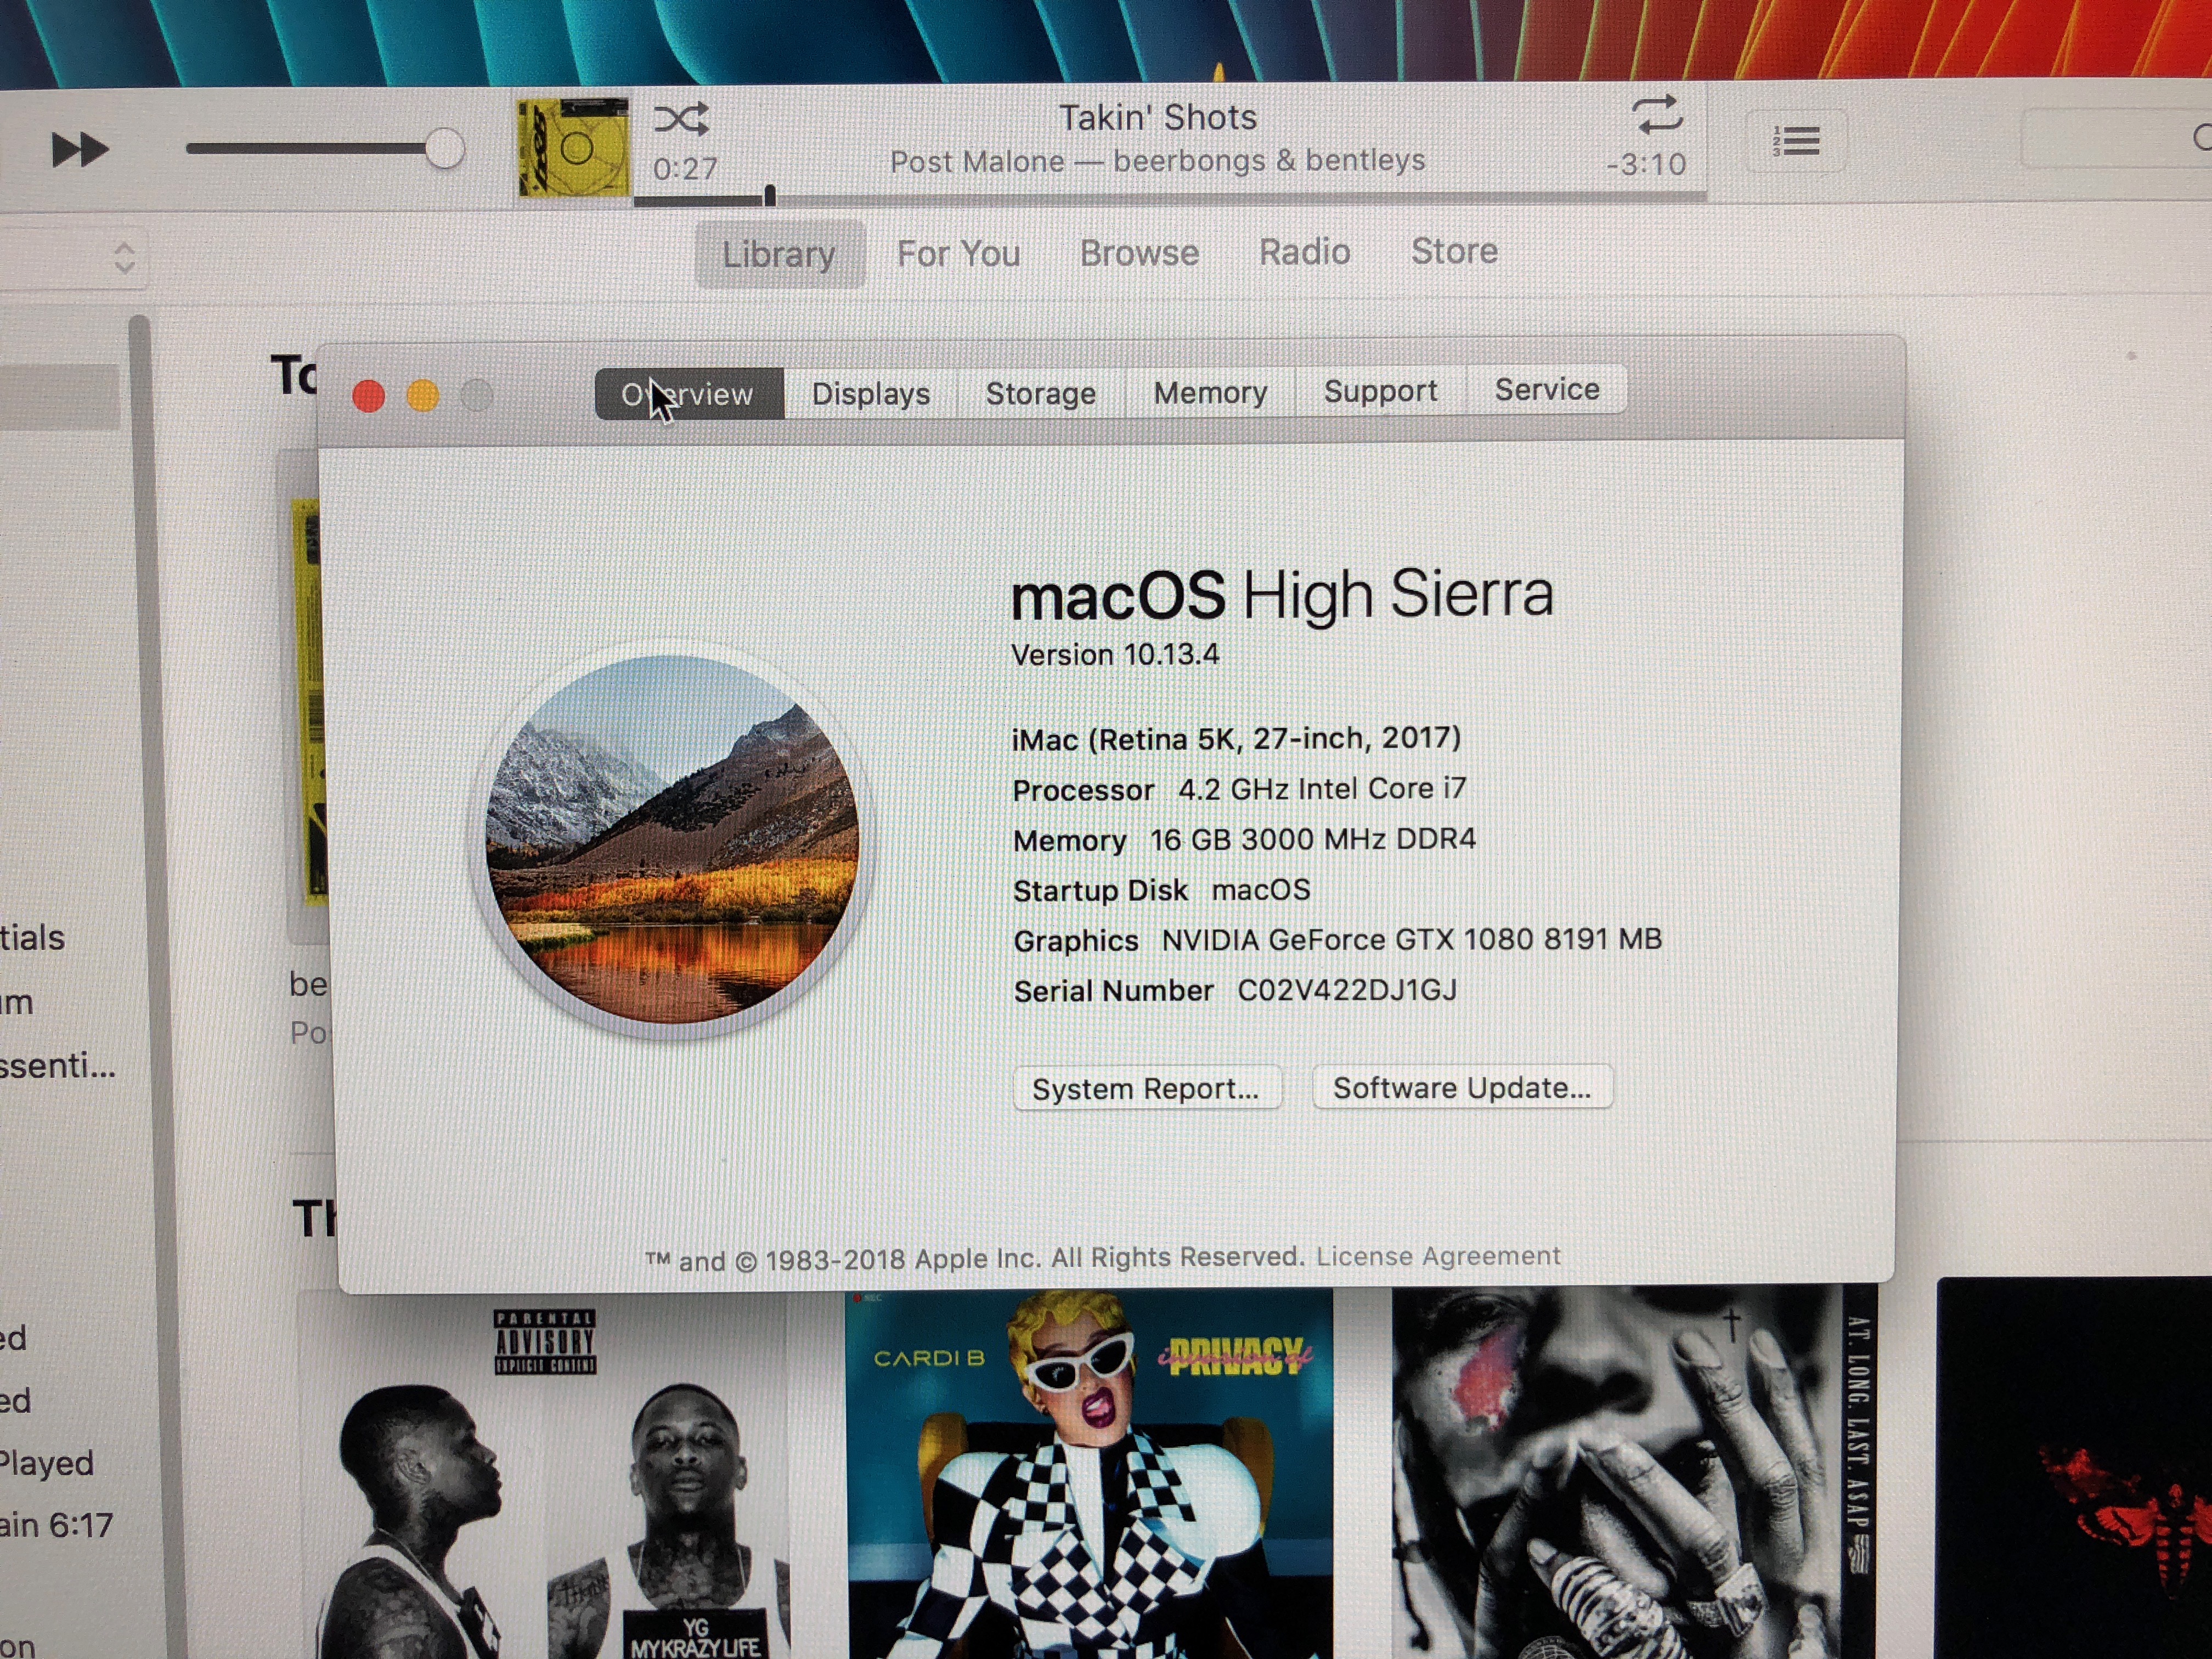
- CPU
- Intel Core i7 7700K
- Graphics
- NVIDIA GeForce GTX 1080 8GB
- Mac
- Mobile Phone
knitty's Build:
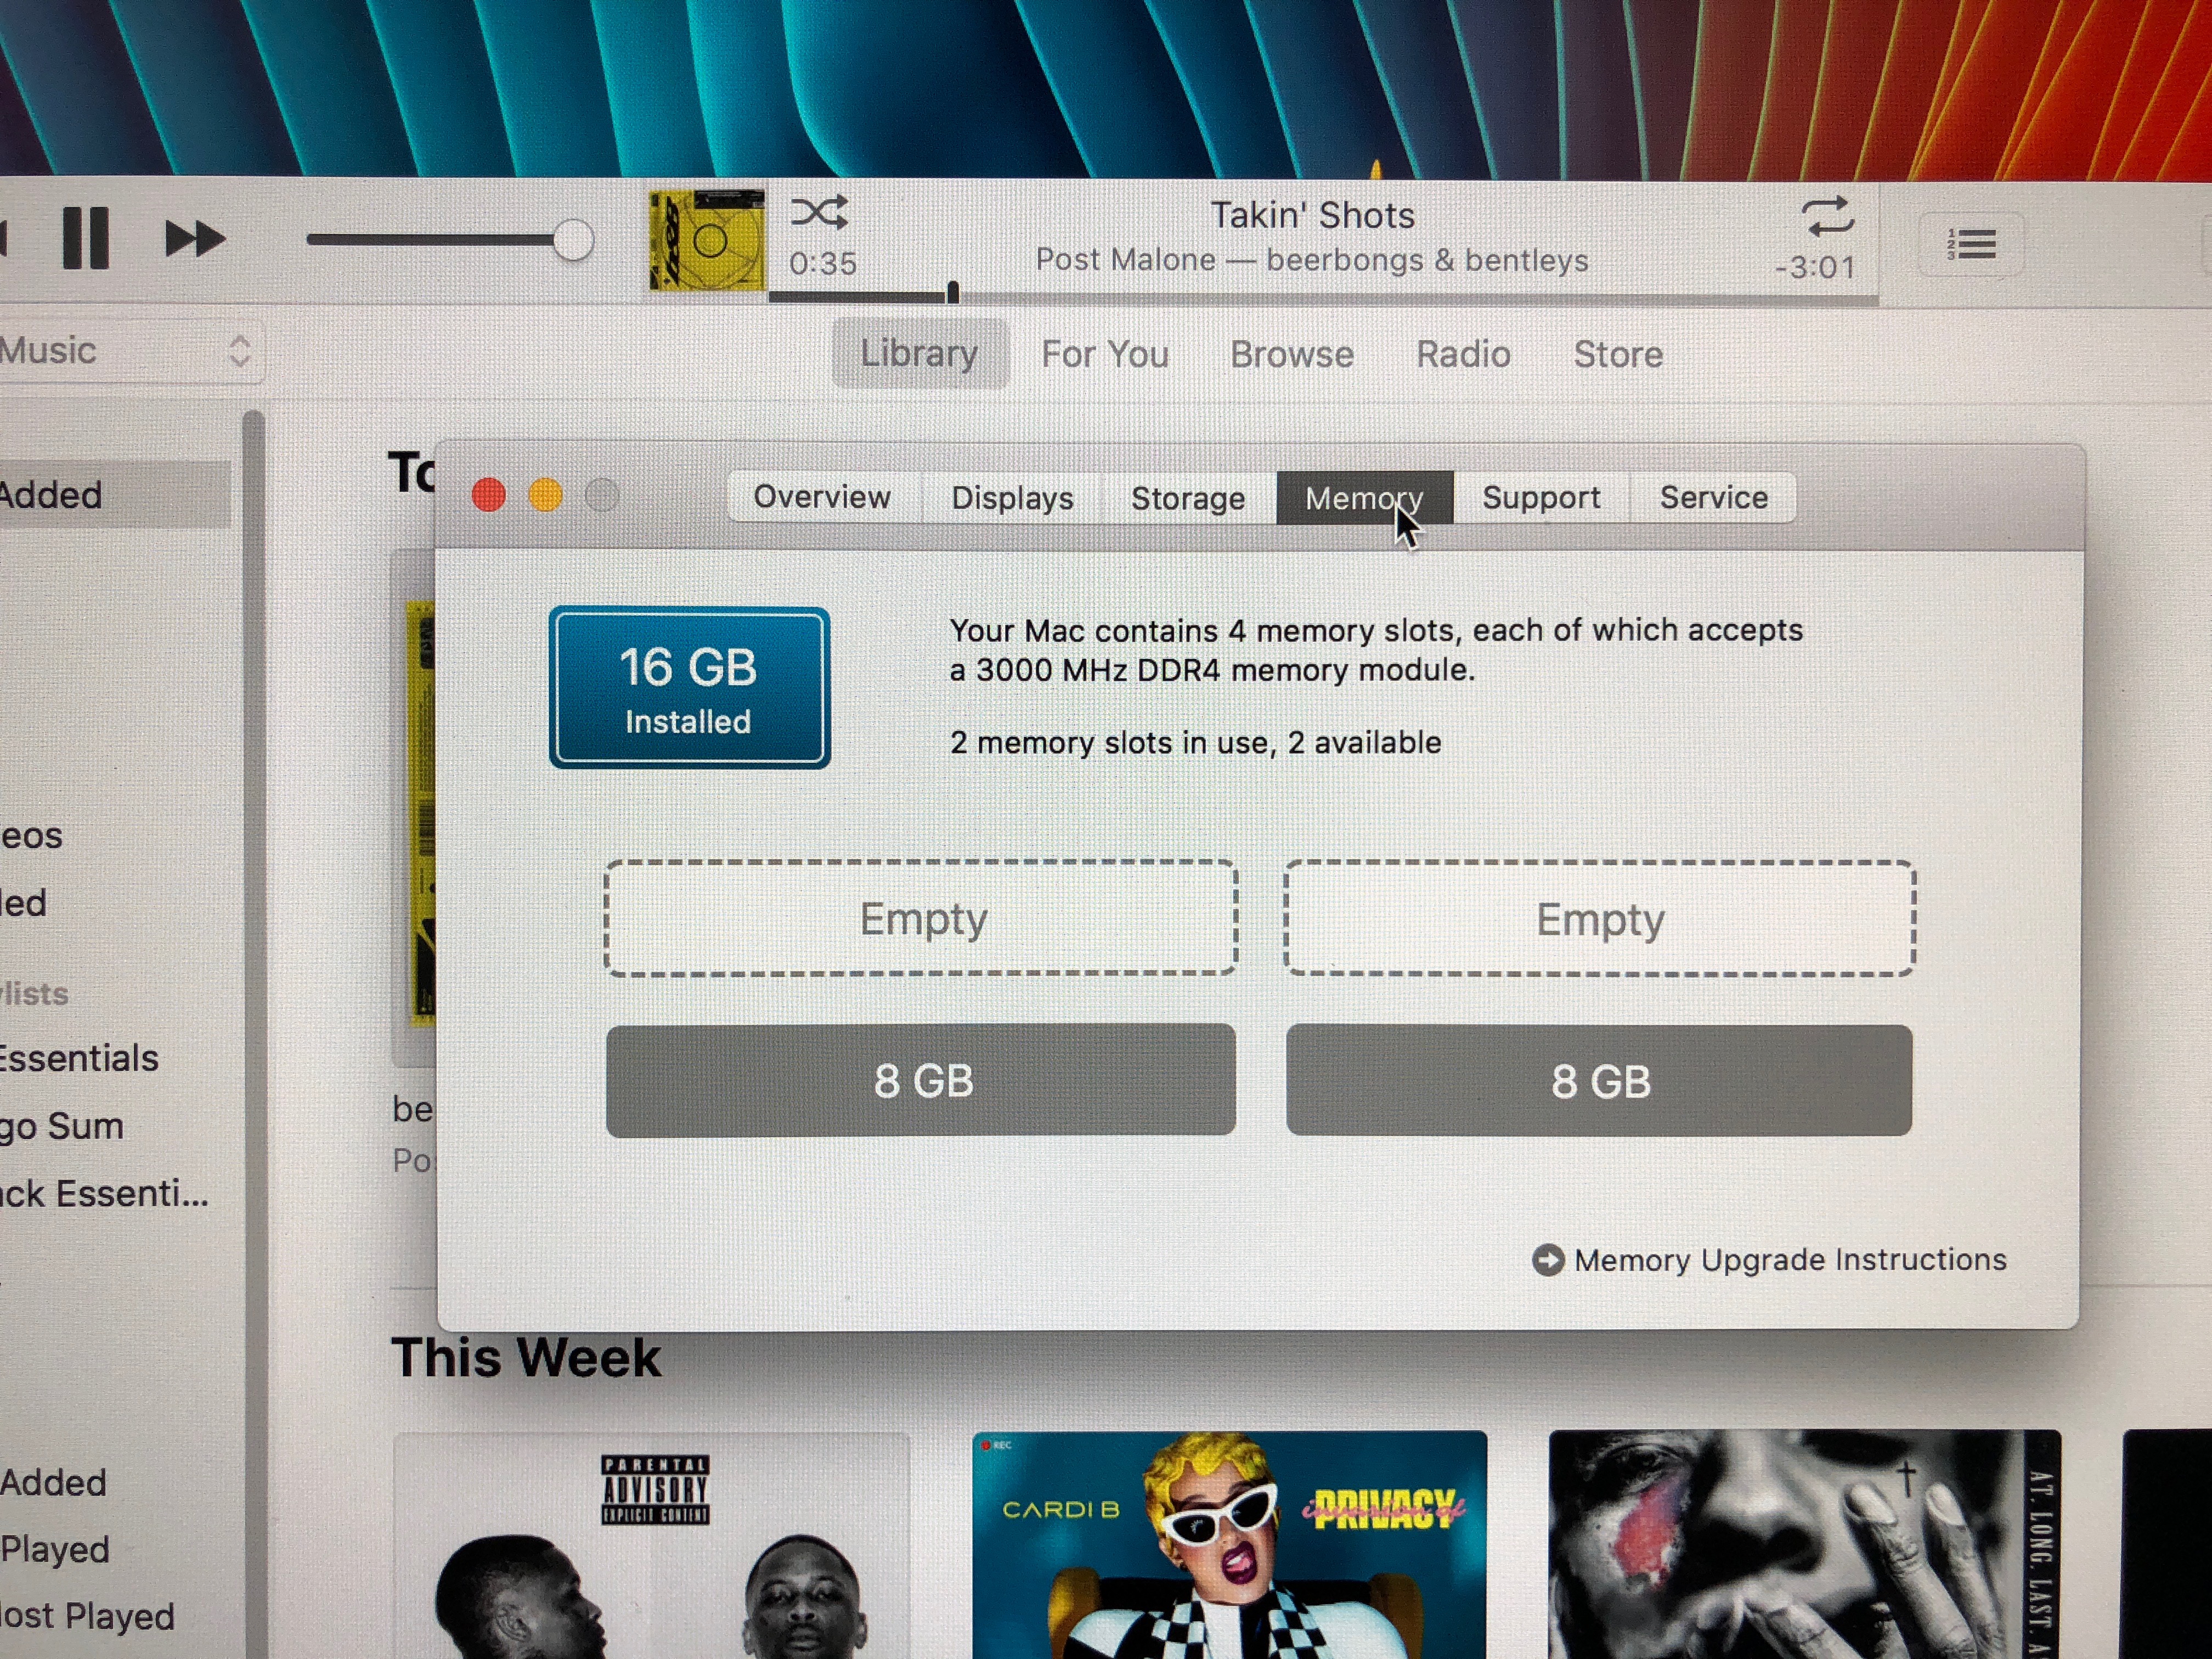
Core i7 7700K - Z270 GAMING M6 - 16GB RAM - GTX 1080
Components
Intel i7-7700K Kaby Lake Processor
https://www.amazon.com/dp/B01MXSI216/?tag=tonymacx86com-20
https://www.newegg.com/Product/Product.aspx?Item=N82E16819117726
MSI Z270 GAMING M6 A/C Motherboard
https://www.amazon.com/dp/B06XSYZ968/?tag=tonymacx86com-20
https://www.newegg.com/Product/Product.aspx?Item=N82E16813144033
Corsair Vengeance RGB 16GB (2x8GB) DDR4 3000MHz XMP 2.0 RGB LED Lighting (CMR16GX4M2C3000C15)
https://www.amazon.com/dp/B06XRFNWHK/?tag=tonymacx86com-20
https://www.newegg.com/Product/Product.aspx?Item=N82E16820236165
256GB Samsung 840 Pro Series Solid State Drive
https://www.ebay.com/itm/Samsung-84...kUAAOSwvshazMrR:sc:USPSFirstClass!32801!US!-1
https://www.amazon.com/dp/B009NB8WRU/?tag=tonymacx86com-20
https://www.newegg.com/Product/Product.aspx?Item=N82E16820147193
500GB SanDisk Ultra 3D Solid State Drive (SDSSDH3-500G-G25)
https://www.amazon.com/dp/B072R78B6Q/?tag=tonymacx86com-20
https://www.newegg.com/Product/Product.aspx?Item=N82E16820173353
Cryorig H7 Tower Cooler
https://www.amazon.com/dp/B00S7YA5FQ/?tag=tonymacx86com-20
https://www.newegg.com/Product/Product.aspx?Item=13C-000U-00005&Tpk=13C-000U-00005
850W EVGA GQ 80 PLUS Gold Modular Power Supply
https://www.amazon.com/dp/B017HA3SO0/?tag=tonymacx86com-20
https://www.newegg.com/Product/Product.aspx?Item=N82E16817438061
PC/Hackintosh - Handoff and Continuity - Apple Broadcom BCM94360CD WiFI ac + BT 4.0
https://www.amazon.com/gp/product/B012LOT512/?tag=tonymacx86com-20
Corsair 570X RGB case
https://www.amazon.com/dp/B01LE0ZKR2/?tag=tonymacx86com-20
https://www.newegg.com/Product/Product.aspx?Item=N82E16811139087
Comments
Installation
Fully GPT UEFI installation, ensure your Windows installation is UEFI GPT formatted and compatible. If not, then reformat and start over.
Always ensure Windows is set up first before moving onto Hackintosh. Best way to set up UEFI Windows is to follow the same exact boot settings below, create a UEFI Windows USB using Rufus USB utility with GPT partition.
Even without Hackintosh, this will ensure you are able to take advantage of UEFI GOP BIOS on your GPU, a fully EFI boot, native resolution BIOS and splash screens, and Fast Boot features. It is just a much cleaner set up in the very end and native resolution BIOS and splash screens will scale all the way up to even 4K displays. It's really nice.
BIOS Settings
These the are the BIOS settings I recommend (memorize these settings, they will carry with you throughout many of your Intel motherboards, the settings rarely change)
SETTINGS → Advanced → PCI Subsystem Settings
Core i7 7700K - Z270 GAMING M6 - 16GB RAM - GTX 1080


Components
Intel i7-7700K Kaby Lake Processor
https://www.amazon.com/dp/B01MXSI216/?tag=tonymacx86com-20
https://www.newegg.com/Product/Product.aspx?Item=N82E16819117726
MSI Z270 GAMING M6 A/C Motherboard
https://www.amazon.com/dp/B06XSYZ968/?tag=tonymacx86com-20
https://www.newegg.com/Product/Product.aspx?Item=N82E16813144033
Corsair Vengeance RGB 16GB (2x8GB) DDR4 3000MHz XMP 2.0 RGB LED Lighting (CMR16GX4M2C3000C15)
https://www.amazon.com/dp/B06XRFNWHK/?tag=tonymacx86com-20
https://www.newegg.com/Product/Product.aspx?Item=N82E16820236165
256GB Samsung 840 Pro Series Solid State Drive
https://www.ebay.com/itm/Samsung-84...kUAAOSwvshazMrR:sc:USPSFirstClass!32801!US!-1
https://www.amazon.com/dp/B009NB8WRU/?tag=tonymacx86com-20
https://www.newegg.com/Product/Product.aspx?Item=N82E16820147193
500GB SanDisk Ultra 3D Solid State Drive (SDSSDH3-500G-G25)
https://www.amazon.com/dp/B072R78B6Q/?tag=tonymacx86com-20
https://www.newegg.com/Product/Product.aspx?Item=N82E16820173353
Cryorig H7 Tower Cooler
https://www.amazon.com/dp/B00S7YA5FQ/?tag=tonymacx86com-20
https://www.newegg.com/Product/Product.aspx?Item=13C-000U-00005&Tpk=13C-000U-00005
850W EVGA GQ 80 PLUS Gold Modular Power Supply
https://www.amazon.com/dp/B017HA3SO0/?tag=tonymacx86com-20
https://www.newegg.com/Product/Product.aspx?Item=N82E16817438061
PC/Hackintosh - Handoff and Continuity - Apple Broadcom BCM94360CD WiFI ac + BT 4.0
https://www.amazon.com/gp/product/B012LOT512/?tag=tonymacx86com-20
Corsair 570X RGB case
https://www.amazon.com/dp/B01LE0ZKR2/?tag=tonymacx86com-20
https://www.newegg.com/Product/Product.aspx?Item=N82E16811139087

Comments
Installation
Fully GPT UEFI installation, ensure your Windows installation is UEFI GPT formatted and compatible. If not, then reformat and start over.
Always ensure Windows is set up first before moving onto Hackintosh. Best way to set up UEFI Windows is to follow the same exact boot settings below, create a UEFI Windows USB using Rufus USB utility with GPT partition.
Even without Hackintosh, this will ensure you are able to take advantage of UEFI GOP BIOS on your GPU, a fully EFI boot, native resolution BIOS and splash screens, and Fast Boot features. It is just a much cleaner set up in the very end and native resolution BIOS and splash screens will scale all the way up to even 4K displays. It's really nice.
BIOS Settings
These the are the BIOS settings I recommend (memorize these settings, they will carry with you throughout many of your Intel motherboards, the settings rarely change)
SETTINGS → Advanced → PCI Subsystem Settings
Above 4G Decoding : Disabled (for cryptomining purposes only)
SETTINGS → Advanced → Integrated Peripherals
Onboard LAN Controller : Enabled
LAN Option ROM : Disabled
Network Stack : Disabled
SATA Mode : AHCI
SATA# Hot Plug : All Enabled
HD Audio Controller : Enabled
HPET : Enabled
Intel Serial I/O : Disabled (unless you need it)
LAN Option ROM : Disabled
Network Stack : Disabled
SATA Mode : AHCI
SATA# Hot Plug : All Enabled
HD Audio Controller : Enabled
HPET : Enabled
Intel Serial I/O : Disabled (unless you need it)
SETTINGS → Advanced → USB Configuration
Legacy USB Support : Auto
XHCI Hand-off : Enabled
XHCI Hand-off : Enabled
SETTINGS → Advanced → Integrated Graphics Configuration →
Initiate Graphics Adapter : PEG or IGD (PEG For dGPU and IGD for iGPU)
Integrated Graphics Memory : 192M
IGD Multi-Monitor : Enabled (enables iGPU + dGPU, present only when there's dGPU)
Integrated Graphics Memory : 192M
IGD Multi-Monitor : Enabled (enables iGPU + dGPU, present only when there's dGPU)
SETTINGS → Boot →
Full Screen Logo Display : Up to you
Bootup Numlock State: Enabled
Boot Mode Select : UEFI
Boot Option #1 : UEFI Flash Drive
Boot Option #2 : UEFI Hard Drive (or Drive Name will be listed here)
Bootup Numlock State: Enabled
Boot Mode Select : UEFI
Boot Option #1 : UEFI Flash Drive
Boot Option #2 : UEFI Hard Drive (or Drive Name will be listed here)
O.C.
Extreme Memory Profile(X.M.P.) : Profile1 (for optimal DDR4 memory speed)
O.C. → CPU Specifications
Hyper-Threading : Enabled (not available for Core i5 and some CPUs)
Active Processor Cores Control : Disabled
Active Processor Cores Control : Disabled
Limit CPUID Maximum : Disabled (limits CPU cores to one core operation)
Intel Virtualization Tech : Enabled
Intel VT-d : Enabled
Hardware Prefetcher : Enabled
Adjacent Cache Line Prefetcher : Enabled
CPU AES Instructions : Enabled
Intel VT-d : Enabled
Hardware Prefetcher : Enabled
Adjacent Cache Line Prefetcher : Enabled
CPU AES Instructions : Enabled
Intel Adaptive Thermal Monitor : Enabled
Intel C State : Enabled (for power management features)
C1E Support : Enabled (for power management features)
Package C State Limit : Enabled (for power management features)
CFG Lock : Disabled
C1E Support : Enabled (for power management features)
Package C State Limit : Enabled (for power management features)
CFG Lock : Disabled
Save and Exit BIOS by pressing F10 and pressing Enter
Experimental
Enabling UEFI GOP (native resolution UEFI BIOS + Clover UEFI, requires GPU with UEFI GOP firmware, very tricky)
SETTINGS → Advanced → Windows OS configuration → Windows 8.1/10 WHQL Support → Enabled
Enabling UEFI GOP (native resolution UEFI BIOS + Clover UEFI, requires GPU with UEFI GOP firmware, very tricky)
SETTINGS → Advanced → Windows OS configuration → Windows 8.1/10 WHQL Support → Enabled
Moving on...
Creating your macOS USB installer
Create a UniBeast USB installer by following the Steps 1 & 2 here
Create a UniBeast USB installer by following the Steps 1 & 2 here
After creating the UniBeast USB installer,
- Download Clover Configurator, run Clover Configuration
- Go to Mount EFI section and mount EFI partition of the macOS USB installer
- Navigate to the UniBeast USB EFI partition /EFI/CLOVER/driver64uefi
- Download OsxAptioFix2Drv-free2000.efi and place into the driver64uefi folder
Eject the EFI partition and you are ready to begin installing
INSTALLING High Sierra
DISCONNECT ALL SSDs / HDDs from your motherboard
ONLY CONNECT THE TARGET SSD YOU WILL BE INSTALLING macOS ON
This is to avoid messing with any Windows EFI settings and partitions.
Step 1. Install macOS High Sierra
1. Turn on the computer
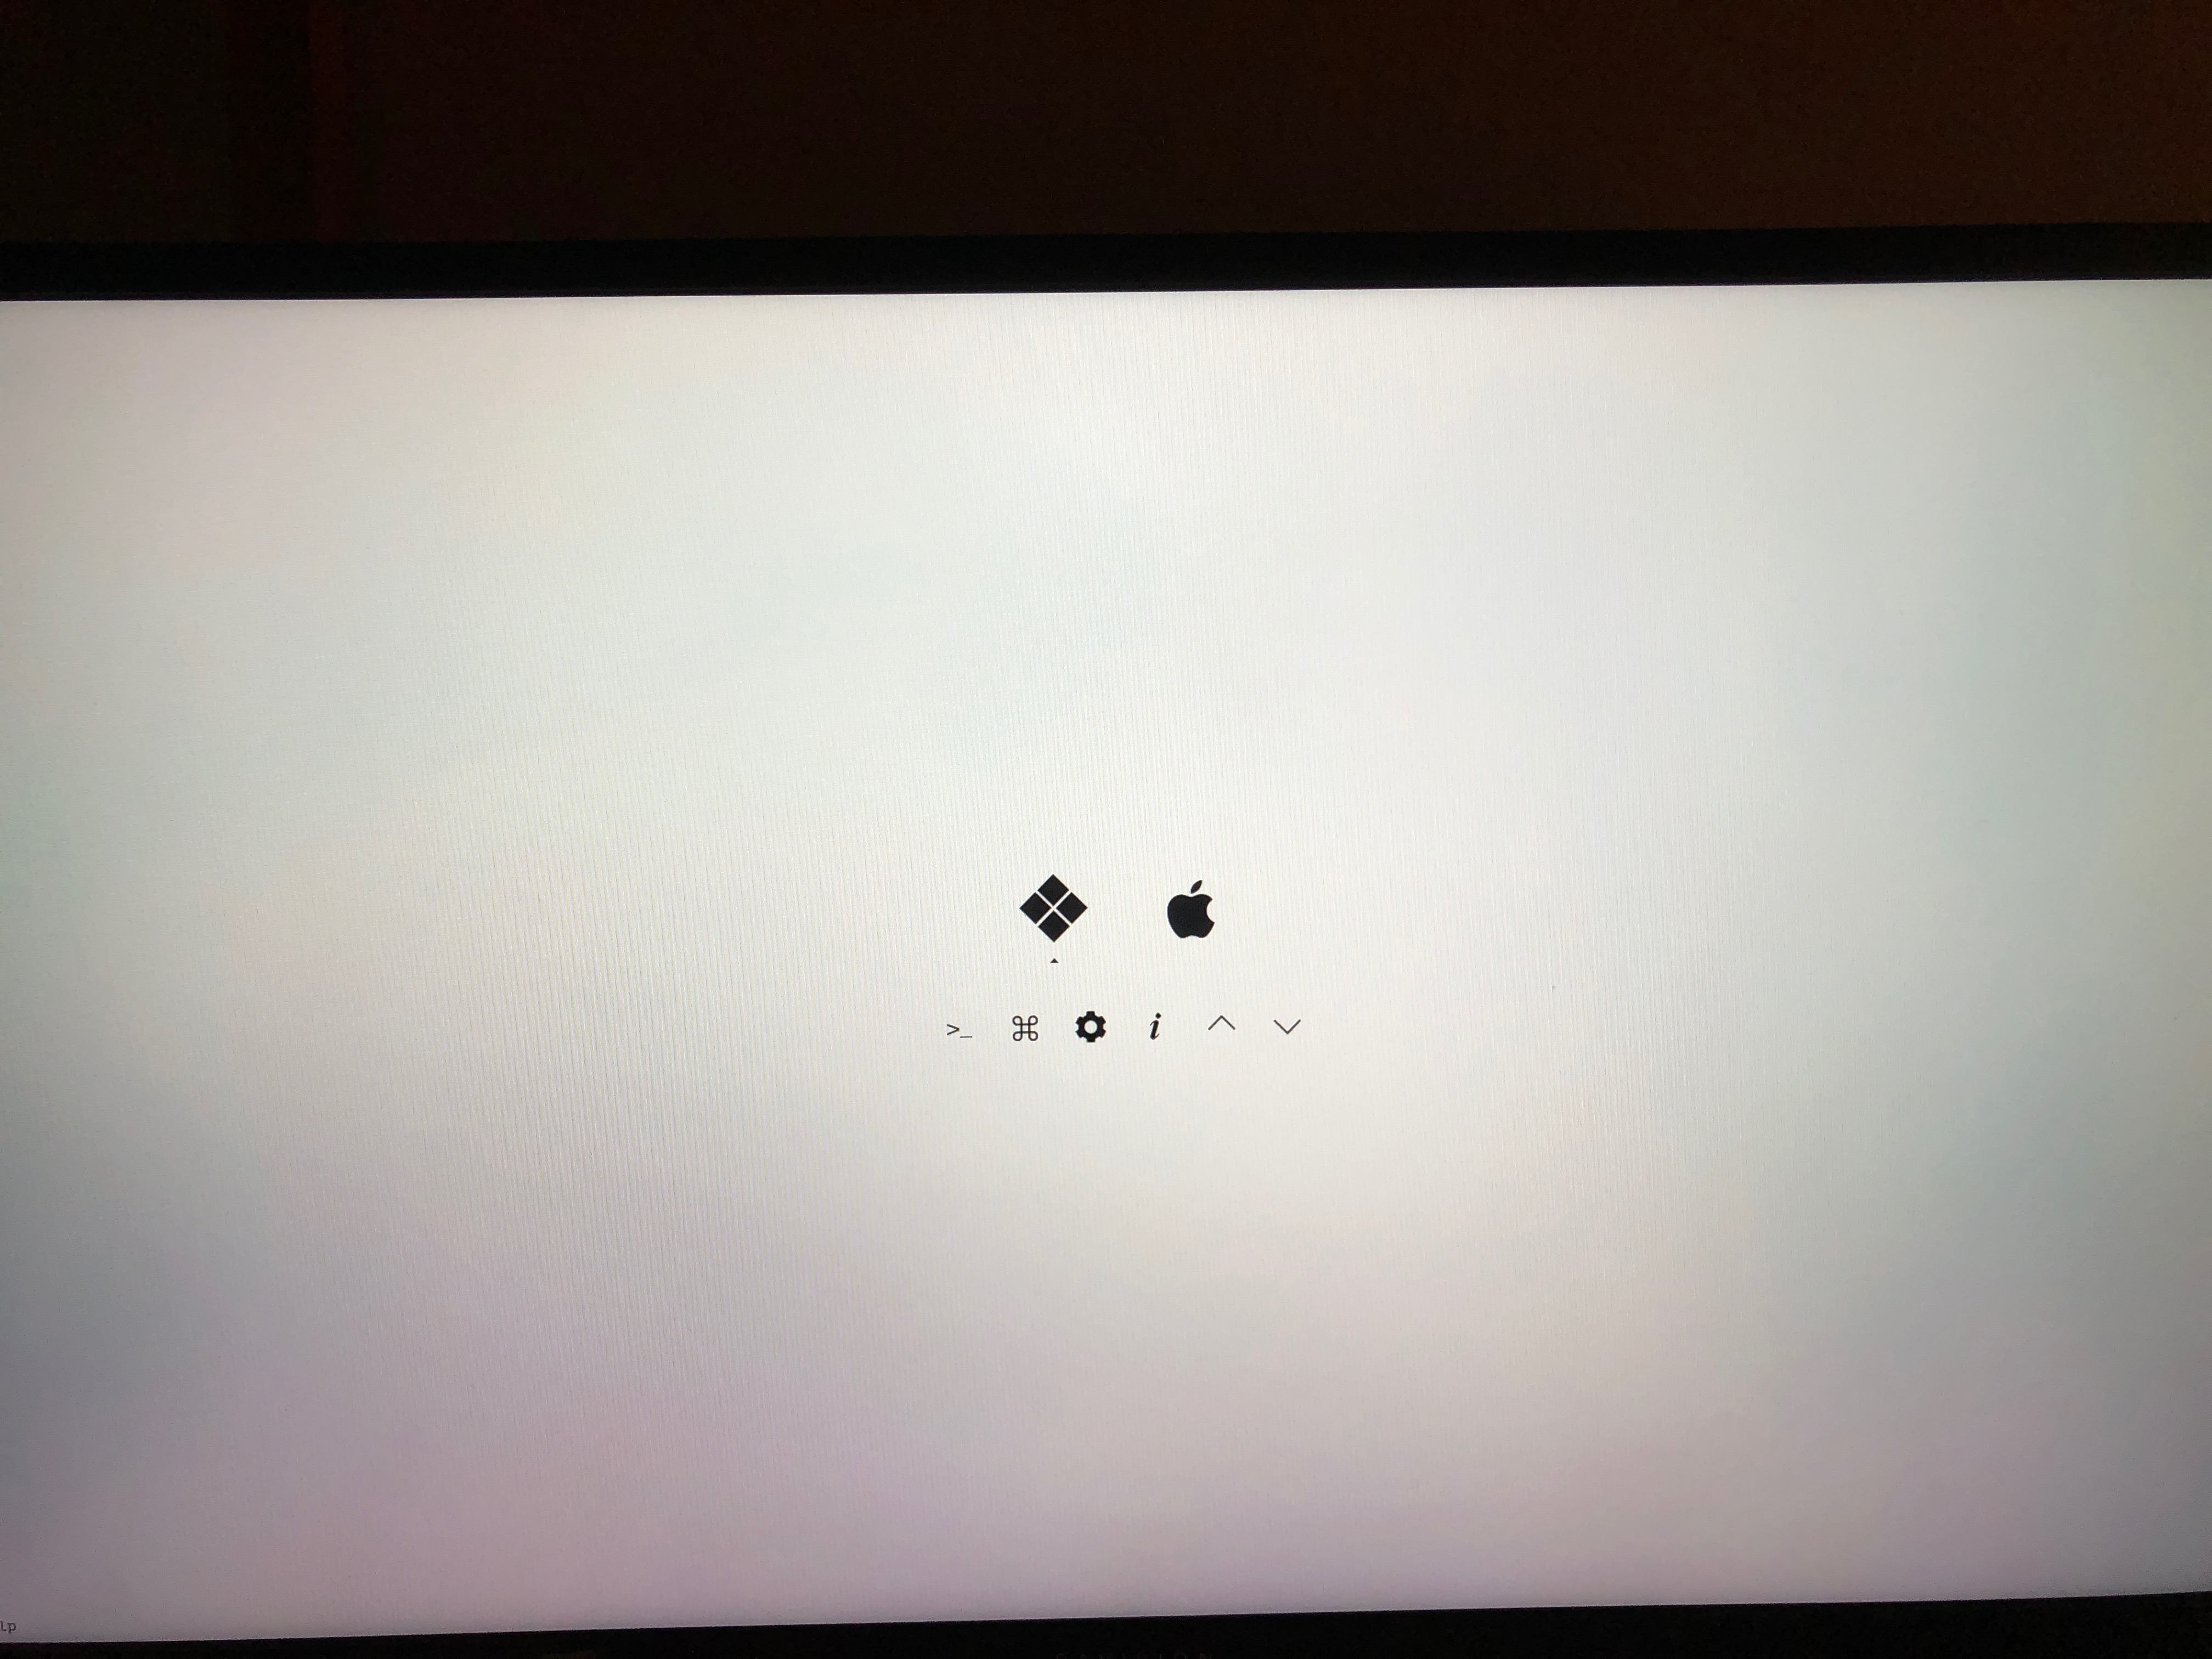
2. Press the hotkey to choose boot device (F11 for MSI motherboards)
3. Choose USB
4. At Clover boot screen, choose Boot OS X Install from Install macOS High Sierra
5. When you arrive at the Installer, choose language.
6. For a new installation of macOS, you MUST erase and format the destination drive according to the following steps before continuing.
a. In the top menu bar choose Utilities, and open Disk Utility
b. Highlight your target drive for the High Sierra installation in left column.
c. Click Erase button
d. For Name: type macOS (or whatever name you want)
e. For Format: choose APFS (Journaled)
f. Click Erase
g. Close Disk Utility
b. Highlight your target drive for the High Sierra installation in left column.
c. Click Erase button
d. For Name: type macOS (or whatever name you want)
e. For Format: choose APFS (Journaled)
f. Click Erase
g. Close Disk Utility
7. When the installer asks you where to install, choose macOS (or your specified drive name)
8. Upon completion, the system will automatically restart.
9. Press the hotkey to choose boot device (F11 for MSI motherboards)
10. Choose USB
11. At the Clover Boot Screen, choose macOS (or your specified drive name)
There is a good chance it will reboot in the middle of install. If it does, then press the hotkey (F12) and choose USB. At Clover Boot Screen, choose macOS (or specified drive name)
12. Complete macOS installation. The system will automatically reboot (let it reboot on its own).Step 2. First boot with macOS
I did not use MultiBeast but I installed Clover and the necessary drivers/kext individually. MultiBeast is useful do not get me wrong, it comes very useful in many situations for me (thank you tonymacx86) but my preferred set up is designed so I can keep macOS vanilla.
Once the macOS installation is complete, it automatically reboots and the Clover boot screen appears again.
Select the installed macOS and press Enter to display the High Sierra initial setting screen.
When the MacOS Welcome screen opens, choose your country. Press continue choose your keyboard. Press continue. Choose don’t transfer any information now. Press continue. Choose Don’t Sign In and press continue. After agreeing to terms, create name and password.
After completing the setup, you will install Clover UEFI bootloader on your macOS drive so you can boot on your own without the flash drive.
Step 3. Install and configure the latest version of Clover on your macOS drive
Download and open Clover Configurator on your macOS driveand mount your macOS drive's EFI partition.
Download the latest Clover UEFI
When installing the clover, click Customize and select the options as shown below.
Install for UEFI booting only
Install Clover in the ESP
Install Clover in the ESP
Drivers64UEFI → OsxAptioMemory
Download the following kexts:
Lilu.kext (patcher)
IntelGraphicsFixUp.kext (for Intel iGPU kexts fix to load properly)
Shiki.kext (for iTunes DRM)[/B]
AtherosE2200.kext (for Killer E2500 Ethernet)
FakeSMC.kext (mandatory kext otherwise you will get K/P)
Realtek ALC1220 Sound RealtekALC.kext
CodecCommander.kext
For NVIDIA GPUs onlyNVIDIAGraphicsFixUp.kext
Place these kexts in macOS EFI/EFI/CLOVER/kexts/Other
Afterwards go back to Clover Configurator we will create your config.plist. So go to
File → Open EFI → EFI → CLOVER → config.plist
Creating your config.plist
It is always better to know the ins and outs of your EFI system rather than copying and pasting someone else's EFI (should always be last resort and only do so in order to reverse engineer and find out what you were doing wrong)
Acpi
Under DSDT Patches tab
Patch #1
Comment : "Rename HDAS to HDEF"
Find* HEX : 48444153
Replace* HEX : 48444546
Patch #2
Comment : change GFX0 to IGPU
Find *HEX : 47465830
Replace* HEX : 49475055
Boot
XMPDetection=Yes
Devices
Fake ID → IntelGFX→ 0x59128086
USB → Inject : Enabled
USB → AddClockID : Enabled
USB → FixOwnership : Enabled
Audio → Inject : 11
Audio → ResetHDA : Enabled
USB → Inject : Enabled
USB → AddClockID : Enabled
USB → FixOwnership : Enabled
Audio → Inject : 11
Audio → ResetHDA : Enabled
Under Properties
Device : IntelGFX
Key* : AAPL,GfxYTile
Value* : 00AAAA00
Value Type : DATA
Key* : AAPL,GfxYTile
Value* : 00AAAA00
Value Type : DATA
GUI
Mouse : Enabled
Scan
Custom : Entries, Tools, Linux
Theme : Whatever theme you like's folder name (place themes in /EFI/CLOVER/themes folder)
Screen resolution : blank
Hide VolumeScan
Custom : Entries, Tools, Linux
Theme : Whatever theme you like's folder name (place themes in /EFI/CLOVER/themes folder)
Screen resolution : blank
BOOTX64.efi
Preboot
Recovery
Preboot
Recovery
Graphics
ig-platform-id : 0x59120000
Inject Intel : Enabled
Inject Intel : Enabled
Kernel and Kext Patches
Kernel and Kext Patches
AppleRTC : Enabled
AppleIntelCPUPM : Enabled[/B]
AppleIntelCPUPM : Enabled[/B]
KextsToPatch
#1
Name : AppleAHCIPort
Find* HEX : 45787465 726E616C
Replace* HEX : 496E7465 726E616C
Comment : External icons patch
#2
Name : com.apple.driver.usb.AppleUSBXHCI
Find* HEX : 837D940F 0F839704 0000
Replace* HEX : 837D940F 90909090 9090
Comment : Remove USB port limit in XHCI kext
MatchOS : 10.13.x
#3
Name : AppleUSBXHCIPCI
Find* HEX : 837D8C10
Replace* HEX : 837D8C1B
Comment : Change 15 port limit to 24 in XHCI kext
#4
Name : AppleHDAController
Find* HEX : 3D70A1
Replace* HEX : 3DF0A2
Comment : 200_Series-X299_ Audio_Controller
#5
Name : AppleHDA
Find* HEX : 8A19D411
Replace* HEX : 00000000
Comment : 10.12-AppleHDA/Realtek ALC...
#6
Name : AppleHDA
Find* HEX : 8B19D411
Replace* HEX : 2012EC10
Comment : 10.12-AppleHDA/Realtek ALC...
#7
Name : AppleHDA
Find* HEX : 786D6C2E 7A6C
Replace* HEX : 7A6D6C2E 7A6C
Comment : AppleHDA/Resources/xml>zml
from System : Enabled
Press Generate
BooterConfig : 0x28
CsrActiveConfig : 0x67
SMBIOS
Select iMac18 from the list (which version you choose depends on which processor you have, unlocked models should choose iMac18,3)
Press Generate New button next to the Serial Number
Check the serial number to be sure it is not currently used (required otherwise you may get your Apple ID banned)
System Parameters
CustomUUID→ Get it from system
Copy CustomUUID[
Go back into SMBIOS tab
Paste CustomUUID into SmUUID field
Inject Kexts : Yes
Inject System ID : Enabled
For NVIDIA GPU only
NvidiaWeb : Enabled
Press Command + S to save configuration.
At this point install your dGPU drivers if needed
https://www.tonymacx86.com/nvidia-drivers/
Most AMD cards work natively under macOS High Sierra from HD 7850 and up.
Step 4. Finishing Up
Now you can boot to the hard disk where you installed macOS without booting to the USB drive. Enter the BIOS setup and change the boot order to [UEFI] macOS installed disk to the priority boot.
You should be able to connect all your drives back now.
At this point multi-boot through Clover UEFI bootloader menu should be possible.
Windows UEFI and macOS. Linux as well if you have that installed via UEFI.
After everything, you should be working fine. iTunes should not be crashing. Sleep/wake should be working.
iGPU kexts should be loading.
You'll have also learned how to properly set up and install a Hackintosh with working UEFI GOP, native resolution boot, schematics of your own Clover EFI settings and what it took to get everything working. A lot of these settings will apply to many other motherboards as well save a few specific Ethernet kexts (different Ethernet chipsets) and CPUID (newer generation processor) or OsxAptio fixes (memory mapping differences on special motherboards).
dGPU acceleration is dependent on what model dGPU you are using and how you configure it but that is outside of the scope of this build and guide.
NVIDIA GTX 6xx, 7xx, 9xx, and 1xxx can use the latest NVIDIA Web Drivers for macOS
AMD HD 7xxx, R9 2xx, R9 3xx, Rx 4xx, Rx 5xx, Rx Vega should work natively under macOS
Last edited: