Contribute
Register

[SUCCESS] Mountain Lion, GA-Z77X-UD5H, i7 3770 Ivy Bridge, GTX 670

Status
Not open for further replies.
i'm getting a
"fdisk440: could not open MBR file /Users/the Composer/Downloads/boot0md: No such file or directory"
error.

i have no idea what's going on. =_=
or any idea how to fix it
 
i'm getting a
"fdisk440: could not open MBR file /Users/the Composer/Downloads/boot0md: No such file or directory"
error.

i have no idea what's going on. =_=
or any idea how to fix it
Try this. Make sure that boot0md and fdisk440 are both in your downloads folder. Open Terminal, and change your current directory to the downloads folder. Do that using the "cd" command: (e.g. cd /Users/the\ Composer/Downloads).

Once you are in the downloads directory, run this command:
sudo fdisk440 -f boot0md -u /dev/rdisk1


okay first of all. I just want to say Thank you very much for the help. i really appreciate it.

and second, when you say downloads directory, do you mean, OSx directory? or windows 7 directory?

and my windows 7 username is the Composer, while my osx username is VJTV. is just tried cd/Users/the\ Composer/Downloads and it said no such directory.

im so confused.

but again. thank you very much. this is such a nice community. =]

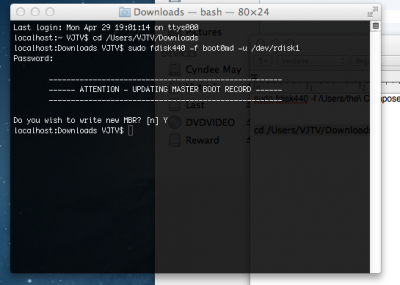
EDIT: just put them both in my mac download folder and here's what i got
Screen Shot 2013-04-29 at 7.11.07 PM.png

So i'm assuming it worked.?

2nd Edit:
okay, i just copied and pasted the boot0md and fdisk440 from my mac dl's to my window dl's and tested Sleep and it works. now, i hope updates works. =] but thank you CoBrA2168! i really appreciate all the help. it was a great guide and it was really helpful, especially the extra "one-on-one" or whatever. lol =] i'm assuming you have to keep the boot0md file in downloads?
 
okay first of all. I just want to say Thank you very much for the help. i really appreciate it.

and second, when you say downloads directory, do you mean, OSx directory? or windows 7 directory?

and my windows 7 username is the Composer, while my osx username is VJTV. is just tried cd/Users/the\ Composer/Downloads and it said no such directory.

im so confused.

but again. thank you very much. this is such a nice community. =]

EDIT: just put them both in my mac download folder and here's what i got
View attachment 54780

So i'm assuming it worked.?

2nd Edit:
okay, i just copied and pasted the boot0md and fdisk440 from my mac dl's to my window dl's and tested Sleep and it works. now, i hope updates works. =] but thank you CoBrA2168! i really appreciate all the help. it was a great guide and it was really helpful, especially the extra "one-on-one" or whatever. lol =] i'm assuming you have to keep the boot0md file in downloads?
Yep, that means it should have worked! And no, you can delete all of that stuff from the Downloads folder.
 
First of all, thanks for the guide. This guide inspired me to start building my own hackintosh. Now once I have the parts, I would like to ask two things. Are there any changes in the settings for the new MultiBeast (5.3) for this build? And with the new Multibeast there comes a new Version of Chimera Bootloader. Do we still need to install Windows 7 using MBR instead of GPT, or does the new Bootloader cope with GPT? And finally, which System Definitions do we need to set for this build (MacPro, etc)?

Thanks
 
Here's a useful tip for those having problems with sleep and shutdown, that is, fans keep running after initiating sleep but your rig won't wake up. Hard restart required to get back on line. This would be particularly helpful for those who are using the recommended TDN4800 Airport Wireless card, especially those who noticed that the sleep problem goes away when this TP Link PCIe card is removed. Don't install the card in the X1 PCIe slot above the video card, the one closest to the CPU. Install it instead in the X8-16 slot furthest from the CPU, in the slot closest to the "bottom" edge of the motherboard, and sleep/shutdown will now work perfectly. You could probably use any of the PCIe slots below the video card - that would probably work too. I've never seen anyone else mention this "fix" but it might be true for any Gigabyte motherboard using both a video card and a wireless card like the WDN4800.

Other than that, my Z77X-UD5H rev 1.1/F14 bios + i7-3770 + EVGA GTX 560ti video card + the recommended IOGEAR Bluetooth 4.0 adapter work perfectly and did so from the start until I installed the TP Link wireless card and ran into the sleep problem. Not using onboard HD4000 video. Many of the rev 1.0 Z77X-UD5H mobos had the green audio port problem so many reported, but it appears Gigabyte fixed it with the rev 1.1 boards. Tried one of these rev 1.0 boards last fall and, frustrated with the audio issues, sent it back. Other than that, be sure to disable WOL(Wake on LAN), VT-d(non "K"/non overclockable CPUs only), Internal CPU PLL Overvoltage... change CPU Clock ratio to 34(at least for a i7-3770 CPU), set Extreme Memory Profile(X.M.P.) to Profile1 to bring RAM up to speed, EHCI Handoff to Enabled, Init Display First to PEG, Internal Graphics to disabled(for video card/non HD4000 users) in the bios and use the latest MultiBeast from TonyMac, 5.3 in my case. Don't plug the USB 2.0 front panel plug into the red USB port on the motherboard. Don't plug the supplied USB 3.0 connector into the #1 USB 3.0 port on the motherboard, the one closest to the CPU. Geekbench = 14,857(Intel 64 bit). Like the UP5-TH and the Z77-DS3H Gigabyte motherboards, they work perfectly for Mountain Lion 10.8.3 builds.
 
borbo120,
Very interesting. I, too, haven't heard of that fix. I've got the TP-Link card in the PCI-e slot "above" the graphics card in my Thunderball build, and, yet, sleep/wake-up works as it should. (It does sleep when it's connected to a KVM switch. :( )
 
GREAT GUIDE! im planning a build almost identical to this so i think this thread will be great help when i get round to installing OSX, only thing is i would have thought the Geekbench score to be a bit higher then this, does anyone know why this is? or how to optimise performance on a rig like this?
 
GREAT GUIDE! im planning a build almost identical to this so i think this thread will be great help when i get round to installing OSX, only thing is i would have thought the Geekbench score to be a bit higher then this, does anyone know why this is? or how to optimise performance on a rig like this?

I'm glad you find this guide useful. Unfortunately it's a bit outdated since newer version of Multibeast/Unibeast have come out since then.

At some point (maybe months from now) I plan on re-installing both Windows and OSX on this rig. I plan to use Clover bootloader for a strict UEFI build. Right now I'm trying to optimize my hackintosh Lenovo T61 laptop...
 
Hello, my setup is almost exactly the same and everything runs great but I could never get the boot loader to work right. The only way I can load OSX is if I hold f12 at boot and manually select the SATA drive.

I just reinstalled following your guide but I'm still having the same problem. Windows 7 just automatically boots unless I use bios to manually load OSX drive.

Any ideas?
 
Status
Not open for further replies.
Back
Top