- Joined
- Oct 22, 2011
- Messages
- 21
- Motherboard
- MSI MPG Z790 EDGE WIFI
- CPU
- i9-13900K
- Graphics
- RX 6900 XT
- Mac
- Mobile Phone
Components
Intel Core i9-9900K Desktop Processor
https://www.amazon.ca/dp/B005404P9I/?tag=tonymacx86c0c-20
https://www.amazon.com/dp/B005404P9I/?tag=tonymacx86com-20
https://www.newegg.com/Product/Product.aspx?Item=N82E16819117957
Noctua NH-C14S, Premium CPU Cooler with NF-A14 PWM 140mm Fan (Brown)
https://www.amazon.ca/gp/product/B00XUV3JTK/?tag=tonymacx86c0c-20
https://www.amazon.com/gp/product/B00XUV3JTK/?tag=tonymacx86com-20
https://www.newegg.com/Product/Product.aspx?Item=9SIA86J67V9942
Gigabyte Z390-I AORUS PRO WiFi Motherboard
https://www.amazon.ca/dp/B07JBX52TM/?tag=tonymacx86c0c-20
https://www.amazon.com/dp/B07JBX52TM/?tag=tonymacx86com-20
https://www.newegg.com/Product/Product.aspx?Item=N82E16813145097
Corsair Vengeance LPX 32GB DDR4 DRAM 3200MHz C16 Memory Kit, Red
https://www.amazon.ca/gp/product/B01ARHF6Z4/?tag=tonymacx86c0c-20
https://www.amazon.com/gp/product/B01ARHF6Z4/?tag=tonymacx86com-20
https://www.newegg.com/Product/Product.aspx?item=N82E16820233984
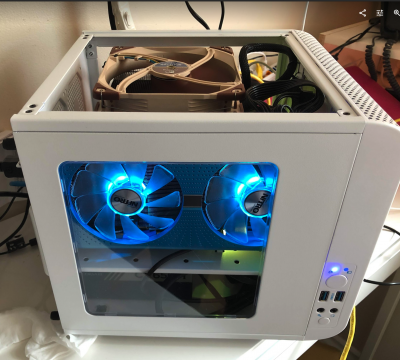
Thermaltake Core V1 Snow Edition SPCC Mini ITX Cube Computer Chassis CA-1B8-00S6WN-01
https://www.amazon.ca/gp/product/B015UDUAKG/?tag=tonymacx86c0c-20
https://www.amazon.com/gp/product/B015UDUAKG/?tag=tonymacx86com-20
https://www.newegg.com/Product/Product.aspx?Item=N82E16811133282
Corsair Semi-Modular ATX CX650M Power Supply CP-9020103-NA
https://www.amazon.ca/gp/product/B01B72W1VA/?tag=tonymacx86c0c-20
https://www.amazon.com/gp/product/B01B72W1VA/?tag=tonymacx86com-20
https://www.newegg.com/Product/Product.aspx?Item=N82E16817139148
Sapphire 11265-07-20G Radeon Nitro+ RX 580 4GBDual HDMI / DVI-D / Dual DP Graphics Card
https://www.amazon.ca/gp/product/B06ZZGXTTK/?tag=tonymacx86c0c-20
https://www.amazon.com/gp/product/B06ZZGXTTK/?tag=tonymacx86com-20
https://www.newegg.com/Product/Product.aspx?Item=N82E16814202279
MSI Radeon RX 570 ARMOR 8G OC 1268 MHz Core, 7000 MHz Memory PCI-E 3.0, 1x DVI-D, 1x HDMI, 3x DP
https://www.amazon.com/dp/B076Y93L8F/?tag=tonymacx86com-20
https://www.amazon.ca/dp/B076Y93L8F/?tag=tonymacx86c0c-20
Monitor
https://www.amazon.com/dp/B07HDBD9CM/?tag=tonymacx86com-20?tag=tonymacx86c0c-20
https://www.amazon.ca/dp/B07HDBD9CM/?tag=tonymacx86c0c-20?tag=tonymacx86c0c-20
Already Owned
Intel SSD Pro 2500 450GB
https://www.amazon.ca/dp/B00LAT1VZI/?tag=tonymacx86c0c-20
https://www.amazon.com/dp/B00LAT1VZI/?tag=tonymacx86com-20
Razer Ornata Chroma: Mecha-Membrane Gaming Keyboard
https://www.amazon.ca/gp/product/B01LVTI3TO/?tag=tonymacx86c0c-20
https://www.amazon.com/gp/product/B01LVTI3TO/?tag=tonymacx86com-20
https://www.newegg.com/Product/Product.aspx?Item=N82E16823114072
Logitech C910 Webcam HD Pro (Discontinued)
Comments
This build is my first mini-ITX build. The reason I want to build a mITX is I wanted a more compact form factor, yet powerful mac to use. I have spent a months on finalizing my decision. I have tried top-loaded 2018 Mac mini, 2017 iMac. Does not work. So I went ahead and ordered the hardware list and plan to work on it during Christmas time.
The Build
Motherboard
Based on everything I'd read, I have seen people succeed in most Gigabyte Aorus Pro Z370 boards so I'm pretty confident that I can make it work on a Aorus Pro Z370 I pro wifi, which is the mini-ITX board.
CPU
It may seem crazy to spend $800 on a CPU, but I plan to keep the build LONG (this time) so I opt for the i9 9900K
Heatsink & Fans
I want a quiet build so I chose Noctua NH-C14S, known to be quite powerful.
(Room temp is 24)

Graphics card
I don't game but in the same I don't want to use onboard graphic. This RX580 is best for the buck on the market.
Case
The Thermaltake Core V1 Mini ITX Cube is best you can find that offers both small form and plenty of room inside the case.
Well designed inside out.
Monitor
I am fan of Dell monitors and IPS. No regret buying the UltraSharp u3219q. So clear and crispy.

Installation
BIOS Settings
The full operating system is a free download for anyone who has purchased Mac OS X Snow Leopard, Lion, or Mountain Lion or has a Mac preloaded with OS X Mavericks, Yosemite, El Capitan, macOS Sierra, or macOS High Sierra.
1. Open Mac App Store
2. Log in with your Apple ID
3. Download macOS Mojave
4. Insert the USB drive
5. Open /Applications/Utilities/Disk Utility
6. Highlight the USB drive in left column (Note: in the Mojave version of Disk Utility, you must first select View / Show All 7evices before you can see the USB drive there)
8. Click Erase button
9. For Name: type USB (You can rename it later)
10. For Format: choose Mac OS Extended (Journaled)
11. Click Erase then Done
12. Download and run UniBeast
13. Click Continue, Continue, Continue, Continue, Agree
14. At Destination Select, choose USB and click Continue
15. At Select OS Installation screen choose Mojave and click Continue
16. At Bootloader Options screen choose UEFI Boot Mode or Legacy Boot Mode. UEFI Boot Mode is recommended for 7/8/9/100/200/300 Series CustoMac desktops and all UEFI capable systems. Legacy Boot Mode is recommended for 5/6 Series CustoMac desktops and all BIOS based systems.
17. Drag MultiBeast to your completed USB drive.
Prepare USB Installer with UniBeast for Mojave
3a. Make some minor modifications to USB EFI Partition using Clover Configurator
• Open USB Stick EFI Partition, navigate to EFI/CLOVER/
• Drag config.plist onto Clover Configurator app icon to open
• System Parameters → Inject Kexts : Yes
• SMBIOS → Product Name : iMac18,3 (or iMacPro1,1 but I am getting slightly better benchmark with iMac18,3)
• Boot → Verbose : Enable, slide : 0
• Rt Variables → CsrAcrtiveConfig : 0x67
• Close Clover Configurator, select "OK" if warning dialog for permanent volume storage
• Download attached EmuVariableUefi-64.efi and put it to /Volumes/EFI/EFI/CLOVER/drivers64UEFI
Install Mojave
1. Restart
2. Hold F12 during BIOS to enter boot menu
3. Select your USB Stick EFI
4. Inside installer, use Disk Utility and format "Erase" the SSD. Choose the recommended filesystem option
6. Exit Disk Utility
6. Install Mac OS X
Post-Install
Note: Since I copied the USB boot drive (created by UniBeast-9.0.0) EFI content to my SSD's EFI,
I didn't use MultiBeast for the post install.
1. Open Clover Configurator on your USB stick main Partition
2. Mount EFI → SSD → Mount Partition
3. Mount EFI → SSD → Open Partition
4. Apply most Z390_Mini_ITX_EFI.zip kext from the top link into /Volumes/EFI/EFI/CLOVER/kexts/Other
and /Volumes/EFI/EFI/CLOVER/kexts/10.14 accordingly.
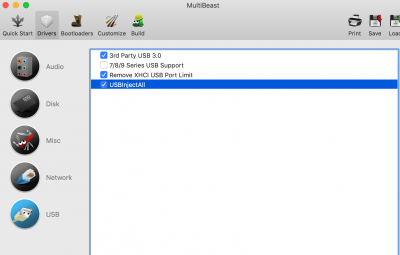
5. Install MultiBeast 3rd party USB patch if you want to use 3rd party USB hubs
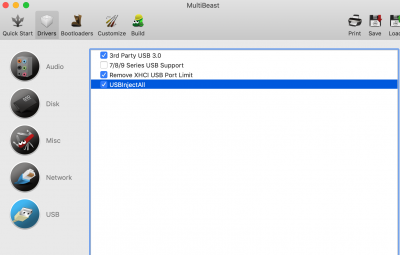
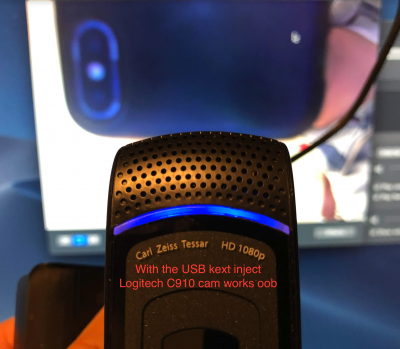
6. With the USB kext inject, logitech C910 cam works oob, so Siri works too
GeekBench
I'm so excited to see the score, made my day!!
CPU: single 6726, Multi: 38426 https://browser.geekbench.com/v4/cpu/11349590
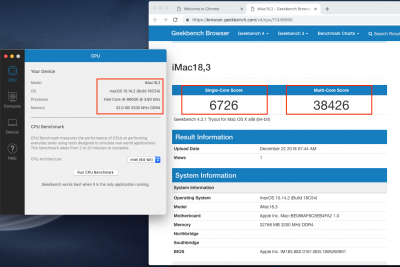
Bench mark after oc to 5.0 https://browser.geekbench.com/v4/cpu/11464430

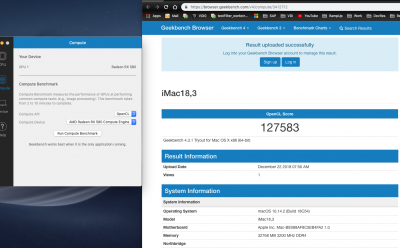
Graphic (RX 580) 127583 . https://browser.geekbench.com/v4/compute/3412712
Working
Reboot/Shutdown
Sleep/Wakeup (sleep is normal, wakeup needs 2nd key press)..
Onboard Ethernet
Audio
Graphic Card (RX580)
NOT Working
Onboard wifi (who cares)
Edits/Updates
Intel Core i9-9900K Desktop Processor
https://www.amazon.ca/dp/B005404P9I/?tag=tonymacx86c0c-20
https://www.amazon.com/dp/B005404P9I/?tag=tonymacx86com-20
https://www.newegg.com/Product/Product.aspx?Item=N82E16819117957
Noctua NH-C14S, Premium CPU Cooler with NF-A14 PWM 140mm Fan (Brown)
https://www.amazon.ca/gp/product/B00XUV3JTK/?tag=tonymacx86c0c-20
https://www.amazon.com/gp/product/B00XUV3JTK/?tag=tonymacx86com-20
https://www.newegg.com/Product/Product.aspx?Item=9SIA86J67V9942
Gigabyte Z390-I AORUS PRO WiFi Motherboard
https://www.amazon.ca/dp/B07JBX52TM/?tag=tonymacx86c0c-20
https://www.amazon.com/dp/B07JBX52TM/?tag=tonymacx86com-20
https://www.newegg.com/Product/Product.aspx?Item=N82E16813145097
Corsair Vengeance LPX 32GB DDR4 DRAM 3200MHz C16 Memory Kit, Red
https://www.amazon.ca/gp/product/B01ARHF6Z4/?tag=tonymacx86c0c-20
https://www.amazon.com/gp/product/B01ARHF6Z4/?tag=tonymacx86com-20
https://www.newegg.com/Product/Product.aspx?item=N82E16820233984
Thermaltake Core V1 Snow Edition SPCC Mini ITX Cube Computer Chassis CA-1B8-00S6WN-01
https://www.amazon.ca/gp/product/B015UDUAKG/?tag=tonymacx86c0c-20
https://www.amazon.com/gp/product/B015UDUAKG/?tag=tonymacx86com-20
https://www.newegg.com/Product/Product.aspx?Item=N82E16811133282
Corsair Semi-Modular ATX CX650M Power Supply CP-9020103-NA
https://www.amazon.ca/gp/product/B01B72W1VA/?tag=tonymacx86c0c-20
https://www.amazon.com/gp/product/B01B72W1VA/?tag=tonymacx86com-20
https://www.newegg.com/Product/Product.aspx?Item=N82E16817139148
https://www.amazon.com/gp/product/B06ZZGXTTK/?tag=tonymacx86com-20
https://www.newegg.com/Product/Product.aspx?Item=N82E16814202279
MSI Radeon RX 570 ARMOR 8G OC 1268 MHz Core, 7000 MHz Memory PCI-E 3.0, 1x DVI-D, 1x HDMI, 3x DP
https://www.amazon.com/dp/B076Y93L8F/?tag=tonymacx86com-20
https://www.amazon.ca/dp/B076Y93L8F/?tag=tonymacx86c0c-20
Monitor
https://www.amazon.com/dp/B07HDBD9CM/?tag=tonymacx86com-20?tag=tonymacx86c0c-20
https://www.amazon.ca/dp/B07HDBD9CM/?tag=tonymacx86c0c-20?tag=tonymacx86c0c-20
Already Owned
Intel SSD Pro 2500 450GB
https://www.amazon.ca/dp/B00LAT1VZI/?tag=tonymacx86c0c-20
https://www.amazon.com/dp/B00LAT1VZI/?tag=tonymacx86com-20
Razer Ornata Chroma: Mecha-Membrane Gaming Keyboard
https://www.amazon.ca/gp/product/B01LVTI3TO/?tag=tonymacx86c0c-20
https://www.amazon.com/gp/product/B01LVTI3TO/?tag=tonymacx86com-20
https://www.newegg.com/Product/Product.aspx?Item=N82E16823114072
Logitech C910 Webcam HD Pro (Discontinued)
Comments
This build is my first mini-ITX build. The reason I want to build a mITX is I wanted a more compact form factor, yet powerful mac to use. I have spent a months on finalizing my decision. I have tried top-loaded 2018 Mac mini, 2017 iMac. Does not work. So I went ahead and ordered the hardware list and plan to work on it during Christmas time.
The Build
Motherboard
Based on everything I'd read, I have seen people succeed in most Gigabyte Aorus Pro Z370 boards so I'm pretty confident that I can make it work on a Aorus Pro Z370 I pro wifi, which is the mini-ITX board.
CPU
It may seem crazy to spend $800 on a CPU, but I plan to keep the build LONG (this time) so I opt for the i9 9900K
Heatsink & Fans
I want a quiet build so I chose Noctua NH-C14S, known to be quite powerful.
(Room temp is 24)
Graphics card
I don't game but in the same I don't want to use onboard graphic. This RX580 is best for the buck on the market.
Case
The Thermaltake Core V1 Mini ITX Cube is best you can find that offers both small form and plenty of room inside the case.
Well designed inside out.
Monitor
I am fan of Dell monitors and IPS. No regret buying the UltraSharp u3219q. So clear and crispy.
Installation
BIOS Settings
- Save & Exit
- Load Optimized Defaults then make (or confirm) the following settings -- important settings in bold:
- M.I.T.
- Extreme Memory Profile (X.M.P.) --> Profile 1
- BIOS
- Windows 8/10 Features --> Other OS
- CSM Support --> Disabled
- Secure Boot will be disabled by default, but good to check
- Peripherals
- Intel Platform Trust Technology (PTT) --> Disabled
- Thunderbolt(TM) Configuration
- TBT Vt-d Base Security --> Disabled
- USB Configuration
- Legacy USB Support --> Enabled
- XHCI Hand-off --> Enabled
- Network Stack Configuration
- Network Stack --> Disabled
- Chipset
- Vt-d --> Disabled
- Internal Graphics --> Enabled
- DVMT Pre-Alloc --> 64M
- DVMT Total Gfx Mem --> 256M
- Audio Controller --> Enabled
- Above 4G Decoding --> Enabled
- Power
- ErP --> Enabled (in order for sleep to work, together with EmuVariableUefi-64.efi and side=0 option)
- RC6 (Render Standby) --> Enabled
The full operating system is a free download for anyone who has purchased Mac OS X Snow Leopard, Lion, or Mountain Lion or has a Mac preloaded with OS X Mavericks, Yosemite, El Capitan, macOS Sierra, or macOS High Sierra.
1. Open Mac App Store
2. Log in with your Apple ID
3. Download macOS Mojave
4. Insert the USB drive
5. Open /Applications/Utilities/Disk Utility
6. Highlight the USB drive in left column (Note: in the Mojave version of Disk Utility, you must first select View / Show All 7evices before you can see the USB drive there)
8. Click Erase button
9. For Name: type USB (You can rename it later)
10. For Format: choose Mac OS Extended (Journaled)
11. Click Erase then Done
12. Download and run UniBeast
13. Click Continue, Continue, Continue, Continue, Agree
14. At Destination Select, choose USB and click Continue
15. At Select OS Installation screen choose Mojave and click Continue
16. At Bootloader Options screen choose UEFI Boot Mode or Legacy Boot Mode. UEFI Boot Mode is recommended for 7/8/9/100/200/300 Series CustoMac desktops and all UEFI capable systems. Legacy Boot Mode is recommended for 5/6 Series CustoMac desktops and all BIOS based systems.
17. Drag MultiBeast to your completed USB drive.
Prepare USB Installer with UniBeast for Mojave
3a. Make some minor modifications to USB EFI Partition using Clover Configurator
• Open USB Stick EFI Partition, navigate to EFI/CLOVER/
• Drag config.plist onto Clover Configurator app icon to open
• System Parameters → Inject Kexts : Yes
• SMBIOS → Product Name : iMac18,3 (or iMacPro1,1 but I am getting slightly better benchmark with iMac18,3)
• Boot → Verbose : Enable, slide : 0
• Rt Variables → CsrAcrtiveConfig : 0x67
• Close Clover Configurator, select "OK" if warning dialog for permanent volume storage
• Download attached EmuVariableUefi-64.efi and put it to /Volumes/EFI/EFI/CLOVER/drivers64UEFI
Install Mojave
1. Restart
2. Hold F12 during BIOS to enter boot menu
3. Select your USB Stick EFI
4. Inside installer, use Disk Utility and format "Erase" the SSD. Choose the recommended filesystem option
6. Exit Disk Utility
6. Install Mac OS X
Post-Install
Note: Since I copied the USB boot drive (created by UniBeast-9.0.0) EFI content to my SSD's EFI,
I didn't use MultiBeast for the post install.
1. Open Clover Configurator on your USB stick main Partition
2. Mount EFI → SSD → Mount Partition
3. Mount EFI → SSD → Open Partition
4. Apply most Z390_Mini_ITX_EFI.zip kext from the top link into /Volumes/EFI/EFI/CLOVER/kexts/Other
and /Volumes/EFI/EFI/CLOVER/kexts/10.14 accordingly.
5. Install MultiBeast 3rd party USB patch if you want to use 3rd party USB hubs

6. With the USB kext inject, logitech C910 cam works oob, so Siri works too

GeekBench
I'm so excited to see the score, made my day!!
CPU: single 6726, Multi: 38426 https://browser.geekbench.com/v4/cpu/11349590

Bench mark after oc to 5.0 https://browser.geekbench.com/v4/cpu/11464430
Graphic (RX 580) 127583 . https://browser.geekbench.com/v4/compute/3412712

Working
Reboot/Shutdown
Sleep/Wakeup (sleep is normal, wakeup needs 2nd key press)..
Onboard Ethernet
Audio
Graphic Card (RX580)
NOT Working
Onboard wifi (who cares)
Edits/Updates
- 21 Dec 2018: My final part arrives: cpu cooler: Noctua NH-D15. Start assembling the parts together
- 21 Dec 2018: Done installation and injects/hacks.
- 21 Dec 2018: Post and share what I did to make it work
- 22 Dec 2018: Re-formatting this "user build" post, added a picture of the case.
- 22 Dec 2018: Replaced with Noctua NH-C14s, fits perfectly now.
- 22 Dec 2018: Replaced with Corsair RMx Series RM750x
- 24 Dec 2018: Replaced with 970 EVO 500GB as primary hard drive. Updated BIOS from F1 to F4.
- 25 Dec 2018: Install win 10 pro on the 2nd M.2 SSD, for gaming~
- 26 Dec 2018: Replaced with MSI Radeon RX 570 ARMOR 8G OC
- 27 Dec 2018: Satisfied
- 30 Dec 2018: Overclock to 5.0 Ghz, got Geekbench 4 score of ( 6749 single and 40072 multi-core)
- 10 Jan 2019: Added Dell 32' monitor U3219Q
- 15 Jan 2019: Added TP-Link TL-WN725N Wireless N Nano USB Adapter
Attachments
Last edited:

