- Joined
- Jul 25, 2012
- Messages
- 6,663
- Motherboard
- Gigabyte GA-Z77X-UP5 TH
- CPU
- i7-3770K
- Graphics
- HD 4000+GT 710
- Mac
- Mobile Phone
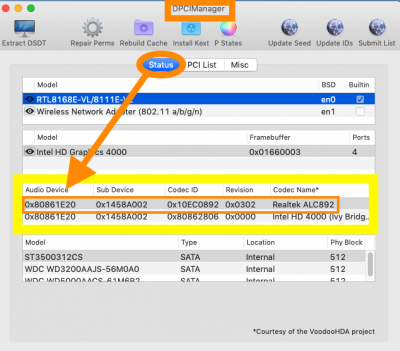
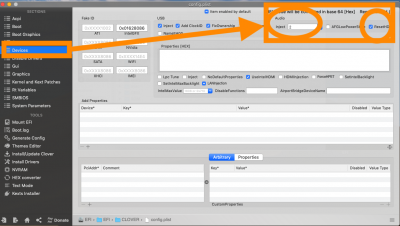
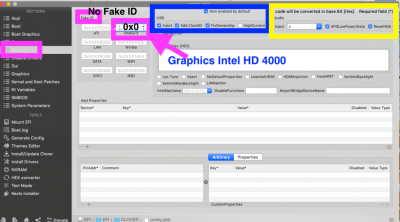
I have been running macOS High Sierra , Windows 10 and Ubuntu from 3 different SATA Spin disks on this system (listed in my profile) using ATI Radeon 5450. But when Mojave was released and it had no support for Radeon 5450, I removed the PCIE Graphics and decided to try the Integrated Intel HD 4000 associated with my CPU i7 3770S. Surprisingly in Mojave Intel HD 4000 is NATIVELY SUPPORTED; No Fake ID in config.plist _Devices , No [√]IntelInjector and No ig-platform-id in config.plist_Graphics.
- For the installation I disconnected my other system disks and connected a SATA Segate ST 3500312CS 500GB Disk .
- USB installer was created on a 16GB Kootion USB 2.0 using CreateInstallMedia Command and RehabMan's CLOVER Clover_v2.4k_r4701.RM-4963.ca6cca7c.zip manually installed on the created Mojave 14.1 UEFI USB Installer.
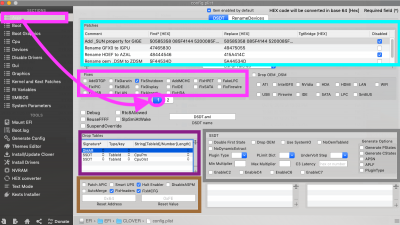
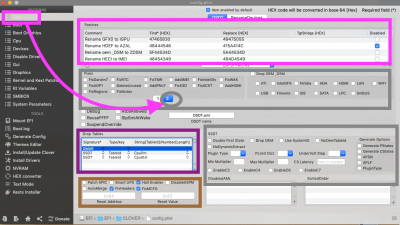
- CLOVER File tree and contents of CLOVER folders and config.plist are uploaded as images viewed from Clover Configurator Vibrant. [See images]
- Booted the computer with the Mojave USB installer and at Gigabyte Splash screen , pressing Del key opened BIOS Setup screen.
- Made the BIOS Screen options for the Installation and took Screen captures using F-12 and Saved on the EFI Partition of the USB installer.
- BMP images converted to JPG are uploaded. (11 Images)
- After booting the UEFI Mojave USB installer as First boot device from BIOS, pressed F12 and selected UEFI USB Installer to enter Clover Boot Manager (CBM) Screen. The Old High Sierra UEFI System Disk icon was seen along with the new UEFI USB Installer.. (See image 1)
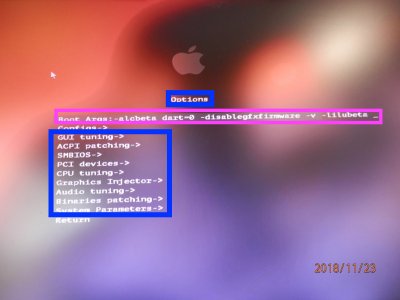
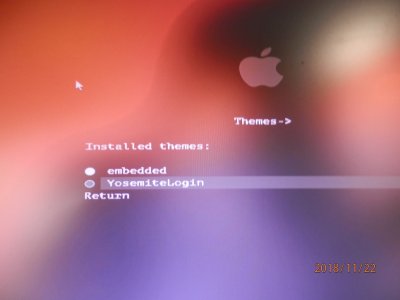
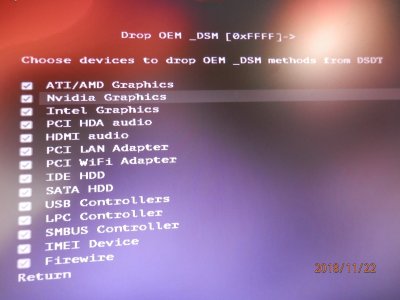
- CBM Options Boot Args and sub menu screens were checked to make sure everything is OK as per the config.plist of CLOVER (See images)
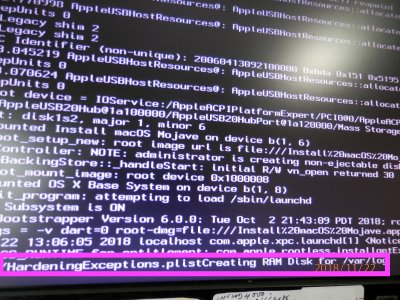
- UEFI USB Installer was booted in Verbose mode and screen shots were made.
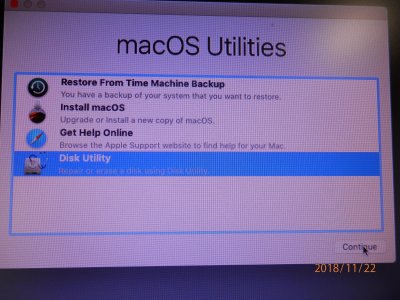
- Target ST 3500312CS SATA disk was Formatted and Installation started and competed ( See images)
- After reboot License Agreement, Apple Account Creation, iCloud Account, Desktop Setup were created and Desktop opened. (see images from Desktop )
- The EFI Partition of USB Installer was mounted and its EFI folder was copied.
- EFI Partition of System ST 3500312CS was mounted and its EFI Folder was deleted.
- Copied EFI from USB installer was pasted on System Hard disk's EFI partition.
- SATA System Disk's EFI >CLOVER and subfolders were checked for all required kexts and properly edited config.plist.
- System Disk was booted and logged back in.
- Apple About This Mac_Overview and System Report menus were checked to make sure everything is set properly.
- Images uploaded
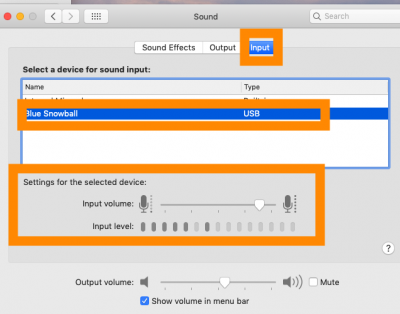
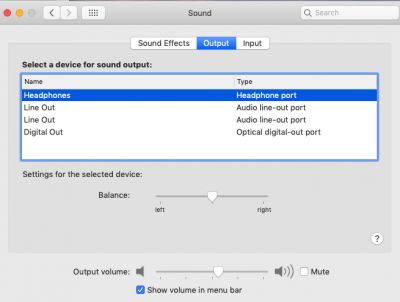
- Everything is working OK with the above installation routine with Intel HD 4000 Graphics, Intel LAN, Realtek ALC 892 Audio and TPLink WDN 4800 PCIE WiFi.
Attachments
-
 1.Mojave USB Installer EFI Mounting.png565 KB · Views: 972
 -
 2. EFI Partition and EFI Folder of Mojave USB Installer .png100.3 KB · Views: 1,046
 -
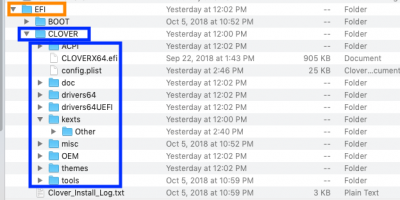 3.EFI Folder _File Tree.png77.5 KB · Views: 1,017
 -
 4.CLOVER:drivers64UEFI.png52.1 KB · Views: 1,029
 -
 5.CLOVER:kexts:Other.png65.7 KB · Views: 1,045
 -
 6.ACPI-1.png301.7 KB · Views: 1,043
 -
 7.ACPI-2.png323.7 KB · Views: 1,015
 -
 8.Boot.png262.3 KB · Views: 985
 -
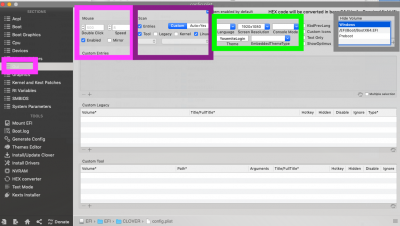 10.Gui.png236.8 KB · Views: 938
 -
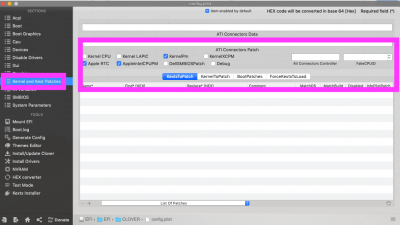 12.Kernel and Kext Patches.png205.1 KB · Views: 895
 -
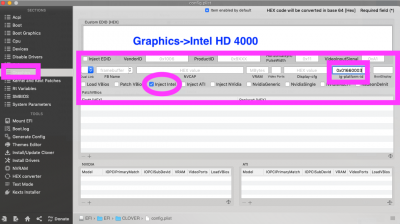 11.Graphics.png241.9 KB · Views: 905
 -
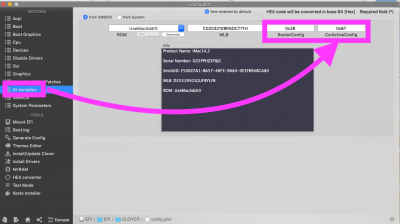 13.Rt Variables-Csr_Active_Config.png270.6 KB · Views: 884
 -
 14.SMBIOS.png272.4 KB · Views: 880
 -
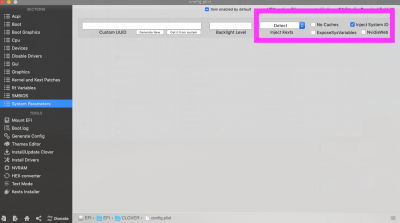 15.System Parameters.png247.8 KB · Views: 848
 -
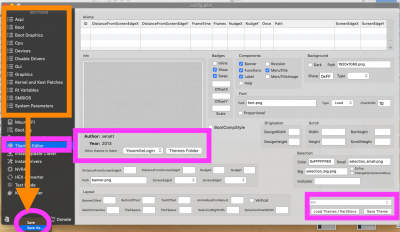 16.Themes Editor.png318.1 KB · Views: 880
 -
 17.Edited config.plist Saved.png114.8 KB · Views: 911
 -
 1.MIT_XMP.png179.6 KB · Views: 940
 -
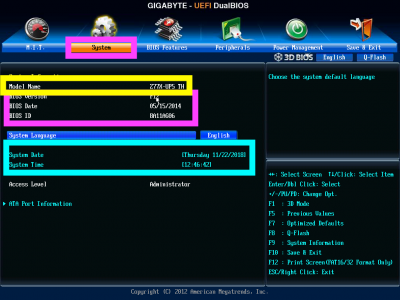 2.System_BIOS Version DATEcand Time.png163.4 KB · Views: 885
 -
 3.SATA Ports.png189.3 KB · Views: 852
 -
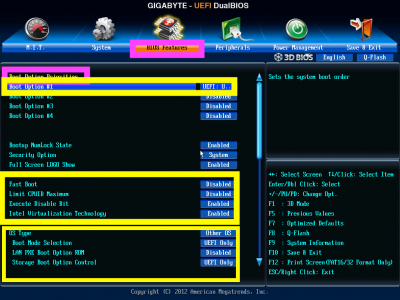 4.BIOS Features Boot Option..png194 KB · Views: 826
 -
 5.Boot Option #1 UEFI Mojave 14.1 USB Drive.png212.9 KB · Views: 832
 -
 6.BIOS Features OS Type and Mode.png197.2 KB · Views: 813
 -
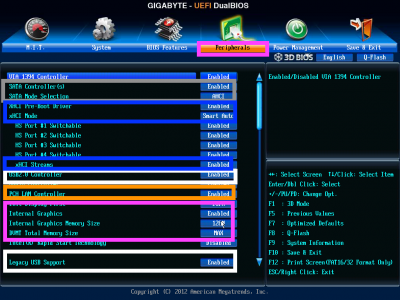 7.Peripherals_SATA-USB_LAN_Video Controllers.png198.3 KB · Views: 810
 -
 8.Peripherals_IGFX Initial Display First_USB UEFI Boot Disk Auto .png217.4 KB · Views: 752
 -
 9.Peripherals_ISCT Disabled.png160 KB · Views: 792
 -
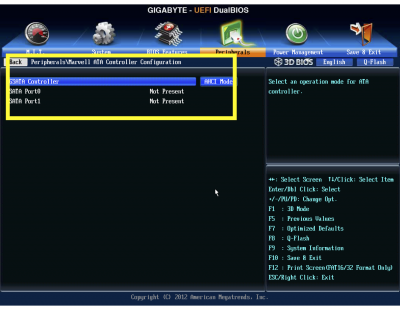 10.Marvel GSATA _No drives.png490.8 KB · Views: 770
 -
 11.Power Management_ ErP Enabled WOL Disabled.png581.2 KB · Views: 775
 -
 1.CBM Screen.JPG2.9 MB · Views: 779
 -
 2. Options _Boot Args.JPG2.8 MB · Views: 766
 -
 3.Gui _Themes.JPG3 MB · Views: 708
 -
 4.ACPI_Tables Dropping.JPG2.8 MB · Views: 659
 -
 5.Drop OEM_DSM.JPG2.9 MB · Views: 654
 -
 6.DSDT fix Mask.png1.4 MB · Views: 634
 -
 7.Custom DSDT Patches.JPG2.8 MB · Views: 618
 -
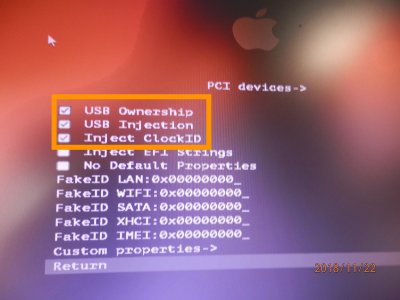 8.PCI Devices.JPG2.9 MB · Views: 616
 -
 9.CPU Tuning.JPG2.8 MB · Views: 615
 -
 10.Graphics Injector.JPG2.6 MB · Views: 611
 -
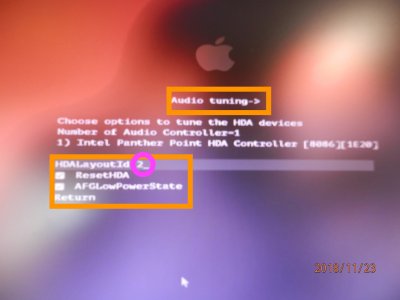 11.Audio Tuning.JPG2.7 MB · Views: 623
 -
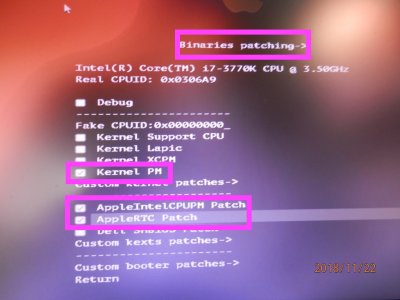 12.Binaries Patching .JPG2.6 MB · Views: 580
 -
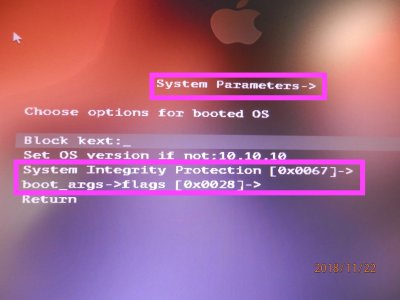 13.System Parameters.JPG2.6 MB · Views: 576
 -
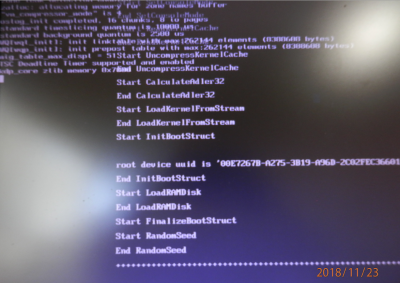 14.Verbose Boot.png1.5 MB · Views: 568
 -
 15.Verbose Boot.JPG2.8 MB · Views: 563
 -
 16.Verbose Boot.JPG3 MB · Views: 526
 -
 17.Verbose boot.JPG2.7 MB · Views: 532
 -
 18.Verbose boot.JPG2.7 MB · Views: 559
 -
 19.Verbose boot.JPG2.8 MB · Views: 539
 -
 20.Verbose Boot ending_Graphics loaded.JPG2.9 MB · Views: 538
 -
 21. Grey screen.JPG2.8 MB · Views: 521
 -
 22.macOS Utilities_DU screen.JPG2.8 MB · Views: 534
 -
 23.DU.JPG3.1 MB · Views: 515
 -
 24.DU_Show All Volumes.JPG2.9 MB · Views: 520
 -
 25.Target Hard Disk Segate SARA Chosen .JPG2.8 MB · Views: 485
 -
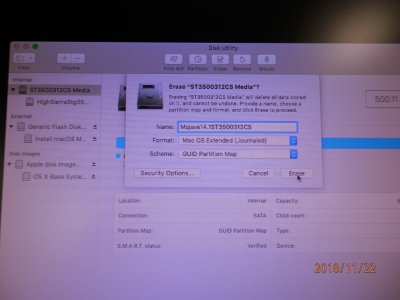 26.ST HDD Partitioned and Formatted.JPG3 MB · Views: 493
 -
 27.Install maCOS.png1.3 MB · Views: 498
 -
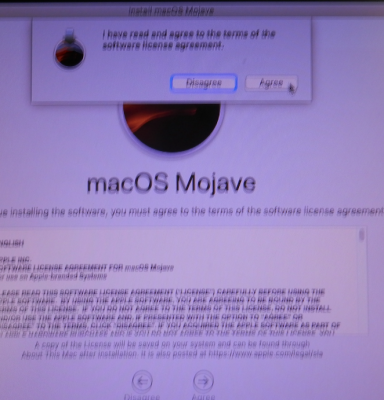 28.License Agreed.png748.8 KB · Views: 481
 -
 29.Install Started.png1.5 MB · Views: 487
 -
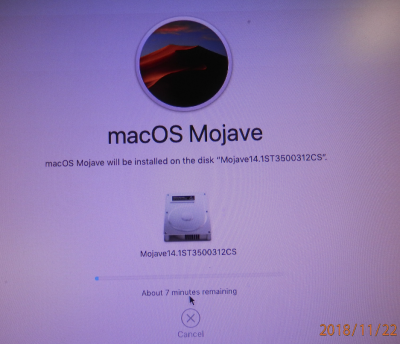 30.10 or 7 minutes installation remain First Stage.png1.3 MB · Views: 487
 -
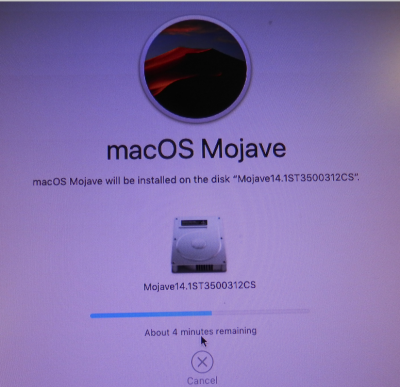 31.4 minutes remaining First stage.png1,007.3 KB · Views: 485
 -
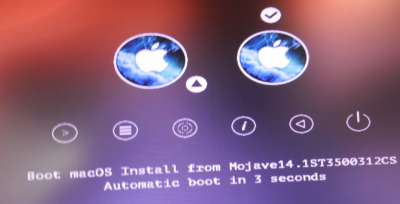 32. CBM Screen after first reboot.png842.2 KB · Views: 594
 -
 1.Desktop & Keyboard.png3 MB · Views: 502
 -
 2.Keyboard Setup.png590.9 KB · Views: 603
 -
 3.Date and Time Setup.png280.9 KB · Views: 534
 -
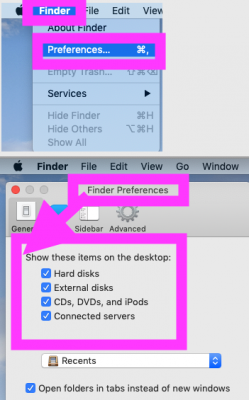 4.Finder Preferences.png135.8 KB · Views: 529
 -
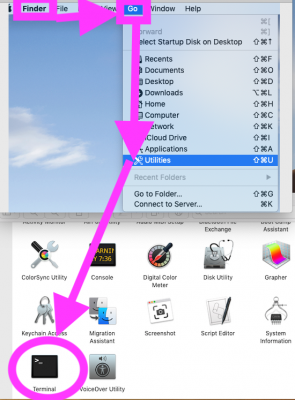 5.Launch Terminal from >Finder>Utilities.png415.8 KB · Views: 541
 -
 6.sudo spctl Terminal command.png129.3 KB · Views: 566
 -
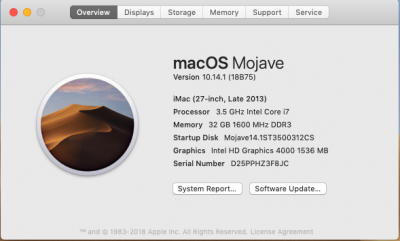 2.AbouthThisMac_Overview.png82.4 KB · Views: 548
 -
 3.Hardware Overview.png64.1 KB · Views: 578
 -
 4.Audio..png60.9 KB · Views: 546
 -
 5.USB WebCam.png17.3 KB · Views: 527
 -
 6. Optical Disc Drive.png41.6 KB · Views: 502
 -
 7.Ethernet Cards.png42.7 KB · Views: 521
 -
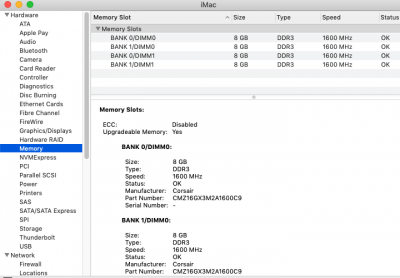 9.Memory.png77.3 KB · Views: 507
 -
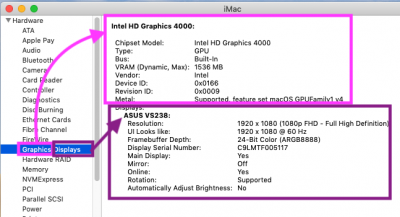 8.Graphics and Displays.png71.6 KB · Views: 535
 -
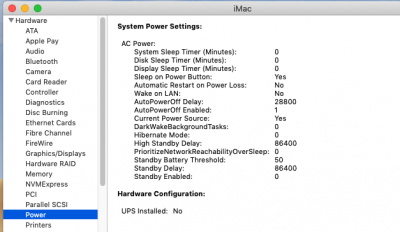 10.Power Supply Unit.png66.3 KB · Views: 512
 -
 11.SATA_SATA Express.png50.9 KB · Views: 531
 -
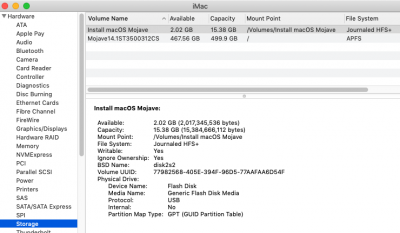 12.Storage.png74.7 KB · Views: 540
 -
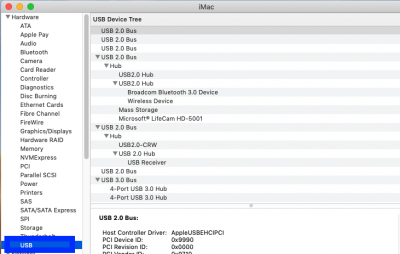 13.USB.png74.3 KB · Views: 551
 -
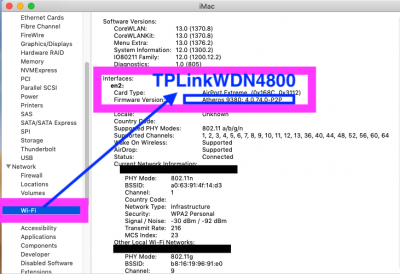 14.WiFi.png108.4 KB · Views: 516
 -
 9.config.plist_Devices.png272.4 KB · Views: 226
 -
 11.Graphics.png200.2 KB · Views: 247
Last edited: