- Joined
- Oct 16, 2017
- Messages
- 24
- Motherboard
- GA-Z270N
- CPU
- i7-7700K
- Graphics
- EVA GeForce GTX 1050 Ti
Pingvinens CustomMac Build:
GA-Z270N-WIFI - i7-7700k - GTX 1040

ComponentsGA-Z270N-WIFI - i7-7700k - GTX 1040
Intel Core i7-7700K Kaby Lake Quad-Core 4.2 GHz LGA 1151 91W BX80677I77700K Desktop Processor
Amazon US || Newegg
Gigabyte GA-Z270N-Wifi Motherboard
Amazon US || Newegg
Fracal Design Node 304 Computer Case
Newegg
Ballistick Sport LT DDR4 32GB Memory
Amazon US || Newegg
Corsair 650x 650W PSU
Newegg
Seaggate Skyhawk 6TB 3,5" HDD x 5 (Not required) I only bought them for my Raid 5. (with Softraid)
Newegg
Cooler Master Hyper TX3i CPU Cooler
Newegg
Gigabyte GeForce GTX 1050 Ti 4Gb Gaming Graphics Card
Newegg
Philips 25" LED 258B6UEB Monitor
Newegg
Already Owned
- Samsung 40GB SSD
- Logitech mouse
- Logitech keyboard
Comments
I have been using MacBook for quite a long time, and previously had a GNU/Linux NAS for all my data. My main idea with the build, was a Plex server and storage of TM backups for my laptop, and using it as a gaming rig / video editing machine when needed, therefore the CPU/GCU.
Since I´m too old for neon light and big cases. I wanted to put all the components in the smallest possible case. Node 304 was an obvious choice, as it had room for 6 drives. I could install the 1050 GPU as well. You could install a bigger graphic card, but you will lose 2 hard drive spaces, and that was not an option for me.
Installation Notes
The most of this guide is copied directly from this build. So, a big thanks goes to jimmakos01. https://www.tonymacx86.com/threads/gigabyte-z270x-ultra-gaming-i7-6700k-gtx-1060.231054/
I do have a few edits (removed FAKESMC etc) and added download instructions for Sierra and so on.
For this guide keep in mind that I am running Mac os Sierra 10.12.6, and I have tested only this version of Mac OS. This build, is just copy past from a bunch of guides around the site.
I found out that if anyone would like the same build, this would make it a lot easier.
Installation
Downloading and Preparing
Step 1. Download macOS Sierra
I recommend following this guide, and just use my changes and tips for a successful installations. The biggest changes are in the step 2,3 and 4.
https://www.tonymacx86.com/threads/...ierra-on-any-supported-intel-based-pc.200564/
I grabbed macOS sierra 10.12.6 using this link, as I could not find Sierra in my app store.
https://support.apple.com/en-us/HT208202
Step 2: Create a bootable USB drive with UniBeast
These steps are coming from another guide (see link below). I used the USB 3.0 instructions to be able to boot from USB 3.0 as my motherboard does not have USB 2.0. I don`t know if it will work without this mod, but my Motherboard only has USB 3.0 so I figured I should do this as well.
https://www.tonymacx86.com/threads/...on-200-series-with-kabylake-processor.218494/
Files To Download
You need to download some files to get things work. These files are necessary for the entire session of the macOS installation. After finishing making a bootable USB stick with UniBeast, copy these files to the USB stick.
- Clover Configurator
- UniBeast And MultiBeast (Get the latest Versions)
- USBInjectAll.kext
- XHCI-200-series-injector.kext
- AppleALC.kext release
- Lilu.kext release
- Latest Clover Bootloader
- Kextbeast
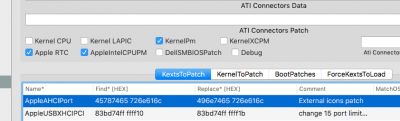
Increase port limit
Kernel and Kext Patches –> KextToPatch –> +
- Name: AppleUSBXHCIPCI
Find: 83bd74ff ffff10
Replace: 83bd74ff ffff1b
Comment: Increase port limit

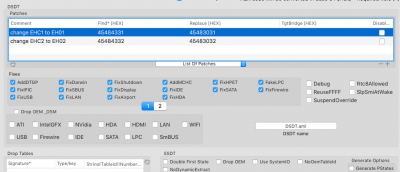
Rename EHC to EH0
ACPI –> DSDT–> Patches –> +
This two patches would let USBInjectAll.kext load:
- Comment: change EHC1 to EH01
Find: 45484331
Replace: 45483031
- Comment: change EHC2 to EH02
Find: 45484332
Replace: 45483032
- Move USBInjectAll.kext & XHCI-200-series-injector.kext to USB’s EFI partition /EFI/Clover/kexts/Other.
Step 3: Recommended BIOS settings
Before start installing we should modify our BIOS settings to have a successful installation.
BIOS TAB
BIOS Features > Windows 8/10 Features > Other OS
BIOS Features > Storage Boot Option Control > UEFI Only
BIOS Features > Boot Option #1 > UEFI USB Drive
Peripherals TAB
Initial Display Output > PCIe 1 Slot
Peripherals > XHCI Hand-off > Enable
Network Stack > Disabled
Chipset TAB
VTd > Disabled
Internal Graphics > Disabled
Step 4: Install macOS sierra
Step 5: Post installation with Multibeast.
So, after the installation (Step 4) we have to run MultiBeast 9.2
We choose UEFI Boot Mode at quick start.
In the Drivers tab for the audio we must choose ALC1220 and 100 / 200 series audio.
In Network tab we choose IntelMausiethernet v2.3.0
In USB tab, I choose increase max port limit 200 series.
In Bootloader tab we choose the third option Clover 2.4 UEFI BOOT MODE + Emulated NVRAM
In Customize tab for the graphics choose NVIDIA WEB drivers boot flag and NVIDIA Graphics fix up
In System Definition for the i7 6700K we must choose iMac 18.3
After all this we hit Build and Install.
Remember that you must not do any reboot yet.
It's time to install the graphics card drivers from the link bellow
https://www.tonymacx86.com/threads/...for-macos-sierra-10-12-6-378-05-05-25.227494/
After the installation remember to not restart your PC.
To be fully working the graphic card we have to install the lilu.kext with KextBeast
You must use KextBeast, or other kernel extension tools, as I was unable to get my Hackintosh working the first time with just copying the kernel extensions.
Lilu.kext
One last step is to enable the audio. I was follow one other guide from the forum.
https://www.tonymacx86.com/threads/...16gb-ram-m-2-nvme-alc1220-bcm943602cs.228467/
- Audio ALC1220
- AppleALC.kext
- Audio / Inject: 11 (On devices)
- Patches “change HDAS to HDEF” (On ACPI)
Replace: 48444546
After all these steps it's time to reboot. Remember in BIOS to choose your hard drive for boot.
What works
- Sleep and wake
- USB 3.0, 3.1
- Audio
- Ethernet
- NVIDIA Drivers
- WiFi
- Bluetooth
What has not been tested
- iMessage
- Facetime
Update 23.11.17
I have purchased a BCM94360CS2 and M.2 adapter for native Bluetooth and WiFi support
https://www.ebay.com/itm/BCM94360CS2-Card-To-NGFF-M-2-Key-A-E-Adapter-For-Mac-OS-and-Hackintosh/391512537270?ssPageName=STRK:MEBIDX:IT&_trksid=p2057872.m2749.l2649
https://www.ebay.com/itm/MacBook-Air-BCM94360CS2-Wireless-AC-Wifi-Bluetooth-Card-For-Air-13-A1465-A1466/191769077085?ssPageName=STRK:MEBIDX:IT&_trksid=p2057872.m2749.l2649
Installed, and working like a charm right out of the box
Update 26.11.17
Updated to 10.13.1 without any problems.
Update 09.01.18
Updated to 10.13.2 without any problems.
Just remember to update the lilu.kext file
Update 27.02.18
- Updated to 10.13.3 supplemental update without any problems.
- Also replaced the hard drive with a 120GB SSD drive. Just used Carbon Copy Cloner to clone the disk, mounted the EFI volumes using clover configurator and copied from old drive to the new one. Booted without any problems
")
Update 29.02.18
So, I had a bit of a problem with memory leak on my GFX. WindowServer would EAT up memory and CPU usage. Was able to sort it with this fix. Thanks a lot to benjamin.dobell
https://www.tonymacx86.com/threads/nvidia-update-simple-way-to-install-nvidia-web-drivers.244987/
Basically it downgrades the Nvidia drivers from 378.10.10.10.25.158 to 378.10.10.10.25.106
Update 22.05.18
-Updated to 10.13.4 without any problems. Just updated clover before installing.
Update 14.07.18
- Updated to 10.13.5 without any problems. Updated Clover before updating, and remembered to select AptioMemoryFix-64.ef under customise when updating!
Update 17.07.18
-Upadted my soft raid ti the latest version. Was not able to boot anymore, not from main, backup or USB installing stick, take a look at thread; https://www.tonymacx86.com/threads/solved-clover-reboots-computer.256442/
Had to replace VBoxHfs-64.efi with HFSPlus.efi in EFI/CLOVER/drivers64UEFI/ !
More info could be found on; https://www.tonymacx86.com/threads/...ntries-because-of-software-raid.176173/page-7
PS: as I am a Norwegian trying my best to write English, I would be happy to receive PM`s with tips that would improve my grammar.
Attachments
Last edited: