
- Joined
- Dec 4, 2015
- Messages
- 3
- Motherboard
- MSI Z97 Gaming 5
- CPU
- Intel Core i7 4770 3.4GHz
- Graphics
- Onboard Intel HD 4600
- Mobile Phone
This guide is still being overhauled. Some information may be incorrect. Use at your own peril!
Prerequisites
1) You must be running OS X Lion 10.7.5 or later
2) Mac computers introduced in late 2009 or later can be upgraded to macOS Sierra
3) Check your Mac hardware
4) If you have OS X Server, you must wait until version 5.2 is available as older versions will not work on macOS Sierra
Overview
1. Configure your BIOS
2. Download The macOS Sierra Application From The Mac App Store
3. Prepare A USB Flash Drive With Installation And Boot Files
4. Install macOS Sierra
5. Install The Bootloader And Drivers To System Drive
STEP 1: Edit BIOS/UEFI Settings
1. To access UEFI Setup, press and hold Delete on a USB Keyboard while the system is booting up
2. Settings - Save & Exit - Restore Defaults.

3. Overclocking\CPU Features: Disable "Intel VT-D Tech"

4. Overclocking\CPU Features: Disable "CFG Lock"

5. Settings\Advanced\Windows 8/8.1 Configuration: Disable "Windows 8/8.1 Feature"

6. Settings\Boot: Boot mode select "UEFI"
7. Save and exit.
STEP 2: Download macOS Sierra
Download the Application from the Mac App Store using your Apple ID on any Mac or functional computer running Mac OS X 10.6.8 or later.
1. Open Mac App Store
2. Log in with your Apple ID
3. Download macOS Sierra
The Application Install macOS Sierra will appear in /Applications.
STEP 3: Prepare Bootable USB Drive
This step extracts the macOS Installer contents, then installs Clover bootloader to the USB stick.
1. Insert the USB drive
2. Open /Applications/Utilities/Disk Utility

3. Highlight the USB drive in left column and click "Erase"

4. Name: USB; Format: Mac OS Extended (Journaled); Scheme: GUID Partition Map
5. Click "Erase"

10. Click "Done" once erasing process has completed and close the Disk Utility
11. Open /Applications/Utilities/Terminal

12. Type or copy the following, hit enter, enter password (if required) and hit enter. This command completely erases the USB, then creates native macOS installer media from the Install macOS Sierra Application.
Code (Text):
sudo /Applications/Install\ macOS\ Sierra.app/Contents/Resources/createinstallmedia --volume /Volumes/USB --applicationpath /Applications/Install\ macOS\ Sierra.app --no interaction
Upon completion, the USB will be renamed Install macOS Sierra.
13. Download the latest version of Clover from sourceforge
14. Open Clover package installer

Click "Continue"

Click "Continue"

Click "Change Install Location..."

Click "Install m...S Sierra" And Then Click "Continue"

Click "Customize"
View attachment 209947
Click The Following And Uncheck Anything Else:
-Under “Bootloader,” Click “Install boot0af in MBR”
-Under “CloverEFI,” Click “CloverEFI 64-bits SATA”
-Under “Drivers64UEFI,” Click “OsxAptioFixDrv-64”

Type In An Administrator's User Name And Password. Then Click "Install Software."

Click "Close"
Download the EFI.zip file below and copy the CLOVER file folder to the EFI root directory. This will copy the config.plist, kexts and a 64 bit UEFI driver to your EFI partition.
STEP 4: Install macOS Sierra
1. Turn Off/On or Reboot the computer
2. Press F11 to choose boot device
3. Choose USB
4. When Clover boot screen is visible, choose Boot macOS Sierra Install from Install macOS Sierra
5. The system will then boot into the macOS Installer
6. For a new installation of macOS, you MUST erase and format the destination drive according to the following steps before continuing. If you are upgrading from Snow Leopard, Lion, or Mountain Lion and you want to keep your files and apps, skip steps a-j.
a. Choose Disk Utility
b. Highlight your target hard drive for the macOS Sierra installation in left column.
c. Click Partition tab
d. Click Current and choose 1 Partition
e. Click Options...
f. Choose GUID Partition Table
g. Under Name: type macOS (You can rename it later)
h. Under Format: choose Mac OS Extended (Journaled)
i. Click Apply then Partition
j. Close Disk Utility
7. When the installer asks you where to install, choose macOS, or your existing install.
8. Upon completion, system will restart a 1st time
9. Press F11 to choose boot device
10. Choose USB
11. When Clover boot screen is visible, choose Boot macOS Sierra Install from macOS Sierra Install. The system will boot into the new drive, create the recovery partition, and complete the installation. Upon completion, system will restart a 2nd time.
12. Upon restart, press F11 to choose boot device
13. When Clover boot screen is visible, choose macOS
14. The system will launch macOS Setup
15. Setup macOS as you wish. DO NOT TURN ON FILEVAULT! YOU WILL HAVE TO RESTART THIS WHOLE PROCESS!
STEP 4: Post-Installation
At this point, the easiest way to proceed is to install the bootloader, grab backups from the root of your USB drive, and copy the files that worked directly to the system drive's EFI partition. However, getting post-installation 100% right for your system is something that needs to be done on a case by case basis. No single Clover setup will work perfectly for every system.
1. Download the latest version of Clover from sourceforge
2. Open Clover package installer
3. Click "Continue"
4. Click "Continue"
5. Click "Change Install Location..."

6.Click "macOS" And Then Click "Continue"
7. Click "Customize"

8. Click The Following And Uncheck Anything Else:
-"Install for UEFI booting only"
-"Install Clover in the ESP"
-Under “Drivers64UEFI,” Click “OsxAptioFixDrv-64”
9. Type In An Administrator's User Name And Password. Then Click "Install Software."
10. Click "Close"
11. Download the EFI.zip file below and copy the CLOVER file folder to the EFI root directory. This will copy the config.plist, kexts and a 64 bit UEFI driver to your EFI partition.
12. Restart the computer.
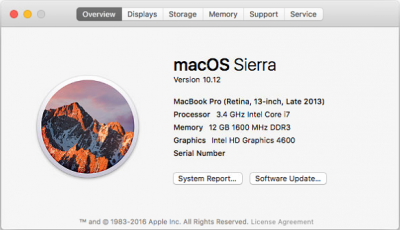
If all was installed properly, you should now have a fully functioning Hackintosh with macOS Sierra. If you have an MSI Z97 Gaming 5 motherboard, but are having issues, please comment below for help.
Info & Screenshot:

How to Install macOS Sierra
on an
MSI Z97 Gaming 5 Motherboard using Clover

on an
MSI Z97 Gaming 5 Motherboard using Clover
Prerequisites
1) You must be running OS X Lion 10.7.5 or later
2) Mac computers introduced in late 2009 or later can be upgraded to macOS Sierra
3) Check your Mac hardware
4) If you have OS X Server, you must wait until version 5.2 is available as older versions will not work on macOS Sierra
Overview
1. Configure your BIOS
2. Download The macOS Sierra Application From The Mac App Store
3. Prepare A USB Flash Drive With Installation And Boot Files
4. Install macOS Sierra
5. Install The Bootloader And Drivers To System Drive
STEP 1: Edit BIOS/UEFI Settings
1. To access UEFI Setup, press and hold Delete on a USB Keyboard while the system is booting up
2. Settings - Save & Exit - Restore Defaults.
3. Overclocking\CPU Features: Disable "Intel VT-D Tech"
4. Overclocking\CPU Features: Disable "CFG Lock"
5. Settings\Advanced\Windows 8/8.1 Configuration: Disable "Windows 8/8.1 Feature"
6. Settings\Boot: Boot mode select "UEFI"
7. Save and exit.
STEP 2: Download macOS Sierra
Download the Application from the Mac App Store using your Apple ID on any Mac or functional computer running Mac OS X 10.6.8 or later.
1. Open Mac App Store
2. Log in with your Apple ID
3. Download macOS Sierra
The Application Install macOS Sierra will appear in /Applications.
STEP 3: Prepare Bootable USB Drive
This step extracts the macOS Installer contents, then installs Clover bootloader to the USB stick.
1. Insert the USB drive
2. Open /Applications/Utilities/Disk Utility
3. Highlight the USB drive in left column and click "Erase"
4. Name: USB; Format: Mac OS Extended (Journaled); Scheme: GUID Partition Map
5. Click "Erase"
10. Click "Done" once erasing process has completed and close the Disk Utility
11. Open /Applications/Utilities/Terminal
12. Type or copy the following, hit enter, enter password (if required) and hit enter. This command completely erases the USB, then creates native macOS installer media from the Install macOS Sierra Application.
Code (Text):
sudo /Applications/Install\ macOS\ Sierra.app/Contents/Resources/createinstallmedia --volume /Volumes/USB --applicationpath /Applications/Install\ macOS\ Sierra.app --no interaction
Upon completion, the USB will be renamed Install macOS Sierra.
13. Download the latest version of Clover from sourceforge
14. Open Clover package installer
Click "Continue"
Click "Continue"
Click "Change Install Location..."
Click "Install m...S Sierra" And Then Click "Continue"
Click "Customize"
View attachment 209947
Click The Following And Uncheck Anything Else:
-Under “Bootloader,” Click “Install boot0af in MBR”
-Under “CloverEFI,” Click “CloverEFI 64-bits SATA”
-Under “Drivers64UEFI,” Click “OsxAptioFixDrv-64”
Type In An Administrator's User Name And Password. Then Click "Install Software."
Click "Close"
Download the EFI.zip file below and copy the CLOVER file folder to the EFI root directory. This will copy the config.plist, kexts and a 64 bit UEFI driver to your EFI partition.
STEP 4: Install macOS Sierra
1. Turn Off/On or Reboot the computer
2. Press F11 to choose boot device
3. Choose USB
4. When Clover boot screen is visible, choose Boot macOS Sierra Install from Install macOS Sierra
5. The system will then boot into the macOS Installer
6. For a new installation of macOS, you MUST erase and format the destination drive according to the following steps before continuing. If you are upgrading from Snow Leopard, Lion, or Mountain Lion and you want to keep your files and apps, skip steps a-j.
a. Choose Disk Utility
b. Highlight your target hard drive for the macOS Sierra installation in left column.
c. Click Partition tab
d. Click Current and choose 1 Partition
e. Click Options...
f. Choose GUID Partition Table
g. Under Name: type macOS (You can rename it later)
h. Under Format: choose Mac OS Extended (Journaled)
i. Click Apply then Partition
j. Close Disk Utility
7. When the installer asks you where to install, choose macOS, or your existing install.
8. Upon completion, system will restart a 1st time
9. Press F11 to choose boot device
10. Choose USB
11. When Clover boot screen is visible, choose Boot macOS Sierra Install from macOS Sierra Install. The system will boot into the new drive, create the recovery partition, and complete the installation. Upon completion, system will restart a 2nd time.
12. Upon restart, press F11 to choose boot device
13. When Clover boot screen is visible, choose macOS
14. The system will launch macOS Setup
15. Setup macOS as you wish. DO NOT TURN ON FILEVAULT! YOU WILL HAVE TO RESTART THIS WHOLE PROCESS!
STEP 4: Post-Installation
At this point, the easiest way to proceed is to install the bootloader, grab backups from the root of your USB drive, and copy the files that worked directly to the system drive's EFI partition. However, getting post-installation 100% right for your system is something that needs to be done on a case by case basis. No single Clover setup will work perfectly for every system.
1. Download the latest version of Clover from sourceforge
2. Open Clover package installer
3. Click "Continue"
4. Click "Continue"
5. Click "Change Install Location..."
6.Click "macOS" And Then Click "Continue"
7. Click "Customize"
8. Click The Following And Uncheck Anything Else:
-"Install for UEFI booting only"
-"Install Clover in the ESP"
-Under “Drivers64UEFI,” Click “OsxAptioFixDrv-64”
9. Type In An Administrator's User Name And Password. Then Click "Install Software."
10. Click "Close"
11. Download the EFI.zip file below and copy the CLOVER file folder to the EFI root directory. This will copy the config.plist, kexts and a 64 bit UEFI driver to your EFI partition.
12. Restart the computer.
If all was installed properly, you should now have a fully functioning Hackintosh with macOS Sierra. If you have an MSI Z97 Gaming 5 motherboard, but are having issues, please comment below for help.
Info & Screenshot:
Attachments


Last edited by a moderator:
