- Joined
- Aug 29, 2014
- Messages
- 159
- Motherboard
- MSI Z87-G45 Gaming
- CPU
- i7-4770K
- Graphics
- GTX 960
- Mac
- Mobile Phone
Components
Apple Mac OS X El Capitan 10.11.1
https://itunes.apple.com/nl/app/os-x-el-capitan/id1018109117?mt=12
Windows 8.1 Pro
http://www.microsoftstore.com/store/msusa/en_US/pdp/Windows-8.1-Pro/productID.288401500
MSI Z87-G45 GAMING Intel® Z87 Express Chipset
http://www.amazon.com/dp/B00D12OBEU
MSI NVIDIA GeForce GTX 960 Gaming OC 4GB GDDR5
http://www.amazon.com/dp/B00V4HY522
Intel Core i7-4770K Quad-Core Desktop Processor (3.5 GHz, 8 MB Cache, Intel HD graphics, BX80646I74770K)
http://www.amazon.com/dp/B00CO8TBQ0
Corsair XMS3 8GB (2x4GB) DDR3 1600 MHz (PC3 12800) Desktop Memory (CMX8GX3M2A1600C9)
http://www.amazon.com/dp/B0042A7CAA
Corsair Vengeance 16GB (2x8GB) DDR3 1600 MHz (PC3 12800) Desktop Memory (CML16GX3M2A1600C10)
http://www.amazon.com/dp/B007TG8QRW
Corsair RM Series 1000 Watt ATX/EPS 80PLUS Gold-Certified Power Supply - CP-9020062-NA RM1000
http:/www.amazon.com/dp/B00EB7UIZU
Corsair Graphite Series Arctic White 760T Full Tower Windowed Case CC-9011045-WW
http://www.amazon.com/dp/B00HSY20DQ
OCZ Technology 240GB Agility 3 Series SATA 6Gb/s 2.5-Inch Midrange Performance Solid State Drive (SSD) with Max 525MB/s Read and Max 85K IOPS- AGT3-25SAT3-240G
http://www.amazon.com/dp/B004Z0S6S4
Samsung 840 MZ-7TD500 500 GB 2.5" Internal Solid State Drive
http://www.amazon.com/dp/B009NHAF3I
Samsung S24B150BL 23.6 inch LED Monitor (200cd/m2, 1920x1080, 5ms, DVI, VGA)
http://www.amazon.com/dp/B00BJ744F0
Comments
Before I am going to explain how I made this Hackintosh build I do need to point out something.
When creating a Dual Boot Hackintosh system, I really advise everybody to use two physical HDDs/SSDs. This will allow you to boot in one of the two systems if one fails.
During the installation, leave the USB drive in the USB3.0 port on the rear IO.
OS X Installation Guide
Step 1:
With this motherboard it's important to that you have an edited bios that gives you the ability to boot up you UniBeast USB drive.
I've had Windows 8.1 Pro installed already, but whatever OS you already have installed, just enter is. Insert your USB drive and format it to FAT-32. Now drag and drop the file needed to fix you motherboard. On the bottom of this post you will find the necessary file to make your bios OS X compatible.
Step 2:
Leave the USB stick inserted and reboot your pc. Press Del to enter your Bios settings. Go to the Bios Update menu and select your USB stick to upgrade your bios.
After updating your pc will reboot. Because I had Windows 8.1 Pro installed already I just let it boot to Windows so I could see if everything worked properly.
Step 3:
Now it's time to create your UniBeast usb stick with El Capitan installation on it. I used a different Mac running OS X El Capitan already.
Select the following options in the Unibeast creation process:
- The proper installation path
- El Captitan
- UEFI
This last part is very important for things to work if you have the same motherboard
!! TIP !!: After UniBeast was done, I also upload the latest version of MultiBeast because internet and booting options will not work immediately.
After the USB is created power off you PC. Like I mentioned in my comments I used two separate SSD's. For each OS one SSD. I disconnected my Windows drive and only the future OS X drive stayed connected. Insert your UniBeast into the usb slot en boot up your PC.
Step 4:
To boot in the Mac OS X El Capitain installation I used the following commands:
nv_disable=1 -v
Now you will be able to boot into the OS X installation. Please take your time!! It may take a while before it load the OS X installation screen depending on the quality and speeds your usb stick has.
Step 5:
When you enter the OS X installation menu, make sure you format the future OS X drive properly and continue the installation. After the installation the computer will reboot. Leave the UniBeast in it's place. Your computer will load the UniBeast bootloader again. Now you will see two icons. One is your UniBeast USB and one is your freshly installed HDD/SSD with Mac OS X El Capitan on it.
Enter bootcommands: nv_disable=1 -v
Select your HDD/SSD and press the Enter ( return-key ).
Step 6:
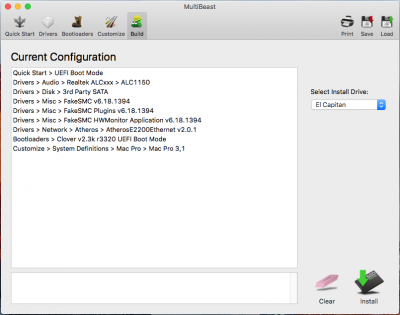
Once you are loaded in OS X El Capitan, open your USB drive and drag and drop MultiBeast to your "Desktop". Open it and use the following options:
After MultiBeast says it's done, quit the program.
Now you need to install the important Nvidia drivers so this GFX card will work:
http://www.nvidia.com/download/driverResults.aspx/93555/en-us
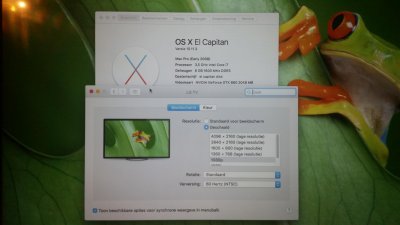
After installing the Nvidia drivers you can reboot your fully functional hackintosh!
Troubleshoot:
Am I able to use dual monitor
Yes you can! The graphics card I use in this build needs Nvidia driver to work. You can find the download link in the discription. I bought two monitors which you can find in the component section. Both work properly on the DVI port and a HDMI port.
Not booting properly
If you have done all of the above, and reconnect your Windows drive, it can happen that the OSX drive isn't loading properly anymore.
To fix this you need to enter the bios and reconfigure the boot priority. Naturally your OS X drive being the first it needs to address.
Not booting properly part 2
You need to use a Clover configurator the add nvda_drv=1, and delete Inject Intel from the Clover config.plist file. This is an important step so your Hackintosh can boot normally.
Sound not working
I've got a Logitech G430 Headset that is USB connected. After the install the sound immediately worked. If you want to use the sounds from the rear IO, you need the install the ALC 1150 sound driver from Multibeast. Once installed, reboot and go to your OS X System Preferences ==> Sound ==> Select Output ==> Select Internal Sound. Your sound will be fully activated, no separate actions needed.
GL & HF
My patched BIOS View attachment E7821IMS.190.patched.zip
Apple Mac OS X El Capitan 10.11.1
https://itunes.apple.com/nl/app/os-x-el-capitan/id1018109117?mt=12
Windows 8.1 Pro
http://www.microsoftstore.com/store/msusa/en_US/pdp/Windows-8.1-Pro/productID.288401500
MSI Z87-G45 GAMING Intel® Z87 Express Chipset
http://www.amazon.com/dp/B00D12OBEU
MSI NVIDIA GeForce GTX 960 Gaming OC 4GB GDDR5
http://www.amazon.com/dp/B00V4HY522
Intel Core i7-4770K Quad-Core Desktop Processor (3.5 GHz, 8 MB Cache, Intel HD graphics, BX80646I74770K)
http://www.amazon.com/dp/B00CO8TBQ0
Corsair XMS3 8GB (2x4GB) DDR3 1600 MHz (PC3 12800) Desktop Memory (CMX8GX3M2A1600C9)
http://www.amazon.com/dp/B0042A7CAA
Corsair Vengeance 16GB (2x8GB) DDR3 1600 MHz (PC3 12800) Desktop Memory (CML16GX3M2A1600C10)
http://www.amazon.com/dp/B007TG8QRW
Corsair RM Series 1000 Watt ATX/EPS 80PLUS Gold-Certified Power Supply - CP-9020062-NA RM1000
http:/www.amazon.com/dp/B00EB7UIZU
Corsair Graphite Series Arctic White 760T Full Tower Windowed Case CC-9011045-WW
http://www.amazon.com/dp/B00HSY20DQ
OCZ Technology 240GB Agility 3 Series SATA 6Gb/s 2.5-Inch Midrange Performance Solid State Drive (SSD) with Max 525MB/s Read and Max 85K IOPS- AGT3-25SAT3-240G
http://www.amazon.com/dp/B004Z0S6S4
Samsung 840 MZ-7TD500 500 GB 2.5" Internal Solid State Drive
http://www.amazon.com/dp/B009NHAF3I
Samsung S24B150BL 23.6 inch LED Monitor (200cd/m2, 1920x1080, 5ms, DVI, VGA)
http://www.amazon.com/dp/B00BJ744F0
Comments
Before I am going to explain how I made this Hackintosh build I do need to point out something.
When creating a Dual Boot Hackintosh system, I really advise everybody to use two physical HDDs/SSDs. This will allow you to boot in one of the two systems if one fails.
During the installation, leave the USB drive in the USB3.0 port on the rear IO.
OS X Installation Guide
Step 1:
With this motherboard it's important to that you have an edited bios that gives you the ability to boot up you UniBeast USB drive.
I've had Windows 8.1 Pro installed already, but whatever OS you already have installed, just enter is. Insert your USB drive and format it to FAT-32. Now drag and drop the file needed to fix you motherboard. On the bottom of this post you will find the necessary file to make your bios OS X compatible.
Step 2:
Leave the USB stick inserted and reboot your pc. Press Del to enter your Bios settings. Go to the Bios Update menu and select your USB stick to upgrade your bios.
After updating your pc will reboot. Because I had Windows 8.1 Pro installed already I just let it boot to Windows so I could see if everything worked properly.
Step 3:
Now it's time to create your UniBeast usb stick with El Capitan installation on it. I used a different Mac running OS X El Capitan already.
Select the following options in the Unibeast creation process:
- The proper installation path
- El Captitan
- UEFI
This last part is very important for things to work if you have the same motherboard
!! TIP !!: After UniBeast was done, I also upload the latest version of MultiBeast because internet and booting options will not work immediately.
After the USB is created power off you PC. Like I mentioned in my comments I used two separate SSD's. For each OS one SSD. I disconnected my Windows drive and only the future OS X drive stayed connected. Insert your UniBeast into the usb slot en boot up your PC.
Step 4:
To boot in the Mac OS X El Capitain installation I used the following commands:
nv_disable=1 -v
Now you will be able to boot into the OS X installation. Please take your time!! It may take a while before it load the OS X installation screen depending on the quality and speeds your usb stick has.
Step 5:
When you enter the OS X installation menu, make sure you format the future OS X drive properly and continue the installation. After the installation the computer will reboot. Leave the UniBeast in it's place. Your computer will load the UniBeast bootloader again. Now you will see two icons. One is your UniBeast USB and one is your freshly installed HDD/SSD with Mac OS X El Capitan on it.
Enter bootcommands: nv_disable=1 -v
Select your HDD/SSD and press the Enter ( return-key ).
Step 6:
Once you are loaded in OS X El Capitan, open your USB drive and drag and drop MultiBeast to your "Desktop". Open it and use the following options:
After MultiBeast says it's done, quit the program.
Now you need to install the important Nvidia drivers so this GFX card will work:
http://www.nvidia.com/download/driverResults.aspx/93555/en-us
After installing the Nvidia drivers you can reboot your fully functional hackintosh!

Troubleshoot:
Am I able to use dual monitor
Yes you can! The graphics card I use in this build needs Nvidia driver to work. You can find the download link in the discription. I bought two monitors which you can find in the component section. Both work properly on the DVI port and a HDMI port.
Not booting properly
If you have done all of the above, and reconnect your Windows drive, it can happen that the OSX drive isn't loading properly anymore.
To fix this you need to enter the bios and reconfigure the boot priority. Naturally your OS X drive being the first it needs to address.
Not booting properly part 2
You need to use a Clover configurator the add nvda_drv=1, and delete Inject Intel from the Clover config.plist file. This is an important step so your Hackintosh can boot normally.
Sound not working
I've got a Logitech G430 Headset that is USB connected. After the install the sound immediately worked. If you want to use the sounds from the rear IO, you need the install the ALC 1150 sound driver from Multibeast. Once installed, reboot and go to your OS X System Preferences ==> Sound ==> Select Output ==> Select Internal Sound. Your sound will be fully activated, no separate actions needed.
GL & HF
My patched BIOS View attachment E7821IMS.190.patched.zip
Last edited:


 and nothing. Applications are able to open and terminate, nothing else.

