
- Joined
- Jul 15, 2011
- Messages
- 16
- Motherboard
- Dell XPS 8300
- CPU
- i7 > Need full CPU model number > See Rules!
- Graphics
- ATI > Need model name > See Rules!
[Success] iDell XPS 8300 *Mountain Lion 10.8.4*
Hey guys I finally got Mountain Lion booting up on my Dell XPS 8300 and its working just fine. I got my inspiration to make this guide from Gravewyrm, I followed his guide to setup Lion on my XPS 8300 and it worked like a charm. So here is a link to his guide on how to install Lion on the system: http://www.tonymacx86.com/lion-desk...ess-project-idell-xps-8300-lion-10-7-3-a.html (The title says 10.7.3, but a software update to 10.7.4 works just fine as I have done it before updating to ML).
There are two ways of installing ML on your XPS system, and I have done it both ways and it runs at about 99.9%.
Finally got sleep working with the help of kawayuppie. The only problem is waking up from sleep and having no network. Another network issue I'm facing is when uploading large amounts the internet times out. I believe this is a common issue with the BCM5722D kext, but it really doesn't hinder the experience unless you t*****t a lot. If anyone does have a better solution for the ethernet please message me so we can get this issue out of the way.
Method Number 1: (Upgrade from Lion)
If you have followed Gravewyrm's awesome guide on installing Lion all you have to do is use Unibeast ML Edition to create a bootable USB stick. Follow Tony's guide if you want to know what exactly you have to do in order to create the bootable USB.
Once you have created the bootable USB enter your BIOS and hit the F12 key to get into the boot selection menu. Enter "Setup" and make sure your Hard Drive mode is set to AHCI. Save and exit. Now when booting up the PC again hit the F12 key, and boot from the USB stick and select your installer. Since you already have Lion installed (again remember to follow Gravewyrm's guide to the letter), all you have to do is continue, agree and select your target disk (the one you already have Lion on) and proceed with the installation.
One the installation is complete it will restart the computer and again you will have to hit the F12 key and boot into the USB. This time select the ML Installed drive. Now all your files should be safe and you have updated to ML without any hassle.
The last step is to install Chimera and select the ML partition and you are done. Use DiskUtility to verify the permissions and reboot the system. Everything should be working fine and you have a newly upgraded ML system with everything working and no need to install additional kexts!
Method Number 2: (ML Clean Installation)
If you want to completely wipe the system and have a fresh installation of ML the process is slightly different towards the end with the installation of kexts. Again you must create a bootable USB via Unibeast ML Edition, and to find out how to do that follow Tony's guide.
The installation process is the same as an upgrade, once you have created the bootable USB enter your BIOS and hit the F12 key to get into the boot selection menu. Enter "Setup" and make sure your Hard Drive mode is set to AHCI. Save and exit. Now when booting up the PC again hit the F12 key, and boot from the USB stick and select your installer.
Now if you want to wipe your existing OS go to the menu bar, and select Disk Utility. Erase the partition. If you already had Lion installed there is no need to set the table as GUID and format the partition as OS X Extended (Journaled), but if you are installing it on a new HDD make sure the set the table as GUID and format the partition as OS X Extended (Journaled). Once the drive is erased/formatted close Disk Utility and go through with the installation. Once the installation is complete it will reboot the system and hit F12 again, select the USB stick but this time boot into the drive you install ML onto.
So here is where the major difference comes in. You will need the files I have attached to complete the installation and make the system run smoothly.
You will notice that there are 3 files (MultiBeast for Lion and Chimera can be downloaded in the Resources > Downloads) which I'll upload shortly:
Kext Beast
BCM5722D.kext
SleepEnabler.kext
Due to ML's new feature you can't install any apps that are not from the AppStore unless you change the settings. So go into the Settings App, enter Security & Privacy. Under the General Tab you'll see a couple options on the bottom. Click the lock button and change the setting to install apps from anywhere and lock the option.
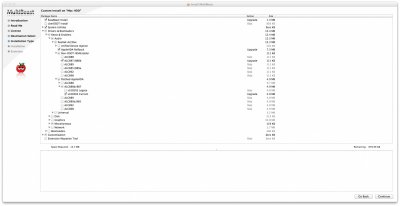
The first one you have to run is MultiBeast. Tick the same options as shown in the screenshot below:
Before you reboot the computer drag BCM5722D and Kext Beast onto the desktop. Run Kext Beast and it will install BCM5722D. Open Disk Utility and repair permissions. Once the permissions have been repaired reboot the system.
You should be on your desktop and the sound should be working. Move BCM5722D to the trash and drag SleepEnabler onto the desktop and run Kext Beast to install the kext. Again go to Disk Utility and repair permissions. Once the permissions have been repaired reboot the system.
When the system has rebooted and you are on the desktop install Chimera and reboot. There you have it your own iDell.
*Update*
The update to 10.8.1 is working. Simply use the App Store to install the latest update. For some reason I haven't been able to get iCloud working. I know that's a concern and I'll attempt to find a resolution!
*Update*
The update to 10.8.2 is working, again just use the App Store to install the software update.
*Update*
The update to 10.8.3 is working. Simply update from the App Store to install the newest software update.
*Update*
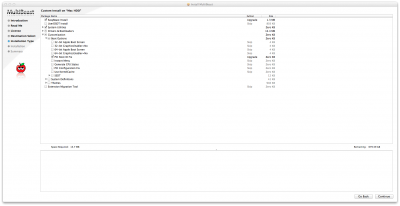
The update to 10.8.4 is working. The installation works fine from the App Store. The sound will be missing, so just run the Multibeast installer and click on the settings below.
Hey guys I finally got Mountain Lion booting up on my Dell XPS 8300 and its working just fine. I got my inspiration to make this guide from Gravewyrm, I followed his guide to setup Lion on my XPS 8300 and it worked like a charm. So here is a link to his guide on how to install Lion on the system: http://www.tonymacx86.com/lion-desk...ess-project-idell-xps-8300-lion-10-7-3-a.html (The title says 10.7.3, but a software update to 10.7.4 works just fine as I have done it before updating to ML).
There are two ways of installing ML on your XPS system, and I have done it both ways and it runs at about 99.9%.
Finally got sleep working with the help of kawayuppie. The only problem is waking up from sleep and having no network. Another network issue I'm facing is when uploading large amounts the internet times out. I believe this is a common issue with the BCM5722D kext, but it really doesn't hinder the experience unless you t*****t a lot. If anyone does have a better solution for the ethernet please message me so we can get this issue out of the way.
Method Number 1: (Upgrade from Lion)
If you have followed Gravewyrm's awesome guide on installing Lion all you have to do is use Unibeast ML Edition to create a bootable USB stick. Follow Tony's guide if you want to know what exactly you have to do in order to create the bootable USB.
Once you have created the bootable USB enter your BIOS and hit the F12 key to get into the boot selection menu. Enter "Setup" and make sure your Hard Drive mode is set to AHCI. Save and exit. Now when booting up the PC again hit the F12 key, and boot from the USB stick and select your installer. Since you already have Lion installed (again remember to follow Gravewyrm's guide to the letter), all you have to do is continue, agree and select your target disk (the one you already have Lion on) and proceed with the installation.
One the installation is complete it will restart the computer and again you will have to hit the F12 key and boot into the USB. This time select the ML Installed drive. Now all your files should be safe and you have updated to ML without any hassle.
The last step is to install Chimera and select the ML partition and you are done. Use DiskUtility to verify the permissions and reboot the system. Everything should be working fine and you have a newly upgraded ML system with everything working and no need to install additional kexts!
Method Number 2: (ML Clean Installation)
If you want to completely wipe the system and have a fresh installation of ML the process is slightly different towards the end with the installation of kexts. Again you must create a bootable USB via Unibeast ML Edition, and to find out how to do that follow Tony's guide.
The installation process is the same as an upgrade, once you have created the bootable USB enter your BIOS and hit the F12 key to get into the boot selection menu. Enter "Setup" and make sure your Hard Drive mode is set to AHCI. Save and exit. Now when booting up the PC again hit the F12 key, and boot from the USB stick and select your installer.
Now if you want to wipe your existing OS go to the menu bar, and select Disk Utility. Erase the partition. If you already had Lion installed there is no need to set the table as GUID and format the partition as OS X Extended (Journaled), but if you are installing it on a new HDD make sure the set the table as GUID and format the partition as OS X Extended (Journaled). Once the drive is erased/formatted close Disk Utility and go through with the installation. Once the installation is complete it will reboot the system and hit F12 again, select the USB stick but this time boot into the drive you install ML onto.
So here is where the major difference comes in. You will need the files I have attached to complete the installation and make the system run smoothly.
You will notice that there are 3 files (MultiBeast for Lion and Chimera can be downloaded in the Resources > Downloads) which I'll upload shortly:
Kext Beast
BCM5722D.kext
SleepEnabler.kext
Due to ML's new feature you can't install any apps that are not from the AppStore unless you change the settings. So go into the Settings App, enter Security & Privacy. Under the General Tab you'll see a couple options on the bottom. Click the lock button and change the setting to install apps from anywhere and lock the option.
The first one you have to run is MultiBeast. Tick the same options as shown in the screenshot below:
Before you reboot the computer drag BCM5722D and Kext Beast onto the desktop. Run Kext Beast and it will install BCM5722D. Open Disk Utility and repair permissions. Once the permissions have been repaired reboot the system.
You should be on your desktop and the sound should be working. Move BCM5722D to the trash and drag SleepEnabler onto the desktop and run Kext Beast to install the kext. Again go to Disk Utility and repair permissions. Once the permissions have been repaired reboot the system.
When the system has rebooted and you are on the desktop install Chimera and reboot. There you have it your own iDell.
*Update*
The update to 10.8.1 is working. Simply use the App Store to install the latest update. For some reason I haven't been able to get iCloud working. I know that's a concern and I'll attempt to find a resolution!
*Update*
The update to 10.8.2 is working, again just use the App Store to install the software update.
*Update*
The update to 10.8.3 is working. Simply update from the App Store to install the newest software update.
*Update*
The update to 10.8.4 is working. The installation works fine from the App Store. The sound will be missing, so just run the Multibeast installer and click on the settings below.
Attachments
Last edited by a moderator:
 Sorry i havent been around much to lend any support to those trying to do this. Life has had me very busy lately, lol. Again, excellent work, and i will add more to it as people start moving towards ML.