
- Joined
- Nov 14, 2012
- Messages
- 24
- Motherboard
- Asus Z97 Pro Wifi AC
- CPU
- i7-4790K
- Graphics
- GTX 1080
- Mac
- Mobile Phone
IamI1's Simple Build:
Asus Z270-A Prime - i7 7700K - Asus ThunderboltEX 3

Asus Z270-A Prime - i7 7700K - Asus ThunderboltEX 3
Components
Intel Core i7 7700K Processor
https://www.amazon.it/dp/B01LTI1JEM/?tag=tonymacx86com-21
Asus Z270-A Prime Motherboard
https://www.amazon.it/dp/B01N1UVO5Y/?tag=tonymacx86com-21
Corsair Vengeance LPX 3000Mhz 2x8GB Memory
https://www.amazon.it/dp/B0134EW7G8/?tag=tonymacx86com-21
Be Quiet Dark Rock 3
https://www.amazon.it/dp/B00HPX7IKU/?tag=tonymacx86com-21
Corsair VS550
https://www.amazon.it/gp/product/B00LMBWSI8/?tag=tonymacx86com-21
Bitfenix Nova Black
https://www.amazon.it/dp/B016CMTFIC/?tag=tonymacx86com-21
Samsung EVO 860 500GB SSD
https://www.amazon.it/dp/B078WQT6S6/?tag=tonymacx86com-21
Asus ThunderboltEX 3
https://www.amazon.it/dp/B01J2GVTWA/?tag=tonymacx86com-21
Apple adapter from Thunderbolt 3 to Thunderbolt 2/1;
https://www.amazon.it/dp/B01M72VEQR/?tag=tonymacx86com-21
Comments
Hi all! I needed an Hackintosh for music production. This one is very simple with the configurations.
Case and PSU are only temporary, i'll transfer all the other pieces in a decent Case with a decent PSU.
This will start very easy with Windows (10) for upgrading the firmware on the ThunderboltEX 3, then install OS X (High Sierra).
BIOS
I followed Middleman's Guide for the Bios options. (Point 4).
BIOS version: 1203.
Don't touch the Thunderbolt options yet.
Windows:
Don't plug in the ThunderboltEX card yet.
Install Windows on a separate HDD or SSD. Update everything and install the Chipset driver for the Motherboard (Asus site).
Install the drivers for the Card (Asus site) then shutdown.
Insert the Card and connect the bridge too.
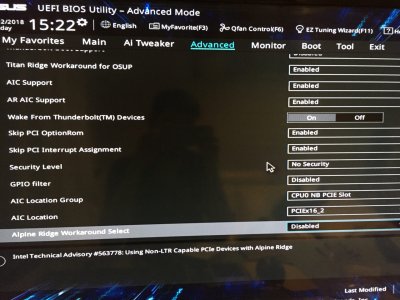
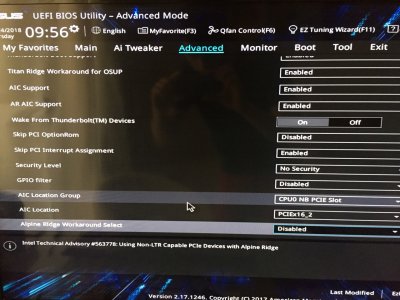
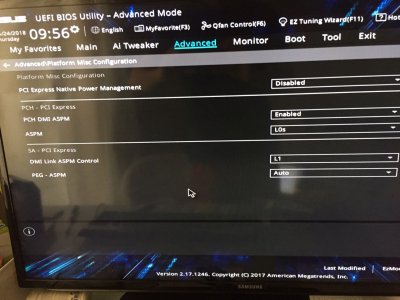
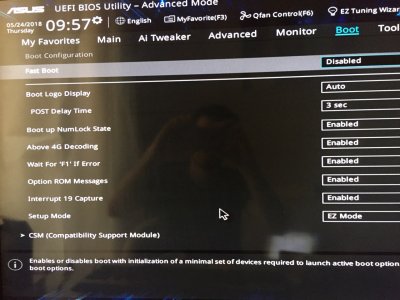
Now in the BIOS we need to enable the Thunderbolt card. (Place the card in the PCI 16x 2)
View media item 190537View media item 190536View media item 190535View media item 190534View media item 190533View media item 190532
Boot Windows and start the firmware updater for the Card.
If everything worked now the card is updated.
You can now see Thunderbolt devices attached in Windows.
High Sierra Installation
Remove the Windows HDD/SSD and the Thunderbolt card from the system.
I created a simple USB with UniBeast (High Sierra).
Plug-in the USB in the computer and start the installation of the system.
After the installation, I used MultiBeast to install a few kext:
- UEFI Boot Mode
- FakeSMC
- IntelMausiEthernet 2.30
- Latest VoodooHDA (for me it's 2.9.0d10)
- iMac 14,1
NOTE: If you have installed 10.13.4, old USB fix doesn't work at the time of writing this article (may be fixed in the future so do this step only if your usb 3 increase limit on 200 series fix on MultiBeast doesn't work)
Fix for USB 3:
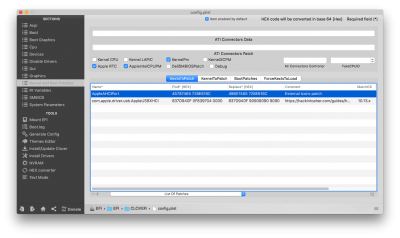
Open Clover Configurator and mount the EFI partition.
After loaded the config.plist go in "Kernel and Kext Patches".
Click on the "+" in the left bottom corner (Make sure you are in the "KextToPatch" section) and add this:
Name: com.apple.driver.usb.AppleUSBXHCI
Find [HEX]: 837d940f 0f839704 0000
Replace [HEX]: 837d940f 90909090 9090
Comment: What you want to write (USB 10.13.4+ by PMHeart)
Match: 10.13.X
Now all USB on the computer should works.
After that I checked OS X with the Thunderbolt card in but I could not boot the system.
I followed this guide and placed this kext (OsxAptioFix2Drv-free2000.efi) in the /EFI/ClOVER/drivers64UEFI folder.
Now the system boots and everything works.
Last thing I did was to enable XMP, and the system still works.
Attachments
-
 2018-05-24 11.59.57.jpg174.4 KB · Views: 7,318
 -
 2018-05-22 17.25.02.jpg451.2 KB · Views: 1,519
 -
 2018-05-22 17.25.10.jpg476.9 KB · Views: 1,294
 -
 2018-05-24 11.59.45.jpg196.2 KB · Views: 1,200
 -
 2018-05-24 11.59.50.jpg167.6 KB · Views: 1,198
 -
 2018-05-24 11.59.52.jpg192.2 KB · Views: 1,220
 -
 2018-05-24 11.59.55.jpg182.9 KB · Views: 1,206
 -
 Screen Shot 2018-05-24 at 12.58.42.png188.1 KB · Views: 1,019
Last edited: